Configure an Interface as a DHCPv6 Client with Prefix Delegation
Table of Contents
Configure an Interface as a DHCPv6 Client with Prefix Delegation
Configure a DHCPv6 Client Interface with Prefix Delegation.
Before you configure DHCPV6 Client, learn
about how a Layer 3 Ethernet, VLAN, or AE interface on the firewall
can function as a DHCPv6 client,
with or without prefix delegation.
The following task begins
by showing how to configure the interface facing the DHCPv6 server
to be a DHCPv6 client and request a Non-Temporary or Temporary address
for itself. This interface also requests a delegated prefix on behalf
of the host-facing interface. The task then shows how to configure
an interface facing the hosts as an inherited interface
that provides prefix delegation to the LAN hosts.
- Select an Ethernet, AE, or VLAN interface (that faces the DHCPv6 server and ISP) to be a DHCPv6 client.
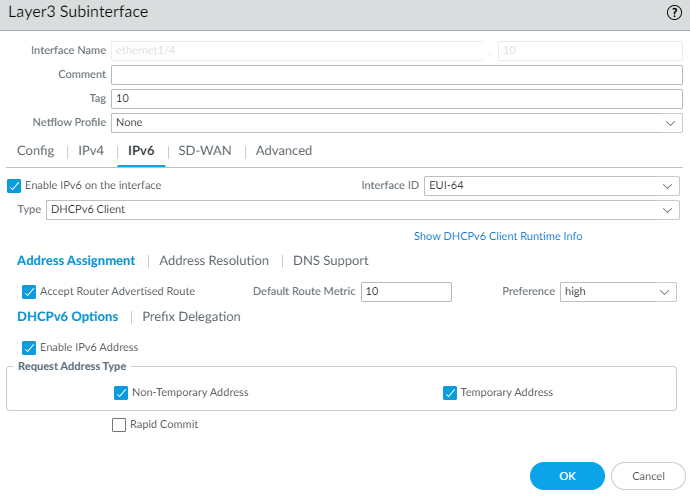
- Select or select and select an AE interface, or select .For Interface Type, select Layer3.(Optional) Add Subinterface if you want a single Ethernet or VLAN interface facing the ISP to be separated into subinterfaces.On the Config tab, assign the interface to a Virtual Router and Security Zone.Select IPv6.Enable IPv6 on the interface.For Interface ID, enter the EUI-64 (default 64-bit Extended Unique Identifier) in hexadecimal format (for example, 00:26:08:FF:FE:DE:4E:29). If you leave this field blank, the firewall uses the EUI-64 generated from the MAC address of the physical interface.Configure the interface that faces the ISP to be a DHCPv6 client and request its leased, temporary IPv6 address and/or non-temporary IPv6 address.
- For Type, select DHCPv6 Client.Select Address Assignment and Accept Router Advertised Route to allow the DHCPv6 Client to accept the Router Advertisement.
![]() Enter a Default Route Metric for the route from the interface to the ISP; range is 1 to 65,535; default is 10.Select Preference of the DHCPv6 client interface (low, medium or high) so that, in the event you have two interfaces (each connected to a different ISP for redundancy), you can assign the interface to one ISP a higher preference than the interface to the other ISP. The ISP connected to the preferred interface will be the ISP that provides the delegated prefix to send to a host-facing interface. If the interfaces have the same preference, both ISPs provide a delegated prefix and the host decides which prefix to use.Select DHCPv6 Options and Enable IPv6 Address.In the Request Address Type area, select Non-Temporary Address (default setting). This address type has a longer lifespan.Select Temporary Address for a greater level of security because the address is intended to be used for a short period of time.Whether you request a Non-Temporary Address or Temporary Address for the interface is based on your discretion and the capability of the DHCPv6 server; some servers can provide only a temporary address. The best practice is to select both Non-Temporary Address and Temporary Address, in which case the firewall will prefer the Non-Temporary Address.Select Rapid Commit to use the DHCPv6 process of Solicit and Reply messages (two messages), rather than the process of Solicit, Advertise, Request, and Reply messages (four messages).Select Prefix Delegation and Enable Prefix Delegation to allow the firewall to support prefix delegation functionality. This means that the interface accepts a prefix from the upstream DHCPv6 server and places the prefix into the Prefix Pool, from which the firewall delegates a prefix to a host via RA. The ability to enable or disable prefix delegation for an interface allows the firewall to support multiple ISPs (one ISP per interface). Enabling prefix delegation on this interface controls which ISP provides the prefix.The delegated prefix is used on the host-facing interface, and its IPv6 address is constructed with the MAC address and EUI-64 input. In our example, the inherited interface receives the inherited prefix displayed in the step to view DHCPv6 information.
Enter a Default Route Metric for the route from the interface to the ISP; range is 1 to 65,535; default is 10.Select Preference of the DHCPv6 client interface (low, medium or high) so that, in the event you have two interfaces (each connected to a different ISP for redundancy), you can assign the interface to one ISP a higher preference than the interface to the other ISP. The ISP connected to the preferred interface will be the ISP that provides the delegated prefix to send to a host-facing interface. If the interfaces have the same preference, both ISPs provide a delegated prefix and the host decides which prefix to use.Select DHCPv6 Options and Enable IPv6 Address.In the Request Address Type area, select Non-Temporary Address (default setting). This address type has a longer lifespan.Select Temporary Address for a greater level of security because the address is intended to be used for a short period of time.Whether you request a Non-Temporary Address or Temporary Address for the interface is based on your discretion and the capability of the DHCPv6 server; some servers can provide only a temporary address. The best practice is to select both Non-Temporary Address and Temporary Address, in which case the firewall will prefer the Non-Temporary Address.Select Rapid Commit to use the DHCPv6 process of Solicit and Reply messages (two messages), rather than the process of Solicit, Advertise, Request, and Reply messages (four messages).Select Prefix Delegation and Enable Prefix Delegation to allow the firewall to support prefix delegation functionality. This means that the interface accepts a prefix from the upstream DHCPv6 server and places the prefix into the Prefix Pool, from which the firewall delegates a prefix to a host via RA. The ability to enable or disable prefix delegation for an interface allows the firewall to support multiple ISPs (one ISP per interface). Enabling prefix delegation on this interface controls which ISP provides the prefix.The delegated prefix is used on the host-facing interface, and its IPv6 address is constructed with the MAC address and EUI-64 input. In our example, the inherited interface receives the inherited prefix displayed in the step to view DHCPv6 information.![]() Select DHCP Prefix Length Hint to enable the firewall to send a preferred DHCPv6 prefix length to the DHCPv6 server.Enter the preferred DHCP Prefix Length (bits) in the range from 48 to 64, which is sent as the hint to the DHCPv6 server. The DHCPv6 server has the discretion to send whatever prefix length it chooses.Requesting a prefix length of 48, for example, leaves 16 bits remaining for subnets (64-48), which indicates you require many subdivisions of that prefix to delegate. On the other hand, requesting a prefix length of 63 leaves 1 bit for delegating only two subnets. Of the 128 bits, there are still 64 more bits for host address.The interface can receive a /48 prefix, but delegate a /64 prefix, for example, which means the firewall is subdividing the prefix it delegates.Enter a Prefix Pool Name for the pool where the firewall stores the received prefix. The name must be unique and contain a maximum of 63 alphanumeric characters, hyphens, periods, and underscores.Use a prefix pool name that reflects the ISP for easy recognition.For a DHCPv6 Client, configure address resolution.
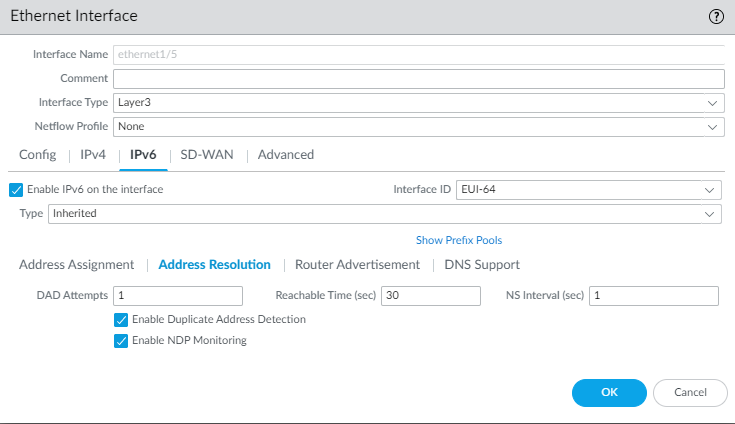
Select DHCP Prefix Length Hint to enable the firewall to send a preferred DHCPv6 prefix length to the DHCPv6 server.Enter the preferred DHCP Prefix Length (bits) in the range from 48 to 64, which is sent as the hint to the DHCPv6 server. The DHCPv6 server has the discretion to send whatever prefix length it chooses.Requesting a prefix length of 48, for example, leaves 16 bits remaining for subnets (64-48), which indicates you require many subdivisions of that prefix to delegate. On the other hand, requesting a prefix length of 63 leaves 1 bit for delegating only two subnets. Of the 128 bits, there are still 64 more bits for host address.The interface can receive a /48 prefix, but delegate a /64 prefix, for example, which means the firewall is subdividing the prefix it delegates.Enter a Prefix Pool Name for the pool where the firewall stores the received prefix. The name must be unique and contain a maximum of 63 alphanumeric characters, hyphens, periods, and underscores.Use a prefix pool name that reflects the ISP for easy recognition.For a DHCPv6 Client, configure address resolution.- Select Address ResolutionEnable Duplicate Address Detection (DAD) if you want the uniqueness of a potential IPv6 address to be verified before it is assigned to the interface (enabled by default).If you selected Enable Duplicate Address Detection, specify the number of DAD Attempts within the neighbor solicitation (NS) interval before the attempt to identify neighbors fails; range is 1 to 10; default is 1.Enter the Reachable Time (sec), the length of time in seconds that the client assumes a neighbor is reachable after receiving a Reachability Confirmation message; range is 10 to 36,000; default is 30.Enter the NS Interval (sec), which is the length of time between Neighbor Solicitations; range is 1 to 3,600; default is 1.Neighbor solicitations are sent every second using a well-known multicast group. The interface is asking if a device with the same IPv6 address exists on the network by sending NS, including its own address in the request. If another device has the same address, it responds to these requests.Enable NDP Monitoring to enable Neighbor Discovery Protocol monitoring. When enabled, you can select the NDP icon (in the Features column) and view information such as the IPv6 address of a neighbor the firewall has discovered, the corresponding MAC address, User-ID, and status (on a best-case basis).
![]()
![]() For a DHCPv6 Client, configure DNS support.
For a DHCPv6 Client, configure DNS support.- Select DNS Support.Enable DNS Recursive Name Server and select:
- DHCPv6—To have the DHCPv6 Server send the DNS Recursive Name Server information to the client.
- Manual—To manually configure the DNS
Recursive Name Server. Add the IPv6 address
of the Server, for example, 2001:4860:4860:0:0:0:8888. Enter
a Lifetime in seconds, which is the maximum
length of time the client can use the specific DNS Recursive Name
Server to resolve domain names. The Lifetime range is 4 to 3,600;
default is 1,200.
![]()
Enable Domain Search List and select:- DHCPv6—To have the DHCPv6 Server send the Domain Search List information to the client.
- Manual—To manually configure the Domain Search List. Add a Domain suffix to add to a partial name in DNS to form a fully qualified domain name. For example, enter company.org. Enter a Lifetime in seconds for the list; range is 4 to 3,600; default is 1,200.
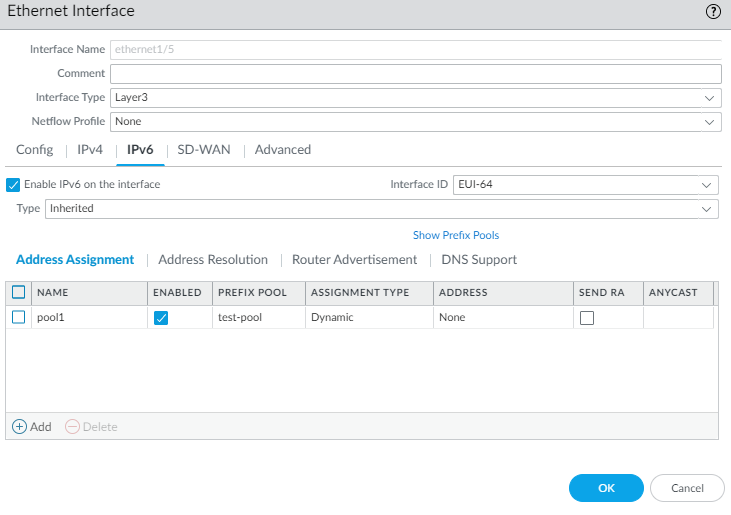
Click OK to save the DHCPv6 Client configuration.Configure a host-facing interface to inherit the IPv6 prefix and advertise allocated /64 prefixes from the pool to the hosts.- Select or select and select an AE interface, or select .Select a Layer 3 interface.Select IPv6.Enable IPv6 on the interface.For Type, select Inherited.
![]() Select Address Assignment and Add an address by entering a Name. The name can be a maximum of 63 alphanumeric characters, hyphens, periods, and underscores.
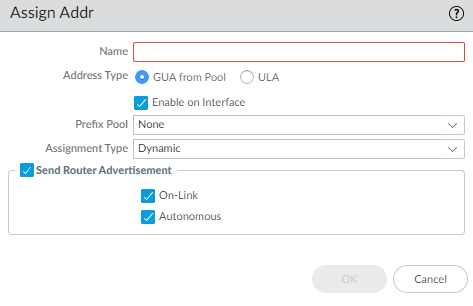
Select Address Assignment and Add an address by entering a Name. The name can be a maximum of 63 alphanumeric characters, hyphens, periods, and underscores.![]() For Address Type, select one of the following:
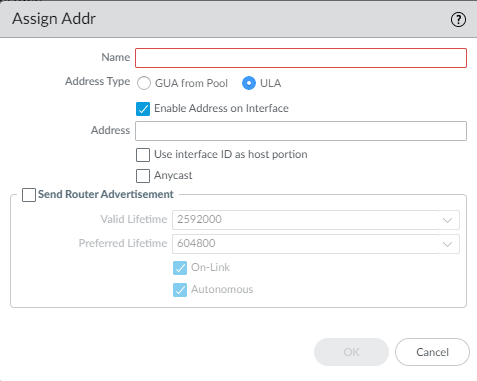
For Address Type, select one of the following:- GUA from Pool—Global Unicast Address (GUA) that comes from the Prefix Pool chosen below.
- ULA—Unique Local Address is a private
address in the address range fc00::/7 for connectivity within a
private network. Select ULA if there is no DHCPv6 server. The DHCPv6
server has the discretion to send whatever prefix length it chooses.It is recommended to also configure a ULA to maintain local connectivity in case the connection to the DHCPv6 server is lost.
Enable on Interface (GUA) or Enable Address on Interface (ULA) to enable this address.(GUA only) Select the Prefix Pool from which to get the GUA.(GUA only) Select Assignment Type:- Dynamic—The DHCPv6 client is responsible for choosing an identifier to configure the inherited interface.
- Dynamic with Identifier—You are responsible
for choosing an identifier in the range 0 to 4,000 and maintaining
a unique Identifier across the DHCPv6 clients.If you received a /64 prefix from the DHCPv6 server, do not select Dynamic with Identifier.If you are applying Dynamic with Identifier to more than one address, assign the lowest Identifier value to the first address, and a higher Identifier value to each subsequent address you configure.
(ULA only) Enter an Address.(ULA only) Select Use interface ID as host portion to use the interface ID as the host portion of the IPv6 address.(ULA only) Select Anycast to make the IPv6 address an Anycast address, which means multiple locations can advertise the same prefix, and IPv6 sends the Anycast traffic to the node it considers the nearest, based on routing protocol costs and other factors.![]() Select Send Router Advertisement to send RAs from the inherited interface to the LAN hosts.If you chose ULA, enter a Valid Lifetime and Preferred Lifetime.Select On-Link if systems that have addresses within the prefix are reachable without a router.Select Autonomous if systems can independently create an IPv6 address by combining the advertised prefix with an Interface ID.Click OK to save address assignment.For Inherited interface, configure address resolution.
Select Send Router Advertisement to send RAs from the inherited interface to the LAN hosts.If you chose ULA, enter a Valid Lifetime and Preferred Lifetime.Select On-Link if systems that have addresses within the prefix are reachable without a router.Select Autonomous if systems can independently create an IPv6 address by combining the advertised prefix with an Interface ID.Click OK to save address assignment.For Inherited interface, configure address resolution.- Select Address Resolution.
![]() Enable Duplicate Address Detection (DAD) if you want such detection (enabled by default).If you selected Enable Duplicate Address Detection, specify the number of DAD Attempts within the neighbor solicitation (NS) interval before the attempt to identify neighbors fails; range is 1 to 10; default is 1.Enter the Reachable Time (sec) that the client will use to assume a neighbor is reachable after receiving a Reachability Confirmation message; range is 10 to 36,000; default is 30.Enter the NS Interval (sec), which is the length of time between Neighbor Solicitation requests; range is 1 to 3,600; default is 1.Enable NDP Monitoring to enable Neighbor Discovery Protocol monitoring. When enabled, you can select the NDP icon (in the Features column) and view information such as the IPv6 address of a neighbor the firewall has discovered, the corresponding MAC address, User-ID, and status (on a best-case basis).
Enable Duplicate Address Detection (DAD) if you want such detection (enabled by default).If you selected Enable Duplicate Address Detection, specify the number of DAD Attempts within the neighbor solicitation (NS) interval before the attempt to identify neighbors fails; range is 1 to 10; default is 1.Enter the Reachable Time (sec) that the client will use to assume a neighbor is reachable after receiving a Reachability Confirmation message; range is 10 to 36,000; default is 30.Enter the NS Interval (sec), which is the length of time between Neighbor Solicitation requests; range is 1 to 3,600; default is 1.Enable NDP Monitoring to enable Neighbor Discovery Protocol monitoring. When enabled, you can select the NDP icon (in the Features column) and view information such as the IPv6 address of a neighbor the firewall has discovered, the corresponding MAC address, User-ID, and status (on a best-case basis).![]() For Inherited interface, configure Router Advertisement so that this interface can send RAs to the hosts advertising the prefix that the hosts can use to construct their own IPv6 address.
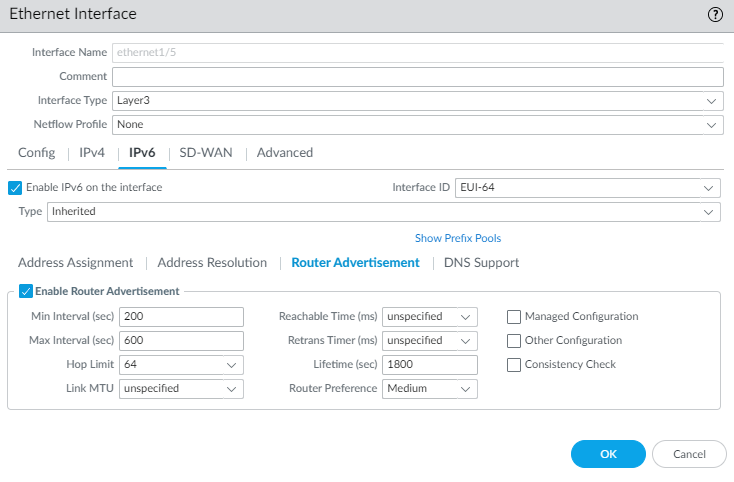
For Inherited interface, configure Router Advertisement so that this interface can send RAs to the hosts advertising the prefix that the hosts can use to construct their own IPv6 address.- Select Router Advertisement and Enable Router Advertisement so this interface can reply to Router Solicitations from the hosts by sending RAs to hosts (default is enabled). The following 11 fields all pertain to the RA.
![]() Set the Min Interval (sec), the minimum interval, in seconds, between RAs the firewall sends (range is 3 to 1,350; default is 200). The firewall sends RAs at random intervals between the minimum and maximum values you set.Set Max Interval (sec), the maximum interval, in seconds between RAs the firewall sends (range is 4 to 1,800; default is 600). The firewall sends RAs at random intervals between the minimum and maximum values you set.Set Hop Limit to apply to clients for outgoing packets (range is 1 to 255; default is 64). Select unspecified to use the system default.Set Link MTU, the link maximum transmission unit (MTU) to apply to clients (range is 1,280 to 9,216; default is unspecified, which means the system default.Set Reachable Time (ms), in milliseconds, that the client will use to assume a neighbor is reachable after receiving a Reachability Confirmation message (range is 0 to 3,600,000; default is unspecified).Set Retrans Timer (ms), the retransmission timer that determines how long the client will wait, in milliseconds, before retransmitting Neighbor Solicitation messages. Select unspecified for no retransmission time (range is 0 to 4,294,967,295; default is unspecified).Set Lifetime (sec) to specify how long, in seconds, the client will use the firewall as the default gateway (range is 0 to 9,000; default is 1,800). Zero specifies that the firewall is not the default gateway. When the lifetime expires, the client removes the firewall entry from its Default Router List and uses another router as the default gateway.Set Router Preference in case there are two or more inherited interfaces on different routers sending RAs to a host. High, Medium, or Low is the priority that the RA advertises indicating the relative priority and the host uses the prefix from the higher prioritized router.Select Managed Configuration to indicate to the client that addresses are available via DHCPv6.Select Other Configuration to indicate to the client that other address information (such as DNS-related settings) is available via DHCPv6.Select Consistency Check to have the firewall verify that RAs sent from other routers are advertising consistent information on the link. The firewall logs any inconsistencies.For Inherited interface, configure DNS Support.
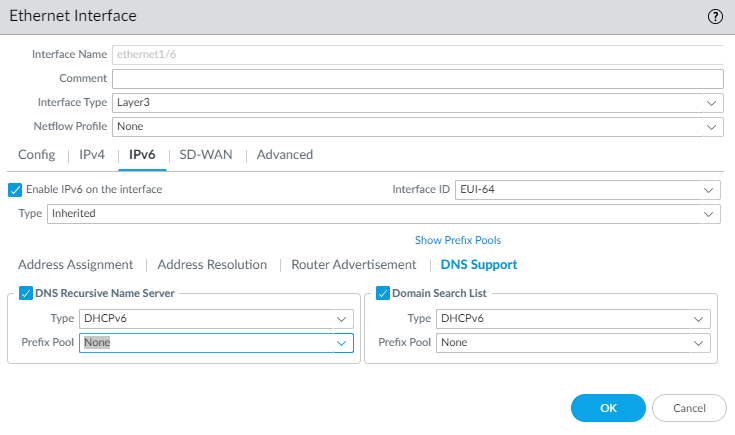
Set the Min Interval (sec), the minimum interval, in seconds, between RAs the firewall sends (range is 3 to 1,350; default is 200). The firewall sends RAs at random intervals between the minimum and maximum values you set.Set Max Interval (sec), the maximum interval, in seconds between RAs the firewall sends (range is 4 to 1,800; default is 600). The firewall sends RAs at random intervals between the minimum and maximum values you set.Set Hop Limit to apply to clients for outgoing packets (range is 1 to 255; default is 64). Select unspecified to use the system default.Set Link MTU, the link maximum transmission unit (MTU) to apply to clients (range is 1,280 to 9,216; default is unspecified, which means the system default.Set Reachable Time (ms), in milliseconds, that the client will use to assume a neighbor is reachable after receiving a Reachability Confirmation message (range is 0 to 3,600,000; default is unspecified).Set Retrans Timer (ms), the retransmission timer that determines how long the client will wait, in milliseconds, before retransmitting Neighbor Solicitation messages. Select unspecified for no retransmission time (range is 0 to 4,294,967,295; default is unspecified).Set Lifetime (sec) to specify how long, in seconds, the client will use the firewall as the default gateway (range is 0 to 9,000; default is 1,800). Zero specifies that the firewall is not the default gateway. When the lifetime expires, the client removes the firewall entry from its Default Router List and uses another router as the default gateway.Set Router Preference in case there are two or more inherited interfaces on different routers sending RAs to a host. High, Medium, or Low is the priority that the RA advertises indicating the relative priority and the host uses the prefix from the higher prioritized router.Select Managed Configuration to indicate to the client that addresses are available via DHCPv6.Select Other Configuration to indicate to the client that other address information (such as DNS-related settings) is available via DHCPv6.Select Consistency Check to have the firewall verify that RAs sent from other routers are advertising consistent information on the link. The firewall logs any inconsistencies.For Inherited interface, configure DNS Support.- Select DNS Support.Enable DNS Recursive Name Server and select DHCPv6 or Manual:
- DHCPv6—To have the DHCPv6 Server
send the DNS Recursive Name Server information. Select a Prefix
Pool. When the DNS Recursive Namer Server is from the
DHCPv6 server, an inherited interface can derive information indirectly
from the prefix pool. (If on the Address Assignment tab
you configured the Address Type as ULA, the
Prefix Pool will be None.)
![]()
- Manual—To manually configure the DNS
Recursive Name Server. Add an IPv6 address
of the Server, for example, 2001:4860:4860:0:0:0:8888. Enter
a Lifetime for the server; the range is any
value equal to or between the Max Interval (that
you configured on the Router Advertisement tab) and
two times that Max Interval. Default is 1200 seconds.
![]()
Enable Domain Search List and select:- DHCPv6—to have the DHCPv6 Server send the Domain Search List information. Select a Prefix Pool. When the Domain Search List is from the DHCPv6 server, an inherited interface can derive information indirectly from the prefix pool. (If on the Address Assignment tab you configured the Address Type as ULA, the Prefix Pool will be None.)
- Manual—To manually configure the Domain Search List. Add a Domain suffix to add to a partial name in DNS to form a fully qualified domain name. For example, enter company.org. Enter a Lifetime for the domain; the range is any value equal to or between the Max Interval (that you configured on the Router Advertisement tab) and two times that Max Interval. Default is 1200.
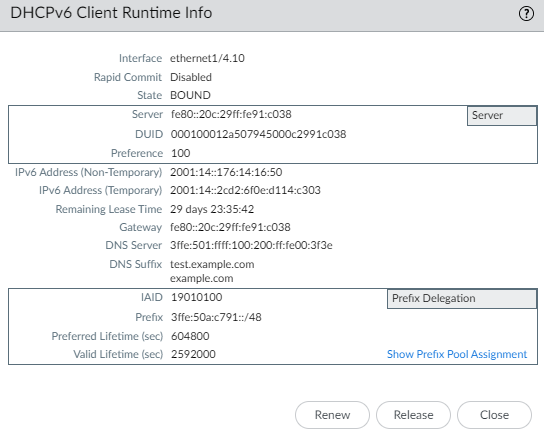
Click OK to save the Inherited interface.Commit.View DHCPv6 information for an interface.- Select or VLAN or AE Group.In the row of your configured interface, select the Dynamic-DHCP Client link in the IP Address column to view the settings that the DHCPv6 server assigned to this DHCPv6 client.Alternatively, you could select the interface and then select Show DHCPv6 Client Runtime Info.View the information.
- In the following example, the middle section shows that the interface facing the ISP received a Non-Temporary address and a Temporary address for itself. The Remaining Lease Time applies to both addresses.
- The Prefix Delegation section shows that the interface also received a Prefix that the host-facing Inherited interface can advertise in RAs to the hosts.
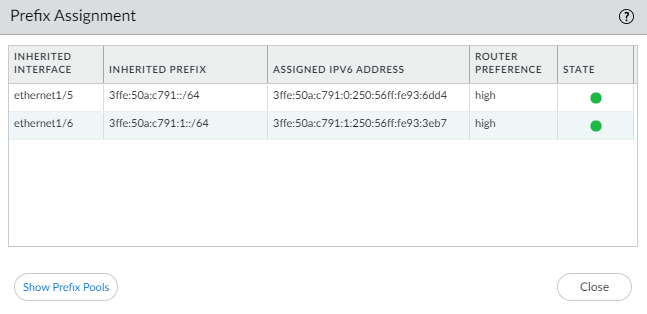
![]() Select Show Prefix Pool Assignment to view for each host-facing Inherited Interface: the Inherited Prefix (prefix that the interface is distributing to hosts), the Assigned IPv6 Address of the inherited interface itself (based on the prefix and constructed from the MAC address), the Router Preference, and the State of the interface.
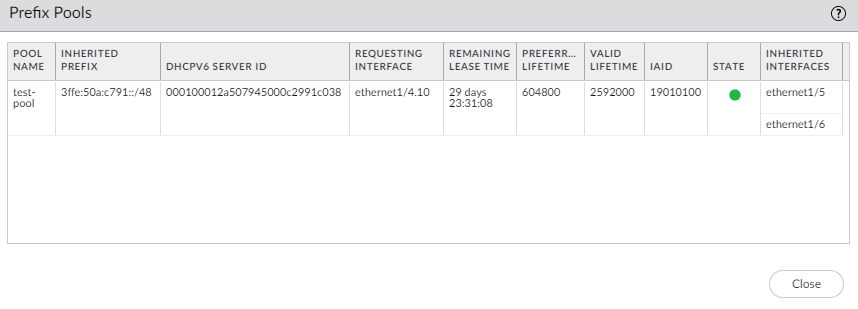
Select Show Prefix Pool Assignment to view for each host-facing Inherited Interface: the Inherited Prefix (prefix that the interface is distributing to hosts), the Assigned IPv6 Address of the inherited interface itself (based on the prefix and constructed from the MAC address), the Router Preference, and the State of the interface.![]() The DHCPv6 Client requested a prefix length of /48 from the server and received it, but then divided that prefix into /64 prefixes and delegated them to the Inherited interfaces. The inherited interfaces advertise the /64 prefixes to the hosts.Select Show Prefix Pools to see the prefix pools created.
The DHCPv6 Client requested a prefix length of /48 from the server and received it, but then divided that prefix into /64 prefixes and delegated them to the Inherited interfaces. The inherited interfaces advertise the /64 prefixes to the hosts.Select Show Prefix Pools to see the prefix pools created.![]() Close the list of prefix pools.Renew a DHCPv6 lease with the DHCPv6 server (regardless of the lease term) if you want to renew sooner than the automatic renewal that the firewall requests.
Close the list of prefix pools.Renew a DHCPv6 lease with the DHCPv6 server (regardless of the lease term) if you want to renew sooner than the automatic renewal that the firewall requests.- Select or VLAN or AE Group.In the row of your configured interface, select the Dynamic-DHCP Client link in the IP Address column.Select Renew from the DHCPv6 Client Runtime Info screen.
![]() Close the DHCPv6 Client Runtime Info.Release the following DHCP options that came from the DHCPv6 server if you no longer need the options before the lifetime expires.
Close the DHCPv6 Client Runtime Info.Release the following DHCP options that came from the DHCPv6 server if you no longer need the options before the lifetime expires.- Prefix
- IPv6 Address (Non-Temporary)
- IPv6 Address (Temporary)
- Remaining Lease Time
- Gateway
- DNS Server
- DNS Suffix
A release frees the IP address, which drops your network connection and renders the firewall unmanageable if no other interface is configured for management access.- Select or VLAN or AE Group.In the row of your configured interface, select the Dynamic-DHCP Client link in the IP Address column.Select Release from the DHCPv6 Client Runtime Info screen.Close the DHCPv6 Client Runtime Info.