Configure Log Forwarding to Panorama
Table of Contents
Configure Log Forwarding to Panorama
Each firewall stores its log files locally
by default and cannot display the logs that reside on other firewalls. Therefore,
to achieve global visibility into the network activity that all
your firewalls monitor, you must forward all firewall logs to Panorama
and Use
Panorama for Visibility. In cases where some teams in your
organization can achieve greater efficiency by monitoring only the
logs that are relevant to their operations, you can create forwarding
filters based on any log attributes (such as threat type or source
user). For example, a security operations analyst who investigates
malware attacks might be interested only in Threat logs with the
type attribute set to wildfire-virus.
The following steps
describe how to use Panorama templates and device groups for configuring
multiple firewalls to forward logs.
If
Panorama manages firewalls running software versions earlier than
PAN-OS 7.0, specify a WildFire® server from which Panorama can gather
analysis information for WildFire samples that those firewalls submit.
Panorama uses the information to complete WildFire Submissions logs
that are missing field values introduced in PAN-OS 7.0. Firewalls
running earlier releases won’t populate those fields. To specify
the server, select ,
edit the General Settings, and enter the WildFire Private
Cloud name. The default is wildfire-public-cloud,
which is the WildFire cloud hosted in the United States.
You
can also forward firewall logs to external services (such as a syslog
server). For details, see Log
Forwarding Options.
- Add
a Device Group for the firewalls that will forward logs.Panorama requires a device group to push a Log Forwarding profile to firewalls. Create a new device group or assign the firewalls to an existing device group.
- Add
a Template for the firewalls that will forward logs.Panorama requires a template to push log settings to firewalls. Create a new template or assign the firewalls to an existing template.
- Create a Log Forwarding profile.The profile defines the destinations for Traffic, Threat, WildFire Submission, URL Filtering, Data Filtering, Tunnel and Authentication logs.
- Select , select the Device Group of the firewalls that will forward logs, and Add a profile.
- Enter a Name to identify the Log Forwarding profile.
- Add one
or more match list profiles.The profiles specify log query filters, forwarding destinations, and automatic actions such as tagging. For each match list profile:
- Enter a Name to identify the profile.
- Select the Log Type.
- In the Filter drop-down, select Filter Builder. Specify the following and then Add each query:Connector logic (and/or)Log AttributeOperator to define inclusion or exclusion logicAttribute Value for the query to match
- Select Panorama/Logging Service.
- Click OK to save the Log Forwarding profile.
- Assign the Log Forwarding profile to policy rules and
network zones.Security, Authentication, and DoS Protection rules support log forwarding. In this example, you assign the profile to a Security rule.Perform the following steps for each rule that will trigger log forwarding:
- Select the rulebase (for example, ), select the Device Group of the firewalls that will forward logs, and edit the rule.
- Select Actions and select the Log Forwarding profile you created.
- Set the Profile Type to Profiles or Group,
and then select the security profiles or Group
Profile required to trigger log generation and forwarding
for:
- Threat logs—Traffic must match any security profile assigned to the rule.
- WildFire logs—Traffic must match a WildFire Analysis profile assigned to the rule.
- For Traffic logs, select Log At Session
Start and/or Log At Session End.Log At Session Start consumes more resources than logging only at the session end. In most cases, you only Log At Session End. Enable both Log At Session Start and Log At Session End only for troubleshooting, for long-lived tunnel sessions such as GRE tunnels (you can't see these sessions in the ACC unless you log at the start of the session), and to gain visibility into Operational Technology/Industrial Control Systems (OT/ICS) sessions, which are also long-lived sessions.
- Click OK to save the rule.
- Configure the destinations for System logs, Configuration
logs, User-ID™ logs, and HIP Match logs.Panorama generates Correlation logs based on the firewall logs it receives, rather than aggregating Correlation logs from firewalls.
- Select and select the Template of the firewalls that will forward logs.
- For each log type that the firewall will forward, see step Add one or more match list profiles.
- (PA-7000 Series firewalls only) Configure a
log card interface to perform log forwarding.When you configure a data port on one of the PA-7000 Series Network Processing Cards (NPCs) as a Log Card interface, the firewall will automatically begin using this interface to forward logs to the logging destinations you configure and forward files for WildFire analysis. Make sure that the interface you configure can reach the log forwarding destinations and the WildFire cloud, WildFire appliance, or both.Because PA-7000 Series firewall can now forward logs to Panorama, Panorama no longer treats the PA-7000 Series firewalls it manages as Log Collectors. If you have not configured the PA-7000 Series firewalls to forward logs to Panorama, all logs a managed PA-7000 Series firewall generates are only viewable from the local firewall and not from Panorama. If you do not yet have a log forwarding infrastructure that is capable of handling the logging rate and volume from the PA-7000 Series firewalls, starting with PAN-OS 8.0.8 you can enable Panorama to directly query PA-7000 Series firewalls when monitoring logs. To use this functionality, both Panorama and the PA-7000 Series firewalls must be running PAN-OS 8.0.8 or later. Enable Panorama to directly query PA-7000 Series firewalls by entering the following command from the Panorama CLI:
> debug reportd send-request-to-7k yesAfter running this command, you will be able to view logs for managed PA-7000 Series firewalls on the Panorama Monitor tab. Additionally, as with all managed devices, you can also generate reports that include PA-7000 Series log data by selecting Remote Device Data as the Data Source. If you later decide to enable the PA-7000 Series firewalls to forward logs to Panorama, you must first disable this option using the debug reportd send-request-to-7k no command.- Select , select the Template of the firewalls that will forward logs, and Add Interface.
- Select the Slot and Interface Name.
- Set the Interface Type to Log Card.
- Enter the IP Address, Default Gateway, and (for IPv4 only) Netmask.
- Select Advanced and specify
the Link Speed, Link Duplex,
and Link State.These fields default to auto, which specifies that the firewall automatically determines the values based on the connection. However, the minimum recommended Link Speed for any connection is 1000 (Mbps).
- Click OK to save your changes.
- Configure Panorama to receive the logs.If you will forward logs to a Panorama virtual appliance in Legacy mode, you can skip this step.
- For each Log Collector that will receive logs, Configure a Managed Collector.
- Configure a Collector Group to assign firewalls to specific Log Collectors for log forwarding.
- Commit your configuration changes.
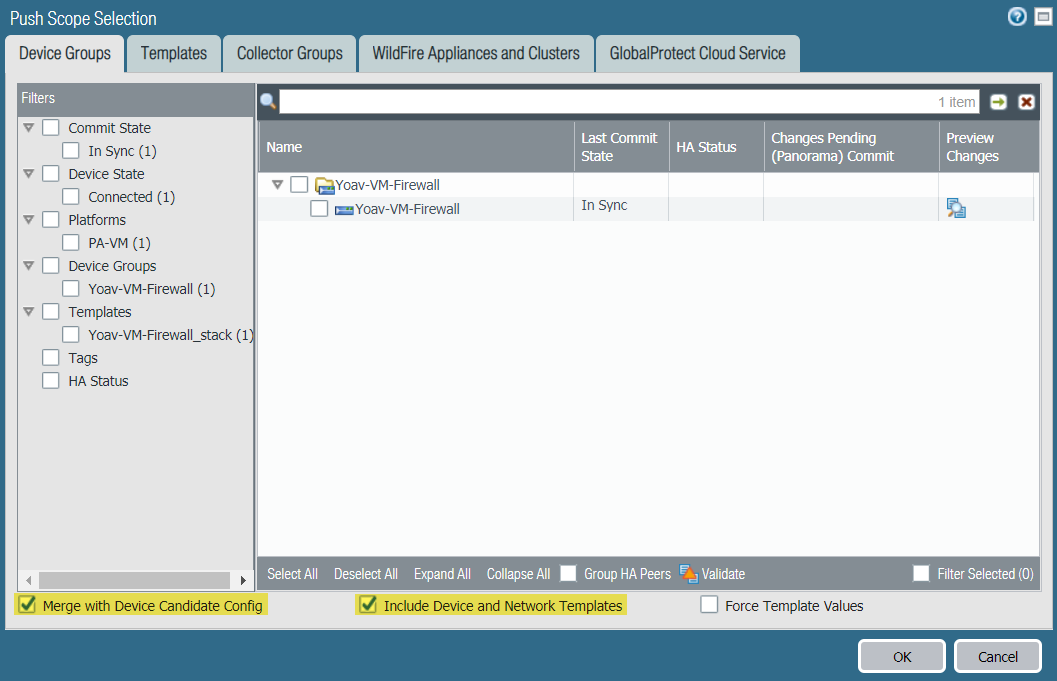
- Select and Edit Selections.
- Select Merge with Device Candidate Config and
Include Device and Network Templates.
![]()
- Click Collector Groups to verify your target Collector Group is selected, and click OK.
- Commit and Push your changes to Panorama and push the changes to the device groups, templates, and Collector Groups.
- Verify
Log Forwarding to Panorama to confirm that your configuration
is successful.To change the log forwarding mode that the firewalls use to send logs to Panorama, you can Modify Log Forwarding and Buffering Defaults. You can also Manage Storage Quotas and Expiration Periods for Logs and Reports.