Create OSPFv3 Routing Profiles
Table of Contents
Create OSPFv3 Routing Profiles
Create routing profiles for OSPFv3 authentication, global
timers, interface timers, and redistribution on an Advanced Routing
Engine.
The Advanced Routing Engine supports OSPFv3;
create OSPFv3 global timer profiles, authentication profiles, interface
timer profiles, and redistribution profiles to apply to OSPFv3.
This topic describes the profiles and how to create them. Reference
them when you Configure OSPFv3 on an Advanced Routing Engine.
- OSPFv3 Global Timer Profiles—Specify the timers for the link-state advertisement (LSA) interval, SPF calculation delay, initial hold time, and maximum hold time that apply all OSPFv3 areas. SPF Throttle settings allow the protocol to slow the sending of LSA updates while a network is unstable (undergoing topology changes). Apply the profile in the general OSPFv3 configuration. The profile is global for OSPFv3 on the logical router; you can create more than one to easily change global timers.
- OSPFv3 Interface Authentication Profiles—OSPFv3 does not have its own authentication capabilities; it relies on IPSec to secure OSPFv3 messages between neighbors. Apply the profile in the tab.
- OSPFv3 Interface Timer Profiles—Specify timers related to interface operations, such as OSPFv3 hello and graceful restart. Apply the profile in the general OSPFv3 configuration.
- OSPFv3 Redistribution Profiles—Redistribute IPv6 static, connected, or IPv6 BGP routes or the IPv6 default route into OSPFv3. Apply the profile in the general OSPFv3 configuration.
- Create an OSPFv3 Global Timer Profile.
- Select .Add an OSPFv3 Global Timer Profile by Name (a maximum of 63 characters). The name must start with an alphanumeric character, underscore (_), or hyphen (-), and can contain a combination of alphanumeric characters, underscore, or hyphen. No dot (.) or space is allowed.Enter the LSA min-arrival (in seconds), which is the smallest interval at which the firewall recalculates the SPF tree; range is 1 to 10; default is 5. The firewall would recalculate at a larger interval (less frequently than the setting).In the SPF Throttle area, enter the Initial delay (in seconds) from when the logical router receives a topology change until it performs the Shortest Path First (SPF) calculation; range is 0 to 600; default is 5.Enter the Initial hold time (in seconds) between the first two consecutive SPF calculations; range is 0 to 600; default is 5. Each subsequent hold time is twice as long as the prior hold time until the hold time reaches the maximum hold time.Enter the Maximum hold time (in seconds), which is the largest value that the hold time increases to until it remains steady; range is 0 to 600; default is 5.
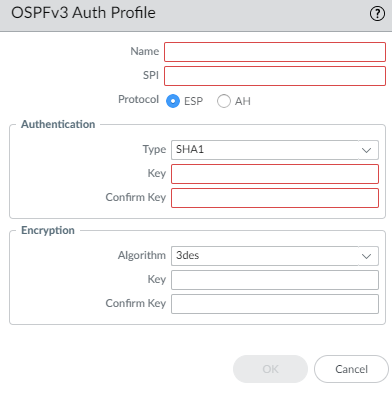
![]() Click OK.Create an OSPFv3 Interface Authentication Profile.
Click OK.Create an OSPFv3 Interface Authentication Profile.- Select .Add an OSPFv3 Auth Profile by Name (a maximum of 63 characters). The name must start with an alphanumeric character, underscore (_), or hyphen (-), and can contain a combination of alphanumeric characters, underscore, or hyphen. No dot (.) or space is allowed.Enter the SPI (Security Policy Index), which must match between both ends of the OSPFv3 adjacency.Select the Protocol: ESP (Encapsulating Security Payload) (recommended) or AH (Authentication Header).Select the Type of authentication:
- SHA1 (default) Secure Hash Algorithm 1
- SHA256
- SHA384
- SHA512
- MD5
- None
Enter the authentication Key using 5 hexadecimal sections of 8 hexadecimal characters for a total of 40 hexadecimal characters (for example, A5DEC4DD155A695A8B983AACEAA5A97C6AECB6D1).Confirm Key by entering the same key.![]() (ESP only) Select the encryption Algorithm:
(ESP only) Select the encryption Algorithm:- 3des (default)
- aes-128-cbc
- aes-192-cbc
- aes-256-cbc
- null
Enter the encryption Key in hexadecimal format; use the correct number of sections based on the type of ESP encryption:- 3des—Use a total of 6 hexadecimal sections in the key.
- aes-128-cbc—Use a total of 4 hexadecimal sections in the key.
- aes-192-cbc—Use a total of 6 hexadecimal sections in the key.
- aes-256-cbc—Use a total of 8 hexadecimal sections in the key.
Confirm Key by entering the same key.Click OK.Create an OSPFv3 Interface Timer Profile.- Select .Add an OSPFv3 Interface Timer Profile by Name (a maximum of 63 characters). The name must start with an alphanumeric character, underscore (_), or hyphen (-), and can contain a combination of alphanumeric characters, underscore, or hyphen. No dot (.) or space is allowed.
![]() Enter the Hello Interval, the interval (in seconds) at which OSPFv3 sends Hello packets; range is 1 to 3,600; default is 10.Enter the Dead Count, the number of times the Hello Interval can occur from a neighbor without OSPFv3 receiving a Hello packet from the neighbor, before OSPFv3 considers that neighbor down; range is 3 to 20; default is 4.Enter the Retransmit Interval, the number of seconds that OSPFv3 waits to receive an ACK for an LSA from a neighbor before OSPFv3 retransmits the LSA; range is 1 to 1,800; default is 5.Enter the Transmit Delay, the number of seconds that OSPFv3 delays transmitting an LSA before sending the LSA out an interface; range is 1 to 1,800; default is 1.Enter the Graceful Restart Hello Delay (sec) in seconds; range is 1 to 10; default is 10. This setting applies to an OSPFv3 interface when Active/Passive HA is configured. Graceful Restart Hello Delay is the number of seconds during which the firewall sends Grace LSA packets at 1-second intervals. During this time, no Hello packets are sent from the restarting firewall. During the restart, the dead time (which is the Hello Interval multiplied by the Dead Count) is also counting down. If the dead timer is too short, the adjacency will go down during the graceful restart because of the hello delay. Therefore it is recommended that the dead timer be at least four times the value of the Graceful Restart Hello Delay. For example, a Hello Interval of 10 seconds and a Dead Count of 4 yield a dead timer of 40 seconds. If the Graceful Restart Hello Delay is set to 10 seconds, that 10-second delay of hello packets is comfortably within the 40-second dead timer, so the adjacency will not time out during a graceful restart.Click OK.Create an OSPFv3 Redistribution Profile to specify any combination of IPv6 static routes, connected routes, IPv6 BGP routes, and default IPv6 route to redistribute to OSPFv3.
Enter the Hello Interval, the interval (in seconds) at which OSPFv3 sends Hello packets; range is 1 to 3,600; default is 10.Enter the Dead Count, the number of times the Hello Interval can occur from a neighbor without OSPFv3 receiving a Hello packet from the neighbor, before OSPFv3 considers that neighbor down; range is 3 to 20; default is 4.Enter the Retransmit Interval, the number of seconds that OSPFv3 waits to receive an ACK for an LSA from a neighbor before OSPFv3 retransmits the LSA; range is 1 to 1,800; default is 5.Enter the Transmit Delay, the number of seconds that OSPFv3 delays transmitting an LSA before sending the LSA out an interface; range is 1 to 1,800; default is 1.Enter the Graceful Restart Hello Delay (sec) in seconds; range is 1 to 10; default is 10. This setting applies to an OSPFv3 interface when Active/Passive HA is configured. Graceful Restart Hello Delay is the number of seconds during which the firewall sends Grace LSA packets at 1-second intervals. During this time, no Hello packets are sent from the restarting firewall. During the restart, the dead time (which is the Hello Interval multiplied by the Dead Count) is also counting down. If the dead timer is too short, the adjacency will go down during the graceful restart because of the hello delay. Therefore it is recommended that the dead timer be at least four times the value of the Graceful Restart Hello Delay. For example, a Hello Interval of 10 seconds and a Dead Count of 4 yield a dead timer of 40 seconds. If the Graceful Restart Hello Delay is set to 10 seconds, that 10-second delay of hello packets is comfortably within the 40-second dead timer, so the adjacency will not time out during a graceful restart.Click OK.Create an OSPFv3 Redistribution Profile to specify any combination of IPv6 static routes, connected routes, IPv6 BGP routes, and default IPv6 route to redistribute to OSPFv3.- Select .Add an OSPFv3 Redistribution Profile by Name (maximum of 63 characters). The name must start with an alphanumeric character, underscore (_), or hyphen (-), and can contain a combination of alphanumeric characters, underscore, or hyphen. No dot (.) or space is allowed.
![]() Select IPv6 Static to allow configuration of this portion of the profile.
Select IPv6 Static to allow configuration of this portion of the profile.- Enable the IPv6 static redistribution portion of the profile.
- Enter a Metric to apply to the IPv6 static routes redistributed to OSPFv3; range is 1 to 65,535.
- Select a Metric Type: Type 1 or Type 2.
- Select a Redistribute Route-Map or create a new Redistribution Route Map whose Match criteria control the IPv6 static routes to redistribute into OSPFv3. Default is None. If the route map Set configuration includes a Metric Action and Metric Value, they are applied to the redistributed route. Otherwise, the Metric configured on this redistribution profile is applied to the redistributed route. Likewise, the Metric Type in the route map Set configuration takes precedence over the Metric Type configured in this redistribution profile.
Select Connected to allow configuration of this portion of the profile.- Enable the connected route redistribution portion of the profile.
- Enter a Metric to apply to the connected routes redistributed to OSPFv3; range is 1 to 65,535.
- Select a Metric Type: Type 1 or Type 2.
- Select a Redistribute Route-Map or create a new Redistribution Route Map whose Match criteria control the connected routes to redistribute into OSPFv3. Default is None. If the route map Set configuration includes a Metric Action and Metric Value, they are applied to the redistributed route. Otherwise, the Metric configured on this redistribution profile is applied to the redistributed route. Likewise, the Metric Type in the route map Set configuration takes precedence over the Metric Type configured in this redistribution profile.
Select BGP AFI IPv6 to allow configuration of this portion of the profile.- Enable the BGP AFI IPv6 route redistribution portion of the profile.
- Enter a Metric to apply to the IPv6 BGP routes redistributed to OSPFv3; range is 0 to 4,294,967,295.
- Select a Metric Type: Type 1 or Type 2.
- Select a Redistribute Route-Map or create a new Redistribution Route Map whose Match criteria control the IPv6 BGP routes to redistribute into OSPFv3. Default is None. If the route map Set configuration includes a Metric Action and Metric Value, they are applied to the redistributed route. Otherwise, the Metric configured on this redistribution profile is applied to the redistributed route. Likewise, the Metric Type in the route map Set configuration takes precedence over the Metric Type configured in this redistribution profile.
Select IPv6 Default Route to allow configuration of this portion of the profile.- Select Always to always create and redistribute the default route to OSPFv3, even if there is no default route on the router; default is enabled. If Always is not set, when there is no default route on the ABR, the default route is not redistributed.
- Enable the IPv6 Default Route redistribution portion the profile.
- Enter a Metric to apply to the IPv6 default route redistributed to OSPFv3; range is 0 to 4,294,967,295.
- Select a Metric Type: Type 1 or Type 2.
Click OK.Commit.