Configure a PPPoE Client on a subinterface to connect to your ISP using an 802.1Q
VLAN tag.
Beginning with PAN-OS 11.0.1, you can configure a PPPoE (Point-to-Point Protocol over
Ethernet) client on a Layer 3 subinterface when your ISP indicates that PPPoE over
802.1Q VLAN is the way in which to connect to its internet services. The firewall
establishes a PPPoE connection to the ISP using an 802.1Q VLAN tag. The PPPoE client
that you configure on the subinterface learns its IPv4 address from the ISP, along
with other information such as the IP address of the server, DNS information, and
MTU.
The subinterface supports an IPv4 address. You can configure a PPPOE client on either
a physical interface or a subinterface, but not both at the same time. Only one
PPPoE subinterface is supported on a physical interface. Before you begin
configuring a PPPoE client, ask your ISP what VLAN tag to use for your connection.
You must enter that tag when you configure the subinterface number and the
Tag. The task below assumes you have already configured a
Layer 3 Ethernet interface on the firewall with a security zone.
The following example topology has a PPPoE connection between the firewall and the
access concentrator.
The firewall encapsulates northbound traffic (a PPPoE packet) from a host in an
802.1Q frame and sends it to the opposite end of the PPPoE link, on its way to the
ISP network. Likewise, the firewall decapsulates the southbound traffic from the
802.1Q frame before sending the PPPoE packet to the host.
Configure a subinterface as a PPPoE client (termination point).
Select NetworkInterfacesEthernet and highlight a Layer 3 Ethernet interface.
Add Subinterface.
To the right of the Interface Name and dot,
enter the subinterface number; use the VLAN tag number that your ISP
provided. This subinterface number is for reference purposes; the VLAN
tag ID is read from the Tag field.
Enter the Tag, which is the VLAN tag number that
your ISP provided. The actual VLAN tag ID is read from this Tag
field.
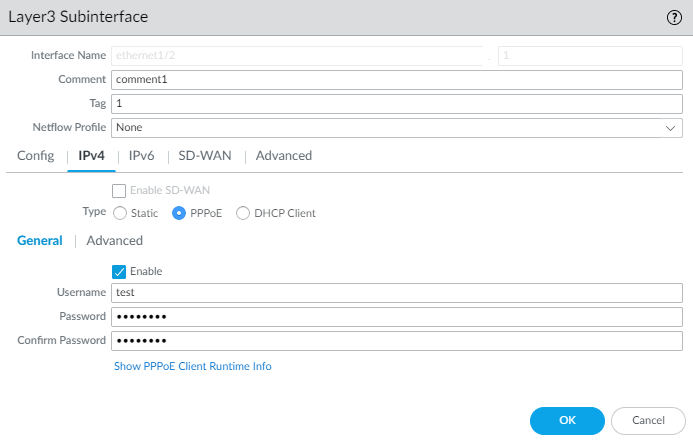
Select IPv4.
Select the Type of address as
PPPoE.
Select General and Enable
the subinterface.
Enter the Username for the authentication you
will choose in the next step.
Enter the Password and Confirm
Password.
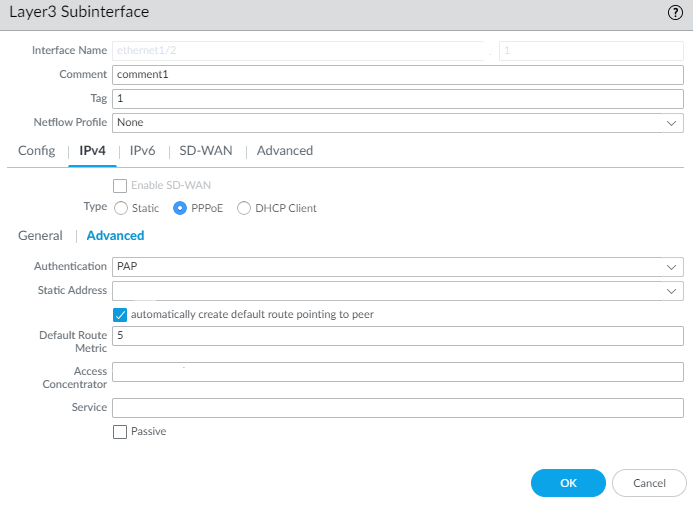
Configure additional characteristics of the PPPoE subinterface.
Select Advanced.
Select the type of Authentication:
None—(default) If you keep this setting,
the firewall selects auto as the
authentication protocol.
PAP—Firewall uses Password Authentication
Protocol (PAP). PAP sends usernames and passwords in plain text,
and is less secure than CHAP.
auto—Firewall negotiates the
authentication method (CHAP or PAP) with the PPPoE server.
To request that the PPPoE server assign a certain IPv4 address for the
subinterface, specify a Static Address. (The
PPPoE server may assign the requested address or a different address at
its discretion.) Default is None.
To automatically create a default route that points to the default
gateway that the PPPoE server provides, select automatically
create default route pointing to peer.
Enter the Default Route Metric (priority level)
of the PPPoE connection; range is 1 to 65,535; default is 10. A route
with a lower number has higher priority during route selection. For
example, a route with a metric of 10 is used before a route with a
metric of 100.
Enter the name of the Access Concentrator that
your ISP provided, if any (string value of 0 to 255 characters). The
firewall will connect with this Access Concentrator.
Enter the Service that your ISP provided, if any
(string value of 0 to 255 characters).
If you want the PPPoE client (firewall) to wait for the PPPoE server to
initiate a connection, select Passive. If Passive
is not selected, the firewall is allowed to initiate a connection.
Click OK.
Commit the changes.
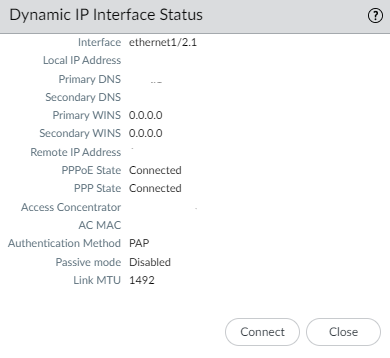
View information about the PPPoE client. The Local IP Address, Primary DNS,
Secondary DNS, Primary WINS, Secondary WINS, Remote IP Address, Access
Concentrator name, and AC MAC address were received from the PPPoE server.
Select NetworkInterfacesEthernet and in the row of the subinterface that you configured,
select Dynamic-PPPoE.
Alternatively, you can select the
subinterface, IPv4, and Show PPPoE
Client Runtime Info.