Add a Virtual Disk to Panorama on Azure
Table of Contents
9.1 (EoL)
Expand all | Collapse all
-
- Determine Panorama Log Storage Requirements
-
- Setup Prerequisites for the Panorama Virtual Appliance
- Perform Initial Configuration of the Panorama Virtual Appliance
- Set Up The Panorama Virtual Appliance as a Log Collector
- Set Up the Panorama Virtual Appliance with Local Log Collector
- Set up a Panorama Virtual Appliance in Panorama Mode
- Set up a Panorama Virtual Appliance in Management Only Mode
-
- Preserve Existing Logs When Adding Storage on Panorama Virtual Appliance in Legacy Mode
- Add a Virtual Disk to Panorama on an ESXi Server
- Add a Virtual Disk to Panorama on vCloud Air
- Add a Virtual Disk to Panorama on AWS
- Add a Virtual Disk to Panorama on Azure
- Add a Virtual Disk to Panorama on Google Cloud Platform
- Add a Virtual Disk to Panorama on KVM
- Add a Virtual Disk to Panorama on Hyper-V
- Mount the Panorama ESXi Server to an NFS Datastore
-
- Increase CPUs and Memory for Panorama on an ESXi Server
- Increase CPUs and Memory for Panorama on vCloud Air
- Increase CPUs and Memory for Panorama on AWS
- Increase CPUs and Memory for Panorama on Azure
- Increase CPUs and Memory for Panorama on Google Cloud Platform
- Increase CPUs and Memory for Panorama on KVM
- Increase CPUs and Memory for Panorama on Hyper-V
- Complete the Panorama Virtual Appliance Setup
-
- Convert Your Evaluation Panorama to a Production Panorama with Local Log Collector
- Convert Your Evaluation Panorama to a Production Panorama without Local Log Collector
- Convert Your Evaluation Panorama to VM-Flex Licensing with Local Log Collector
- Convert Your Evaluation Panorama to VM-Flex Licensing without Local Log Collector
- Convert Your Production Panorama to an ELA Panorama
-
- Register Panorama
- Activate a Panorama Support License
- Activate/Retrieve a Firewall Management License when the Panorama Virtual Appliance is Internet-connected
- Activate/Retrieve a Firewall Management License when the Panorama Virtual Appliance is not Internet-connected
- Activate/Retrieve a Firewall Management License on the M-Series Appliance
- Install the Panorama Device Certificate
-
- Migrate from a Panorama Virtual Appliance to an M-Series Appliance
- Migrate a Panorama Virtual Appliance to a Different Hypervisor
- Migrate from an M-Series Appliance to a Panorama Virtual Appliance
- Migrate from an M-100 Appliance to an M-500 Appliance
- Migrate from an M-100 or M-500 Appliance to an M-200 or M-600 Appliance
-
- Configure an Admin Role Profile
- Configure an Access Domain
-
- Configure a Panorama Administrator Account
- Configure Local or External Authentication for Panorama Administrators
- Configure a Panorama Administrator with Certificate-Based Authentication for the Web Interface
- Configure an Administrator with SSH Key-Based Authentication for the CLI
- Configure RADIUS Authentication for Panorama Administrators
- Configure TACACS+ Authentication for Panorama Administrators
- Configure SAML Authentication for Panorama Administrators
-
- Add a Firewall as a Managed Device
-
- Add a Device Group
- Create a Device Group Hierarchy
- Create Objects for Use in Shared or Device Group Policy
- Revert to Inherited Object Values
- Manage Unused Shared Objects
- Manage Precedence of Inherited Objects
- Move or Clone a Policy Rule or Object to a Different Device Group
- Push a Policy Rule to a Subset of Firewalls
- Manage the Rule Hierarchy
- Manage the Master Key from Panorama
- Redistribute User-ID Information to Managed Firewalls
-
- Plan the Transition to Panorama Management
- Migrate a Firewall to Panorama Management and Reuse Existing Configuration
- Migrate a Firewall to Panorama Management and Push a New Configuration
- Migrate a Firewall HA Pair to Panorama Management and Reuse Existing Configuration
- Migrate a Firewall HA Pair to Panorama Management and Push a New Configuration
- Load a Partial Firewall Configuration into Panorama
- Localize a Panorama Pushed Configuration on a Managed Firewall
-
- Add Standalone WildFire Appliances to Manage with Panorama
- Configure Basic WildFire Appliance Settings on Panorama
- Remove a WildFire Appliance from Panorama Management
-
-
- Configure a Cluster and Add Nodes on Panorama
- Configure General Cluster Settings on Panorama
- Remove a Cluster from Panorama Management
- Configure Appliance-to-Appliance Encryption Using Predefined Certificates Centrally on Panorama
- Configure Appliance-to-Appliance Encryption Using Custom Certificates Centrally on Panorama
- View WildFire Cluster Status Using Panorama
- Upgrade a Cluster Centrally on Panorama with an Internet Connection
- Upgrade a Cluster Centrally on Panorama without an Internet Connection
-
-
- Manage Licenses on Firewalls Using Panorama
-
- Supported Updates
- Schedule a Content Update Using Panorama
- Upgrade Log Collectors When Panorama Is Internet-Connected
- Upgrade Log Collectors When Panorama Is Not Internet-Connected
- Upgrade Firewalls When Panorama Is Internet-Connected
- Upgrade Firewalls When Panorama Is Not Internet-Connected
- Upgrade a ZTP Firewall
- Revert Content Updates from Panorama
-
- Preview, Validate, or Commit Configuration Changes
- Enable Automated Commit Recovery
- Compare Changes in Panorama Configurations
- Manage Locks for Restricting Configuration Changes
- Add Custom Logos to Panorama
- Use the Panorama Task Manager
- Reboot or Shut Down Panorama
- Configure Panorama Password Profiles and Complexity
-
-
- Verify Panorama Port Usage
- Resolve Zero Log Storage for a Collector Group
- Replace a Failed Disk on an M-Series Appliance
- Replace the Virtual Disk on an ESXi Server
- Replace the Virtual Disk on vCloud Air
- Migrate Logs to a New M-Series Appliance in Log Collector Mode
- Migrate Logs to a New M-Series Appliance in Panorama Mode
- Migrate Logs to a New M-Series Appliance Model in Panorama Mode in High Availability
- Migrate Logs to the Same M-Series Appliance Model in Panorama Mode in High Availability
- Migrate Log Collectors after Failure/RMA of Non-HA Panorama
- Regenerate Metadata for M-Series Appliance RAID Pairs
- Troubleshoot Registration or Serial Number Errors
- Troubleshoot Reporting Errors
- Troubleshoot Device Management License Errors
- Troubleshoot Automatically Reverted Firewall Configurations
- Complete Content Update When Panorama HA Peer is Down
- View Task Success or Failure Status
- Restore an Expired Device Certificate
- Downgrade from Panorama 9.1
End-of-Life (EoL)
Add a Virtual Disk to Panorama on Azure
Add a virtual logging disk to Panorama™ in Panorama or
Log Collector mode on Microsoft Azure.
After you Install
Panorama on Azure, add virtual logging disks to the Panorama™ virtual
appliance instance to provide storage for logs generated by managed
firewalls. You can add virtual disks to a local log Collector for
a Panorama virtual appliance in Panorama mode or for a Dedicated
Log Collector. To add virtual disks, you must have access to the
Microsoft Azure portal, the Panorama command-line interface (CLI),
and the Panorama web interface.
The Panorama virtual appliance
on Azure supports only 2TB logging disks and, in total, supports
up to 24TB of log storage. You cannot add a logging disk smaller
than 2TB or a logging disk of a size that is not evenly divisible
by 2TB because the Panorama virtual appliance partition logging
disks in to 2TB partitions. For example, if you attach a 4TB logging
disk, Panorama will create two 2TB partitions. However, you cannot
add a 5TB logging disk because the leftover 1TB is not supported
as a partition.
- Log in to the Microsoft Azure portal.
- Add a virtual logging disk to Panorama.In all modes, the first logging disk on the Panorama VM must be at least 2TB in order to add additional disks. If the first logging disk is smaller than 2TB, you will be unable to add additional disk space.
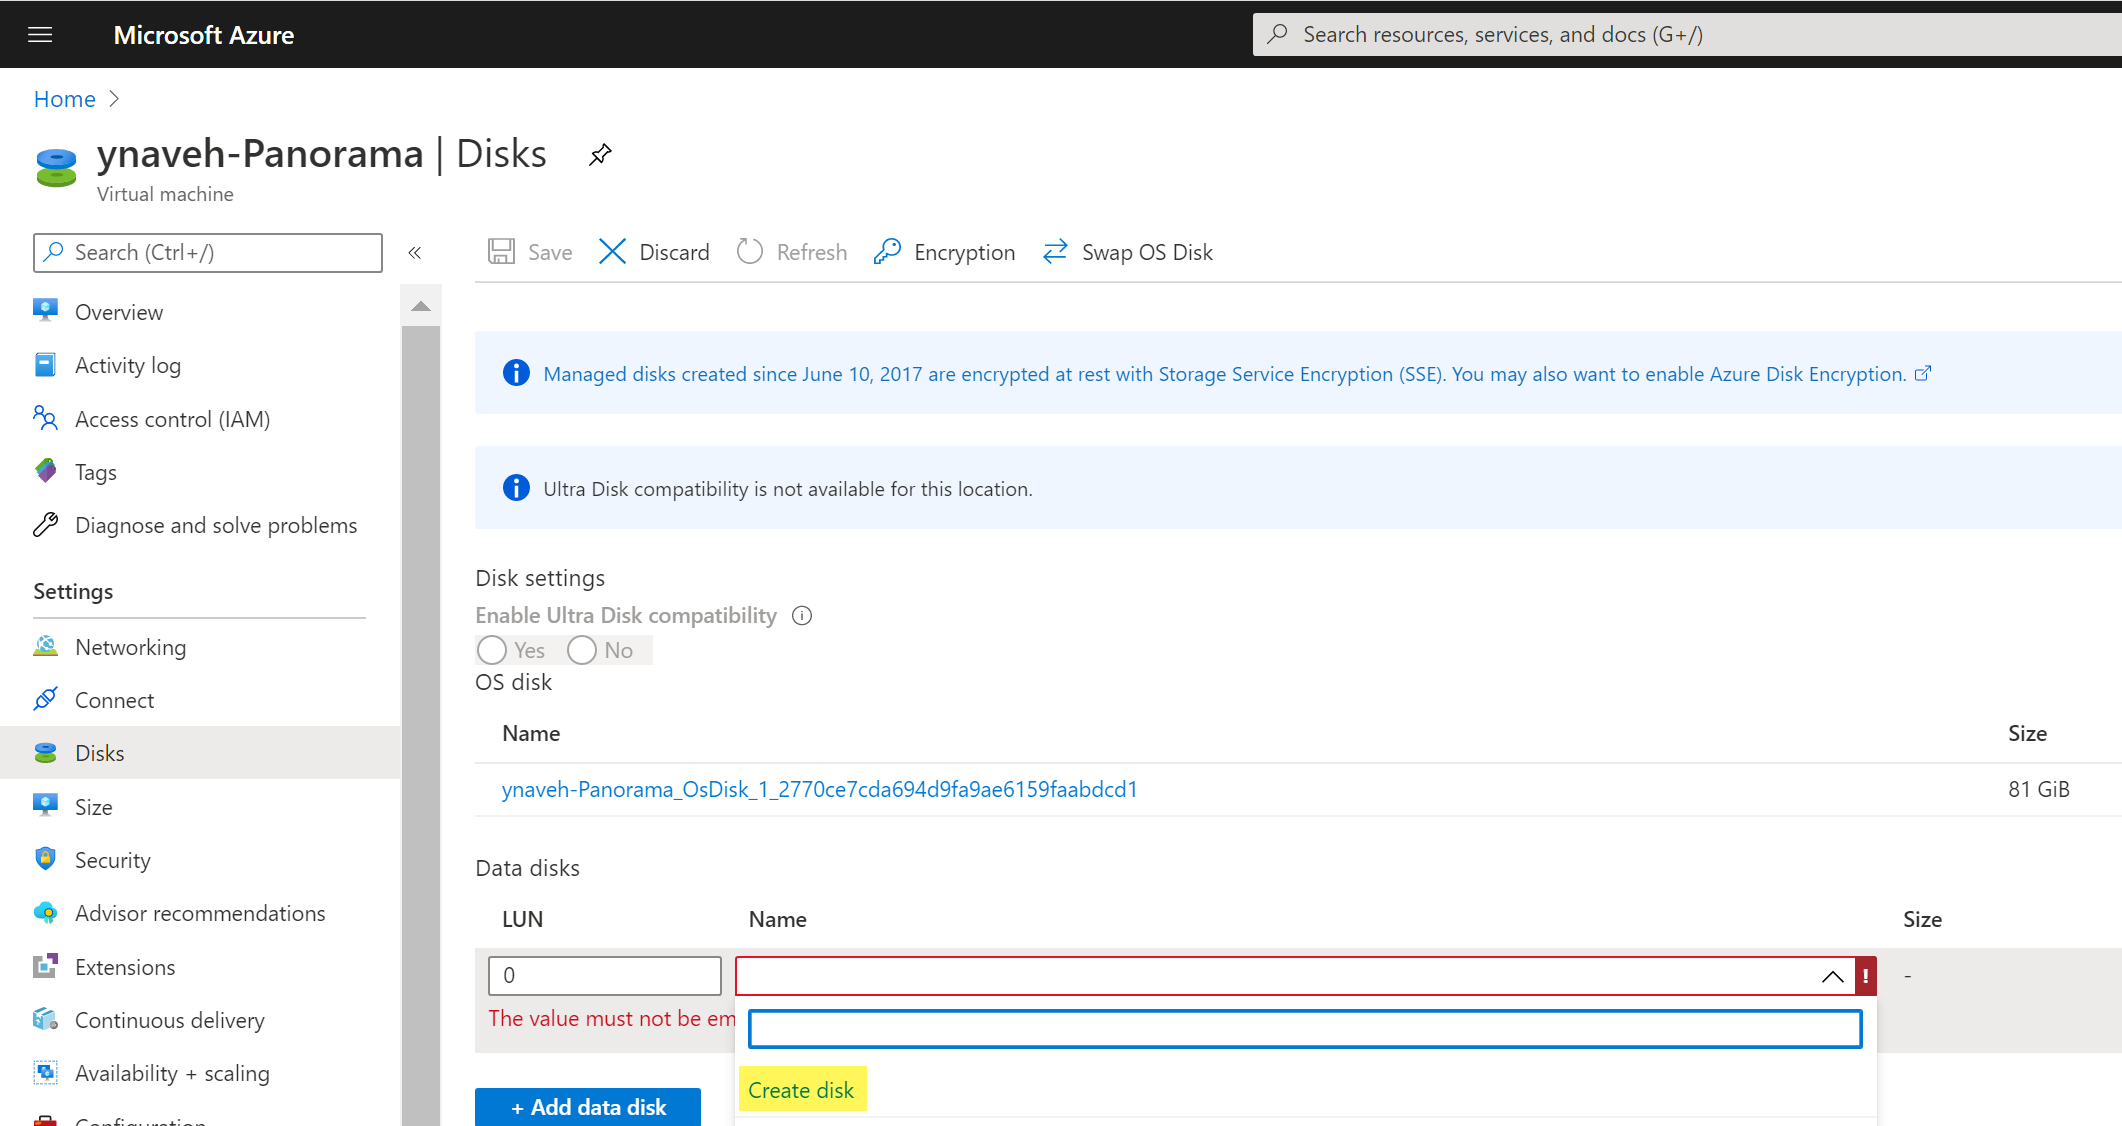
- In the Azure Dashboard, select the Panorama Virtual Machines to which you want to add a logging disk.
- Select Disks.
- +Add data disk.
- In the drop-down for the new disk, Create
disk.
![]()
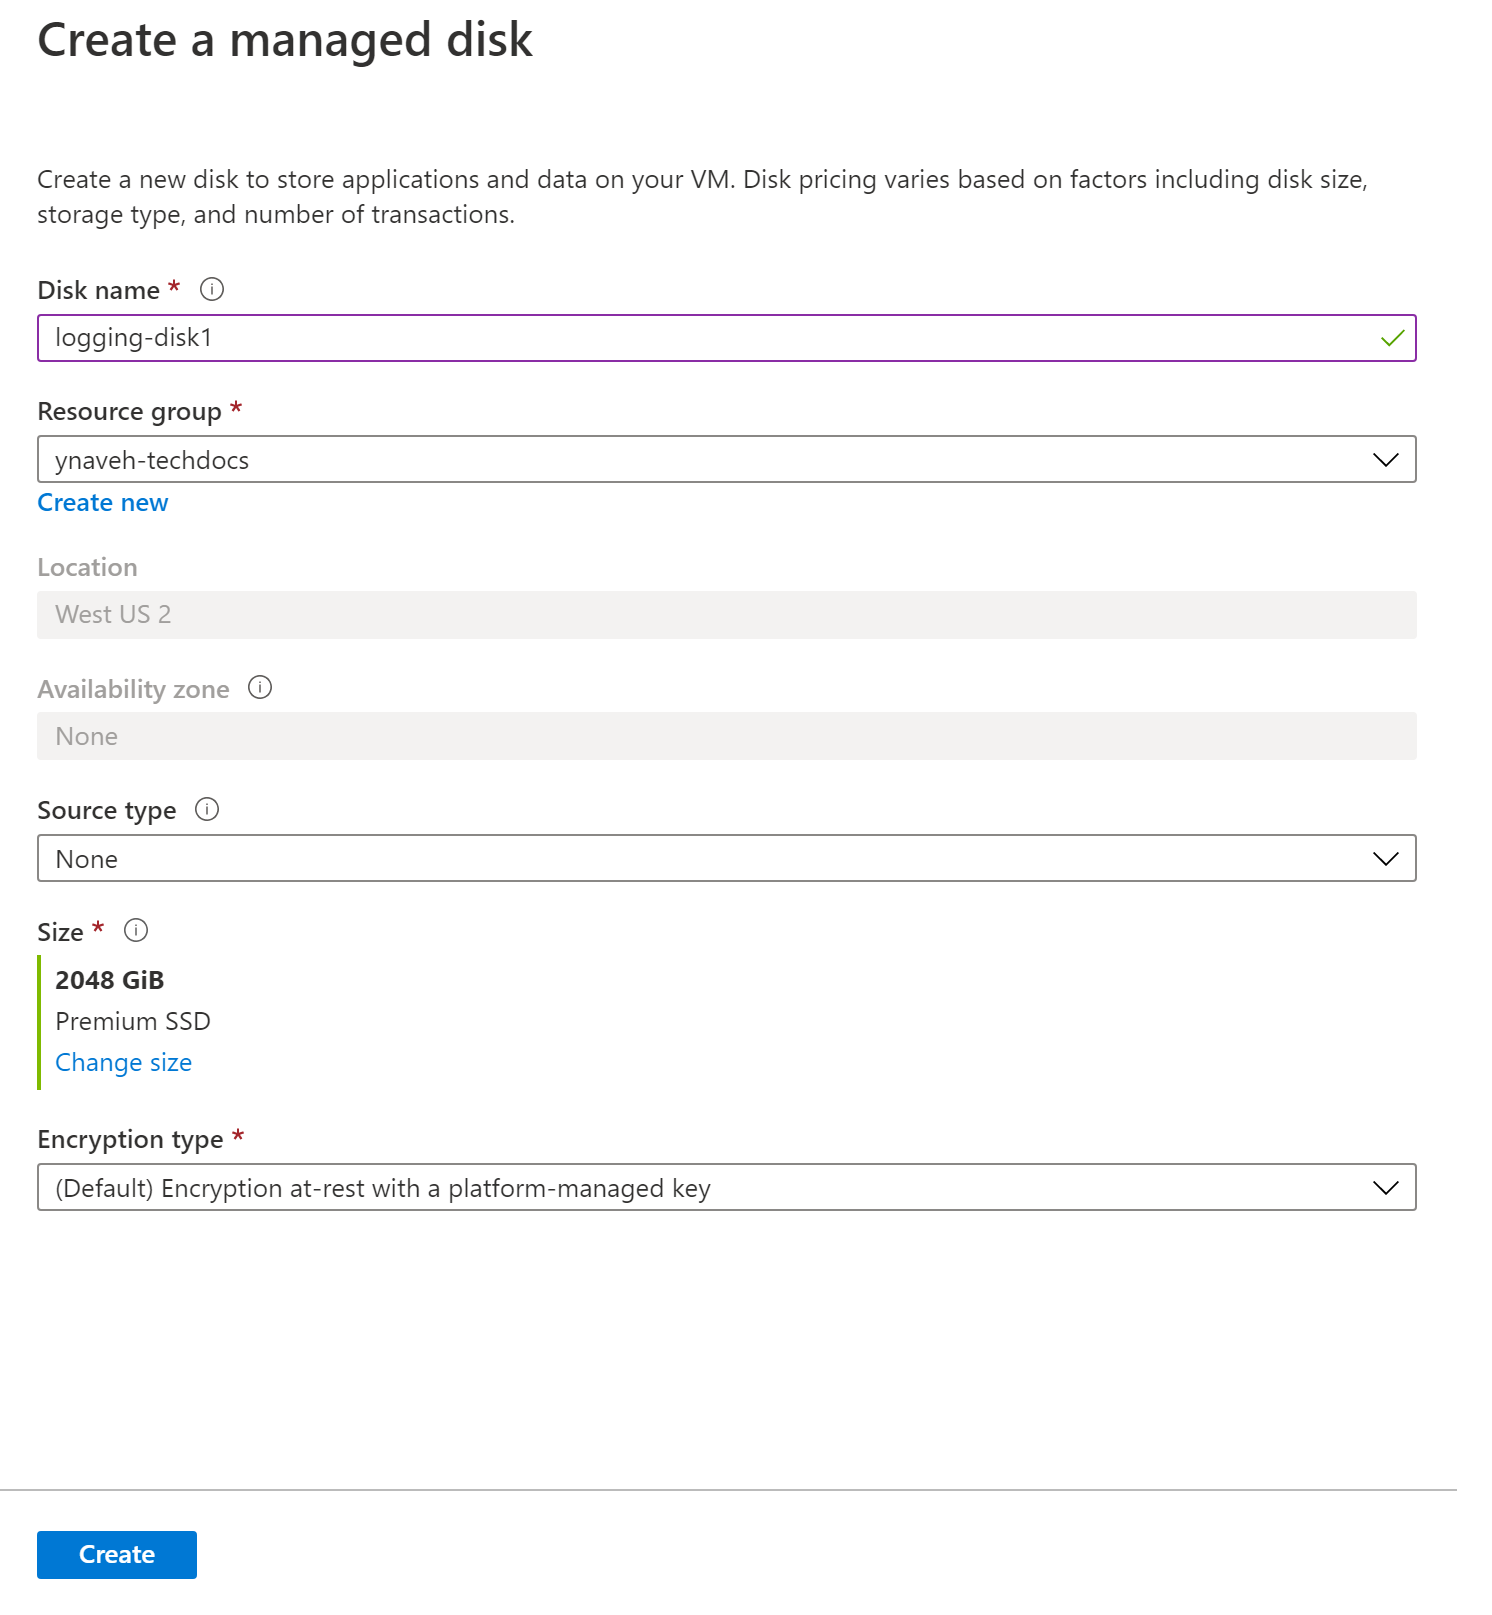
- Configure the logging disk.
- Enter the disk Name.
- Select the Resource group. If you Create new resource groups, enter the group name.
- Verify the Account type (this field is automatically populated).
- In the Source type drop-down, select None.
- Select Change Size and select the 2048 GiB logging disk.
- Create the new logging disk.
![]()
- For the Host caching, select Read/write.
![]()
- Enable each disk.The following example uses the sdc virtual disk.
- Log in to the Panorama CLI.
- Enter the following command to view the disks on the
Panorama virtual appliance:show system disk detailsThe user will see the following response:
Name : sdb State : Present Size : 2048000 MB Status : Available Reason : Admin enabled Name : sdc State : Present Size : 2048000 MB Status : Available Reason : Admin disabled - Enter the following command and confirm the request
when prompted for all disks with the Reason : Admin disabled response:request system disk add sdcThe request system disk add command is not available on a Panorama management server in Management Only mode because logging is not supported in this mode. If you do not see the command, Set up a Panorama Virtual Appliance in Panorama Mode to enable the logging disks. Once in Panorama mode, Log in to the Panorama CLI and continue to Step 4 to verify the disk addition.
- Enter the show system disk details command to verify the status of the disk addition. Continue to the next step when all newly added disk responses display Reason : Admin enabled.
- Make disks available for logging.
- Log in to the Panorama web interface.
- Edit a Log Collector (PanoramaManaged Collectors)
- Select Disks and Add each newly added disk.
- Click OK.
- Select CommitCommit to Panorama.For Panorama in an Active/Passive high availability (HA) configuration, wait for HA sync to complete before continuing.
- Select CommitPush to Devices and push the changes to the Collector Group the Log Collector belongs to.
- (New Panorama deployments in Panorama mode only)
Configure Panorama to receive logs.If you are adding logging disks to an existing Panorama virtual appliance, skip to step 6.
- Verify that the Panorama Log Storage
capacity is increased.
- Log in to the Panorama web interface.
- Select the Collector Group to which the Panorama virtual appliance belongs (PanoramaCollector Groups).
- Verify that the Log Storage capacity accurately displays the disk capacity.


