Configure Authentication for Explicit Web Proxy
Table of Contents
Configure Authentication for Explicit Web Proxy
When you configure an explicit web proxy,
you must configure one of the following user authentication methods:
Configure Kerberos Authentication
- Create a service account for the directory (if it is not already configured) and enable support for AES128 and AES256 encryption in the service account properties.Register the service principal name (SPN) for the proxy FQDN and create a keytab file for the Kerberos single sign-on (SSO).The Kerberos keytab principal name must match the hostname that resolves to the proxy interface IP address.On the firewall, create a server profile for the Kerberos server.Configure an authentication profile to use Kerberos and import the keytab to the authentication profile.(Optional but recommended) If you use Panorama to manage your firewalls, configure a log forwarding profile to forward logs to Cortex Data Lake (CDL), Panorama, or both.By default, the firewall does not forward logs to CDL or Panorama. Forwarding the logs ensures that the complete authentication log information is available to assist in troubleshooting any potential authentication issues.As a best practice, if you are using Panorama to manage the web proxy firewall, configure any objects the proxy uses in a shared Panorama location and configure the web proxy firewall in a separate device group that contains no other firewalls or virtual systems. If the firewall is already a member of a device group, create a child device group as a sub-group and move the firewall to the child device group.If you experience issues with the browser challenge when using the Chrome browser, we recommend using an alternate browser.In the Explicit Proxy Configuration (), select Kerberos Single Sign On as the Authentication service type.
![]() (Optional but recommended) If you are using a decryption policy for the traffic, select Strip ALPN to remove the value in the Application-Layer Protocol Negotiation (ALPN).This option requires HTTPS.
(Optional but recommended) If you are using a decryption policy for the traffic, select Strip ALPN to remove the value in the Application-Layer Protocol Negotiation (ALPN).This option requires HTTPS.![]() Select the Authentication Profile you created in Step 4.Complete the remaining steps to Configure a Web Proxy.
Select the Authentication Profile you created in Step 4.Complete the remaining steps to Configure a Web Proxy.Configure SAML Authentication
SAML authentication for explicit web proxy requires Panorama and the Cloud Services plugin version 3.2.1 (and later versions).To simplify configuration for SAML-based authentication for the explicit web proxy, the firewall or Panorama automatically generates the following rules to allow the necessary traffic. If you are using Panorama, you must select an individual firewall to view the rules.![]()
- SWG-allow-vpc-dns-rule — Allows traffic from the zone where the web proxy upstream interface is located to the primary and secondary DNS server addresses for the web proxy.
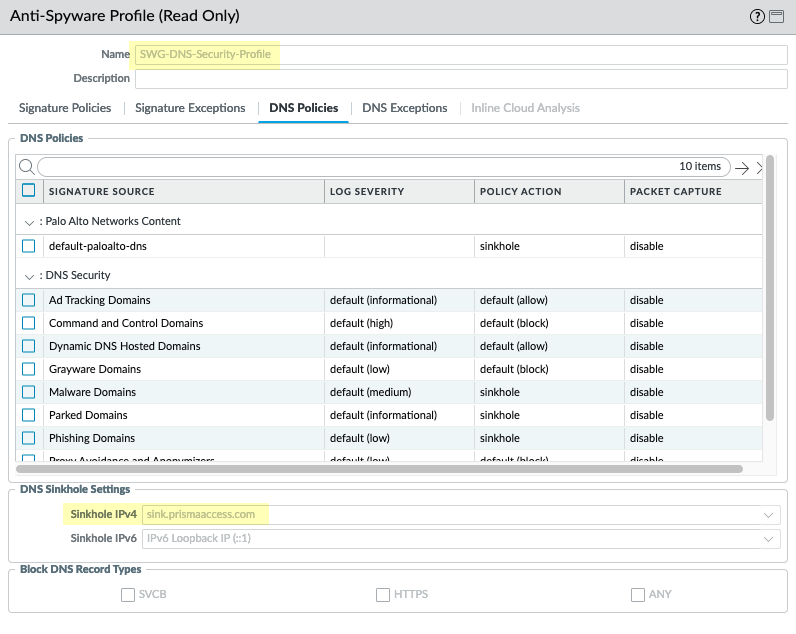
![]() The firewall also generates an anti-spyware profile, SWG-DNS-Security-Profile, to allow the required traffic.
The firewall also generates an anti-spyware profile, SWG-DNS-Security-Profile, to allow the required traffic.![]() The autogenerated rule SWG-allow-vpc-dns-rule applies this profile to the applicable traffic.
The autogenerated rule SWG-allow-vpc-dns-rule applies this profile to the applicable traffic.![]()
- SWG-block-unsolicited-dns-rule —Blocks unauthorized traffic to the primary and secondary DNS server addresses for the web proxy.
- SWG-allow-outbound-auth-domain-rule — (Explicit proxy with SAML authentication only) Allows traffic from the zone where the web proxy upstream interface is located to the Cloud Services plugin.
![]() The autogenerated rule SWG-allow-outbound-auth-domain-rule applies the hybrid-swg-authdomain-bypass URL category to the applicable traffic.
The autogenerated rule SWG-allow-outbound-auth-domain-rule applies the hybrid-swg-authdomain-bypass URL category to the applicable traffic.![]() The URL category,hybrid-swg-authdomain-bypass contains the necessary predefined entries for the required domains.
The URL category,hybrid-swg-authdomain-bypass contains the necessary predefined entries for the required domains.![]()
- If you have not already done so, configure Explicit Proxy for mobile users.This is a typical authentication method for on-premises web proxy authentication and Prisma Access Explicit Proxy, which requires a license. Prisma Access Explicit Proxy settings for cookie and timeout values apply to an explicit web proxy configuration as well. You must commit the changes and push them to the relevant firewalls before continuing.If you have not already done so, configure a SAML Authentication profile.(Required for XAU only) If the downstream proxy sends the XAU header, configure a trusted source address for the downstream proxy.
- Select .Edit the settings for the trusted source address to change the status to Enabled.
![]() Add any address objects you want to allow X-Authenticated User (XAU).Explicit web proxy requires an IP address object for the trusted source address.Click OK.In the Explicit Proxy Configuration (), select SAML/CAS as the Authentication service type.
Add any address objects you want to allow X-Authenticated User (XAU).Explicit web proxy requires an IP address object for the trusted source address.Click OK.In the Explicit Proxy Configuration (), select SAML/CAS as the Authentication service type.![]() (Optional but recommended) If you are using a decryption policy for the traffic, select Strip ALPN to remove the value in the Application-Layer Protocol Negotiation (ALPN).This option requires HTTPS.Complete the remaining steps to configure the Configure a Web Proxy.
(Optional but recommended) If you are using a decryption policy for the traffic, select Strip ALPN to remove the value in the Application-Layer Protocol Negotiation (ALPN).This option requires HTTPS.Complete the remaining steps to configure the Configure a Web Proxy.Configure Cloud Identity Engine Authentication
To simplify configuration for SAML-based authentication for the explicit web proxy, the firewall or Panorama automatically generates the following rules to allow the necessary traffic. If you are using Panorama, you must select an individual firewall to view the rules.![]()
- SWG-allow-vpc-dns-rule — Allows traffic from the zone where the web proxy upstream interface is located to the primary and secondary DNS server addresses for the web proxy.
![]() The firewall also generates an anti-spyware profile, SWG-DNS-Security-Profile, to allow the required traffic.
The firewall also generates an anti-spyware profile, SWG-DNS-Security-Profile, to allow the required traffic.![]() The autogenerated rule SWG-allow-vpc-dns-rule applies this profile to the applicable traffic.
The autogenerated rule SWG-allow-vpc-dns-rule applies this profile to the applicable traffic.![]()
- SWG-block-unsolicited-dns-rule —Blocks unauthorized traffic to the primary and secondary DNS server addresses for the web proxy.
- SWG-allow-outbound-auth-domain-rule — (Explicit proxy with SAML authentication only) Allows traffic from the zone where the web proxy upstream interface is located to the Cloud Services plugin.
![]() The autogenerated rule SWG-allow-outbound-auth-domain-rule applies the hybrid-swg-authdomain-bypass URL category to the applicable traffic.
The autogenerated rule SWG-allow-outbound-auth-domain-rule applies the hybrid-swg-authdomain-bypass URL category to the applicable traffic.![]() The URL category,hybrid-swg-authdomain-bypass contains the necessary predefined entries for the required domains.
The URL category,hybrid-swg-authdomain-bypass contains the necessary predefined entries for the required domains.![]()
- If you have not already done so, configure Explicit Proxy for mobile users.You must commit the changes and push them to the relevant firewalls before continuing.If you have not already done so, configure authentication using the Cloud Identity Engine and configure a Cloud Identity Engine authentication profile.(Required for XAU only) If the downstream proxy sends the XAU header, configure a trusted source address for the downstream proxy.
- Select .Edit the settings for the trusted source address to change the status to Enabled.
![]() Add any address objects you want to allow X-Authenticated User (XAU).Explicit web proxy requires an IP address object for the trusted source address.Click OK.In the Explicit Proxy Configuration (), select SAML/CAS as the Authentication service type.
Add any address objects you want to allow X-Authenticated User (XAU).Explicit web proxy requires an IP address object for the trusted source address.Click OK.In the Explicit Proxy Configuration (), select SAML/CAS as the Authentication service type.![]() (Optional but recommended) Select Strip ALPN to remove the value in the Application-Layer Protocol Negotiation (ALPN).This option requires HTTPS.Complete the remaining steps to configure the Configure a Web Proxy.
(Optional but recommended) Select Strip ALPN to remove the value in the Application-Layer Protocol Negotiation (ALPN).This option requires HTTPS.Complete the remaining steps to configure the Configure a Web Proxy.