Device Security
Set up Device Security and Cortex XSOAR for Microsoft Entra ID Integration
Table of Contents
Expand All
|
Collapse All
Device Security Docs
Set up Device Security and Cortex XSOAR for Microsoft Entra ID Integration
Set up Device Security and Cortex XSOAR to integrate with Microsoft Entra ID
and Microsoft Intune.
| Where Can I Use This? | What Do I Need? |
|---|---|
|
One of the following subscriptions:
One of the following Cortex XSOAR setups:
|
Configure Cortex XSOAR with a Microsoft Entra ID integration instance
and job to import device information from device identities. You can set the job
to run on demand or at regular intervals. The configuration requires the following
information from Microsoft Entra ID:
- Domain URL for Microsoft Entra ID
- Tenant ID
- Client ID
- Client Secret
- Log in to Device Security, and from there access the Microsoft Entra ID integration settings in Cortex XSOAR.
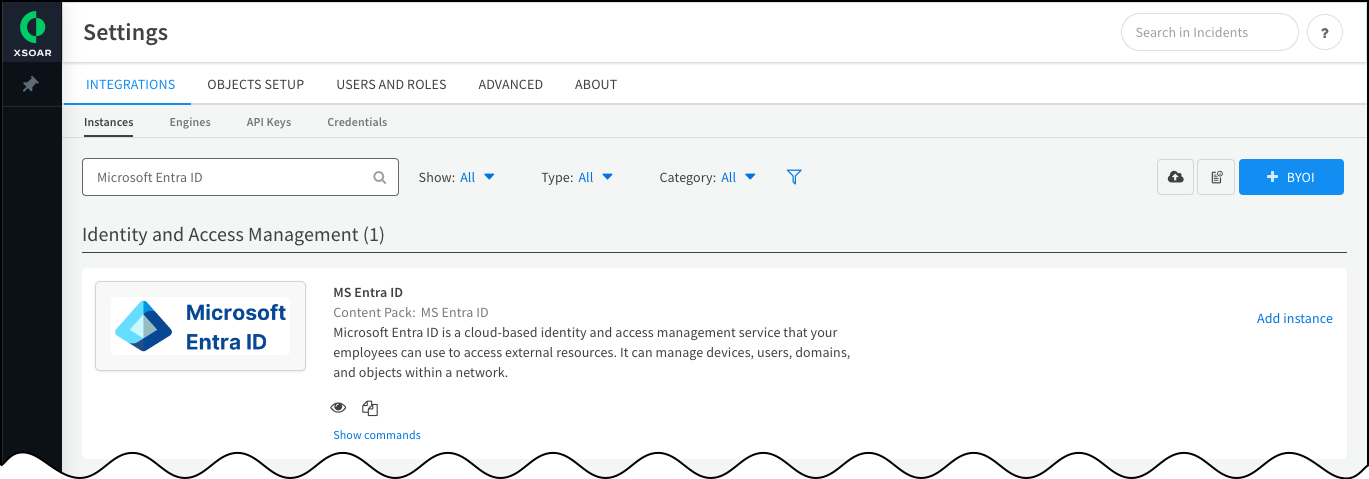
- Log in to Device Security and then click Integrations.Launch Cortex XSOAR from Device Security.Device Security uses Cortex XSOAR to integrate with Microsoft Entra ID. The settings you must configure are in the Cortex XSOAR interface. To access these settings from the Integrations page, Launch Cortex XSOAR. The Cortex XSOAR interface opens in a new browser tab or window.Find the Microsoft Entra ID integration.Click Settings in the left navigation menu. Search for Microsoft Entra ID to locate it among other integrations.
![]() Configure the Microsoft Entra ID integration instance.
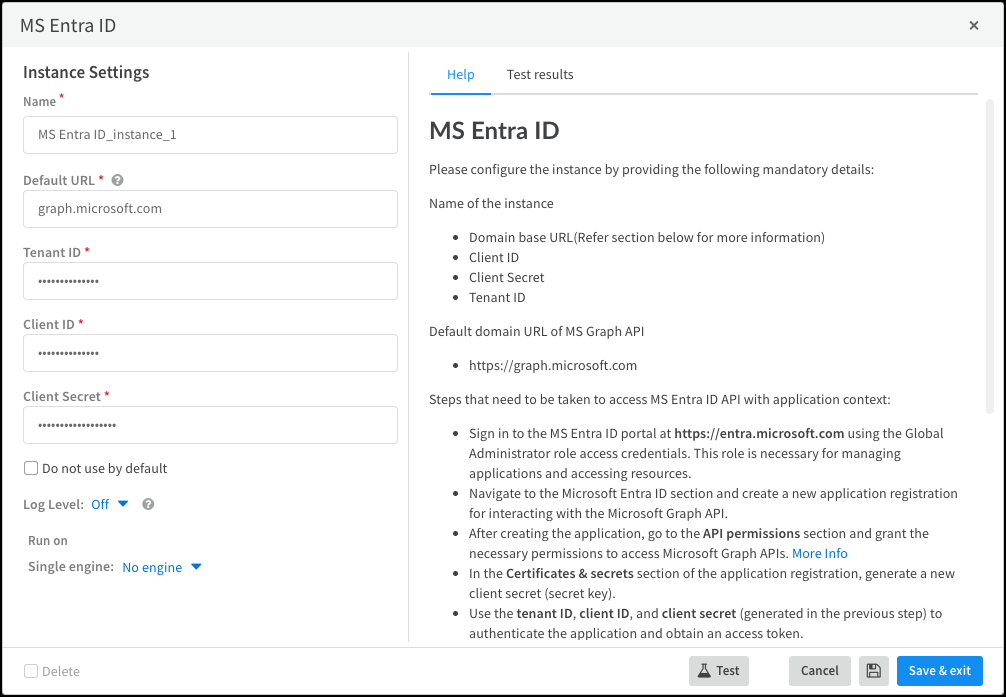
Configure the Microsoft Entra ID integration instance.- Click Add instance to open the settings panel.In the settings panel, configure the following settings:
- Name: Use the default name of the instance or enter a new one.
- Default URL: The default URL is graph.microsoft.com
- Tenant ID: Enter the Tenant ID from your Microsoft application.
- Client ID: Enter the Client ID from your Microsoft application.
- Client Secret: Enter the Client Secret ID from your Microsoft application.
- Run on Single engine: Choose No engine.
![]() When finished, click Test or Test resultsRun test to test the integration instance.If the test is successful, a Success message appears. If not, check that the settings were entered correctly, and then test the configuration again.
When finished, click Test or Test resultsRun test to test the integration instance.If the test is successful, a Success message appears. If not, check that the settings were entered correctly, and then test the configuration again.![]() After the test succeeds, click Save & exit to save your changes and close the settings panel.Create a job for Cortex XSOAR to query Microsoft Entra ID for devices and device attributes and import them to Device Security.
After the test succeeds, click Save & exit to save your changes and close the settings panel.Create a job for Cortex XSOAR to query Microsoft Entra ID for devices and device attributes and import them to Device Security.- Create a new Cortex XSOAR job.Copy the name of the instance you created, click Jobs near the bottom of the left navigation menu, and then click New Job at the top of the page.Configure the new Cortex XSOAR job.In the New Job panel that appears, configure the following and leave the other settings at their default values:
- Recurring: Select this if you want to periodically import device information from Microsoft Entra ID. Clear it if you want to import device details on demand.
- Every: If you select Recurring, enter a number and set the interval value (Minutes, Hours, Days, or Weeks) and select the days on which to run the job. If you don't select specific days, then the job will run every day by default. This determines how often Cortex XSOAR queries Microsoft Entra ID for information about device details.
- Name: Enter a name for the job.
- Playbook: Choose Import MS Entra ID devices to PANW IoT cloud.
- Integration Instance Name: Paste the instance name of your Microsoft Defender XDR integration instance.
Click Create new job and verify that the job appears in the Jobs list.Enable the job and run it.- Check the job status for the job you created.If the job is Disabled, select the appropriate check boxes and then click Enable.Run the job.After you enable the job, keep the check box selected and click Run now. The Run Status should change from Idle to Running.If you selected Recurring, Cortex XSOAR queries Microsoft Entra ID for information at the defined intervals and forwards imported information to Device Security.If you cleared Recurring, Cortex XSOAR immediately queries Microsoft Entra ID and forwards imported information to Device Security.Return to Device Security and check the status of the Microsoft Entra ID integration.An integration instance can be in one of the following four states, which Device Security displays in the Status column on the Integrations page:
- Active — the integration was configured and enabled and is functioning properly.Disabled — either the integration was configured but intentionally disabled or it was never configured and a job that references it is enabled and running.
- Error — the integration was configured and enabled but is not functioning properly, possibly due to a configuration error or network condition.
- Inactive — the integration was configured and enabled but no job has run for at least the past 60 minutes.
When you see that the status of an integration instance is Active, its setup is complete.


