Device Security
Set up Extreme Networks ExtremeCloud IQ Site Engine for Integration
Table of Contents
Expand All
|
Collapse All
Device Security Docs
Set up Extreme Networks ExtremeCloud IQ Site Engine for Integration
Set up Extreme Networks ExtremeCloud IQ Site Engine for integration with
Device Security through Cortex XSOAR.
| Where Can I Use This? | What Do I Need? |
|---|---|
|
One of the following subscriptions:
One of the following Cortex XSOAR setups:
|
To enable Device Security to integrate with your Extreme Networks
ExtremeCloud IQ Site Engine instance, you need access to the
Northbound Interface API.
In ExtremeCloud IQ Site Engine, configure a client and add the client to an
authorization group with the following privileges for the Northbound Interface API:
- Access Control Read/Write
- Inventory Read/Write
- Network Read/Write
- Policy Read/Write
These integration instructions explain how to set up Extreme Networks
ExtremeCloud IQ Site Engine version 24.2.15.5. For more information on
configuring API access for ExtremeCloud IQ Site Engine, see the
Extreme Networks ExtremeCloud IQ Site Engine
documentation.
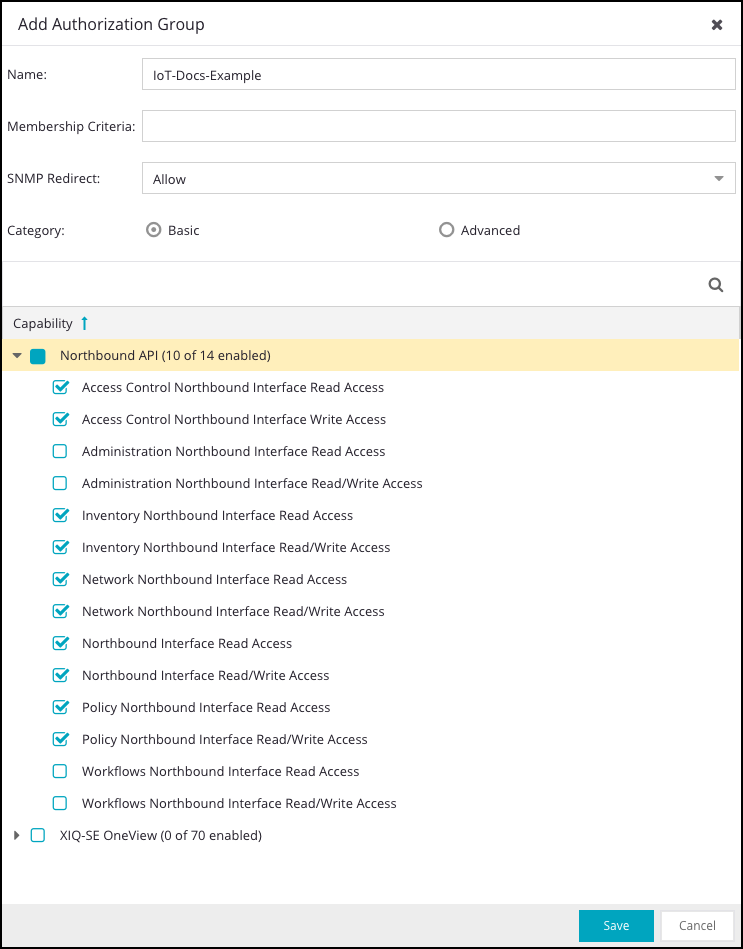
- Log in to your Extreme Networks ExtremeCloud IQ Site Engine instance with an account that has administrator privileges.Create an authorization group, which controls the API access permissions for API clients, by navigating to AdministrationUsersAuthorization Groups and clicking + Add… to bring up the Add Authorization Group pop-up.Configure the following fields for your authorization group:By default, all API permissions are selected. However, we recommend granting only the required persmissions for the integration.
- Name: Enter a name for the authorization group.
- CapabilityNorthbound API: Select the following permissions:
- Access Control Northbound Interface Read Access
- Access Control Northbound Interface Write Access
- Inventory Northbound Interface Read Access
- Inventory Northbound Interface Read/Write Access
- Network Northbound Interface Read Access
- Network Northbound Interface Read/Write Access
- Northbound Interface Read Access
- Northbound Interface Read/Write Access
- Policy Northbound Interface Read Access
- Policy Northbound Interface Read/Write Access
![]() Save your authorization group.Create a registered client for API access by navigating to AdministrationClient API Access and clicking + Add… to bring up the Add Client pop-up.Configure the following fields for your API client:
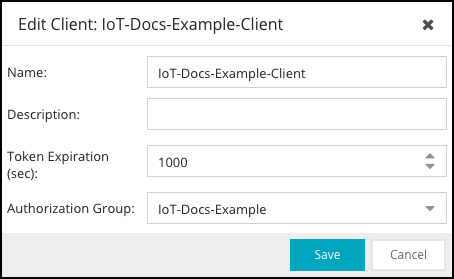
Save your authorization group.Create a registered client for API access by navigating to AdministrationClient API Access and clicking + Add… to bring up the Add Client pop-up.Configure the following fields for your API client:- Name: Enter a name for your client.
- Optional Token Expiration: Set a token expiration duration in seconds.
- Authorization Group: Select the authorization group that you created earlier.
![]() Save your client, and then copy the Client ID and Client Secret from the New Client Created pop-up to a secure location.You will need the Client ID and Client Secret to configure the integration instance in Cortex XSOAR. If you don’t copy the Client ID and Client Secret from the pop-up, you can find these values again in the AdministrationClient API Access table, under the Client ID and Client Secret Action columns.
Save your client, and then copy the Client ID and Client Secret from the New Client Created pop-up to a secure location.You will need the Client ID and Client Secret to configure the integration instance in Cortex XSOAR. If you don’t copy the Client ID and Client Secret from the pop-up, you can find these values again in the AdministrationClient API Access table, under the Client ID and Client Secret Action columns.


