Next-Generation Firewall
Configure the Portal to Authenticate Satellites
Table of Contents
Configure the Portal to Authenticate Satellites
Configure a GlobalProtect portal to authenticate satellite firewalls using methods
like serial number, username/password, and IP address authentication in LSVPN
deployments.
| Where Can I Use This? | What Do I Need? |
|---|---|
|
|
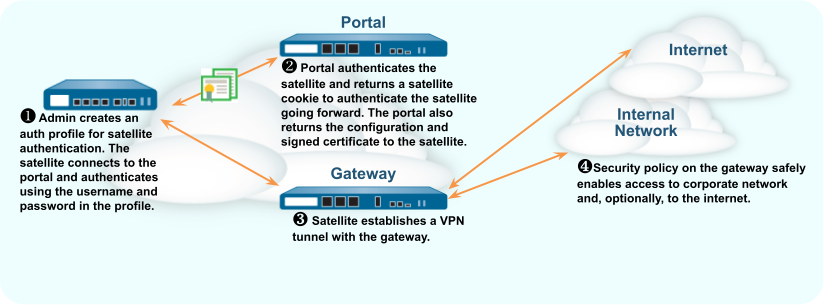
To register with the LSVPN, each satellite must establish an SSL/TLS connection with
the portal. After establishing the connection, the portal authenticates the
satellite to ensure that it is authorized to join the LSVPN. After successfully
authenticating the satellite, the portal will issue a server certificate for the
satellite and push the LSVPN configuration specifying the gateways to which the
satellite can connect and the root CA certificate required to establish an SSL
connection with the gateways.
There are multiple ways that the satellite can
authenticate to the portal during its initial connection:
- (PAN-OS 10.0 and earlier releases) Serial number Authentication—You can configure the portal with the serial number of the satellite firewalls that are authorized to join the LSVPN. During the initial satellite connection to the portal, the satellite presents its serial number to the portal and if the portal has the serial number in its configuration, the satellite will be successfully authenticated. You add the serial numbers of authorized satellites when you configure the portal. See Configure the Portal.
- (PAN-OS 10.1 and later releases) (Default authentication method) Username/password and Satellite Cookie Authentication —For the satellite to authenticate to the portal during its initial connection, you must create an authentication profile for the portal LSVPN configuration. The satellite administrator must manually authenticate the satellite to the portal to establish the first connection. Upon successful authentication, the portal returns a satellite cookie to authenticate the satellite on subsequent connections. The satellite cookie that the portal issues has a lifetime of 6 months, by default. When the cookie expires, the satellite administrator must manually authenticate again, at which time the portal will issue a new cookie.
- (PAN-OS 10.2.8 and later 10.2 releases) (PAN-OS 11.1.3 and later releases) Serial number and IP address Authentication—You can configure the portal with the serial number and IP address of the satellite firewalls that are authorized to join the LSVPN. During the initial satellite connection to the portal, the satellite presents its serial number and IP address to the portal and if the portal has the serial number and IP address in its configuration, the satellite will be successfully authenticated. You add the serial numbers of authorized satellites when you configure the portal.
PAN-OS releases support the following
authentication methods:
| PAN-OS RELEASE | SUPPORTED AUTHENTICATION METHOD |
|---|---|
| PAN-OS 10.0 and earlier releases | Serial number Authentication method |
| PAN-OS 10.1 and later releases | Username/password and Satellite Cookie Authentication method
(Default authentication method) While configuring the Username/password and
Satellite Cookie Authentication method, configure the satellite
cookie expiration to a value more than the satellite upgrade
time to avoid login failures. |
| PAN-OS 10.2.8 and later 10.2 releases, PAN-OS 11.1.3 and later releases |
|
Before upgrading or downgrading to a
particular PAN-OS release, be aware of the authentication methods supported.
Refer to Upgrade and Downgrade Considerations to
learn about the authentication method supported when you upgrade or downgrade the
firewall from one PAN-OS release to another.
(PAN-OS
10.1.7 and later 10.1 releases)(PAN-OS 10.2.4 and later 10.2
releases)(PAN-OS
11.0.1 and later releases) You can configure the cookie expiry period from
1 to 5 years, while the default remains as 6 months.
On the
portal:
- Use the request global-protect-portal set-satellite-cookie-expiration value <1-5> CLI command to change the current satellite cookie expiration time.
- Use the show global-protect-portal satellite-cookie-expiration CLI command to view the current satellite cookie expiration time.
On the satellite:
- Use the show global-protect-satellite satellite CLI command to view (in “Satellite Cookie Generation Time” field) the current satellite authentication cookie's generation time.
Username/Password and Satellite Cookie Authentication (Default Authentication Method)
For authenticating the satellite to the portal, GlobalProtect LSVPN supports only
local database authentication.
The following workflow describes how to set up the portal to authenticate
satellites against an existing authentication service.
- Set up local database authentication so that the satellite administrator can authenticate the satellite to the portal.
- Select and Add the user account to the local database.Add the user account to the local database.Configure an authentication profile.
- Select .Enter a Name for the profile and then set the Type to Local Database.Click OK and Commit your changes.Authenticate the satellite.To authenticate the satellite to the portal, the satellite administrator must provide the username and password configured in the local database.
- Select and click the Gateway Info link in the Status column of the tunnel configuration you created for the LSVPN.Click the enter credentials link in the Portal Status field and provide the username and password to authenticate the satellite to the portal.After the portal successfully authenticates to the portal for the first time, the portal generates a satellite cookie, which it uses to authenticate the satellite on subsequent sessions.
Serial Number and IP Address Authentication Method
(PAN-OS 10.2.8 and later 10.2 releases) (PAN-OS 11.1.3 and later releases) The Serial number and IP address Authentication method will be established successfully only when you configure the necessary parameters correctly and in the correct order.The following table provides you with the details on how your parameter settings impact the establishment of Serial number and IP address authentication:Serial Number and IP Address Authentication Method Configured retry-interval (Default is 5 seconds) Serial Number IP Address in Allow List Satellite Cookie Established Authentication Method EnabledThe retry-interval value is greater than or equal to 5 Registered Allowed Will not be checked Serial number and IP address Authentication method will be established successfully. EnabledThe retry-interval value is greater than or equal to 5 Registered Not Allowed Will not be checked Fails to establish Serial number and IP address Authentication. EnabledThe retry-interval value is greater than or equal to 5 Not Registered Will not be checked Will not be checked Fails to establish Serial number and IP address Authentication. Disabled The retry-interval will not be checked Will not be checked Will not be checked Default behavior The default authentication method, Username/password and Satellite Cookie Authentication method will be established successfully. The satellite initiates a connection to the portal upon successful configuration of the satellite serial number registered and the satellite device IP address in the satellite IP allow list on the portal. You should also ensure that the portal is running PAN-OS 10.2.8 or later versions, or PAN-OS 11.1.3 or later versions before configuring Serial number and IP address Authentication on the portal.We don't support broadcast, multicast, loopback, zeronet IPv4 and IPv6 addresses for the serial number and IP address authentication method.In the LSVPN serial number and IP address authentication method, PAN-OS stores the configuration changes in the database internally. Therefore, the latest saved configuration is applied when you upgrade to or downgrade from this feature.Use the following workflow to authenticate the satellite using the Serial number and IP address Authentication method.- Log in to the portal web interface and select to add a new satellite serial number to the GlobalProtect portal. Commit the configuration.Access the CLI.You can't access the Serial number and IP address Authentication related CLIs from the Panorama.Follow the below steps in the same order to configure the parameters related to Serial number and IP address Authentication on a firewall configured as a GlobalProtect portal. Otherwise, the satellite authentication might fail and an administrator's intervention is required to enter the username and password on the satellite.
- Enter the following operational command per portal to add a satellite device IP address on the GlobalProtect portal.Configure a specific IP address, subnet, or a range to add one or more satellite devices. Both IPv4 and IPv6 addresses are supported.
username@hostname> set global-protect global-protect-portal portal <portal_name> satellite-serialnumberip-auth satellite-ip-allowlist entry <value>Where <value> is the IPv4 address, IPv6 address, IP range, or IP subnet of the satellite device that you want to add.For example:username@hostname> set global-protect global-protect-portal portal gp-portal-1 satellite-serialnumberip-auth satellite-ip-allowlist entry 192.0.2.0-192.0.2.100You can also exclude a specific range of IP address from the satellite-ip-allowlist that you don't wish to configure as a satellite. To do this, use the following command:username@hostname> set global-protect global-protect-portal portal <portal_name> satellite-serialnumberip-auth satellite-ip-exclude-from range <ip-address> exclude-list <value>Where satellite-ip-exclude-from range <ip-address> is the IPv4 or IPv6 subnet or range of the IP address that you want to exclude from configuring as a satellite device. The IP address that you want to exclude must be within the IP address range that you configured in the satellite-ip-allowlist.For example:username@hostname> set global-protect global-protect-portal portal gp-portal-1 satellite-serialnumberip-auth satellite-ip-exclude-from range 192.0.2.0-192.0.2.100 exclude-list 192.0.2.20-192.0.2.30We support the following IP4 and IPv6 address formats to configure the satellite-ip-allowlist.Supported IPv4 and IPv6 Address Formats IP Address FormatIPv4 AddressIPv6 AddressA specific IP addressx.x.x.xFor example:192.0.2.0xxxx:xxxx:xxxx:xxxx:xxxx:xxxx:xxxx:xxxxFor example:2001:db8::IP address subnetx.x.x.x/xFor example:192.0.2.0/24xxxx:xxxx:xxxx:xxxx:xxxx:xxxx:xxxx:xxxx/yFor example:2001:db8::/32IP address rangex.x.x.x-x.x.x.xFor example:192.0.2.10-192.0.2.20xxxx:xxxx:xxxx:xxxx:xxxx:xxxx:xxxx:xxxx-xxxx:xxxx:xxxx:xxxx:xxxx:xxxx:xxxx:xxxx(HA deployments only) The added satellite IP address list is synchronized among the HA peers.- Ensure that Enable Config Sync (select ) is enabled on your HA configuration to configure the Serial number and IP address Authentication method. This setting is required to synchronize the two firewall configurations (that is enabled by default).
- You must add the satellite device serial number first that allows the portal to select the correct satellite configuration.
- If the satellite devices in the HA pair use different IP addresses, then configure both the IP addresses in the satellite IP allow list on the portal.
Enter the following operational command per portal to configure a retry interval for the serial number and IP address authentication in case of failure in establishing the authentication method.username@hostname> set global-protect global-protect-portal portal <name> satellite-serialnumberip-auth retry-interval <value>The retry interval range is 5 to 86,400 seconds and the default value is 5 seconds.For example:username@hostname> set global-protect global-protect-portal portal gp-portal-1 satellite-serialnumberip-auth retry-interval 100(HA deployments only) The authentication retry interval is synchronized among the HA peers.Enter the following operational command to enable the serial number and IP address authentication method on the firewall where you want to enable the Serial number and IP address Authentication method.username@hostname> set global-protect satellite-serialnumberip-auth enableThe serial number and IP address authentication method is disabled by default.When the Serial number and IP address Authentication is enabled and if the satellite authentication fails, then based on the retry interval, the satellite will retry the authentication process again. There is no fall back mechanism available to support Username/Password and Satellite Cookie based authentication in case of failure in configuring the Serial number and IP address Authentication method.If attempting to enable the Serial number and IP address Authentication method results in failure, check for the following:- Whether the portal is running PAN-OS 10.2.8 or later versions, or PAN-OS 11.1.3 or later versions.
- Whether you have added the satellite device's IP address to the satellite IP allow list on the GlobalProtect portal.
- Whether you have configured the satellite's serial number in .
Enter any random username and password (or just press enter) in the pop-up dialog on the satellite to retrigger the authentication process in the following cases:- (PAN-OS 10.2.8 and later 10.2 versions) A scenario where the portal is running PAN-OS 10.2.8 and the satellite is running version earlier to 10.2.8, and the satellite cookie has expired. In this case, when you attempt to enable the Serial number and IP address Authentication method without adding the satellite IP address in the satellite IP allow list on the portal, satellite authentication fails. The failure is due to a missing IP address in the satellite IP allow list.
- (PAN-OS 10.2.8 and later 10.2 versions) A scenario where the satellite is running version earlier to 10.2.8 and the portal is upgraded to PAN-OS 10.2.8. In the meantime, the satellite cookie expires before enabling the Serial number and IP address Authentication method on the portal. Then satellite authentication fails due to satellite cookie expiration.
- (PAN-OS 11.1.3 or later versions) A scenario where the portal is running PAN-OS 11.1.3 and the satellite is running version earlier to 11.1.3, and the satellite cookie has expired. In this case, when you attempt to enable the Serial number and IP address Authentication method without adding the satellite IP address in the satellite IP allow list on the portal, satellite authentication fails. The failure is due to a missing IP address in the satellite IP allow list.
- (PAN-OS 11.1.3 or later versions) A scenario where the satellite is running version earlier to 11.1.3 and the portal is upgraded to PAN-OS 11.1.3. In the meantime, the satellite cookie expires before enabling the Serial number and IP address Authentication method on the portal. Then satellite authentication fails due to satellite cookie expiration.
(HA deployments only) The serial number and IP address authentication method that is enabled is synchronized among the HA peers.(Optional) Use the following operational commands to disable, delete, or view information about the serial number and IP address authentication method.- Enter the following command to disable the serial number and IP address authentication method on the firewall.
username@hostname> set global-protect satellite-serialnumberip-auth disable(HA deployments only) The serial number and IP address authentication method that is disabled is synchronized among the HA peers.Enter the following command to view all the information related to the serial number and IP address authentication method on the portal.username@hostname> show global-protect-portal global-protect-portal portal <name> satellite-serialnumberip-auth allEnter the following command to view if the serial number and IP address authentication method is enabled or disabled on the firewall configured as a portal.username@hostname> show global-protect-portal satellite-serialnumberip-auth statusEnter the following command per portal to view the serial number and IP address retry interval.username@hostname> show global-protect-portal global-protect-portal portal <name> satellite-serialnumberip-auth retry-intervalEnter the following command per portal to view all the configured allowed satellite device IP addresses.This command displays both the IPv4 and IPv6 addresses that you have configured as a satellite IP allowed list in a sorted order.username@hostname> show global-protect-portal global-protect-portal portal <name> satellite-serialnumberip-auth satellite-ip-allowlistEnter the following command per portal to delete a satellite device IP address from the satellite IP allow list.username@hostname> delete global-protect global-protect-portal portal <portal_name> satellite-ip-list allowlist-entry ip-address <value>Where <value> is the IPv4 address, IPv6 address, IP address range, or IP address subnet of the satellite device you want to delete.(HA deployments only) The deleted satellite devices IP address from the satellite IP allow list is synchronized among the HA peers.Enter the following command per portal to delete a satellite device IP address from the satellite IP exclude list. You can delete only the entries that are added in the IP address exclude list. By deleting the entries from the exclude list, you are allowing these IP addresses to be configured in the satellite IP allow list.username@hostname> delete global-protect global-protect-portal portal <portal_name> satellite-ip-list excludelist-entry ip <value>Where <value> is the IPv4 address, IPv6 address, IP address range, or IP address subnet of the satellite device you want to delete from the exclude list entry.(HA deployments only) The deleted satellite devices IP address from the satellite IP exclude list is synchronized among the HA peers.Enter the following command per portal to delete all the satellite devices IP address from the satellite IP allow list.username@hostname> delete global-protect global-protect-portal portal <name> satellite-ip-list satellite-ip-allowlist-all(HA deployments only) The deleted satellite IP address list is synchronized among the HA peers.
