GlobalProtect
Configure HIP-Based Policy Enforcement
Table of Contents
Configure HIP-Based Policy Enforcement
To enable the use of host information in policy
enforcement, you must complete the following steps. For more information
on the HIP feature, see About
Host Information.
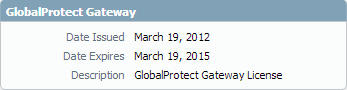
- Verify proper licensing for HIP checks.
![]() To use the HIP feature, you must purchase and install a GlobalProtect subscription license on each gateway that will perform HIP checks. To verify the status of your licenses on each portal and gateway, select .Contact your Palo Alto Networks Sales Engineer or Reseller if you do not have the required licenses. For more information on licensing, see About GlobalProtect Licenses.
To use the HIP feature, you must purchase and install a GlobalProtect subscription license on each gateway that will perform HIP checks. To verify the status of your licenses on each portal and gateway, select .Contact your Palo Alto Networks Sales Engineer or Reseller if you do not have the required licenses. For more information on licensing, see About GlobalProtect Licenses. - (Optional)
Define any custom host information that you want the app to collect.
For example, if you have any required applications that are not
included in the Vendor and/or Product lists for creating HIP objects,
you could create a custom check that allows you to determine whether
that application is installed (has a corresponding registry or plist
key) or is running (has a corresponding running process).Step 2 and 3 assume that you have already configured a GlobalProtect portal. If you have not yet configured your portal, see Set Up Access to the GlobalProtect Portal for instructions.
![]()
- On the firewall hosting your GlobalProtect portal, select .
- Select the portal configuration that you want to modify.
- On the Agent tab, select the agent configuration to which you want to add a custom HIP check, or Add a new one.
- Select Data Collection, and then enable the option to Collect HIP Data.
- Under Custom Checks, define
the following data that you want to collect from hosts running this
agent configuration:
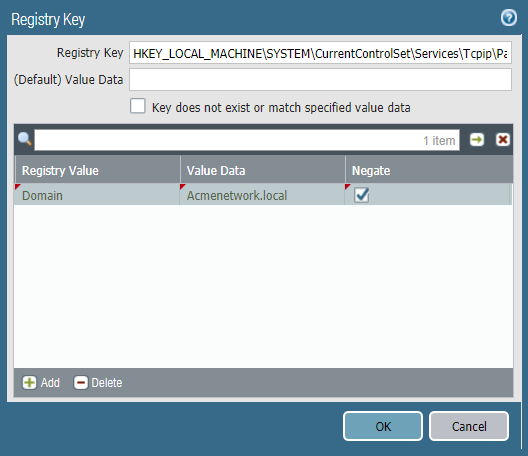
- To collect information about specific registry keys: On the Windows tab, Add the name of a Registry Key for which to collect data in the Registry Key area. To restrict data collection to a specific Registry Value, Add and then define the specific registry value(s). Click OK to save the settings.
- To collect information about running processes: Select the appropriate tab (Windows or Mac) and then Add a process to the Process List. Enter the name of the process that you want the app to collect information about.
- To collect information about specific property lists: On the Mac tab, Add the Plist for which to collect data. To restrict the data collection to specific key values, Add the Key values. Click OK to save the settings.
- If this is a new agent configuration, Define the GlobalProtect Agent Configurations as desired.
- Click OK to save the configuration.
- Commit the changes.
- (Optional)
Exclude categories from collection.
- On the firewall that is hosting your GlobalProtect portal, select .
- Select the portal configuration that you want to modify.
- On the Agent tab, select the agent configuration from which to exclude categories, or Add a new one.
- Select Data Collection, and then verify that Collect HIP Data is enabled.
- Under Exclude Categories, Add a new exclude category.
- Select the Category you want to exclude from the drop-down.
- (Optional) If you want to exclude specific vendors and/or products within the selected category rather than excluding the entire category, click Add. On the Edit Vendor dialog, select the Vendor that you want to exclude, and then click Add to exclude specific products from that vendor. When you are done defining that vendor, click OK. You can add multiple vendors and products to the exclude list.
- Repeat steps 5-7 for each category that you want to exclude.
- If this is a new agent configuration, Define the GlobalProtect Agent Configurations as desired.
- Click OK to save the configuration.
- Commit the changes.
- Create
the HIP objects to filter the raw host data collected by the app.The best way to determine what HIP objects you need is to determine how you will use the host information you collect to enforce policy. Keep in mind that the HIP objects themselves are merely building blocks that allow you to create the HIP profiles that are used in your security policies. Therefore, you may want to keep your objects simple, matching on one item, such as the presence of a particular type of required software, membership in a specific domain, or the presence of a specific OS. By doing this, you will have the flexibility to create a very granular (and very powerful) HIP-augmented policy.For details on a specific HIP category or field, refer to the online help.
- On the firewall that is hosting your GlobalProtect gateway(s) (or on Panorama if you plan to share the HIP objects among multiple gateways), select , and then Add a new HIP object.
- Enter a Name for the object.
- Select the tab that corresponds to the category of
host information you are interested in matching against, and then
select the check box to enable the object to match against the category.
For example, to create an object that looks for information about
antivirus or anti-spyware software, select the Anti-Malware tab,
and then select the Anti-Malware check box
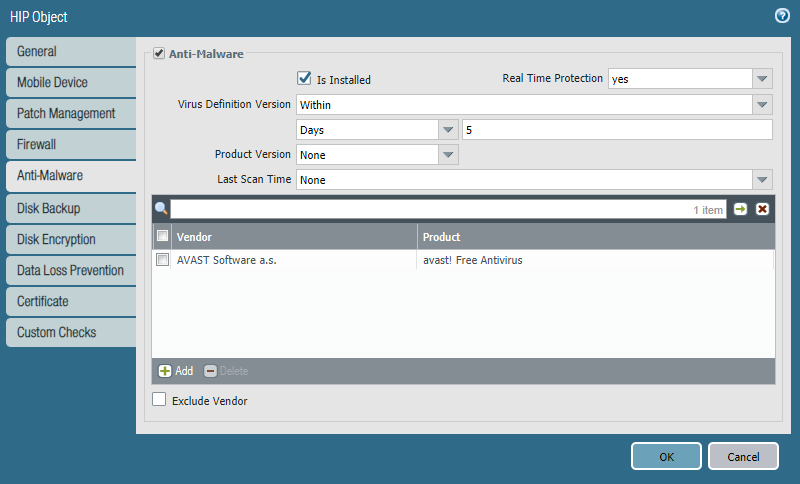
to enable the corresponding fields. Complete the fields to define
the desired matching criteria. For example, the following image
shows how to create a HIP object that matches if the endpoint has
the AVAST Free Antivirus software application installed, has Real Time
Protection enabled, and has virus definitions that have
been updated within the last 5 days.
![]() Repeat this step for each category you want to match against in this object. For more information, see Table: Data Collection Categories.
Repeat this step for each category you want to match against in this object. For more information, see Table: Data Collection Categories. - (Optional) Configure tags to match against
the ownership category or compliance status of the endpoint.For example, you can create a tag to match against employee-owned endpoints so that you can prevent users from accessing sensitive network resources on their personal endpoints.The User-ID agent for Windows queries the MDM server for the following information:
- Mobile device compliance status.
- Smart group (ownership category) to which the mobile device belongs.
The User-ID agent converts this information into tags that are incorporated into the HIP report. You can create HIP objects based on these tag values to enforce HIP-based security policies for the endpoints in your network. For more information, see Configure Windows User-ID Agent to Collect Host Information.- Select the Mobile Device check box to enable configuration of the Mobile Device settings.
- On the Device tab, select a match operator (such as Contains or Is Not) from the Tag drop-down.
- (Optional) When prompted, enter one of the following ownership category values:The ownership category indicates who owns the endpoint.
- Employee Owned
- Corporate-Dedicated
- Corporate-Shared
- (Optional) When prompted, enter one of the following compliance status values:The compliance status indicates whether the endpoint is compliant with the security policies you have defined.
- Compliant
- NonCompliant
- NotAvailable
![]()
- Click OK to save the HIP object.
- Repeat these steps to create each additional HIP object you require.
- Commit the changes.
- Create
the HIP profiles that you plan to use in your policies.When you create your HIP profiles, you can combine the HIP objects you previously created (as well as other HIP profiles) using Boolean logic, such that when a traffic flow is evaluated against the resulting HIP profile, it will either match or not match. If there is a match, the corresponding policy rule is enforced; if there is not a match, the flow is evaluated against the next rule, as with any other policy matching criteria.
- On the firewall that is hosting your GlobalProtect gateway(s) (or on Panorama if you plan to share the HIP profiles among multiple gateways), select , and then Add a new HIP profile.
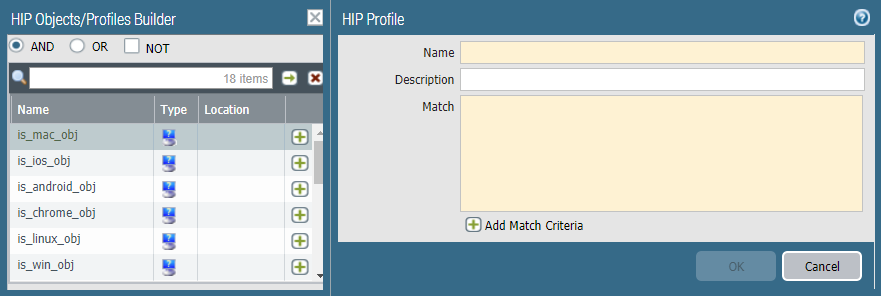
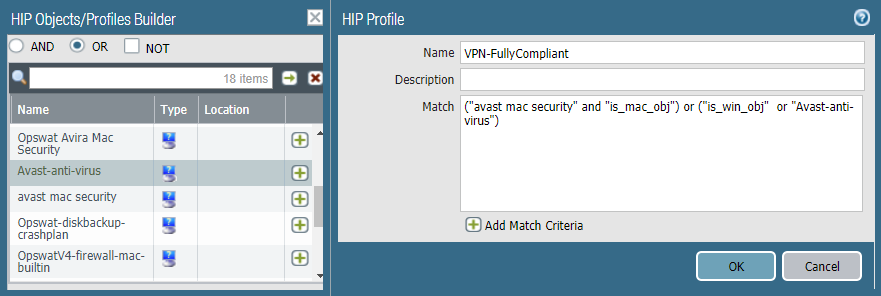
- Enter a Name and Description to identify the profile.
- Click Add Match Criteria to open the HIP Object/Profiles Builder.
- Select the HIP object or profile that you want to
use as match criteria, and then click the add icon () to move it to the Match text box on the HIP Profile dialog. If you want the HIP profile to evaluate the object as a match only when the criteria in the object is not true for a flow, select the NOT check box before adding the object.
![]()
![]()
- Continue adding match criteria for the profile that you are building, making sure to select the appropriate Boolean operator radio button (AND or OR) between each addition (and, again, using the NOT check box when appropriate). The HIP profile can be up to 2048 characters in length.
- If you are creating a complex Boolean expression,
you must manually add the parenthesis in the proper places in the Match text
box to ensure that the HIP profile is evaluated using the logic
you intend. For example, the following HIP profile matches traffic from
a host that has either FileVault disk encryption (for macOS systems)
or TrueCrypt disk encryption (for Windows systems), belongs to the
required Domain, and has a Symantec antivirus client installed:
![]()
- After you add all your match criteria, click OK to save the profile.
- Repeat these steps to create each additional HIP profile you require.
- Commit the changes.
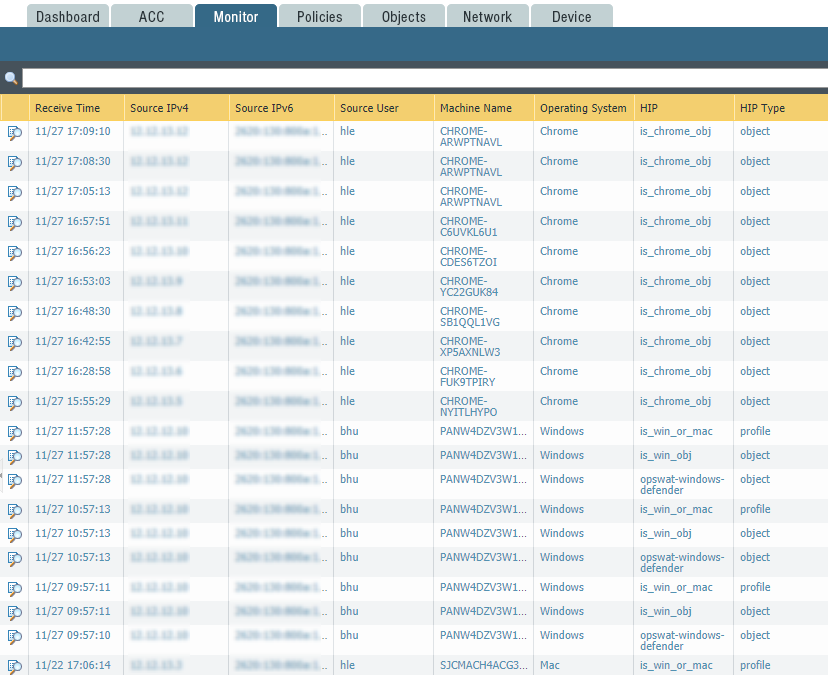
- Verify that the HIP objects and HIP profiles you created
match your GlobalProtect traffic as expected.Consider monitoring HIP objects and profiles as a means to monitor the security state and activity of your host endpoints. By monitoring the host information over time, you can better understand where your security and compliance issues are, which can guide you in creating useful policy. For more details, see How Do I Get Visibility into the State of the Endpoints?On the gateway(s) to which your GlobalProtect users are connecting, select . This log shows all of the matches identified by the gateway when evaluating the raw HIP data reported by the app against the defined HIP objects and HIP profiles. Unlike other logs, a HIP match does not require a security policy match in order to be logged.
![]()
- Enable
User-ID on the source zones containing the GlobalProtect users that
send requests requiring HIP-based access controls. You must enable User-ID
even if you do not plan on using the user identification feature,
otherwise the firewall cannot generate any HIP Match logs entries.
- Select .
- Click the Name of the zone on which you want to enable User-ID.
- Enable User Identification,
and then click OK.
![]()
- Create the HIP-enabled security rules on your gateway(s).As a best practice, you should create your security rules and test that they match the expected flows (based on the source and destination criteria) before adding your HIP profiles. By doing this, you can better determine the proper placement of the HIP-enabled rules within the policy.
- Select , and the select the rule to which you want to add a HIP profile.
- On the Source tab, make sure the Source Zone is a zone for which you enabled User-ID.
- On the User tab, Add the HIP Profiles used to identify users (you can add up to 63 HIP profiles to a rule).
- Click OK to save the rule.
- Commit the changes.
![]()
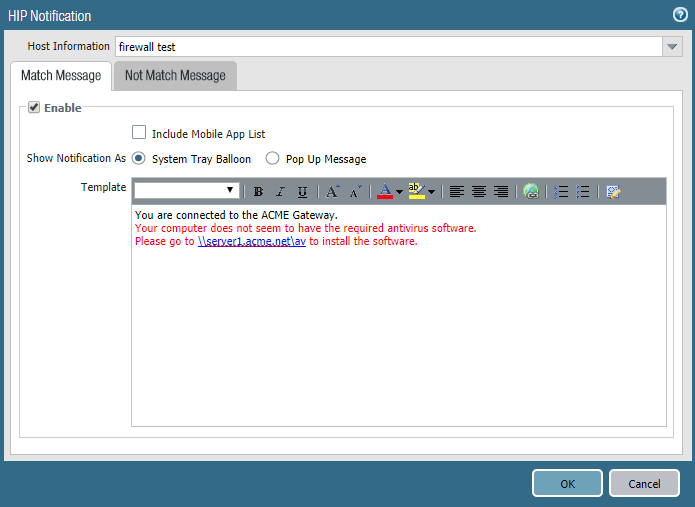
- Define the notification messages end-users see when a
security rule with a HIP profile is enforced.The decision as to when you want to display a notification message (that is, whether to display it when the user’s configuration matches a HIP profile in the policy or when it doesn’t match), depends largely on your policy and what a HIP match (or non-match) means for the user. That is, does a match mean they are granted full access to your network resources? Or does it mean they have limited access due to a non-compliance issue?For example, suppose you create a HIP profile that matches if the required corporate antivirus and anti-spyware software packages are not installed. In this case, you might want to create a HIP notification message for users who match the HIP profile, informing them that they need to install the software. Alternatively, if your HIP profile matches when those same applications are installed, you might want to create the message for users who do not match the profile.
- On the firewall hosting your GlobalProtect gateway(s), select .
- Select the gateway configuration for which you want to add HIP notification messages.
- Select , and then click Add.
- Select the HIP profile to which this message applies from the Host Information drop-down.
- Depending on whether you want to display the message when the corresponding HIP profile is matched or not matched, select Match Message or Not Match Message. In some cases, you might want to create messages for both a match and a non-match, depending on what objects you are matching and what your objectives are for the policy.
- Enable the Match Message or Not Match Message, and then select whether you want to display the message as a Pop Up Message or a System Tray Balloon.
- Enter your message text in the Template text
box, and then click OK. The text box provides
both a WYSIWYG view of the text and an HTML source view, which you
can toggle between using the Source Editicon. The toolbar also provides various options for formatting your text and creating hyperlinks
![]() to external documents (for example, linking users directly to the download URL for a required software program).
to external documents (for example, linking users directly to the download URL for a required software program).![]()
![]()
- Repeat this procedure for each message that you want to define.
- Commit the changes.
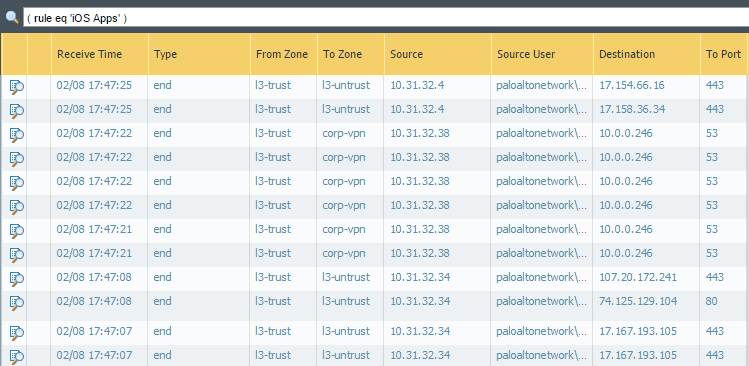
- Verify that your HIP profiles are working as expected.You can monitor the traffic that is hitting your HIP-enabled policies using the Traffic log:
- On the firewall that is hosting your gateway, select .
- Filter the log to display only the traffic that matches
the rule with the HIP profile you are interested in monitoring.
For example, to search for traffic that matches a security rule
named “iOS Apps” you would enter ( rule eq 'iOS Apps' ) in
the filter text box as follows:
![]()