GlobalProtect
GlobalProtect Multiple Gateway Configuration
Table of Contents
GlobalProtect Multiple Gateway Configuration
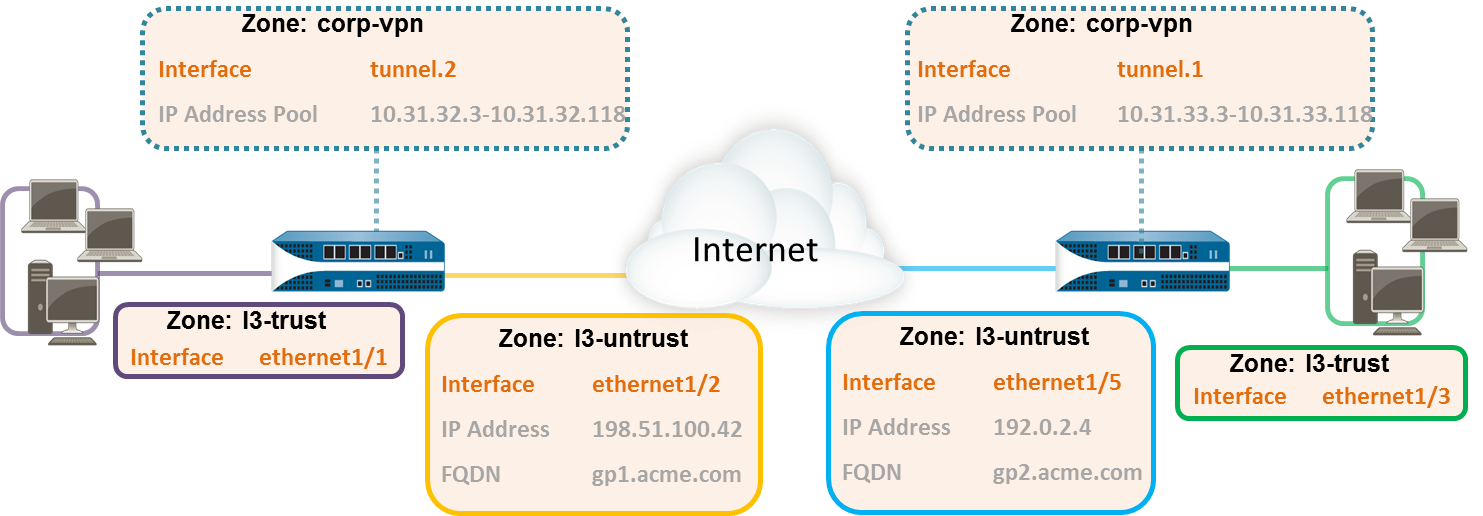
In the GlobalProtect
Multiple Gateway Topology below, a second external gateway
is added to the configuration. In this topology, you must configure
an additional firewall to host the second GlobalProtect gateway.
When you add the client configurations to be deployed by the portal,
you can also specify different gateways for different client configurations
or allow access to all gateways.
If a client configuration
contains more than one gateway, the app attempts to connect to all
gateways listed in its client configuration. The app uses priority
and response time to determine the gateway to which it will connect.
The app only connects to a lower priority gateway if the response
time for the higher priority gateway is greater than the average
response time across all gateways. For more information, see Gateway
Priority in a Multiple Gateway Configuration.
- Create
Interfaces and Zones for GlobalProtect.In this configuration, you must set up interfaces on each firewall hosting a gateway.Use the default virtual router for all interface configurations to avoid having to create inter-zone routing.On the firewall hosting the portal/gateway (gw1):
- Select , and then select ethernet1/2.
- Configure ethernet1/2 as a Layer 3 interface with an IP address of 198.51.100.42, and then assign it to the l3-untrust Security Zone and the default Virtual Router.
- Create a DNS “A” record that maps IP address 198.51.100.42 to gp1.acme.com.
- Select , and then Add the tunnel.2 interface. Add the interface to a new Security Zone called corp-vpn. Assign it to the default Virtual Router.
- Enable User Identification on the corp-vpn zone.
On the firewall hosting the second gateway (gw2):- Select , and then select ethernet1/5.
- Configure ethernet1/5 as a Layer 3 interface with an IP address of 192.0.2.4, and then assign it to the l3-untrust Security Zone and the default Virtual Router.
- Create a DNS “A” record that maps IP address 192.0.2.4 to gp2.acme.com.
- Select , and then Add the tunnel.1 interface. Add the interface to a new Security Zone called corp-vpn. Assign it to the default Virtual Router.
- Enable User Identification on the corp-vpn zone.
- Purchase and install a GlobalProtect subscription on
each gateway if your end-users will be using the GlobalProtect app
on their mobile endpoints or if you plan on using the HIP-enabled
security policy.After you purchase the GlobalProtect subscription and receive your activation code, install the license on the firewall hosting the portal, as follows:
- Select .
- Select Activate feature using authorization code.
- When prompted, enter the Authorization Code, and then click OK.
- Verify that the license was activated successfully:
![]()
- On each firewall hosting a GlobalProtect gateway, create
security policies.This configuration requires policy rules to enable traffic flow between the corp-vpn zone and the l3-trust zone to provide access to your internal resources ().
- Use the following recommendations to obtain server certificates
for each interface hosting your GlobalProtect portal and GlobalProtect
gateways:
- (On the firewall hosting the portal or portal/gateway) Import a server certificate from a well-known, third-party CA.
- (On a firewall hosting only a gateway) Use the root CA on the portal to generate a self-signed server certificate.
On each firewall hosting a portal/gateway or gateway, select to manage certificates as follows:- Obtain a server certificate for the interface hosting portal/gw1. Because the portal and the gateway are on the same interface, you must use the same server certificate. The CN of the certificate must match the FQDN, gp1.acme.com. To enable endpoints to connect to the portal without receiving certificate errors, use a server certificate from a public CA.
- Obtain a server certificate for the interface hosting gw2. Because this interface hosts only a gateway, you can use a self-signed certificate. The CN of the certificate must match the FQDN, gp2.acme.com.
- Define how you will authenticate users to the portal
and the gateways.You can use any combination of certificate profiles and/or authentication profiles as necessary to ensure the security of your portal and gateways. Portals and individual gateways can also use different authentication schemes. See the following sections for step-by-step instructions:
- Set Up External Authentication (authentication profile)
- Set Up Client Certificate Authentication (certificate profile)
- Set Up Two-Factor Authentication (token- or OTP-based)
You must then reference the certificate profile and/or authentication profiles that you define in the portal and gateway configurations. - Configure
a GlobalProtect Gateway.The following example shows the configuration for gp1 and gp2, as seen in GlobalProtect Multiple Gateway Topology.On the firewall hosting gp1, select . Configure the gateway settings as follows:Interface—ethernet1/2IP Address—198.51.100.42Server Certificate—GP1-server-cert.pem issued by GoDaddyTunnel Interface—tunnel.2IP Pool—10.31.32.3 - 10.31.32.118On the firewall hosting gp2, select . Configure the gateway settings as follows:Interface—ethernet1/2IP Address—192.0.2.4Server Certificate—self-signed certificate, GP2-server-cert.pemTunnel Interface—tunnel.1IP Pool—10.31.33.3 - 10.31.33.118
- Configure the GlobalProtect
Portals.Select . Configure the portal settings as follow:
- Set
Up Access to the GlobalProtect Portal:Interface—ethernet1/2IP Address—198.51.100.42Server Certificate—GP1-server-cert.pem issued by GoDaddy
- Define
the GlobalProtect Agent Configurations:The number of client configurations you create depends on your specific access requirements, including whether you require user/group-based policy and/or HIP-enabled policy enforcement.
- Set
Up Access to the GlobalProtect Portal:
- Deploy
the GlobalProtect Agent Software.Select .In this example, follow the procedure to Host App Updates on the Portal.
- Save the GlobalProtect configuration.Commit the configuration on the firewall hosting the portal and gateway(s).