Device Security
Set up Nuvolo for Integration
Table of Contents
Expand All
|
Collapse All
Device Security Docs
Set up Nuvolo for Integration
Set up Nuvolo for integration with Device Security through
Cortex XSOAR.
| Where Can I Use This? | What Do I Need? |
|---|---|
|
One of the following subscriptions:
One of the following Cortex XSOAR setups:
|
Nuvolo is preconfigured with most of what
you need to integrate with Device Security. The following steps explain
what you need to do to complete the Nuvolo configuration.
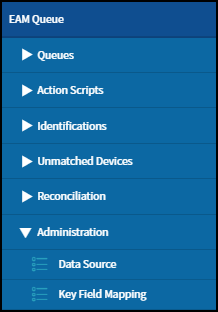
- Contact Nuvolo and request the creation of a user account to access the Nuvolo API.Because Nuvolo is an application that runs on the ServiceNow platform, only users with ServiceNow administrative rights can create users. The user account selected here must not have any roles or permissions granted to it.Log in to Nuvolo as a user with the system admin role, navigate to the EAM Queue module, and then click AdministrationData Source.
![]() In the list of data sources, click the Palo Alto Networks record to open it.
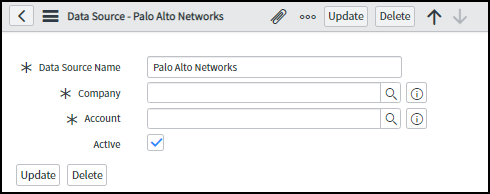
In the list of data sources, click the Palo Alto Networks record to open it.![]() The Palo Alto Networks Data Source record appears with empty Company and Account fields.
The Palo Alto Networks Data Source record appears with empty Company and Account fields.![]() Click the Lookup using list icon () next to the Company field to create or select the company vendor record for Palo Alto Networks.
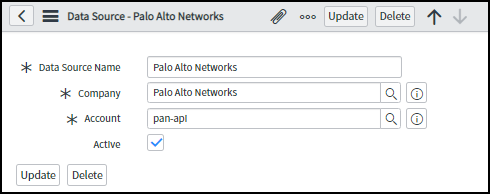
Click the Lookup using list icon () next to the Company field to create or select the company vendor record for Palo Alto Networks.![]() Click the Lookup using list icon () next to the Account field to select the user account record created for API access.
Click the Lookup using list icon () next to the Account field to select the user account record created for API access.![]()
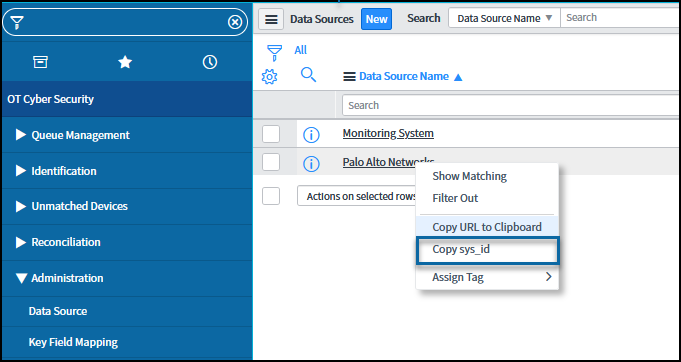
![]() After you make the company and account selections, click Update.Retrieve the source key for the data source record and record its value.To retrieve the value, enter the OT Cyber Security section, navigate to AdministrationData Source, right-click Palo Alto Networks, and then click Copy sys_id in the pop-up menu that appears.
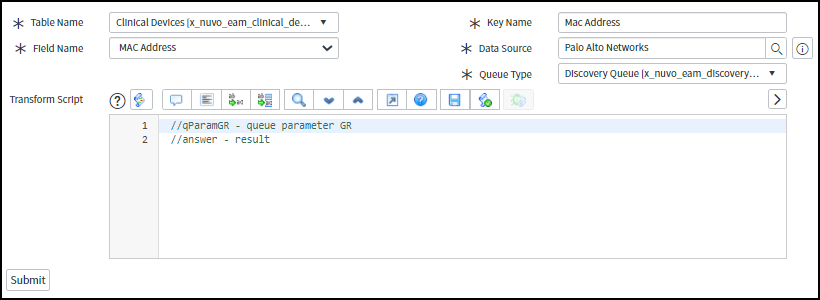
After you make the company and account selections, click Update.Retrieve the source key for the data source record and record its value.To retrieve the value, enter the OT Cyber Security section, navigate to AdministrationData Source, right-click Palo Alto Networks, and then click Copy sys_id in the pop-up menu that appears.![]() This copies the value to your computer’s clipboard. You will later enter this value in the Source Key field in Cortex XSOAR when configuring a Nuvolo instance.Link Device Security-sourced data with Nuvolo assets.To accomplish this critical element in the integration, configure Nuvolo to use the MAC address or serial number key fields in the key/data pairs it receives from Device Security in its discovery and security queues. In the EAM Queue section, click AdministrationKey Field MappingNew, enter the following, and then click Submit:Table Name: Clinical Devices [x_nuvo_eam_clinical_devices]Field Name: MAC AddressKey Name: Mac Address (This must be an exact match for the key name that XSOAR sends.)Data Source: Palo Alto NetworksQueue Type: Discovery Queue [x_nuvo_eam_discovery_queue]
This copies the value to your computer’s clipboard. You will later enter this value in the Source Key field in Cortex XSOAR when configuring a Nuvolo instance.Link Device Security-sourced data with Nuvolo assets.To accomplish this critical element in the integration, configure Nuvolo to use the MAC address or serial number key fields in the key/data pairs it receives from Device Security in its discovery and security queues. In the EAM Queue section, click AdministrationKey Field MappingNew, enter the following, and then click Submit:Table Name: Clinical Devices [x_nuvo_eam_clinical_devices]Field Name: MAC AddressKey Name: Mac Address (This must be an exact match for the key name that XSOAR sends.)Data Source: Palo Alto NetworksQueue Type: Discovery Queue [x_nuvo_eam_discovery_queue]![]() Repeat the previous step three more times to create a total of four key field mappings with the following settings:
Repeat the previous step three more times to create a total of four key field mappings with the following settings:Table Name Field Name Key Name Data Source Queue Type Clinical Devices [x_nuvo_eam_clinical_devices] MAC Address Mac Address Palo Alto Networks Discovery Queue [x_nuvo_discovery_queue] Clinical Devices [x_nuvo_eam_clinical_devices] Serial Number Serial Number Palo Alto Networks Discovery Queue [x_nuvo_discovery_queue] Clinical Devices [x_nuvo_eam_clinical_devices] MAC Address Mac Address Palo Alto Networks Security Queue [x_nuvo_security_queue] Clinical Devices [x_nuvo_eam_clinical_devices] Serial Number Serial Number Palo Alto Networks Security Queue [x_nuvo_security_queue] Nuvolo provides several predefined action scripts specifically for Device Security:- The scripts in the Discovery Queue add new Device Security-discovered devices to the asset inventory in Nuvolo and update existing assets with Device Security-provided details. The two action scripts in the Discovery Queue that add devices and update assets are titled Palo Alto Networks – Create Device and Palo Alto Networks – Update device automatically if identified by trusted identifier.To see newly added and updated assets in the Nuvolo interface, click Clinical Asset ManagementInventoryDevices.
- The action script in the Security Queue is titled Palo Alto Networks – Create Alert, map devices, & create WOs.To see alerts and vulnerabilities sent to Nuvolo from Device Security, click OT Cyber SecurityQueue ManagementSecurity Queue.To see work orders for security events sent from Device Security, click Clinical Asset ManagementWork OrdersAll.

