Use XFF IP Address Values in Security Policy and Logging
Table of Contents
Use XFF IP Address Values in Security Policy and Logging
Configure your firewall to use X-Forwarded For IP address
values in Security Policy and logging.
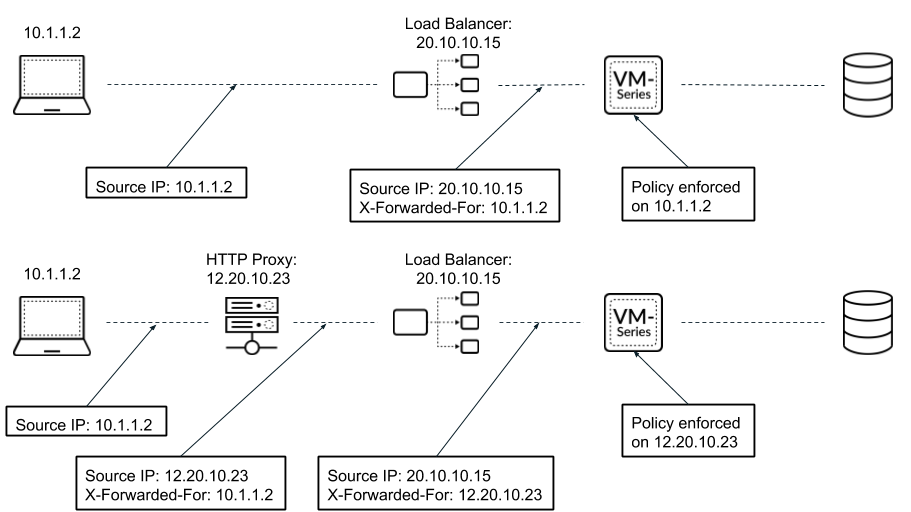
You can configure the firewall to use the
source IP address in an X-Forwarded-For (XFF) HTTP header
field to enforce security policy. When a packet passes through
a single proxy server before reaching the firewall, the XFF field
contains the IP address of the originating endpoint. However, if the
packet passes through multiple upstream devices, the firewall uses
the most recently added IP address to enforce policy or use other
features that rely on IP information.
- Use XFF Values in Policy
- Display XFF Values in Logs
- Display XFF Values in Reports
Use XFF Values in Policy
Complete the following procedure to enforce
security policy using the client IP address in the XFF header.
In
Microsoft Azure, by default, an application gateway inserts the original
source IP address and port in the XFF header. To use XFF headers
in policy on your firewall, you must configure the application gateway
to omit the port from the XFF header. For more information, see Azure documentation.
- Log in to your firewall.
- Select .
- Click the edit icon.
- Select Enabled for Security Policy from the Use X-Forwarded-For Header drop-down.You cannot enable Use X-Forwarded-For Header for security policy and User-ID at the same time.

- (Optional) Select Strip X-Forwarded-For Header to remove the XFF field from outgoing HTTP requests.Selecting this option does not disable the use of XFF headers. The firewall strips the XFF field from client requests after using it to enforce policy and log IP addresses.
- Click OK.
- Commit your changes.

Display XFF Values in Logs
In addition to XFF header usage in security
policy, you can view the XFF IP address in various logs, reports,
and the Application Command Center (ACC) to aid in monitoring and
troubleshooting. You can add the X-Forwarded-For column to Traffic,
Threat, Data Filtering, and Wildfire Submissions logs.
For
non-URL Filtering logs, XFF IP logging is supported only when packet
capture is not enabled.
The X-Forwarded-For IP column does not display a value in the threat logs if
the firewall detects a threat before it inspects the XFF header, however, it
is present in the traffic logs provided the action for the relevant security
profile is configured for Allow or
Alert.
To
view the XFF IP address in your logs, complete the following steps.
- Log in to your firewall.
- Select .
- Select Traffic, Threat, Data Filtering, or Wildfire Submissions.
- Click the arrow to the right of any column header and select Columns.
- Select X-Forwarded-For IP to display the XFF IP in your log.

Display XFF Values in Reports
Predefined reports generated
by the firewall do not contain XFF values. However, the firewall
has built-in report templates that include XFF information. To view
XFF IP addresses in reports, follow the steps to generate reports
with the built-in templates.
- Log in to your firewall.
- Select .
- Click Load Template.
- Enter XFF into the search bar and click the search button to locate the built-in XFF report templates.
- Click Load.
- Configure your custom report. Click Time Frame, Sort By, and Group By to display the XFF information in the manner best suited to your needs.
- (Optional) Click Run Now to generate your report on demand instead of, or in addition to, a Scheduled Time.
