GlobalProtect
Customize the GlobalProtect App
Table of Contents
Customize the GlobalProtect App
The portal agent configuration allows you
to customize how your end users interact with the GlobalProtect
apps installed on their endpoints. You can customize the display
and behavior of the app, and define different app settings for the
different GlobalProtect agent configurations you create. For example,
you can specify the following:
- What menus and views users can access.
- Whether users can uninstall or disable the app (user-logon connect method only).
- Whether to display a welcome page upon successful login. You can also configure whether or not the user can dismiss the welcome page, and you can Customize the GlobalProtect Portal Login, Welcome, and Help Pages to explain how to use GlobalProtect within your environment.
- Whether the GlobalProtect app upgrades automatically or prompts users to upgrade manually.
- Whether to prompt users if multi-factor authentication is required to access sensitive network resources.
You
can also define app settings in the Windows Registry, Windows Installer (Msiexec),
and global macOS plist. Settings that are defined in the web interface (portal
agent configuration) take precedence over settings that are defined
in the Windows Registry, Msiexec, and macOS plist. For more details,
see Deploy
App Settings Transparently.
Some settings do
not have a corresponding portal configuration setting on the web
interface and must be configured using the Windows Registry, Msiexec,
or macOS plist. These settings are listed in the Customizable
App Settings as “Not in portal.”
The additional
settings that are available only through the Windows Registry, Msiexec,
or macOS plist enable you to customize options including, but not
limited to, the following:
- Specify whether the app prompts the end user for credentials when Windows SSO fails.
- Specify the default portal IP address (or hostname).
- Enable GlobalProtect to initiate a connection before the user logs into the endpoint.
- Deploy scripts that run before or after GlobalProtect establishes a connection or after GlobalProtect disconnects.
- Configure the GlobalProtect app to wrap third-party credentials on Windows endpoints, enabling SSO when using a third-party credential provider.
- Select the agent configuration that you want to customize.You can also configure most app settings from the Windows Registry, Windows Installer (Msiexec), and macOS plist. However, settings that are defined in the web interface take precedence over settings that are defined in the Windows Registry, Msiexec, and macOS plist. See Deploy App Settings Transparently for more details.
- Select .
- Select the portal on which you want to add the agent configuration, or Add a new one.
- On the Agent tab, select the agent configuration that you want to modify, or Add a new one.
- Select the App tab.The App Configurations area displays the app settings with default values that you can customize for each agent configuration. When you change the default behavior, the text color changes from gray to the default color.
- Specify the Connect Method that
an app uses for its GlobalProtect connection.Use the Pre-logon (Always On), Pre-logon then On-demand, or User-log on (Always On) connect method to access the network using an internal gateway.In the App Configurations area, select one of the following Connect Method options:
- User-logon (Always On)—The GlobalProtect app automatically connects to the portal as soon as the user logs in to the endpoint (or domain). When used in conjunction with SSO (Windows endpoints only), GlobalProtect login is transparent to the end user.On iOS endpoints, this setting prevents one-time password (OTP) applications from working because GlobalProtect forces all traffic to go through the tunnel.
- Pre-logon (Always On)—The GlobalProtect app authenticates the user and establishes a VPN tunnel to the GlobalProtect gateway before the user logs in to the endpoint. This option requires that you use an external PKI solution to pre-deploy a machine certificate to each endpoint that receives this configuration. See Remote Access VPN with Pre-Logon for details about pre-logon.
- On-demand (Manual user initiated connection)—Users must manually launch the app to connect to GlobalProtect. Use this connect method for external gateways only.
- Pre-logon then On-demand—Similar to the Pre-logon (Always On) connect method, this connect method (which requires Content Release version 590-3397 or later) enables the GlobalProtect app to authenticate the user and establish a VPN tunnel to the GlobalProtect gateway before the user logs in to the endpoint. Unlike the pre-logon connect method, after the user logs in to the endpoint, users must manually launch the app to connect to GlobalProtect if the connection is terminated for any reason. The benefit of this option is that you can allow users to specify a new password after their password expires or they forget their password, but still require users to manually initiate the connection after they log in.
- Specify whether to enforce GlobalProtect connections
for network access.To enforce GlobalProtect for network access, we recommend that you enable this feature only for users that connect in User-logon or Pre-logon modes. Users that connect in On-demand mode may not be able to establish a connection within the permitted grace periods.In the App Configurations area, configure any of the following options:
- To force all network traffic to traverse a GlobalProtect tunnel, set Enforce GlobalProtect Connection for Network Access to Yes. By default, GlobalProtect is not required for network access, meaning users can still access the internet when GlobalProtect is disabled or disconnected. To provide instructions to users before traffic is blocked, configure GlobalProtect to Displays Traffic Blocking Notification Message, and optionally specify when to display the message (Traffic Blocking Notification Delay).When Enforce GlobalProtect Connection for Network Access is enabled, you may want to consider allowing users to disable the GlobalProtect app with a passcode. The Enforce GlobalProtect Connection for Network Access feature enhances the network security by requiring a GlobalProtect connection for network access. On rare occasions, endpoints may fail to connect to the VPN and require remote administrative login for troubleshooting. By disabling the GlobalProtect app (for Windows or macOS) using the passcode provided by the administrator during the troubleshooting session, you can allow administrators to connect to your endpoint remotely.
- Configure exclusions for specific local IP addresses or network segments for network access by entering these IP addresses to Allow traffic to specified hosts/networks when Enforce GlobalProtect Connection for Network Access is enabled and GlobalProtect Connection is not established. Specify up to ten IP addresses or network segments for which you want to allow access when you enforce GlobalProtect for network access and GlobalProtect cannot establish a connection.This option requires a Content Release version of 8196-5685 or later.By configuring exclusions, you can improve the user experience by allowing users to access local resources when GlobalProtect is disconnected. For example, when GlobalProtect is not connected, GlobalProtect can allow access to link-local addresses. This allows a user to access a local network segment or broadcast domain.
- If your users must log in to a captive portal to access the internet, specify a Captive Portal Exception Timeout (sec) to indicate the amount of time (in seconds) within which users can log in to the captive portal (range is 0 to 3600 seconds; default is 0 seconds). If users do not log in within this time period, the captive portal login page times out and users will be blocked from using the network.To enable the GlobalProtect app to display a notification message when it detects a captive portal, set the Display Captive Portal Detection Message to Yes. In the Captive Portal Notification Delay (sec) field, enter the amount of time (in seconds) after which the GlobalProtect app displays this message (range is 1 to 120 seconds; default is 5 seconds). GlobalProtect initiates this timer after the captive portal has been detected but before the internet becomes reachable. You can also provide additional instructions by configuring a Captive Portal Detection Message.To automatically launch your default web browser upon captive portal detection so that users can log in to the captive portal seamlessly, in the Automatically Launch Webpage in Default Browser Upon Captive Portal Detection field, enter the fully qualified domain name (FQDN) or IP address of the website that you want to use for the initial connection attempt that initiates web traffic when the default web browser launches (maximum length is 256 characters). The captive portal then intercepts this website connection attempt and redirects the default web browser to the captive portal login page. If this field is empty (default), GlobalProtect does not launch the default web browser automatically upon captive portal detection.
These options require Content Release version 607-3486 or later. The Captive Portal Notification Delay requires Content Release version 8118-5277 or later. The Automatically Launch Webpage in Default Browser Upon Captive Portal Detection option requires Content Release version released on July 8th, 2019 or later. - Specify additional GlobalProtect connection settings.When single sign-on (SSO) is enabled (default), the GlobalProtect app uses the user’s Windows login credentials to automatically authenticate and connect to the GlobalProtect portal and gateway. This also allows the GlobalProtect app to wrap third-party credentials to ensure that Windows users can authenticate and connect even with a third-party credential provider.In the App Configurations area, configure any of the following options:
- (Windows and macOS only; macOS support requires Content Release version 8196-5685 or later) Set Use Single Sign-On (Windows) or Use Single Sign-On (macOS) to No to disable single sign-on.If you configure the GlobalProtect gateway to authenticate users through SAML authentication and also generate and accept cookies for authentication override, you must set the Use Single Sign-On option to No when the user’s Windows username is different from his or her SAML username (for example, the Windows username is “user” and the SAML username is “user123”) or if one username contains a fully qualified domain name (for example, the Windows username is “user” and the SAML username is “user@example.com”).
- Specify the amount of time (in hours) during which you want the GlobalProtect app to Automatically Use SSL When IPSec Is Unreliable (range is 0-168 hours). If you configure this option, the GlobalProtect app does not attempt to establish an IPSec tunnel during the specified time period. This timer initiates each time an IPSec tunnel goes down due to a tunnel keepalive timeout.If you accept the default value of 0, the app does not fall back to establishing an SSL tunnel if it can establish an IPSec tunnel successfully. It falls back to establishing an SSL tunnel only when the IPSec tunnel cannot be established.This option requires Content Release version released on July 8th, 2019 or later.
- Choose the SSL connection options for the GlobalProtect app. You can opt to enforce SSL connections only, disallow SSL connections, or allow the user to choose SSL or IPSec (default) depending on geo-location and network performance to provide the best user experience.In the App Configuration area, choose the Connect with SSL Only options you want to allow.This option requires Content Release version 8207-5750 or later.
- Yes—Require that all GlobalProtect clients connect using SSL only.
- No—Connect with the protocol configured on the gateway for the VPN connection. If the gateway configuration has enabled IPSec, then it will use IPSec for the VPN connection. If the gateway has SSL configured, then it will use SSL for the VPN connection.
- User can Change—Allow the user to change, whether they want to use SSL or stay with IPSec, on the GlobalProtect app.On the app, the user can select to enable Connect with SSL Only and to verify that the Protocol is SSL.
- Enter the Maximum Internal Gateway Connection Attempts to specify the number of times the GlobalProtect app can retry the connection to an internal gateway after the first attempt fails (range is 0-100; 4 or 5 is recommended; the default value of 0 indicates that the GlobalProtect app does not retry the connection). By increasing this value, you can enable the app to connect to an internal gateway that is temporarily down or unreachable but comes back up before the specified number of retries are exhausted. Increasing the value also ensures that the internal gateway receives the most up-to-date user and host information.
- Enter the GlobalProtect App Config Refresh Interval to specify the number of hours that the GlobalProtect portal waits before it initiates the next refresh of a client’s configuration (range is 1-168; default is 24).
- (Windows only) Depending on your security requirements, specify whether to Retain Connection on Smart Card Removal. By default, this option is set to Yes, meaning GlobalProtect retains the tunnel when a user removes a smart card containing a client certificate. To terminate the tunnel, set this option to No.This feature requires Content Release version 590-3397 or later.
- Configure an Automatic Restoration of VPN Connection Timeout to specify the action GlobalProtect takes when the tunnel is disconnected. Set this option to Yes to allow GlobalProtect to attempt to reestablish the connection after the tunnel is disconnected. Set this option to No to prevent GlobalProtect from attempting to reconnect after the tunnel is disconnected. Configure the Wait Time Between VPN Connection Restore Attempts to adjust the amount of time (in seconds) that GlobalProtect waits between attempts to restore the connection (range is 1 to 60 seconds; default is 5).With the Always On connect method, if a user switches from an external network to an internal network before the timeout value expires, GlobalProtect does not perform network discovery. As a result, GlobalProtect restores the connection to the last known external gateway. To trigger internal host detection, the user must select Refresh Connection from the settings menu on the GlobalProtect status panel.
- Configure
the menus and UI views that are available to users who have this
agent configuration.In the App Configurations area, configure any of the following options:
- If you want users to see only basic status information within
the application, set Enable Advanced View to No.
When you disable this option, users can view information from the
following tabs:
- General—Displays the username and portal(s) associated with the GlobalProtect account.
- Notification—Displays any GlobalProtect notifications.
- Connection—Lists the gateways configured for the GlobalProtect app and information about each gateway.
- Host Profile—Displays the endpoint data that GlobalProtect uses to monitor and enforce security policies using HIP.
- Troubleshooting—Displays information about the network configuration, route settings, active connections, and logs. You can also collect logs generated by GlobalProtect and set the logging level.
- If you want hide the GlobalProtect system tray icon on endpoints, set Display GlobalProtect Icon to No. When the icon is hidden, users cannot perform tasks such as changing saved passwords, rediscovering the network, resubmitting host information, viewing troubleshooting information, or initiating on-demand connections. However, HIP notification messages, login prompts, and certificate dialogs still display as necessary.
- To prevent users from performing network discovery, set the Enable Rediscover Network Option to No. When you disable this option, the Refresh Connection option is grayed out in the settings menu of the GlobalProtect status panel.
- To prevent users from manually resubmitting HIP data to the gateway, set Enable Resubmit Host Profile Option to No. This option, which is enabled by default, is useful in cases where HIP-based security policy prevents users from accessing resources because it allows the user to fix the compliance issue on the computer before resubmitting the HIP data.
- (Windows only) To allow GlobalProtect to display notifications in the system tray, set Show System Tray Notifications to Yes.
- To create a custom message to display to users when their passwords are about to expire, enter a Custom Password Expiration Message (LDAP Authentication Only). The maximum message length is 200 characters.
- To create a custom message to specify password policies or requirements when users change their Active Directory (AD) password, enter a Change Password Message. The maximum message length is 255 characters.
- If you want users to see only basic status information within
the application, set Enable Advanced View to No.
When you disable this option, users can view information from the
following tabs:
- Define what end users with this configuration can do
in their app.
- Set Allow User to Change Portal Address to No to disable the Portal field on the status panel of the GlobalProtect app. Because the user will not be able to specify the portal to which to connect, you must supply the default portal address in the Windows Registry (HKEY_LOCAL_MACHINE\SOFTWARE\PaloAlto Networks\GlobalProtect\PanSetup with key Portal) or the macOS plist (/Library/Preferences/com.paloaltonetworks.GlobalProtect.settings.plist with key Portal under dictionary PanSetup). For more information, see Deploy App Settings Transparently.
- To prevent users from dismissing the welcome page, set Allow User to Dismiss Welcome Page to No. When this option is set to Yes, the user can dismiss the welcome page and prevent GlobalProtect from displaying the page after subsequent logins.
- Specify whether users can disable the GlobalProtect app.The Allow User to Disable GlobalProtect option applies to agent configurations with the User-Logon (Always On) Connect Method. In user-logon mode, the app automatically connects as soon as the user logs in to the endpoint. This mode is sometimes referred to as “always on”, which is why the user must override this behavior to disable the GlobalProtect app.By default, this option is set to Allow, which permits users to disable GlobalProtect without providing a comment, passcode, or ticket number.If the GlobalProtect system tray icon is not visible, users cannot disable the GlobalProtect app. See Step 5 for more details.
- To prevent users with the user-logon connect method from disabling GlobalProtect, set Allow User to Disable GlobalProtect App to Disallow.
- To allow users to disable GlobalProtect only if they provide a passcode, set Allow User to Disable GlobalProtect App to Allow with Passcode. Then, in the Disable GlobalProtect App area, enter (and confirm) the Passcode that the end users must supply.
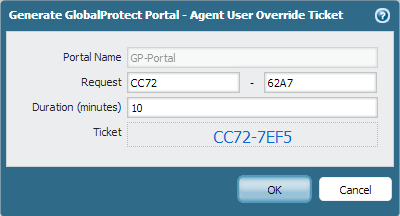
- To allow users to disable GlobalProtect only if they provide a ticket, set Allow User to Disable GlobalProtect to Allow with Ticket. With this option, the disable action triggers the app to generate a Request Number, which the end user must communicate to the administrator. The administrator then clicks Generate Ticket on the page and enters the request number from the user to generate the ticket. The administrator provides the ticket to the end user, who enters it into the Disable GlobalProtect dialog to disable the app.
![]()
- To limit the number of times users can disable the GlobalProtect app, specify the Max Times User Can Disable value in the Disable GlobalProtect App area. A value of 0 (default) indicates that users are not limited in the number of times they can disable the app.This setting is applicable only with the Allow, Allow with Comment, and Allow with Passcode disable options.If your users disable the GlobalProtect app the maximum number of times and must continue to have the ability to disable the app thereafter:
- You can increase the Max Times User Can Disable value in the GlobalProtect portal agent configuration (). The user must then select Refresh Connection from the settings menu of the GlobalProtect status panel or establish a new GlobalProtect connection in order for the new value to take effect.
- Users can reset the counter by reinstalling the app.
- To restrict the amount of time for which the app can be disabled, enter a Disable Timeout (min) value in the Disable GlobalProtect App area. A value of 0 (default) indicates that there is no restriction for how long the user can keep the app disabled.This setting is applicable only with the Allow, Allow with Comment, and Allow with Passcode disable options.
- Specify whether users can uninstall the GlobalProtect
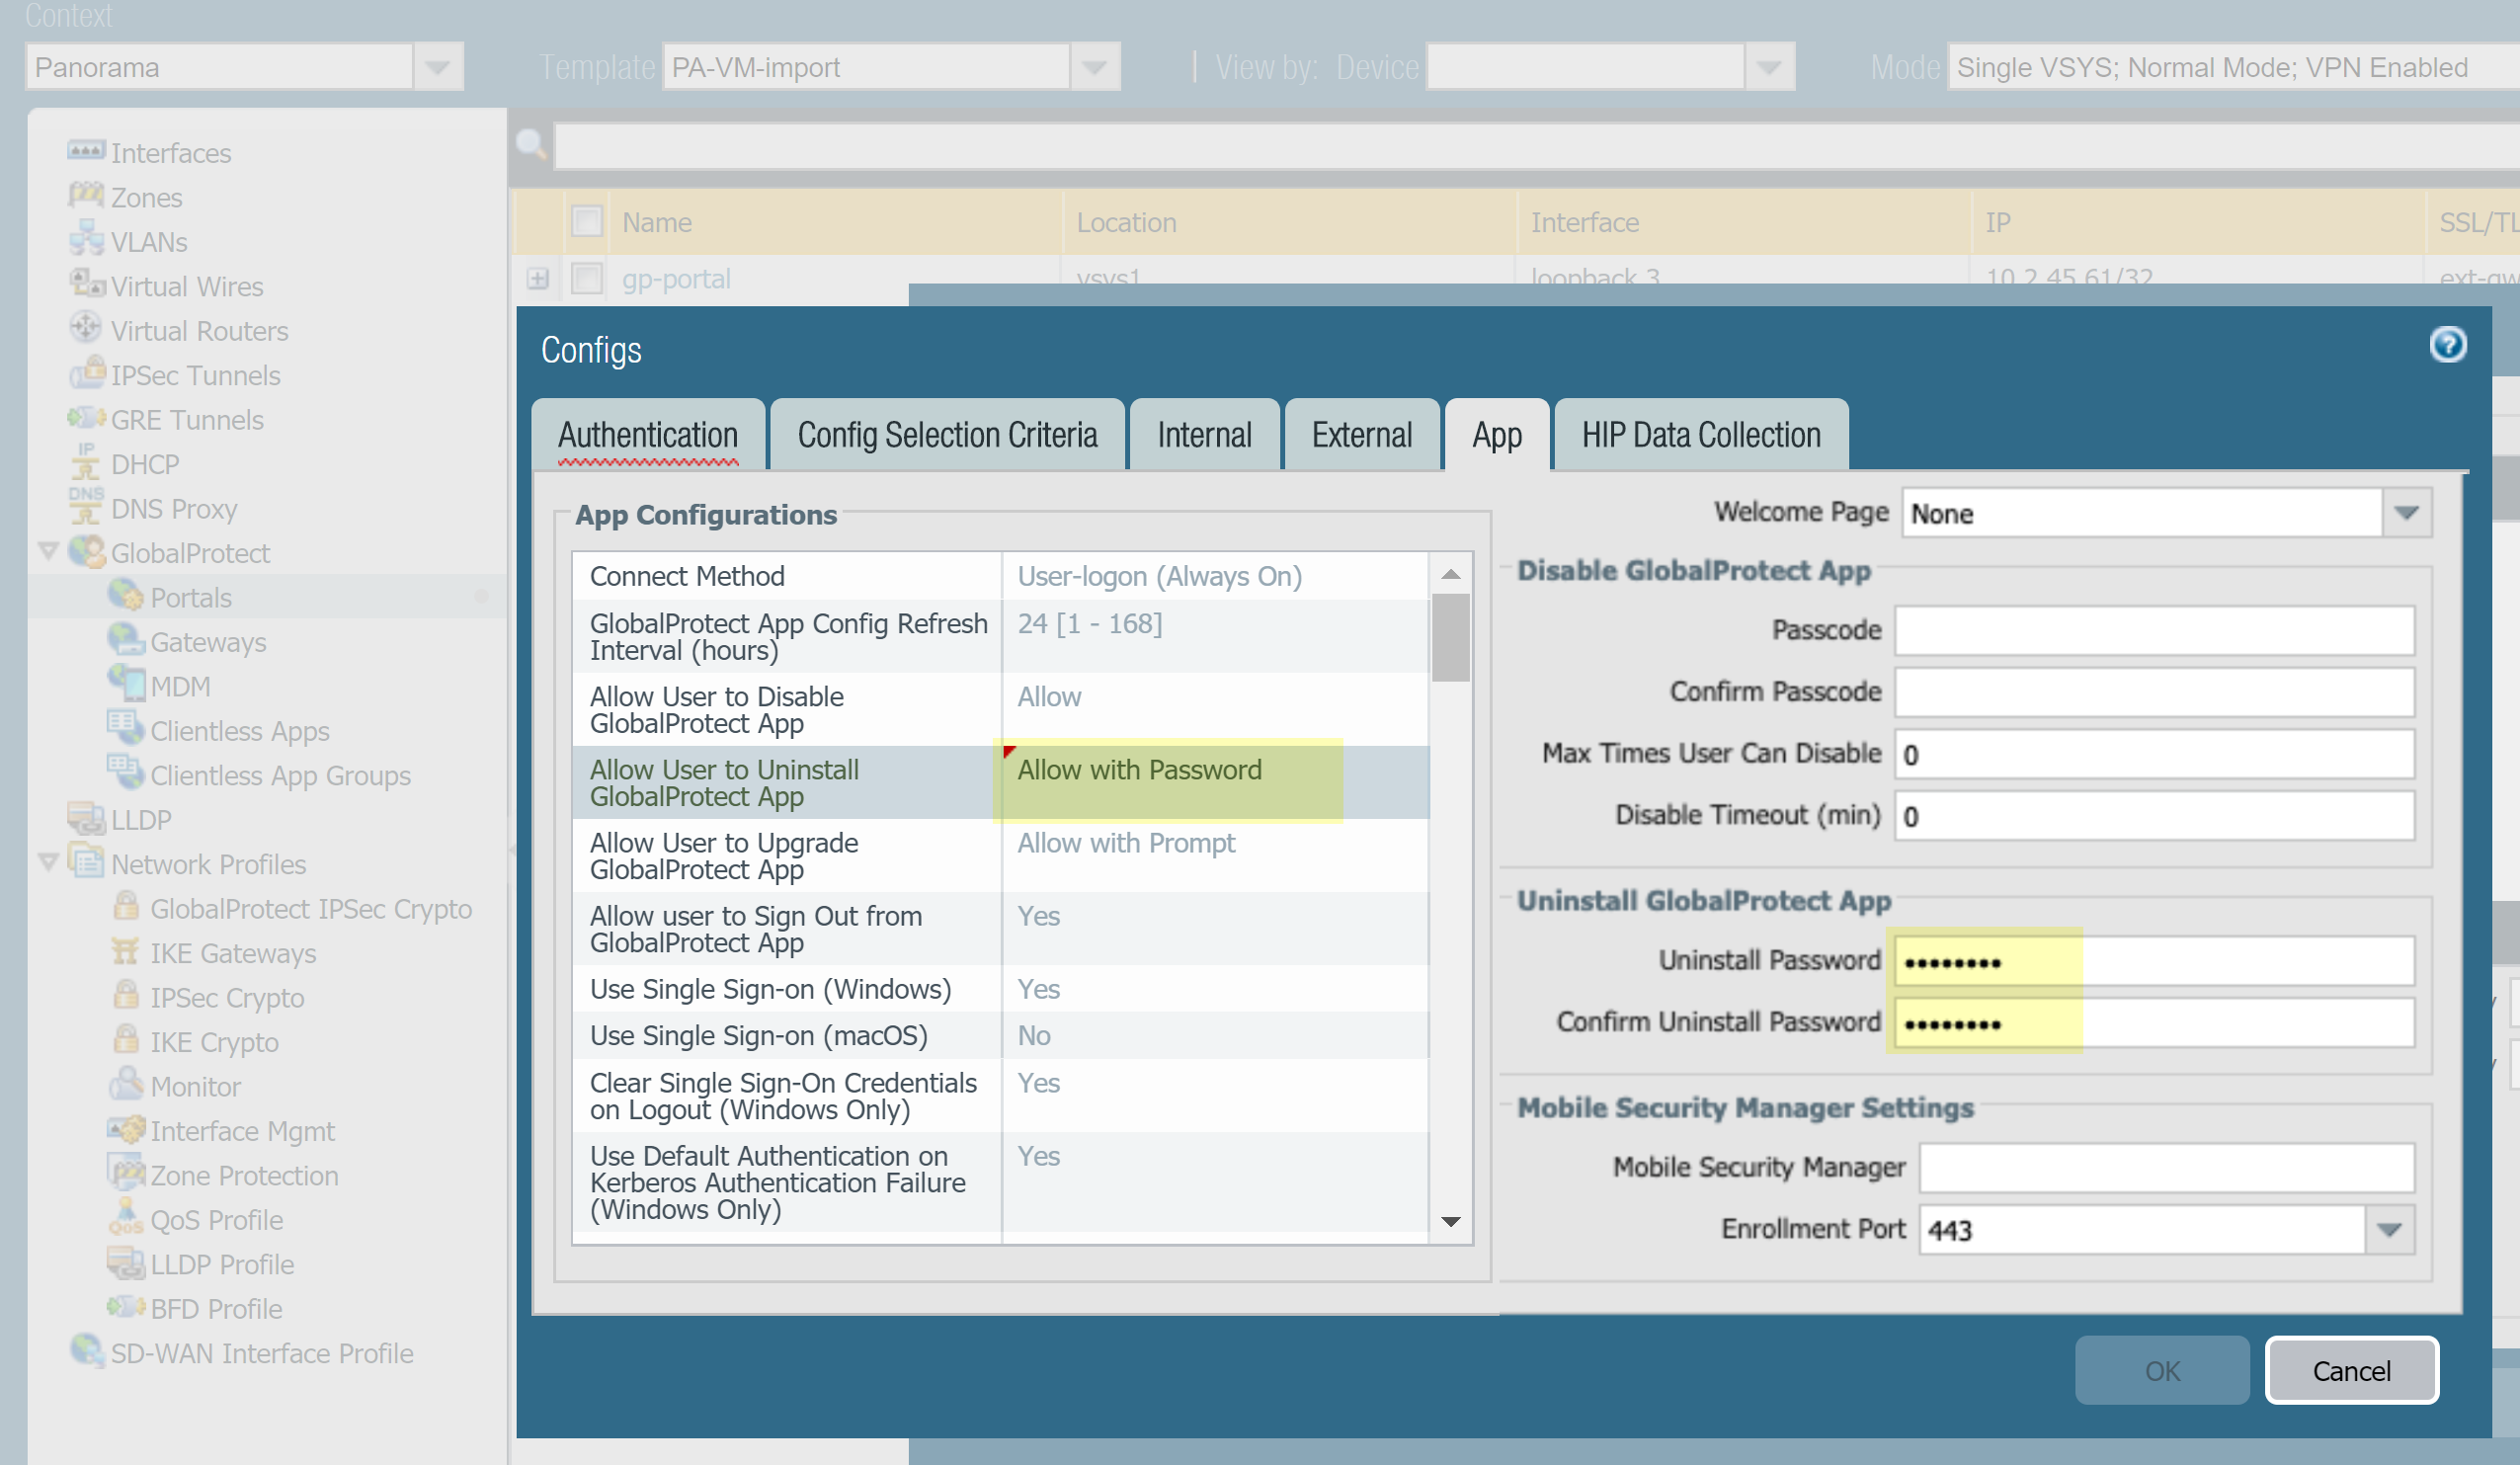
app. Use the Allow User to Uninstall GlobalProtect App option to allow users to uninstall the GlobalProtect app, prevent them from uninstalling the GlobalProtect app, or allow them to uninstall if they specify a password you create.This setting gets pushed to the endpoint device registry when it connects to portal for the first time, and is saved for each portal to which it connects.This option requires Content Release version 8207-5750 or later.
- To allow users to uninstall the GlobalProtect app with no restrictions, select Allow.
- To prevent users from uninstalling the GlobalProtect app, select Disallow.When you set it to Disallow in the Windows registry, the value for that portal is set to 1 under Computer\\HKEY_LOCAL_MACHINE\\SOFTWARE\\Palo Alto Networks\\GlobalProtect\\Settings\\ 'Uninstall = 1'.
- To allow users to uninstall the GlobalProtect app with a password, select Allow with Password; then, in the Uninstall GlobalProtect App section, enter an Uninstall Password and Confirm Uninstall Password.
![]()
- Specify whether users can sign out of the GlobalProtect
app. In the App Configurations area, set Allow user to Sign Out from GlobalProtect App to No to prevent users from logging out of the GlobalProtect app; set Allow user to Sign Out from GlobalProtect App to Yes to allow users to log out.This option requires a Content Release version of 8196-5685 or later.
- Configure the certificate settings and behavior for the
users that receive this configuration.In the App Configurations area, configure any of the following options:
- Client Certificate Store Lookup—Select which store the app should use to look up client certificates. User certificates are stored in the Current User certificate store on Windows and in the Personal Keychain on macOS. Machine certificates are stored in the Local Computer certificate store on Windows and in the System Keychain on macOS. By default, the app looks for User and machine certificates in both places.
- SCEP Certificate Renewal Period (days)—With SCEP, the portal can request a new client certificate before the certificate expires. This time before the certificate expires is the optional SCEP certificate renewal period. During a configurable number of days before a client certificate expires, the portal can request a new certificate from the SCEP server in your enterprise PKI (range is 0-30; default is 7). A value of 0 means the portal does not automatically renew the client certificate when it refreshes the agent configuration.For the GlobalProtect app to obtain the new certificate during the renewal period, the user must log in to the app. For example, if a client certificate has a lifespan of 90 days, the certificate renewal period is 7 days, and the user logs in during the final 7 days of the certificate lifespan, the portal acquires a new certificate and deploys it along with a fresh agent configuration. For more information, see Deploy User-Specific Client Certificates for Authentication.
- Extended Key Usage OID for Client Certificate (Windows and macOS endpoints only)—Use this option only if you enabled client authentication, expect multiple client certificates to be present on the endpoint, and have identified a secondary purpose by which you can filter the client certificates. This option enables you to specify a secondary purpose for a client certificate using the associated object identifier (OID). For example, to display only client certificates that also have a purpose of Server Authentication, enter the OID 1.3.6.1.5.5.7.3.1. When the GlobalProtect app finds only one client certificate that matches the secondary purpose, GlobalProtect automatically selects and authenticates using that certificate. Otherwise, GlobalProtect prompts the user to select the client certificate from the list of filtered client certificates that match the criteria. For more information, including a list of common certificate purposes and OIDs, see Enable Certificate Selection Based on OID.
- If you do not want the app to establish a connection with the portal when the portal certificate is not valid, set Allow User to Continue with Invalid Portal Server Certificate to No. Keep in mind that the portal provides the agent configuration only; it does not provide network access. Therefore, security to the portal is less critical than security to the gateway. However, if you have deployed a trusted server certificate for the portal, disabling this option can help prevent man-in-the-middle (MITM) attacks.
- Specify whether users receive login prompts when multi-factor authentication
is required to access sensitive network resources.For internal gateway connections, sensitive network resources (such as financial applications or software development applications) may require additional authentication. You can Configure GlobalProtect to Facilitate Multi-Factor Authentication Notifications that are required to access these resources.In the App Configurations area, configure any of the following options:
- Set Enable Inbound Authentication Prompts from MFA Gateways to Yes. To support multi-factor authentication (MFA), the GlobalProtect app must receive and acknowledge UDP prompts that are inbound from the gateway. Select Yes to enable GlobalProtect apps to receive and acknowledge the prompt. By default, the value is set to No, meaning GlobalProtect will block UDP prompts from the gateway.
- Specify the Network Port for Inbound Authentication Prompts (UDP) that the GlobalProtect app uses to receive inbound authentication prompts from MFA gateways. The default port is 4501. To change the port, specify a number from 1 to 65535.
- Specify the Trusted MFA Gateways that the GlobalProtect app can trust for multi-factor authentication. When a GlobalProtect app receives a UDP message on the specified network port, GlobalProtect displays an authentication message only if the UDP prompt comes from a trusted gateway.
- Configure the Inbound Authentication Message; for example, You have attempted to access a protected resource that requires additional authentication. Proceed to authenticate at:. When users attempt to access a resource that requires additional authentication, GlobalProtect receives and displays an inbound authentication message. GlobalProtect automatically appends the URL for the Authentication Portal page that you specify when you configure multi-factor authentication to the inbound authentication message.
- (Windows only) Configure settings for Windows endpoints
that receive this configuration.
- Resolve All FQDNs Using DNS Servers Assigned by the Tunnel (Windows Only)— Configure the DNS resolution preferences for the GlobalProtect tunnel. Select No to allow Windows endpoints to send DNS queries to the DNS server set on the physical adapter if the initial query to the DNS server configured on the gateway is not resolved. This option retains the native Windows behavior to query all DNS servers on all adapters recursively but can result in long wait times to resolve some DNS queries. Select Yes (default) to allow Windows endpoints to resolve all DNS queries with the DNS servers you configure on the gateway instead of allowing the endpoint to send some DNS queries to the DNS servers set on the physical adapter.This feature does not support DNS over TCP.This features requires Content Release version 731 or later releases and GlobalProtect app 4.0.3 and later releases.
- Send HIP Report Immediately if Windows Security Center (WSC) State Changes—Select No to prevent the GlobalProtect app from sending HIP data when the status of the Windows Security Center (WSC) changes. Select Yes (default) to immediately send HIP data when the status of the WSC changes.
- Clear Single Sign-On Credentials on Logout—Select No to keep single sign-on credentials when the user logs out. Select Yes (default) to clear them and force users to enter credentials upon the next login.
- Use Default Authentication on Kerberos Authentication Failure—Select No to use only Kerberos authentication. Select Yes (default) to retry using the default authentication method after Kerberos authentication fails.
- (Starting with GlobalProtect™ app 6.1) Specify
the Proxy Auto-Configuration (PAC) File URL that
you want to push to the endpoint to configure proxy settings via
the GlobalProtect portal. You can deploy different PAC URLs to different
endpoints based username or group membership. Once the endpoint
has the proxy settings, it uses the proxy server to access the internet.The
maximum URL length is 256 characters. The following Proxy Auto-Configuration
(PAC) File URL methods are supported:
- Proxy Auto-Config (PAC) standard (for example, http://pac.<hostname or IP>/proxy.pac).
- Web Proxy Auto-Discovery Protocol (WPAD) standard (for example, http://wpad.<hostname or IP>/wpad.dat).
- (Windows only) Configure the GlobalProtect app
for Windows endpoints to Detect Proxy for Each Connection.For more details about network traffic behavior based on proxy use, see Tunnel Connections Over Proxies.
- Select No to auto-detect the proxy for the portal connection and use that proxy for subsequent connections.
- Select Yes (default) to auto-detect the proxy for every connection.
- (Windows and macOS only) Specify whether GlobalProtect
must use proxies or bypass proxies.With this setting, you can configure network traffic behavior based on GlobalProtect proxy use. See Tunnel Connections Over Proxies for more details.
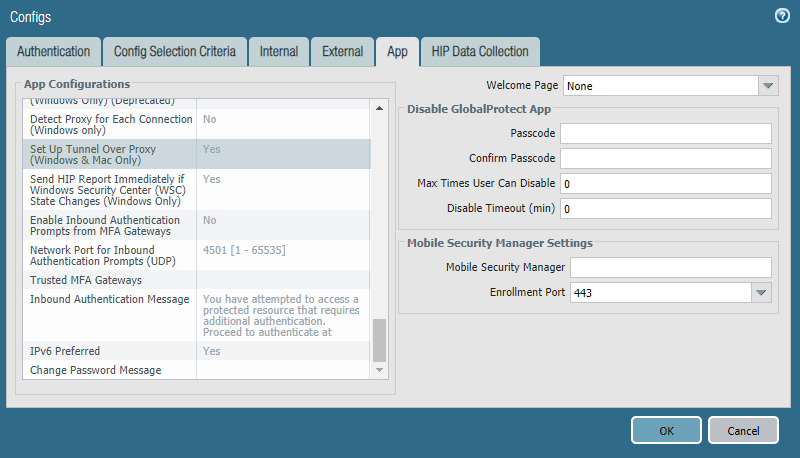
- To require GlobalProtect to use proxies, set the Set Up Tunnel Over Proxy (Windows & Mac only) option to Yes.
![]()
- To require GlobalProtect to bypass proxies, set the Set Up Tunnel Over Proxy (Windows & Mac only) option to No.
![]()
- (Starting with GlobalProtect™ app 6.1) Set Enable Advance Host Detection to Yes to add an additional security layer during the internal host detection by the app. With the advanced internal host detection, the app validates the server certificate of the internal gateways in addition to performing a reverse DNS lookup of the internal host to determine whether the app is inside the enterprise network. Select No (default) for GlobalProtect app to perform internal host detection without validating the server certificate of the internal gateways.
- If your endpoints frequently experience latency or slowness when
connecting to the GlobalProtect portal or gateways, consider adjusting
the portal and TCP timeout values.To allow more time for your endpoints to connect to or receive data from the portal or gateway, increase the timeout values as needed. Keep in mind that increasing the values can result in longer wait times if the GlobalProtect app is unable to establish the connection. In contrast, decreasing the values can prevent the GlobalProtect app from establishing a connection when the portal or gateway does not respond before the timeout expires.In the App Configurations area, configure any of the following timeout options:
- Portal Connection Timeout (sec)—The number of seconds (between 1 and 600) before a connection request to the portal times out due to no response from the portal. When your firewall is running Applications and Threats content versions earlier than 777-4484, the default is 30. Starting with content version 777-4484, the default is 5.
- TCP Connection Timeout (sec)—The number of seconds (between 1 and 600) before a TCP connection request times out due to unresponsiveness from either end of the connection. When your firewall is running Applications and Threats content versions earlier than 777-4484, the default is 60. Starting with content version 777-4484, the default is 5.
- TCP Receive Timeout (sec)—The number of seconds before a TCP connection times out due to the absence of some partial response of a TCP request (range is 1-600; default is 30).
- Specify whether remote desktop connections are permitted
over existing VPN tunnels by specifying the User Switch
Tunnel Rename Timeout. When a new user connects to a
Windows machine using Remote Desktop Protocol (RDP), the gateway
reassigns the VPN tunnel to the new user. The gateway can then enforce
security policies on the new user.Allowing remote desktop connections over VPN tunnels can be useful in situations where an IT administrator needs to access a remote end-user system using RDP.By default, the User Switch Tunnel Rename Timeout value is set to 0, meaning the GlobalProtect gateway terminates the connection if a new user authenticates over the VPN tunnel. To modify this behavior, configure a timeout value from 1 to 600 seconds. If the new user does not log in to the gateway before the timeout value expires, the GlobalProtect gateway terminates the VPN tunnel assigned to the first user.Changing the User Switch Tunnel Rename Timeout value only affects the RDP tunnel and does not rename a pre-logon tunnel when configured.
- To enable GlobalProtect to preserve the existing VPN
tunnel after users log out of their endpoint, specify a Preserve
Tunnel on User Logoff Timeout value (range is 0 to 600
seconds; default is 0 seconds). If you accept the default value
of 0, GlobalProtect does not preserve the
tunnel following user logout.This option requires Content Release version released on July 8th, 2019 or later.Consider the following GlobalProtect connection behaviors when you configure GlobalProtect to preserve the VPN tunnel:
- If the same user logs out and then logs back in to an endpoint within the specified timeout period in either Always On or On-Demand mode, GlobalProtect remains connected without requiring any user interaction (including portal and gateway authentication). If the user does not log back in within the specified timeout period, the tunnel disconnects and he or she must reestablish the GlobalProtect connection.
- If a user logs out of an endpoint and then a different user logs in to the same endpoint in either Always On or On-Demand mode, the existing tunnel is renamed for the new user only if the new user authenticates to GlobalProtect successfully within the specified timeout period. If the new user does not log in and authenticate successfully within the specified timeout period, the existing tunnel disconnects and a new GlobalProtect connection must be established. If the new user is in Always On mode, GlobalProtect attempts to establish a new connection automatically. If the new user is in On-Demand mode, he or she must establish a new GlobalProtect connection manually.
- Specify how GlobalProtect app upgrades occur.If you want to control when users can upgrade, you can customize the app upgrade on a per-configuration basis. For example, if you want to test a release on a small group of users before deploying it to your entire user base, you can create a configuration that applies to users in your IT group only, thus allowing them to upgrade and test while disabling upgrades in all other user/group configurations. After you have thoroughly tested the new version, you can modify the agent configurations for the rest of your users to allow the upgrade.By default, the Allow User to Upgrade GlobalProtect App option is set to Allow with Prompt, which means end users are prompted to upgrade when a new version of the app is activated on the firewall. To modify this behavior, select one of the following options:
- Allow Transparently—Upgrades occur automatically without user interaction. Upgrades can occur when the user is working remotely or connected within the corporate network.
- Internal—Upgrades occur automatically without user interaction, provided the user is connected within the corporate network. This setting is recommended to prevent slow upgrades in low-bandwidth situations. When a user connects outside the corporate network, the upgrade is postponed and re-activated when the user connects within the corporate network. You must configure internal gateways and internal host detection to use this option.
- Disallow—This option prevents app upgrades.
- Allow Manually—End users initiate app upgrades. In this case, the user must select Check Version from the settings menu on the GlobalProtect status panel to determine if there is a new app version available, and then upgrade if desired. Note that this option will not work if the GlobalProtect app is hidden from the user. See Step 5 for details on the Display GlobalProtect Icon settings.
Upgrades for Allow Transparently and Internal occur only if the GlobalProtect software version on the portal is more recent than the GlobalProtect software version on the endpoint. For example, a GlobalProtect 3.1.3 agent connecting to a GlobalProtect 3.1.1 portal is not upgraded. - Add a Change Password Message to specify password policies or requirements your users must follow when they change their passwords (for example, passwords must contain at least one number and one uppercase letter).
- Specify whether to display a welcome page upon successful login.A welcome page can be a useful way to direct users to internal resources that they can only access when connected to GlobalProtect, such as your Intranet or other internal servers.By default, the only indication that the app has successfully connected is a balloon message that displays in the system tray/menubar.To display a welcome page after a successful login, select factory-default from the Welcome Page drop-down. GlobalProtect displays the welcome page in the GlobalProtect app. You can also select a custom welcome page that provides information specific to your users, or to a specific group of users (based on which portal configuration gets deployed). For details on creating custom pages, see Customize the GlobalProtect Portal Login, Welcome, and Help Pages.
- (Windows only) Specify whether you want the
GlobalProtect app to Display Status Panel at Startup.
- To suppress the status panel when users establish a GlobalProtect connection for the first time, select No.
- To automatically display the status panel when users establish a GlobalProtect connection for the first time, select Yes. With this option, users must click outside the status panel to close it manually.
- Save the agent configuration.
- If you are done customizing your agent configurations, click OK to save your agent configuration. Otherwise, return to Define the GlobalProtect Agent Configurations to complete the agent configuration.
- Click OK to save your portal configuration.
- Commit the changes.