Next-Generation Firewall
Configure Layer 3 Interfaces
Table of Contents
Expand All
|
Collapse All
Next-Generation Firewall Docs
-
-
-
-
-
-
-
- PAN-OS 12.1
- PAN-OS 11.2
- PAN-OS 11.1
- PAN-OS 11.0 (EoL)
- PAN-OS 10.2
- PAN-OS 10.1
- PAN-OS 10.0 (EoL)
- PAN-OS 9.1 (EoL)
- PAN-OS 9.0 (EoL)
- PAN-OS 8.1 (EoL)
-
- PAN-OS 12.1
- PAN-OS 11.2
- PAN-OS 11.1
- PAN-OS 10.2
- PAN-OS 10.1
Configure Layer 3 Interfaces
Configure a Layer 3 interface with IPv4 or IPv6 addresses.
| Where Can I Use This? | What Do I Need? |
|---|---|
|
One of these licenses when using Strata Cloud Manager:
|
The following procedure is required to configure Layer 3
Interfaces (Ethernet, VLAN, loopback, and tunnel interfaces) with IPv4 or
IPv6 addresses so that the firewall can perform routing on these interfaces. If a
tunnel is used for routing or if tunnel monitoring is turned on, the tunnel needs an
IP address. Before performing the following task, define one or more virtual routers on a legacy routing engine or logical routers on an Advanced Routing Engine.
You would typically use the following procedure to configure an external interface
that connects to the internet and an interface for your internal network. You can
configure both IPv4 and IPv6 addresses on a single interface.
PAN-OS firewall models support a maximum of 16,000 IP addresses assigned to
physical or virtual Layer 3 interfaces; this maximum includes both IPv4 and IPv6
addresses. A single Layer 3 interface supports multiple static IPv4 and static
IPv6 addresses. At any given time, a Layer 3 interface type can be either static
IPv4, DHCPv4, or PPPoEv4. At any given time, a Layer 3 interface type can be
either static IPv6, DHCPv6, or Inherited.
If you’re using IPv6 routes, you can configure the firewall to provide IPv6 router advertisements for DNS
configuration. The firewall provisions IPv6 DNS clients with Recursive
DNS Server (RDNS) addresses and a DNS Search List so that the client can resolve its
IPv6 DNS requests. Thus the firewall is acting like a DHCPv6 server for you.
Beginning with PAN-OS 11.1.4, you can configure
duplicate (overlapping) IP addresses on Layer 3 interfaces for an Advanced Routing
Engine. A prerequisite is that you first Enable Advanced Routing. If you need duplicate (overlapping) IP addresses, learn about them before you enable
them in this procedure.
Configure Layer 3 Interfaces (PAN-OS)
Procedure for configuring a Layer 3 interface in PAN-OS and Panorama.
- (PAN-OS 11.1.4 and later releases) (Optional) Enable overlapping IP addresses.
- Select DeviceSetupManagement and edit General Settings.Select Duplicate IP Address Support.Commit the change.Select an interface and configure it with a security zone.
- Select NetworkInterfaces and either Ethernet, VLAN, loopback, or Tunnel, depending on what type of interface you want.Select the interface to configure.Select the Interface Type—Layer3.On the Config tab, for Virtual Router, select the virtual router you are configuring, such as default.For Virtual System, select the virtual system you are configuring if on a multi-virtual system firewall.For Security Zone, select the zone to which the interface belongs or create a New Zone.Click OK.Configure the interface with an IPv4 address.You can assign an IPv4 address to a Layer 3 interface in one of three ways:
- Static
- DHCP Client—The firewall interface acts as a DHCP client and receives a dynamically assigned IPv4 address. The firewall also provides the capability to propagate settings received by the DHCP client interface into a DHCP server operating on the firewall. This is most commonly used to propagate DNS server settings from an Internet service provider to client machines operating on the network protected by the firewall.
- PPPoE—Configure the interface as a Point-to-Point Protocol over Ethernet (PPPoE) termination point to support connectivity in a Digital Subscriber Line (DSL) environment where there is a DSL modem but no other PPPoE device to terminate the connection.
- Select NetworkInterfaces and either Ethernet, VLAN, loopback, or Tunnel, depending on what type of interface you want.Select the interface to configure.To configure the interface with a static IPv4 address, on the IPv4 tab, set Type to Static.Add a Name and optional Description for the address.For Type, select one of the following:
- IP Netmask—Enter the IP address and network mask to assign to the interface, for example, 208.80.56.100/24.If you’re using a /31 subnet mask for the Layer 3 interface address, the interface must be configured with the .1/31 address in order for utilities such as ping to work properly.If you’re configuring a loopback interface with an IPv4 address, it must have a /32 subnet mask; for example, 192.168.2.1/32.
- IP Range—Enter an IP address range, such as 192.168.2.1-192.168.2.4.
- FQDN—Enter a Fully Qualified Domain Name.
Select Tags to apply to the address.Click OK.Configure an interface as a PPPoE termination point.PPPoE is not supported in HA active/active mode.- Select NetworkInterfaces and either Ethernet, VLAN, loopback, or Tunnel.Select the interface to configure.On the IPv4 tab, set Type to PPPoE.On the General tab, select Enable to activate the interface for PPPoE termination.Enter the Username for the point-to-point connection.Enter the Password for the username and Confirm Password.Click OK.Configure an Interface as a DHCPv4 Client so that it receives a dynamically-assigned IPv4 address.DHCP Client is not supported in HA active/active mode.Configure an Interface as a DHCPv6 Client (with or without prefix delegation) so that it receives a dynamically-assigned IPv6 address.DHCPv6 Client is not supported in HA active/active mode.Configure an interface with a static IPv6 address.
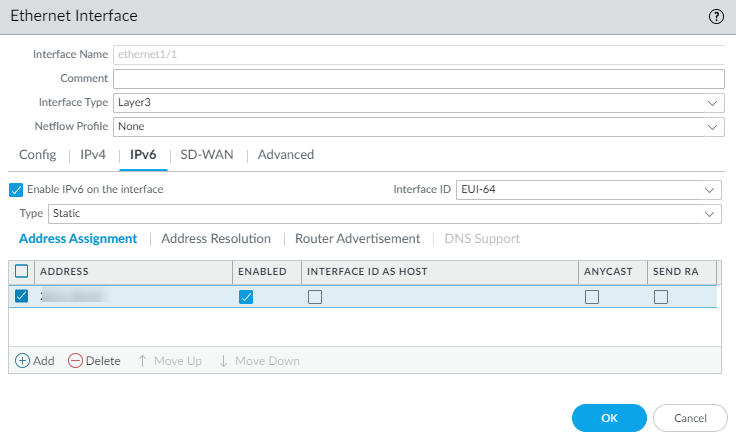
- Select NetworkInterfaces and either Ethernet, VLAN, loopback, or Tunnel.Select the interface to configure.On the IPv6 tab, select Enable IPv6 on the interface to enable IPv6 addressing on the interface.For Interface ID, enter the 64-bit extended unique identifier (EUI-64) in hexadecimal format (for example, 00:26:08:FF:FE:DE:4E:29). If you leave this field blank, the firewall uses the EUI-64 generated from the MAC address of the physical interface. If you enable the Use interface ID as host portion option when adding an address, the firewall uses the Interface ID as the host portion of that address.Select Address Assignment and Add the IPv6 Address or select an address group.
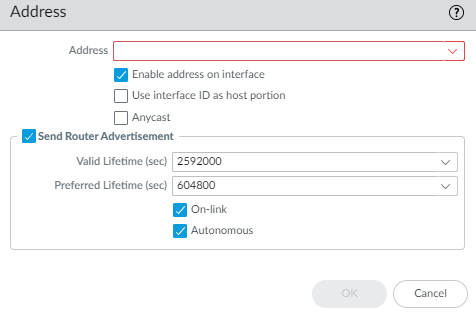
![]() Select Enable address on interface to enable this IPv6 address on the interface.Select Use interface ID as host portion to use the Interface ID as the host portion of the IPv6 address.(Optional) Select Anycast to make the IPv6 address (route) an Anycast address (route), which means multiple locations can advertise the same prefix, and IPv6 sends the anycast traffic to the node it considers the nearest, based on routing protocol costs and other factors.
Select Enable address on interface to enable this IPv6 address on the interface.Select Use interface ID as host portion to use the Interface ID as the host portion of the IPv6 address.(Optional) Select Anycast to make the IPv6 address (route) an Anycast address (route), which means multiple locations can advertise the same prefix, and IPv6 sends the anycast traffic to the node it considers the nearest, based on routing protocol costs and other factors.![]() (Ethernet interface only) Select Send Router Advertisement (RA) to enable the firewall to send this address in Router Advertisements, in which case you must also enable the global Enable Router Advertisement option on the interface (next step).(Ethernet interface only) Enter the Valid Lifetime (sec), in seconds, that the firewall considers the address valid. The Valid Lifetime must equal or exceed the Preferred Lifetime (sec) (default is 2,592,000).(Ethernet interface only) Enter the Preferred Lifetime (sec) (in seconds) that the valid address is preferred, which means the firewall can use it to send and receive traffic. After the Preferred Lifetime expires, the firewall can’t use the address to establish new connections, but any existing connections are valid until the Valid Lifetime expires (default is 604,800).(Ethernet interface only) Select On-link if systems that have addresses within the prefix are reachable without a router.(Ethernet interface only) Select Autonomous if systems can independently create an IP address by combining the advertised prefix with an Interface ID.Click OK.For a static IPv6 interface, configure address resolution.
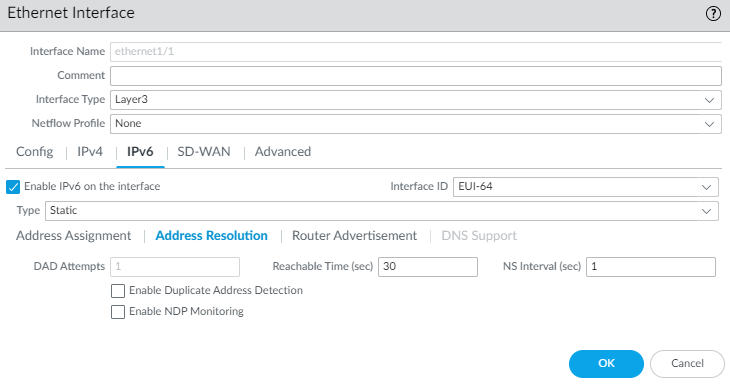
(Ethernet interface only) Select Send Router Advertisement (RA) to enable the firewall to send this address in Router Advertisements, in which case you must also enable the global Enable Router Advertisement option on the interface (next step).(Ethernet interface only) Enter the Valid Lifetime (sec), in seconds, that the firewall considers the address valid. The Valid Lifetime must equal or exceed the Preferred Lifetime (sec) (default is 2,592,000).(Ethernet interface only) Enter the Preferred Lifetime (sec) (in seconds) that the valid address is preferred, which means the firewall can use it to send and receive traffic. After the Preferred Lifetime expires, the firewall can’t use the address to establish new connections, but any existing connections are valid until the Valid Lifetime expires (default is 604,800).(Ethernet interface only) Select On-link if systems that have addresses within the prefix are reachable without a router.(Ethernet interface only) Select Autonomous if systems can independently create an IP address by combining the advertised prefix with an Interface ID.Click OK.For a static IPv6 interface, configure address resolution.- Select Address Resolution.Enable Duplicate Address Detection (DAD) if you want the uniqueness of a potential IPv6 address to be verified before it is assigned to the interface (default is enabled).If you selected Enable Duplicate Address Detection, specify the number of DAD Attempts within the neighbor solicitation (NS) interval before the attempt to identify neighbors fails; range is 0 to 10; default is 1.Enter the Reachable Time (sec), the length of time that the client assumes a neighbor is reachable after receiving a Reachability Confirmation message; range is 10 to 36,000; default is 30.Enter the NS Interval (sec) (Neighbor Solicitation interval), the length of time between Neighbor Solicitations; range is 1 to 3,600; default is 1.Enable NDP Monitoring to enable Neighbor Discovery Protocol monitoring. When enabled, you can select the NDP icon (in the Features column) and view information such as the IPv6 address of a neighbor the firewall has discovered, the corresponding MAC address, User-ID, and status (on a best-case basis).
![]()
![]() Click OK.(Ethernet or VLAN interface using IPv6 address only) Enable the firewall to send IPv6 Router Advertisements (RAs) from an interface, and optionally tune RA parameters.Tune RA parameters for either of these reasons: To interoperate with a router/host that uses different values. To achieve fast convergence when multiple gateways are present. For example, set lower Min Interval, Max Interval, and Router Lifetime values so the IPv6 client/host can quickly change the default gateway after the primary gateway fails, and start forwarding to another default gateway in the network.
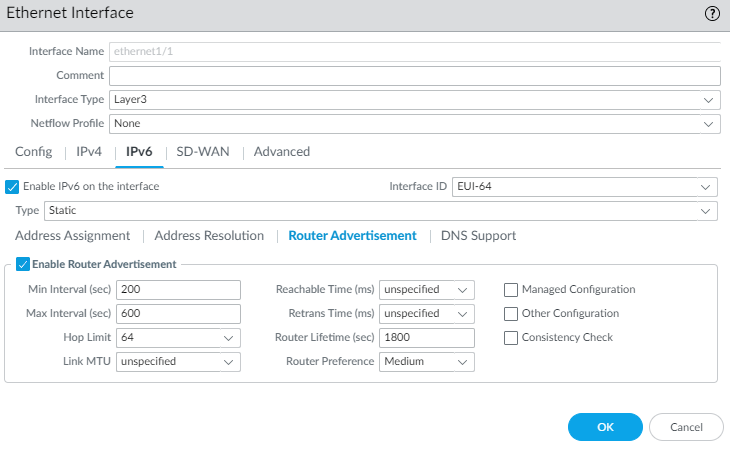
Click OK.(Ethernet or VLAN interface using IPv6 address only) Enable the firewall to send IPv6 Router Advertisements (RAs) from an interface, and optionally tune RA parameters.Tune RA parameters for either of these reasons: To interoperate with a router/host that uses different values. To achieve fast convergence when multiple gateways are present. For example, set lower Min Interval, Max Interval, and Router Lifetime values so the IPv6 client/host can quickly change the default gateway after the primary gateway fails, and start forwarding to another default gateway in the network.- Select NetworkInterfaces and Ethernet or VLAN.Select the interface you want to configure.Select IPv6.Select Enable IPv6 on the interface.On the Router Advertisement tab, select Enable Router Advertisement (default is disabled).
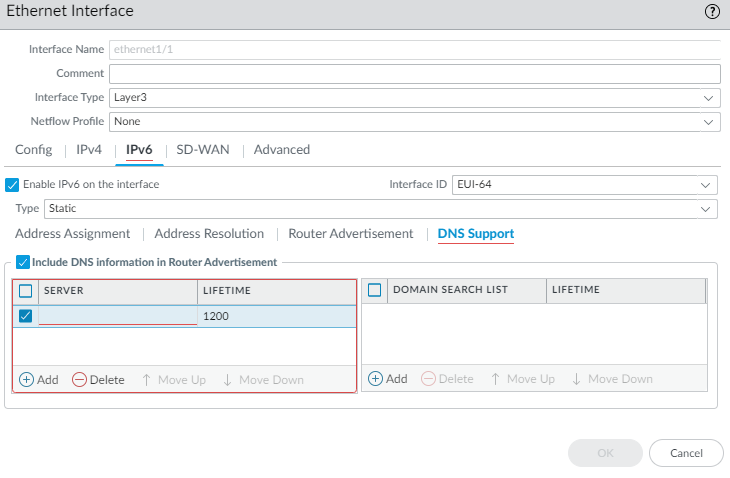
![]() (Optional) Set Min Interval (sec), the minimum interval, in seconds, between RAs the firewall sends (range is 3 to 1,350; default is 200). The firewall sends RAs at random intervals between the minimum and maximum values you set.(Optional) Set Max Interval (sec), the maximum interval, in seconds, between RAs the firewall sends (range is 4 to 1,800; default is 600). The firewall sends RAs at random intervals between the minimum and maximum values you set.(Optional) Set Hop Limit to apply to clients for outgoing packets (range is 1 to 255; default is 64). Enter 0 for no hop limit.(Optional) Set Link MTU, the link maximum transmission unit (MTU) to apply to clients (range is 1,280 to 1,500; default is unspecified). Select unspecified for no link MTU.(Optional) Set Reachable Time (ms), the reachable time, in milliseconds, that the client will use to assume a neighbor is reachable after receiving a Reachability Confirmation message. Select unspecified for no reachable time value (range is 0 to 3,600,000; default is unspecified).(Optional) Set Retrans Time (ms), the retransmission timer that determines how long the client will wait, in milliseconds, before retransmitting Neighbor Solicitation messages. Select unspecified for no retransmission time (range is 0 to 4,294,967,295; default is unspecified).(Optional) Set Router Lifetime (sec) to specify how long, in seconds, the client will use the firewall as the default gateway (range is 0 to 9,000; default is 1,800). Zero specifies that the firewall is not the default gateway. When the lifetime expires, the client removes the firewall entry from its Default Router List and uses another router as the default gateway.Set Router Preference, which the client uses to select a preferred router if the network segment has multiple IPv6 routers. High, Medium (default), or Low is the priority that the RA advertises indicating the relative priority of firewall virtual router relative to other routers on the segment.Select Managed Configuration to indicate to the client that addresses are available via DHCPv6.Select Other Configuration to indicate to the client that other address information (such as DNS-related settings) is available via DHCPv6.Select Consistency Check to have the firewall verify that RAs sent from other routers are advertising consistent information on the link. The firewall logs any inconsistencies.Click OK.(Ethernet or VLAN interface using IPv6 address only) Specify the Recursive DNS Server addresses and DNS Search List the firewall will advertise in ND Router Advertisements from this interface.The RDNS servers and DNS Search List are part of the DNS configuration for the DNS client so that the client can resolve IPv6 DNS requests.You must have selected Enable Router Advertisement on the Router Advertisement tab to make the DNS Support tab available.
(Optional) Set Min Interval (sec), the minimum interval, in seconds, between RAs the firewall sends (range is 3 to 1,350; default is 200). The firewall sends RAs at random intervals between the minimum and maximum values you set.(Optional) Set Max Interval (sec), the maximum interval, in seconds, between RAs the firewall sends (range is 4 to 1,800; default is 600). The firewall sends RAs at random intervals between the minimum and maximum values you set.(Optional) Set Hop Limit to apply to clients for outgoing packets (range is 1 to 255; default is 64). Enter 0 for no hop limit.(Optional) Set Link MTU, the link maximum transmission unit (MTU) to apply to clients (range is 1,280 to 1,500; default is unspecified). Select unspecified for no link MTU.(Optional) Set Reachable Time (ms), the reachable time, in milliseconds, that the client will use to assume a neighbor is reachable after receiving a Reachability Confirmation message. Select unspecified for no reachable time value (range is 0 to 3,600,000; default is unspecified).(Optional) Set Retrans Time (ms), the retransmission timer that determines how long the client will wait, in milliseconds, before retransmitting Neighbor Solicitation messages. Select unspecified for no retransmission time (range is 0 to 4,294,967,295; default is unspecified).(Optional) Set Router Lifetime (sec) to specify how long, in seconds, the client will use the firewall as the default gateway (range is 0 to 9,000; default is 1,800). Zero specifies that the firewall is not the default gateway. When the lifetime expires, the client removes the firewall entry from its Default Router List and uses another router as the default gateway.Set Router Preference, which the client uses to select a preferred router if the network segment has multiple IPv6 routers. High, Medium (default), or Low is the priority that the RA advertises indicating the relative priority of firewall virtual router relative to other routers on the segment.Select Managed Configuration to indicate to the client that addresses are available via DHCPv6.Select Other Configuration to indicate to the client that other address information (such as DNS-related settings) is available via DHCPv6.Select Consistency Check to have the firewall verify that RAs sent from other routers are advertising consistent information on the link. The firewall logs any inconsistencies.Click OK.(Ethernet or VLAN interface using IPv6 address only) Specify the Recursive DNS Server addresses and DNS Search List the firewall will advertise in ND Router Advertisements from this interface.The RDNS servers and DNS Search List are part of the DNS configuration for the DNS client so that the client can resolve IPv6 DNS requests.You must have selected Enable Router Advertisement on the Router Advertisement tab to make the DNS Support tab available.- Select NetworkInterfaces and Ethernet or VLAN.Select the interface you are configuring.Select IPv6DNS Support.
![]() Include DNS information in Router Advertisement to enable the firewall to send IPv6 DNS information.For DNS Server, Add the IPv6 address of a Recursive DNS Server (adding up to eight servers). The firewall sends server addresses in an ICMPv6 Router Advertisement in order from top to bottom.Specify the Lifetime in seconds, which is the maximum length of time the client can use the specific RDNS Server to resolve domain names.
Include DNS information in Router Advertisement to enable the firewall to send IPv6 DNS information.For DNS Server, Add the IPv6 address of a Recursive DNS Server (adding up to eight servers). The firewall sends server addresses in an ICMPv6 Router Advertisement in order from top to bottom.Specify the Lifetime in seconds, which is the maximum length of time the client can use the specific RDNS Server to resolve domain names.- The Lifetime range is any value equal to or between the Max Interval (that you configured on the Router Advertisement tab) and two times that Max Interval. For example, if your Max Interval is 600 seconds, the Lifetime range is 600 to 1,200 seconds.
- The default Lifetime is 1,200 seconds.
Add a Domain Search List (domain name of a maximum of 255 bytes). Add up to eight entries. The firewall sends domains in an ICMPv6 Router Advertisement in order from top to bottom.Specify the Lifetime in seconds, which is the maximum length of time the client can use the list. The Lifetime has the same range and default value as the Server.Click OK.(Ethernet or VLAN interface) Specify static ARP entries. Static ARP entries reduce ARP processing.- Select NetworkInterfaces and Ethernet or VLAN.Select the interface you are configuring.Select AdvancedARP Entries.Add an IP Address and its corresponding MAC Address (hardware or media access control address). For a VLAN interface, you must also select the Interface.Static ARP entries do not time out. Auto-learned ARP entries in the cache time out in 1,800 seconds by default; you can customize the ARP cache timeout.Click OK.(Ethernet or VLAN interface) Specify static Neighbor Discovery Protocol (NDP) entries. NDP for IPv6 performs functions similar to those provided by ARP for IPv4.
- Select NetworkInterfaces and Ethernet or VLAN.Select the interface you are configuring.Select AdvancedND Entries.Add an IPv6 Address and its corresponding MAC Address.Click OK.(Optional) Enable services on the interface.
- To enable services on the interface, select NetworkInterfaces and Ethernet or VLAN.Select the interface you are configuring.Select AdvancedOther Info.Expand the Management Profile list and select a profile or New Management Profile.Enter a Name for the profile.For Permitted Services, select services, such as Ping, and click OK.Commit your changes.Cable the interface.Attach straight-through cables from interfaces you configured to the corresponding switch or router on each network segment.Verify that the interface is active.From the web interface, select NetworkInterfaces and verify that icon in the Link State column is green. You can also monitor link state from the Interfaces widget on the Dashboard.Configure static routes and/or a dynamic routing protocol so that the virtual router or logical router can route traffic.Configure a default route.Configure a Static Route for a virtual router or Create a Static Route for a logical router and set it as the default.(Supported firewalls only) If the interface corresponds to a PoE (Power over Ethernet) port on the firewall, you can optionally configure PoE.
Configure Layer 3 Interfaces (SCM)
Procedure for configuring a layer 3 interface in Strata Cloud Manager.- Log in to Strata Cloud Manager.Select ManageConfigurationNGFW and Prisma AccessDevice SettingsInterfacesEthernetConfigurationNGFW and Prisma AccessDevice SettingsInterfacesEthernet and select the Configuration Scope where you want to create the Layer 3 interface.Select a firewall from your Folders or select Snippets to configure the Layer 3 interface in a snippet.If you select a folder or select a snippet, you create a Layer 3 interface variable that must be assigned at the device level.Add the interface.If you’re configuring a Layer 3 interface for a specific firewall, select the interface you want to configure instead.
- Folders and Snippets—Add Interface and select Interface.
- Firewalls—Add and Add Interface.
Configure the interface.If you’re configuring an interface in the folder or snippet scope, the interface configuration is pushed only to firewalls that have the corresponding interface slot available. For example, if you configure Ethernet 1/5 in the folder scope and the firewall associated with the folder has only four interface slots, then the configuration isn’t pushed to the firewall.- Select the interface Slot.Select the Interface Name.

