Network Security
Policy Object: Applications
Table of Contents
Expand All
|
Collapse All
Network Security Docs
Policy Object: Applications
Exercise granular policy control over applications to minimize the range of
unidentified traffic on your network, thereby reducing the attack surface.
Your network traffic is automatically classified into applications that you can use
to build a versatile Security policy based on your business needs (for example, allow
Slack messages but block file transfers). The Applications object lists various
attributes of each application definition, such as the application’s relative security
risk (1 to 5). The risk value is based on criteria such as whether the application can
share files, is prone to misuse, or tries to evade being detected. Higher values
indicate higher risk.
To configure this and any other Object
settings, go to:
- ConfigurationNGFW and Prisma AccessObjects on Cloud Managed deployments, and select the object you want to configure.
- Objects on PAN-OS and Panorama Managed deployments, and select the object you want to configure from the panel on the left.
On the application page, you can:
- Learn about applications, including their behavioral characteristics and risk level. This list includes over 3000 well-known and commercially available applications.
- Create custom applications based on application characteristics or behavior. Create custom applications to classify internal applications (a custom payroll app), special interest applications (an annual sports event), or a nested application (classify a function separately from the parent application, like Facebook’s Words with Friends). Custom applications can be global or they can be applied only to specific mobile user, remote network, and service connection locations (the Locations column indicates the deployment types that can use the custom app).
Applications Fields
Here are the various applications fields. Custom applications and Palo
Alto® Networks applications might display some or all of these fields.
|
Application Details
|
Description
|
|---|---|
|
Name
|
Name of the application.
|
|
Description
|
Description of the application (up to 255 characters).
|
|
Additional Information
|
Links to web sources (Wikipedia, Google, and Yahoo!) that contain
additional information about the application.
|
|
Standard Ports
|
Ports that the application uses to communicate with the
network.
|
|
Depends on
|
A list of other applications that are required for this
application to run. When creating a security rule to allow the
selected application, you must also be sure that you're allowing
any other applications that the application depends on.
|
|
Implicitly Uses
|
Other applications that the selected application depends on but
that you don't need to add to your Security rules to
allow the selected application because those applications are
supported implicitly.
|
|
Previously Identified As
|
For a new App-ID, or App-IDs that are changed, this indicates
what the application was previously identified as. This helps
you assess whether policy changes are required based on changes
in the application. If an App-ID is disabled, sessions
associated with that application will match the security rule as
the previously identified as application. Similarly, disabled
App-IDs will appear in logs as the application they were
previous identified as.
|
|
Deny Action
|
App-IDs are developed with a default deny action that dictates
the response when the application is included in a Security
security rule with a deny action. The default deny action can
specify either a silent drop or a TCP reset. You can override
this default action in the Security policy.
|
|
Characteristics
| |
|
Evasive
|
Uses a port or protocol for something other than its originally
intended purpose with the hope that it won't get detected.
|
|
Excessive Bandwidth
|
Consumes at least 1 Mbps regularly through normal use.
|
|
Prone to Misuse
|
Often used for nefarious purposes or is easily set up to expose
more than the user intended.
|
|
SaaS
|
Software as a Service (SaaS) is characterized as a service where
the software and infrastructure are owned and managed by the
application service provider but where you retain full control
of the data, including who can create, access, share, and
transfer the data.
Keep in mind that in the context of how an application is
characterized, SaaS applications differ from web services. Web
services are hosted applications where either the user does not
own the data (for example, Pandora) or where the service is
primarily comprised of sharing data fed by many subscribers for
social purposes (for example, LinkedIn, Twitter, or
Facebook).
|
|
Capable of File Transfer
|
It has the capability to transfer a file from one system to
another over a network.
|
|
Tunnels Other Applications
|
It's able to transport other applications inside its
protocol.
|
|
Used by Malware
|
Malware has been known to use the application for propagation,
attack, or data theft, or is distributed with malware.
|
|
Has Known Vulnerabilities
|
Has publicly reported vulnerabilities.
|
|
Pervasive
|
Likely has more than 1,000,000 users.
|
|
Continue Scanning for Other Applications
|
Continue to try to match against other application signatures. If
you don't select this option, additional application matches
won't be sought out after the first matching signature.
|
|
SaaS Characteristics
| |
|
Data Breaches
|
Applications that may have released secure information to an
untrusted source within the past three years.
|
|
Poor Terms of Service
|
Applications with unfavorable terms of service that can
compromise enterprise data.
|
|
No Certifications
|
Applications lacking current compliance with industry programs or
certifications such as SOC1, SOC 2, SSAE16, PCI, HIPAA, FINRAA,
or FedRAMP.
|
|
Poor Financial Viability
|
Applications with the potential to be out of business within the
next 18 to 24 months.
|
|
No IP Restrictions
|
Applications without IP-based restrictions for user access.
|
|
Classification
| |
|
Category
|
The application category will be one of the following:
|
|
Subcategory
|
The subcategory in which the application is classified. Different
categories have different subcategories associated with them.
For example, subcategories in the collaboration category include
email, file sharing, instant-messaging, Internet-conferencing,
social-business, social-networking, voip-video, and web-posting.
Whereas subcategories in the business-systems category include
auth-service, database, erp-crm, general-business, management,
office-programs, software-update, and storage-backup.
|
|
Technology
|
The application technology will be one of the following:
|
|
Risk
|
Assigned risk of the application.
|
|
Tags
|
Tags assigned to an application.
Edit tags to add or remove tags for an application.
|
|
Options
| |
|
Session Timeout
|
The period of time, in seconds, required for the application to
time out due to inactivity (range is 1-604800 seconds). This
timeout is for protocols other than TCP or UDP. For TCP and UDP,
refer to the next rows in this table.
|
|
TCP Timeout (seconds)
|
Timeout, in seconds, for terminating a TCP application flow
(range is 1-604800).
A value of 0 indicates that the global session timer will be
used, which is 3600 seconds for TCP.
|
|
UDP Timeout (seconds):
|
Timeout, in seconds, for terminating a UDP application flow
(range is 1-604800 seconds).
|
|
TCP Half Closed (seconds)
|
Maximum length of time, in seconds, that a session remains in the
session table between receiving the first FIN packet and
receiving the second FIN packet or RST packet. If the timer
expires, the session is closed (range is 1-604800).
Default: If this timer isn't configured at the application level,
the global setting is used.
If this value is configured at the application level, it
overrides the global TCP Half Closed setting.
|
|
TCP Time Wait (seconds)
|
Maximum length of time, in seconds, that a session remains in the
session table after receiving the second FIN packet or an RST
packet. If the timer expires, the session is closed (range is
1-600).
Default: If this timer isn't configured at the application level,
the global setting is used.
If this value is configured at the application level, it
overrides the global TCP Time Wait setting.
|
|
App-ID Enabled
|
Indicates whether the App-ID is enabled or disabled. If an App-ID
is disabled, traffic for that application will be treated as the
Previously Identified As App-ID in both Security policy and in
logs. For applications added after content release version 490,
you have the ability to disable them while you review the impact on Security policy of the new app. After reviewing the security rule, you may
choose to enable the App-ID. You also have the ability to
disable an application that you have previously enabled. On a
multi-vsys, you can disable App-IDs separately in each virtual
system.
|
Create a Custom Application
Create a Custom Application (Strata Cloud Manager)
Exercise granular policy control over applications to minimize the range of
unidentified traffic on your network, thereby reducing the attack surface.
To safely enable applications you must classify all traffic, across all ports, all
the time. With App-ID, the only applications that are typically classified as
unknown traffic—tcp, udp or non-syn-tcp—in the ACC and the Traffic logs are
commercially available applications that have not yet been added to App-ID, internal
or custom applications on your network, or potential threats.
If you're seeing unknown traffic for a commercial application that does not yet
have an App-ID, you can submit a request for a new App-ID here: http://researchcenter.paloaltonetworks.com/submit-an-application/.
To ensure that your internal custom applications don't show up as unknown traffic,
create a custom application. You can then exercise granular policy control over
these applications in order to minimize the range of unidentified traffic on your
network, thereby reducing the attack surface. Creating a custom application also
allows you to correctly identify the application in the ACC and Traffic logs, which
enables you to audit/report on the applications on your network.
To create a custom application, you must define the application attributes: its
characteristics, category, and sub-category, risk, port, timeout. In addition, you
must define patterns or values that the your configuration can use to match to the
traffic flows themselves (the signature). Finally, you can attach the
custom application to a Security rule that allows or denies the application
(or add it to an application group or match it to an application filter). You can
also create custom applications to identify ephemeral applications with topical
interest, such as ESPN3-Video for world cup soccer or March Madness.
In order to collect the right data to create a custom application signature,
you'll need a good understanding of packet captures and how datagrams are
formed. If the signature is created too broadly, you might inadvertently include
other similar traffic; if it's defined too narrowly, the traffic will evade
detection if it does not strictly match the pattern.
Custom applications are stored in a separate database on the firewall and this
database isn't impacted by the weekly App-ID updates.
The supported application protocol decoders that enable the firewall to detect
applications that may be tunneling inside of the protocol include the following
as of content release version 609: FTP, HTTP, IMAP, POP3, SMB, and SMTP.
The following is a basic example of how to create a custom application.
- Gather information about the application that you will be able to use to write custom signatures.To do this, you must have an understanding of the application and how you want to control access to it. For example, you may want to limit what operations users can perform within the application (such as uploading, downloading, or live streaming). Or you may want to allow the application, but enforce QoS policing.
- Capture application packets so that you can find unique characteristics about the application on which to base your custom application signature. One way to do this is to run a protocol analyzer, such as Wireshark, on the client system to capture the packets between the client and the server. Perform different actions in the application, such as uploading and downloading, so that you will be able to locate each type of session in the resulting packet captures (PCAPs).
- Because the firewall by default takes packet captures for all unknown traffic, if the firewall is between the client and the server you can view the packet capture for the unknown traffic directly from the Traffic log.
- Use the packet captures to find patterns or values in the packet contexts that you can use to create signatures that will uniquely match the application traffic. For example, look for string patterns in HTTP response or request headers, URI paths, or hostnames. For information on the different string contexts you can use to create application signatures and where you can find the corresponding values in the packet, refer to Creating Custom Threat Signatures.
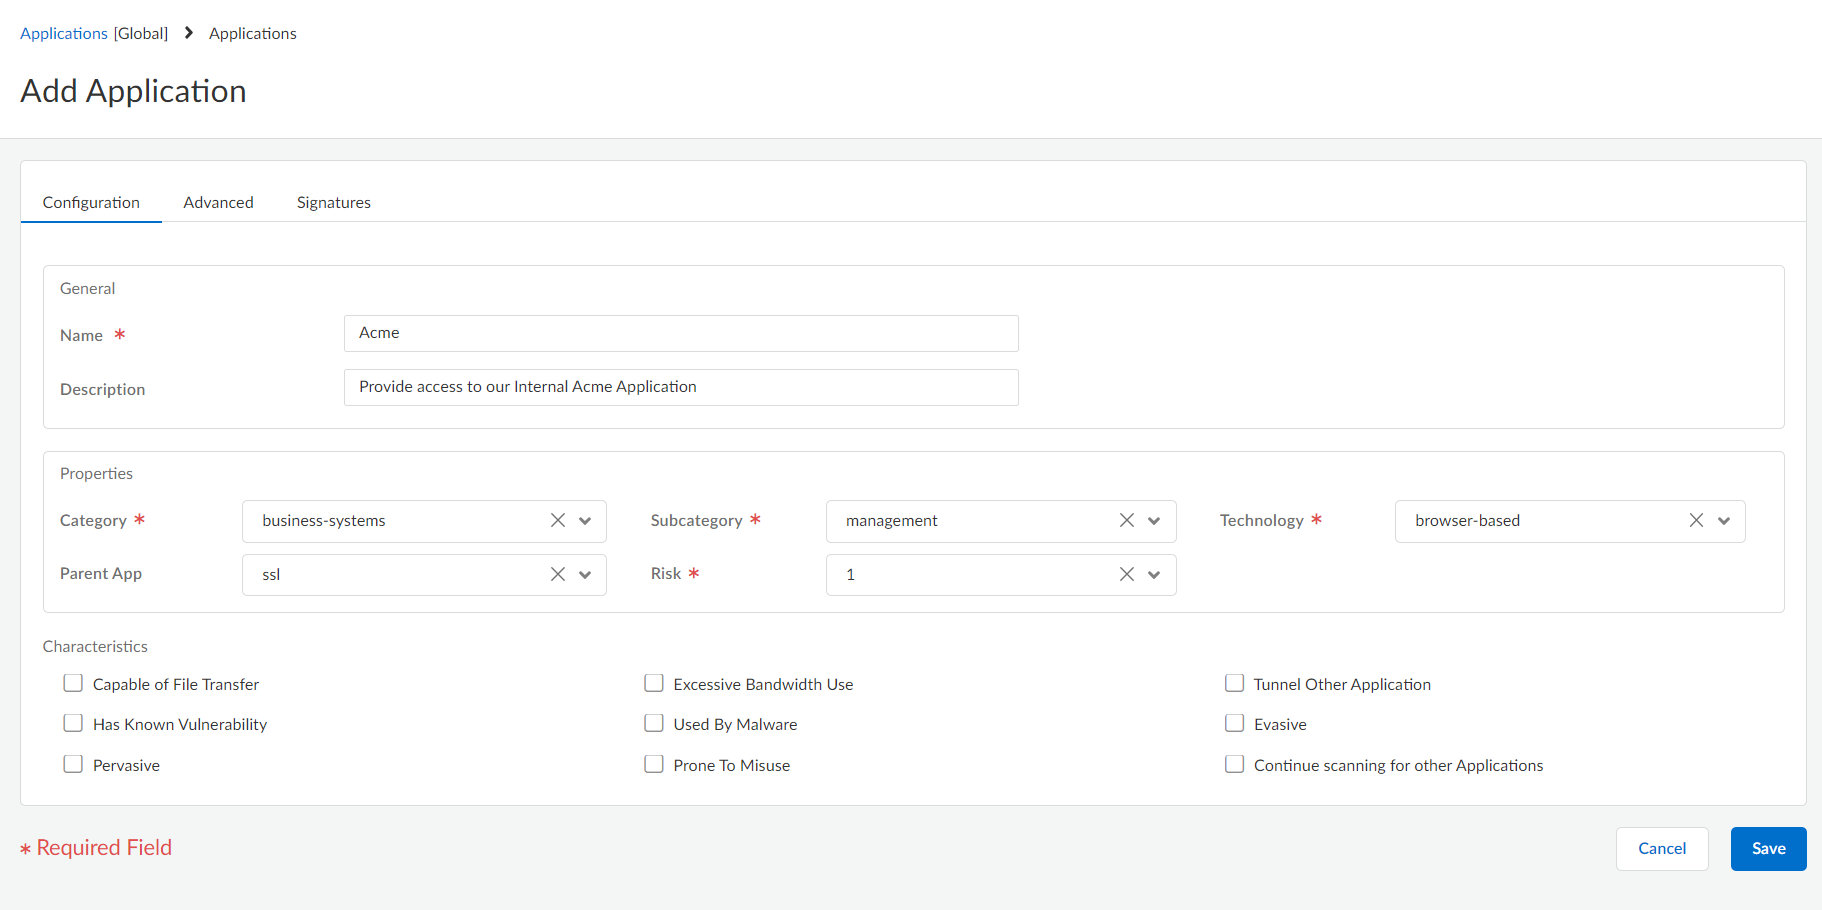
Add the custom application.- Select ManageConfigurationNGFW and Prisma AccessObjectsApplicationApplications and select Add Application.On the Configuration tab, enter a Name and a Description for the custom application that will help other administrators understand why you created the application.Define the application Properties and Characteristics.
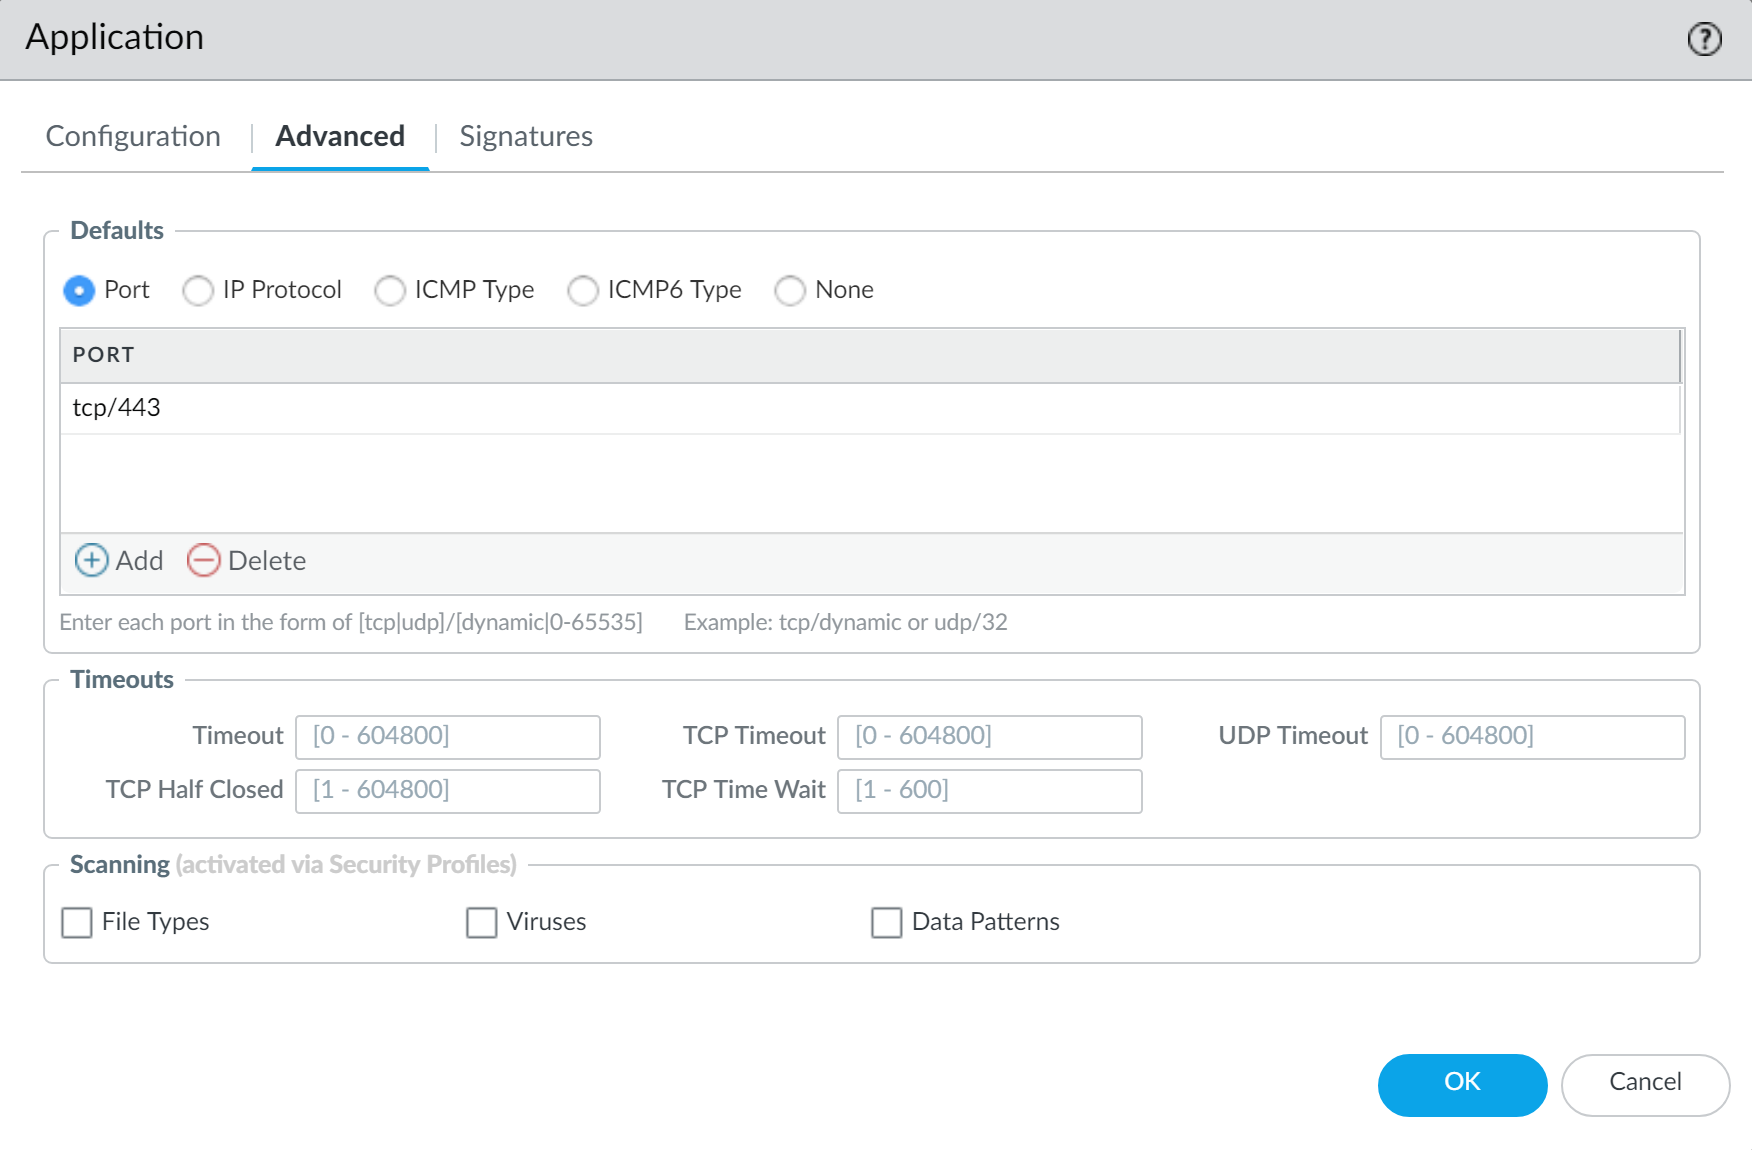
![]() Define details about the application, such as the underlying protocol, the port number the application runs on, the timeout values, and any types of scanning you want to be able to perform on the traffic.On the Advanced tab, define settings that will allow the firewall to identify the application protocol:
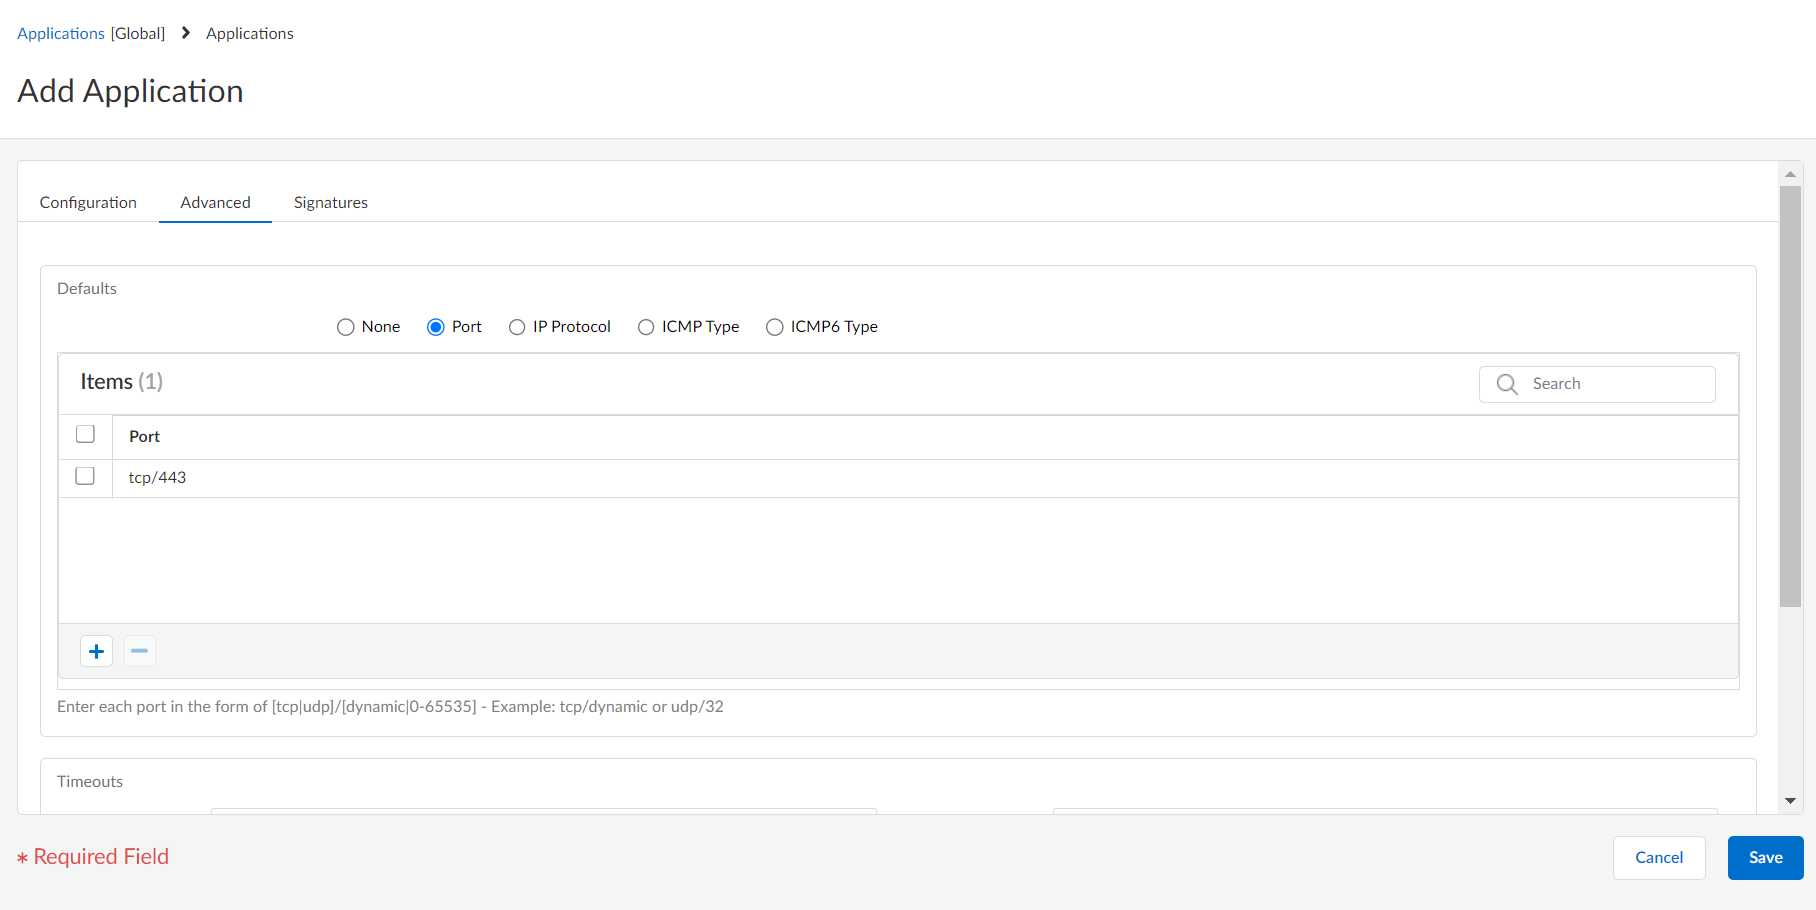
Define details about the application, such as the underlying protocol, the port number the application runs on, the timeout values, and any types of scanning you want to be able to perform on the traffic.On the Advanced tab, define settings that will allow the firewall to identify the application protocol:- Specify the default ports or protocol that the application uses.
- Specify the session timeout values. If you don’t specify timeout values, the default timeout values will be used.
- Indicate any type of additional scanning you plan to perform on the application traffic.
For example, to create a custom TCP-based application that runs over SSL, but uses port 4443 (instead of the default port for SSL, 443), you would specify the port number. By adding the port number for a custom application, you can create security rules that use the default port for the application rather than opening up additional ports on the firewall. This improves your security posture.![]() Define the criteria that the firewall will use to match the traffic to the new application.You will use the information you gathered from the packet captures to specify unique string context values that the firewall can use to match patterns in the application traffic.
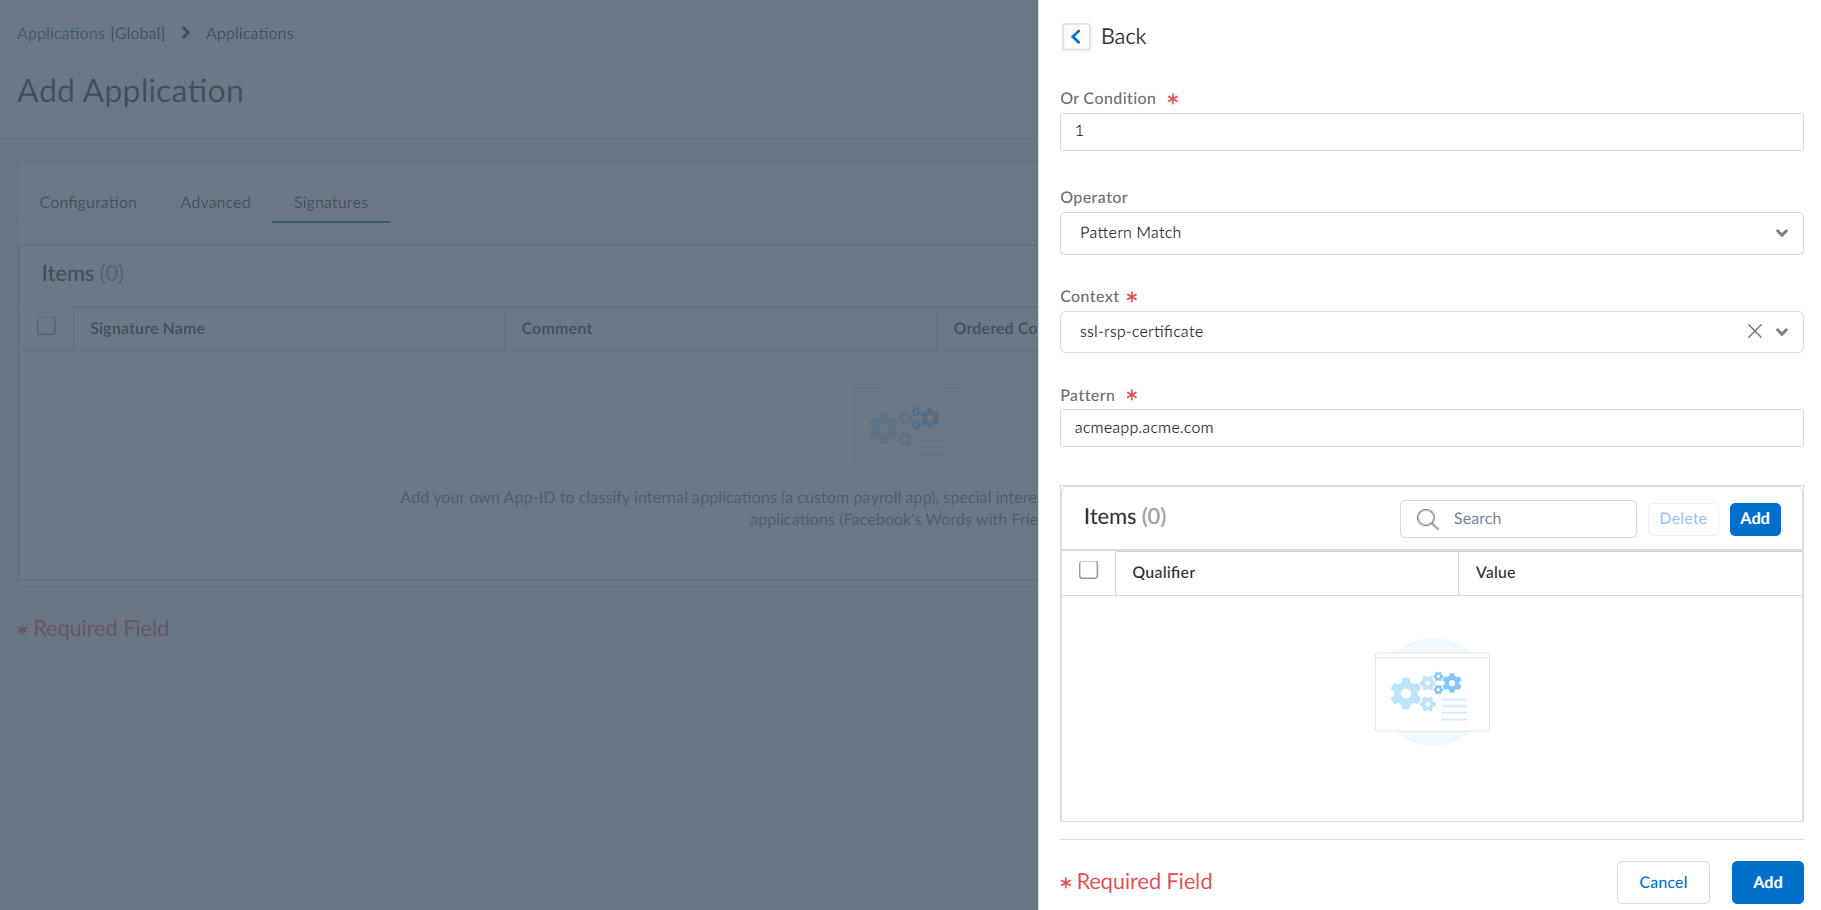
Define the criteria that the firewall will use to match the traffic to the new application.You will use the information you gathered from the packet captures to specify unique string context values that the firewall can use to match patterns in the application traffic.- On the Signatures tab, click Add and define a Signature Name and optionally a Comment to provide information about how you intend to use this signature.Specify the Scope of the signature: whether it matches to a full Session or a single Transaction.Specify conditions to define signatures by clicking Add And Condition or Add Or Condition.Select an Operator to define the type of match conditions you will use: Pattern Match or Equal To.
- If you selected Pattern Match, select the Context and then use a regular expression to define the Pattern to match the selected context. Optionally, click Add to define a qualifier/value pair. The Qualifier list is specific to the Context you chose.
- If you selected Equal To, select the Context and then use a regular expression to define the Position of the bytes in the packet header to use match the selected context. Choose from first-4bytes or second-4bytes. Define the 4-byte hex value for the Mask (for example, 0xffffff00) and Value (for example, 0xaabbccdd).
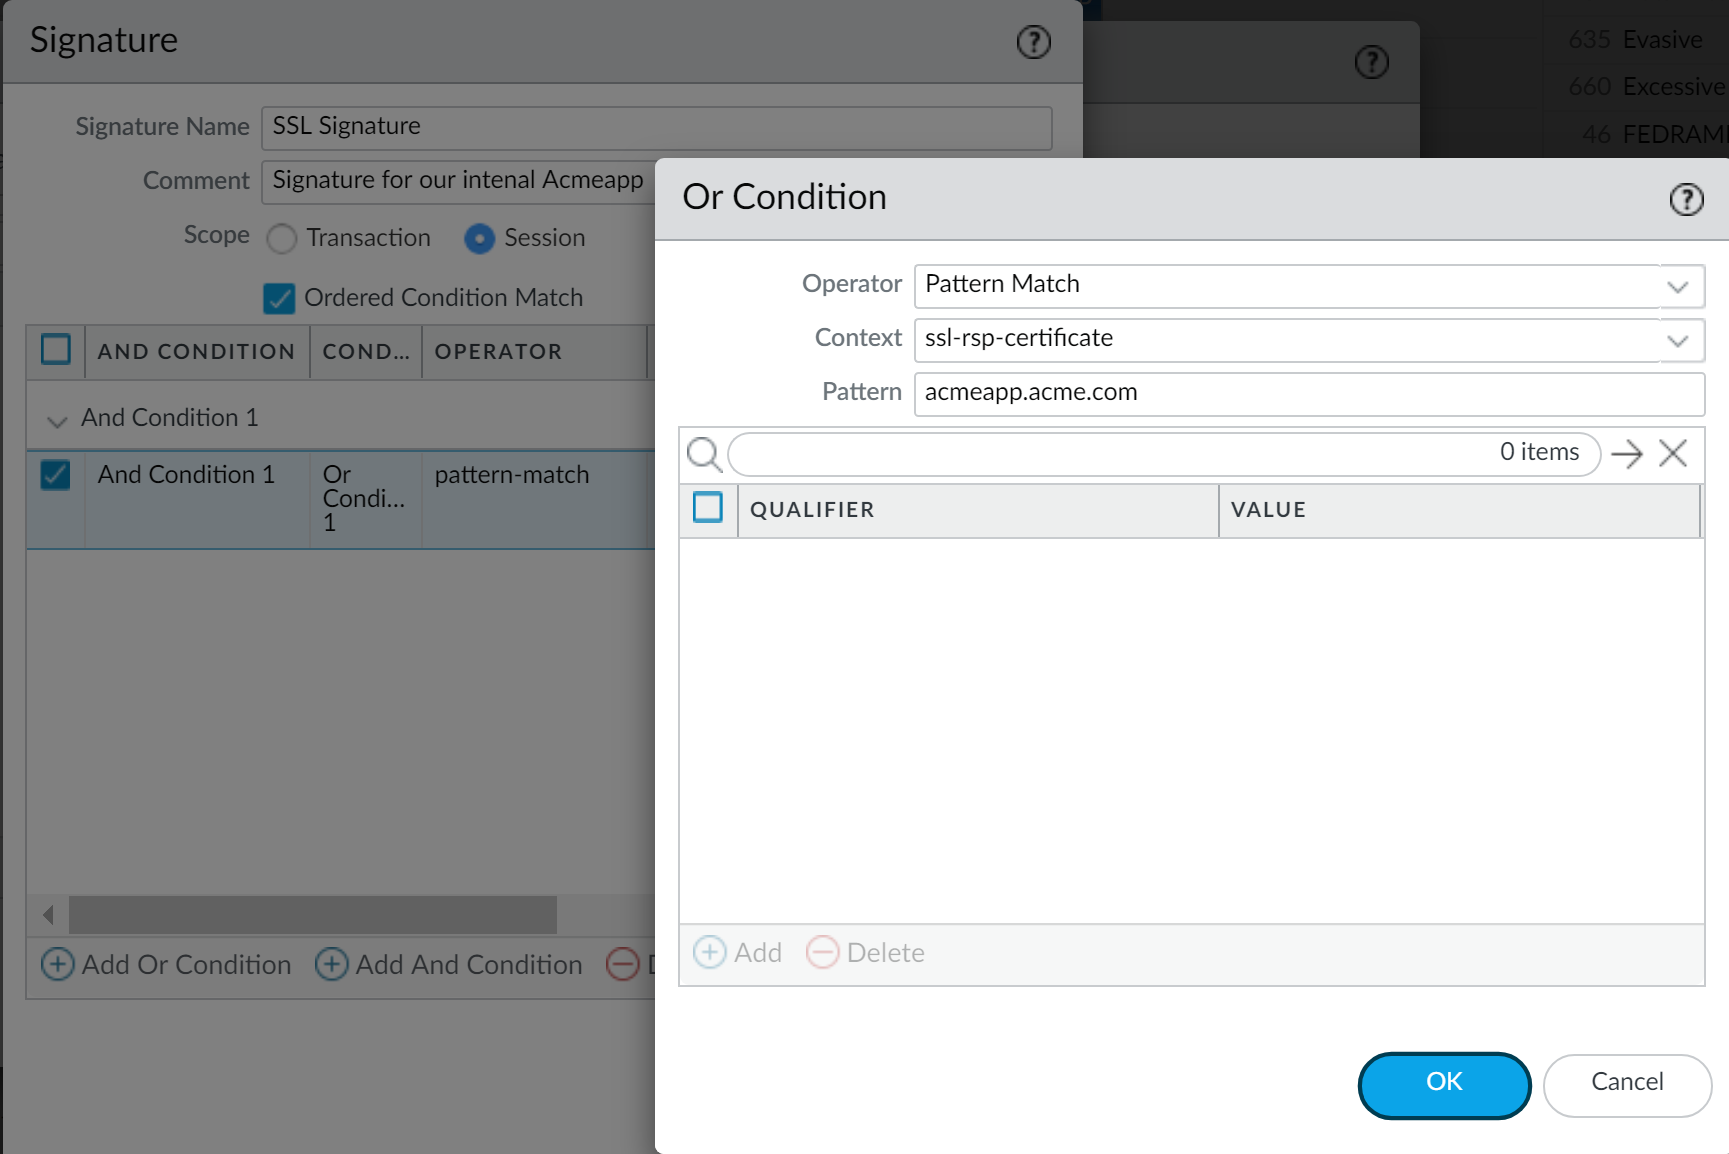
For example, if you're creating a custom application for one of your internal applications, you could use the ssl-rsp-certificate Context to define a pattern match for the certificate response message of an SSL negotiation from the server and create a Pattern to match the Common Name of the server in the message as shown here:![]() Repeat steps 4.c and 4.d for each matching condition.If the order in which your configuration attempts to match the signature definitions is important, make sure the Ordered Condition Match check box is selected and then order the conditions so that they are evaluated in the appropriate order. Select a condition or a group and select the Up Arrow or Down Arrow. You can't move conditions from one group to another.Select Add to save the signature definition.Save the application.Validate that traffic matches the custom application as expected.
Repeat steps 4.c and 4.d for each matching condition.If the order in which your configuration attempts to match the signature definitions is important, make sure the Ordered Condition Match check box is selected and then order the conditions so that they are evaluated in the appropriate order. Select a condition or a group and select the Up Arrow or Down Arrow. You can't move conditions from one group to another.Select Add to save the signature definition.Save the application.Validate that traffic matches the custom application as expected.- Select ConfigurationNGFW and Prisma AccessSecurity ServicesSecurity Policy and select Add Rule add a Security security rule to allow the new application.Run the application from a client system and then check the Traffic logs (Incidents & AlertsLog ViewerFirewall/Traffic) to make sure that you see traffic matching the new application (and that it's being handled per your policy rule).(Optional) Add tags to your custom application. Keep in mind, this cannot be done during the initial creation of the custom application.
- Navigate to ObjectsApplications and select the custom application(s) that you created and click Add/Edit Tag.You can select up to a maximum of ten custom applications at a time.
![]() Apply the applicable tags from the Edit Application Tags menu.
Apply the applicable tags from the Edit Application Tags menu.- (Multiple Applications) Select a tag operation option prior to applying tags. The following options are available:
- Add Tags to Existing—adds additional tags to the previously applied tags for the selected applications.
- Replace Tags with New—overwrites all previously applied tags for selected applications with the new selection.
![]()
- Use the Tags drop down to select the tags that are appropriate for the custom application(s). Custom tags that you have created can also be applied, if available.
![]()
(Optional) You can also Create New tags if suitable tags are not available. For each new tag, you must provide a Name and Color; you can optionally supply Comments to help identify the tag. Save after you have added all necessary tags.![]() Click Save when finished adding the tags to the application.The newly added tag(s) display in Tags column of the Matching Applications list.
Click Save when finished adding the tags to the application.The newly added tag(s) display in Tags column of the Matching Applications list.![]()
Create a Custom Application (PAN-OS & Panorama)
Exercise granular policy control over applications to minimize the range of unidentified traffic on your network, thereby reducing the attack surface.To safely enable applications you must classify all traffic, across all ports, all the time. With App-ID, the only applications that are typically classified as unknown traffic—tcp, udp or non-syn-tcp—in the ACC and the Traffic logs are commercially available applications that have not yet been added to App-ID, internal or custom applications on your network, or potential threats.If you're seeing unknown traffic for a commercial application that does not yet have an App-ID, you can submit a request for a new App-ID here: http://researchcenter.paloaltonetworks.com/submit-an-application/.To ensure that your internal custom applications don't show up as unknown traffic, create a custom application. You can then exercise granular policy control over these applications to minimize the range of unidentified traffic on your network, thereby reducing the attack surface. Creating a custom application also allows you to correctly identify the application in the ACC and Traffic logs, which enables you to audit/report on the applications on your network.To create a custom application, you must define the application attributes: its characteristics, category, and sub-category, risk, port, timeout. In addition, you must define patterns or values that the firewall can use to match to the traffic flows themselves (the signature). Finally, you can attach the custom application to a Security rule that allows or denies the application (or add it to an application group or match it to an application filter). You can also create custom applications to identify ephemeral applications with topical interest, such as ESPN3-Video for world cup soccer or March Madness.In order to collect the right data to create a custom application signature, you'll need a good understanding of packet captures and how datagrams are formed. If the signature is created too broadly, you might inadvertently include other similar traffic; if it's defined too narrowly, the traffic will evade detection if it does not strictly match the pattern.Custom applications are stored in a separate database on the firewall and this database isn't impacted by the weekly App-ID updates.The supported application protocol decoders that enable the firewall to detect applications that may be tunneling inside of the protocol include the following as of content release version 609: FTP, HTTP, IMAP, POP3, SMB, and SMTP.The following is a basic example of how to create a custom application.- Gather information about the application that you will be able to use to write custom signatures.To do this, you must have an understanding of the application and how you want to control access to it. For example, you may want to limit what operations users can perform within the application (such as uploading, downloading, or live streaming). Or you may want to allow the application, but enforce QoS policing.
- Capture application packets so that you can find unique characteristics about the application on which to base your custom application signature. One way to do this is to run a protocol analyzer, such as Wireshark, on the client system to capture the packets between the client and the server. Perform different actions in the application, such as uploading and downloading, so that you will be able to locate each type of session in the resulting packet captures (PCAPs).
- Because the firewall by default takes packet captures for all unknown traffic, if the firewall is between the client and the server you can view the packet capture for the unknown traffic directly from the Traffic log.
- Use the packet captures to find patterns or values in the packet contexts that you can use to create signatures that will uniquely match the application traffic. For example, look for string patterns in HTTP response or request headers, URI paths, or hostnames. For information on the different string contexts you can use to create application signatures and where you can find the corresponding values in the packet, refer to Creating Custom Threat Signatures.
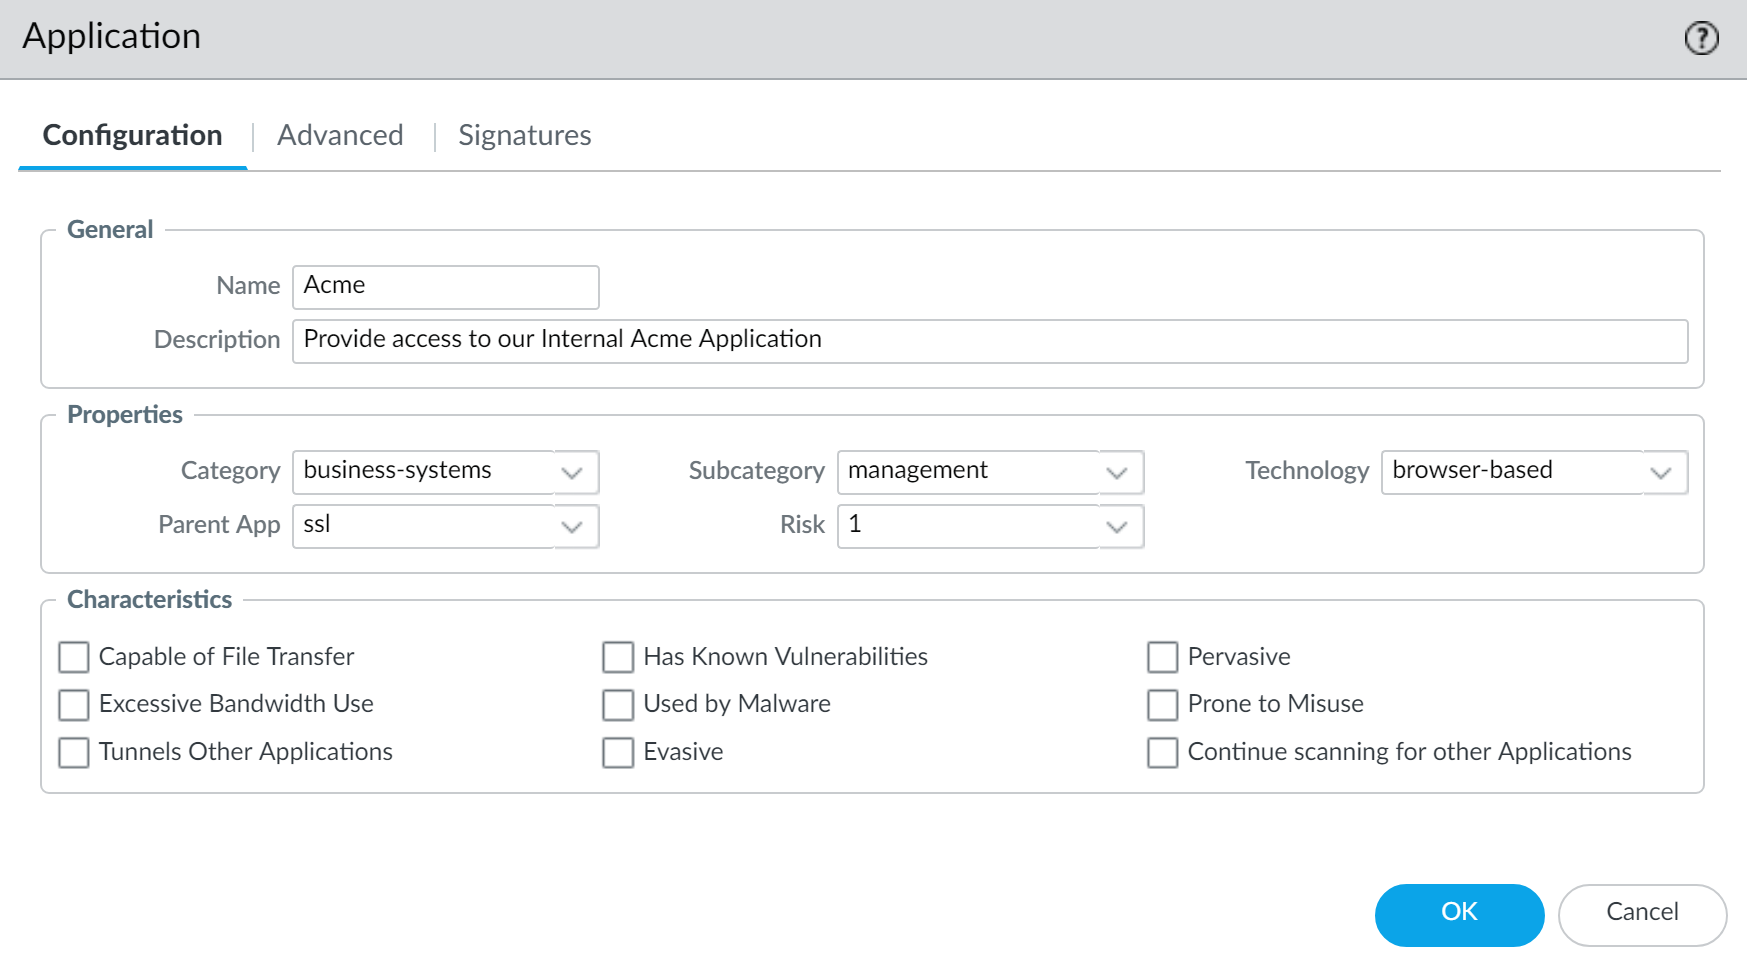
Add the custom application.- Select ObjectsApplications and click Add.On the Configuration tab, enter a Name and a Description for the custom application that will help other administrators understand why you created the application.(Optional) Select Shared to create the object in a shared location for access as a shared object in Panorama or for use across all virtual systems in a multiple virtual system firewall.Define the application Properties and Characteristics.
![]() Define details about the application, such as the underlying protocol, the port number the application runs on, the timeout values, and any types of scanning you want to be able to perform on the traffic.On the Advanced tab, define settings that will allow the firewall to identify the application protocol:
Define details about the application, such as the underlying protocol, the port number the application runs on, the timeout values, and any types of scanning you want to be able to perform on the traffic.On the Advanced tab, define settings that will allow the firewall to identify the application protocol:- Specify the default ports or protocol that the application uses.
- Specify the session timeout values. If you don’t specify timeout values, the default timeout values will be used.
- Indicate any type of additional scanning you plan to perform on the application traffic.
For example, to create a custom TCP-based application that runs over SSL, but uses port 4443 (instead of the default port for SSL, 443), you would specify the port number. By adding the port number for a custom application, you can create security rules that use the default port for the application rather than opening up additional ports on the firewall. This improves your security posture.![]() Define the criteria that the firewall will use to match the traffic to the new application.You will use the information you gathered from the packet captures to specify unique string context values that the firewall can use to match patterns in the application traffic.
Define the criteria that the firewall will use to match the traffic to the new application.You will use the information you gathered from the packet captures to specify unique string context values that the firewall can use to match patterns in the application traffic.- On the Signatures tab, click Add and define a Signature Name and optionally a Comment to provide information about how you intend to use this signature.Specify the Scope of the signature: whether it matches to a full Session or a single Transaction.Specify conditions to define signatures by clicking Add And Condition or Add Or Condition.Select an Operator to define the type of match conditions you will use: Pattern Match or Equal To.
- If you selected Pattern Match, select the Context and then use a regular expression to define the Pattern to match the selected context. Optionally, click Add to define a qualifier/value pair. The Qualifier list is specific to the Context you chose.
- If you selected Equal To, select the Context and then use a regular expression to define the Position of the bytes in the packet header to use match the selected context. Choose from first-4bytes or second-4bytes. Define the 4-byte hex value for the Mask (for example, 0xffffff00) and Value (for example, 0xaabbccdd).
For example, if you're creating a custom application for one of your internal applications, you could use the ssl-rsp-certificate Context to define a pattern match for the certificate response message of an SSL negotiation from the server and create a Pattern to match the Common Name of the server in the message as shown here:![]() Repeat steps 4.c and 4.d for each matching condition.If the order in which the firewall attempts to match the signature definitions is important, make sure the Ordered Condition Match check box is selected and then order the conditions so that they are evaluated in the appropriate order. Select a condition or a group and click Move Up or Move Down. You can't move conditions from one group to another.Click OK to save the signature definition.Save the application.
Repeat steps 4.c and 4.d for each matching condition.If the order in which the firewall attempts to match the signature definitions is important, make sure the Ordered Condition Match check box is selected and then order the conditions so that they are evaluated in the appropriate order. Select a condition or a group and click Move Up or Move Down. You can't move conditions from one group to another.Click OK to save the signature definition.Save the application.- Click OK to save the custom application definition.Click Commit.Validate that traffic matches the custom application as expected.
- Select PoliciesSecurity and Add a Security rule to allow the new application.Run the application from a client system that is between the firewall and the application and then check the Traffic logs (MonitorTraffic) to make sure that you see traffic matching the new application (and that it's being handled per your policy rule).(Optional) Add tags to your custom application. Keep in mind, this cannot be done during the initial creation of the custom application.
- Navigate to ObjectsApplications and select a custom application that you created in the previous steps.
![]() From the Configuration tab, select Edit to open the Tag Application dialog.
From the Configuration tab, select Edit to open the Tag Application dialog.![]() From the Tags drop down, select the tags that are appropriate for the custom application. Custom tags that you have created can also be applied, if available.
From the Tags drop down, select the tags that are appropriate for the custom application. Custom tags that you have created can also be applied, if available.![]() Click OK when finished.The newly added tag(s) are displayed in Tag subsection. Click OK when finished reviewing the tags.
Click OK when finished.The newly added tag(s) are displayed in Tag subsection. Click OK when finished reviewing the tags.![]()
Edit an Application
Edit an Application (Strata Cloud Manager)
After you have created a custom application, you can make changes to the configuration by clicking on the custom application name. This is done in the same manner, and with identical options, as to the creation of the custom application; refer to Create a Custom Application (Strata Cloud Manager) for details on the available options.Predefined applications have limited editing options. From Strata Cloud Manager, you can change the Risk as well as various timeout values.The following describes how to update your predefined application settings:- Navigate to ManageConfigurationNGFW and Prisma AccessObjectsApplications to view the list of available applications.Select a predefined or local application and click Edit Predefined Application.
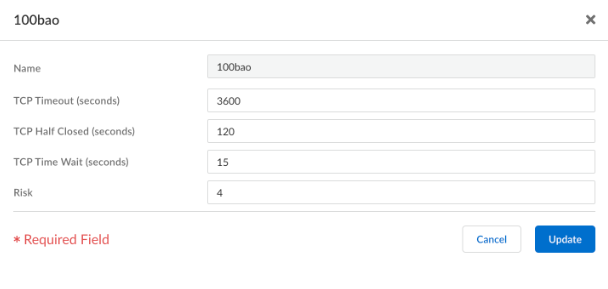
![]() Update the details about the application, such as the TCP Timeout, TCP Half Closed, TCP Time Wait, UDP Time Out, and Risk values, to more appropriately fit the needs of your organization's network security requirements.
Update the details about the application, such as the TCP Timeout, TCP Half Closed, TCP Time Wait, UDP Time Out, and Risk values, to more appropriately fit the needs of your organization's network security requirements.![]() Click Update when finished updating the application.
Click Update when finished updating the application.Edit an Application (PAN-OS & Panorama)
After you have created a custom application, you can make changes to the configuration by clicking on the custom application name. This is done in the same manner, and with identical options, as to the creation of the custom application; refer to Create a Custom Application (PAN-OS & Panorama) for details on the available options.Predefined applications have limited editing options. From Strata Cloud Manager, you can change the Risk as well as various timeout values.The following describes how to update your predefined application settings:- Navigate to ObjectsApplications to view the list of available applications.Click on the name of a predefined or local application. You can also search for an app by keyword or by using the filters,
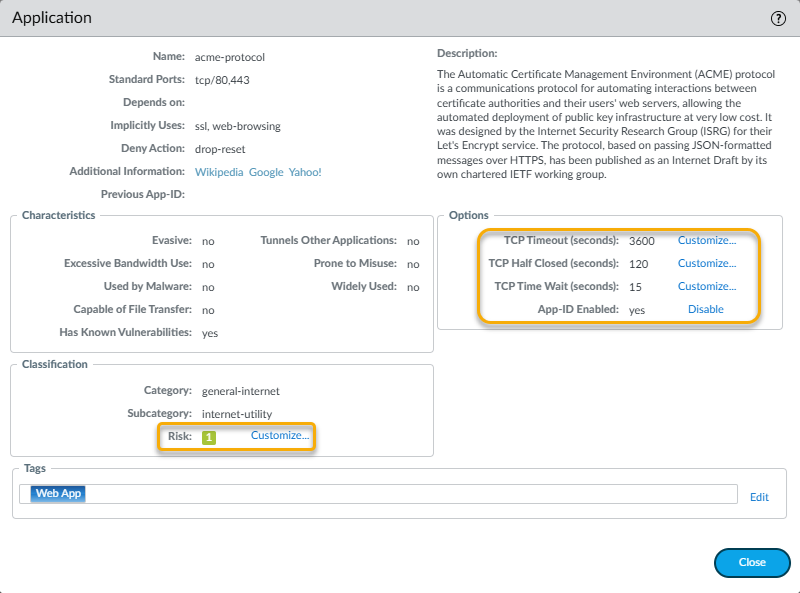
![]() Update the details about the application, such as the TCP Timeout, TCP Half Closed, TCP Time Wait, UDP Time Out, and Risk values, as well as the App-ID Enabled status, to more appropriately fit the needs of your organization's network security requirements.
Update the details about the application, such as the TCP Timeout, TCP Half Closed, TCP Time Wait, UDP Time Out, and Risk values, as well as the App-ID Enabled status, to more appropriately fit the needs of your organization's network security requirements.![]() Click Close when finished updating the application.
Click Close when finished updating the application.
Application Override Policy
Change how your configuration classifies applications.Application Override policies bypass layer 7 processing and threat inspection and instead use less secure stateful layer 4 inspection. Application Override policies prevent layer 7 application identification and layer 7 threat inspection and prevention; do not use Application Override unless you must. Instead, create a custom application or create a custom service timeout so that you maintain visibility into, control, and inspect the application in regular layer 7 Security rules.Only use Application Override in the most highly trusted environments where you can apply the principle of least privilege strictly. Install endpoint protection on endpoints, install compensating protections on servers, and make the Application Override rule as restrictive as possible (only the necessary source, destination, users, applications, and services) since you have limited visibility into the traffic. If you must use Application Override and the traffic traverses multiple inspection points such as a data center and then a perimeter, apply Application Override consistently along the path.There are two main use cases for Application Override:- In Prisma Access, you can’t make application-level gateway (ALG) changes in the cloud and you can’t push them through Panorama, so if you need a SIP ALG, you may need to create an Application Override rule.
- In environments where SMB traffic performance is critically low and Disable Server Response Inspection (DRSI) doesn’t improve performance enough, you may need to create an Application Override rule (Application Override rules are processed faster at the expense of security because they bypass layer 7 inspection).
Application Override Policy (Strata Cloud Manager)
Stateful layer 4 inspection for SIP-ALG and SMB traffic that overrides application-based policy.Palo Alto Networks determines what an application is irrespective of port, protocol, encryption, (SSH or SSL) or any other evasive tactic used by the application. Configure your won Application Override Policy to chance how traffic get classified to support internal or proprietary application.To change how your configuration classifies network traffic into applications, you can specify application override policies. For example, if you want to control one of your custom applications, an application override policy can be used to identify traffic for that application according to zone, source and destination address, and protocol. If you have network applications that are classified as “unknown,” you can create new application definitions for themReview your existing policy rulebase. If you have any Application Override rules for traffic other than SMB or SIP, convert the rule to an App-ID based rule so that you can decrypt and inspect the traffic at layer 7 and prevent threats.To create an application override:- First go to ConfigurationNGFW and Prisma AccessObjectsApplications and create a custom application. This is the application that you want traffic to match instead of the App-ID Prisma Access uses.Return to ConfigurationNGFW and Prisma AccessNetwork PoliciesApplication Override to then create your application override security rule.This rule specifies when Prisma Access should invoke the custom application.Consider that when you create an application override security rule, you’re limiting Prisma Access App-ID from classifying traffic and performing threat inspection based on that application identification.To support internal proprietary applications, it’s worth thinking about creating a custom application (instead of an application override rule) that include the application signature so that Prisma Access performs layer 7 inspection and scans the application traffic for threats.
Application Override Policy (PAN-OS & Panorama)
Stateful layer 4 inspection for SIP-ALG and SMB traffic that overrides application-based policy.Palo Alto Networks determines what an application is irrespective of port, protocol, encryption, (SSH or SSL) or any other evasive tactic used by the application. Configure your own Application Override Policy to chance how traffic get classified to support internal or proprietary application.To change how your configuration classifies network traffic into applications, you can specify application override policies. For example, if you want to control one of your custom applications, an application override policy can be used to identify traffic for that application according to zone, source and destination address, port, and protocol. If you have network applications that are classified as “unknown,” you can create new application definitions for themReview your existing policy rulebase. If you have any Application Override rules for traffic other than SMB or SIP, convert the rule to an App-ID based rule so that you can decrypt and inspect the traffic at layer 7 and prevent threats.To create an application override:- Go to ObjectsApplicationsAdd and create a custom application. This is the application that you want traffic to match instead of the App-ID your configuration uses.Go to PoliciesApplication Override to then create your application override security rule.This rule specifies when Prisma Access should invoke the custom application.Consider that when you create an application override security rule, you’re limiting Prisma Access App-ID from classifying traffic and performing threat inspection based on that application identification.To support internal proprietary applications, it’s worth thinking about creating a custom application (instead of an application override rule) that include the application signature so that Prisma Access performs layer 7 inspection and scans the application traffic for threats.

