Add a Multitenant Notifications Profile
Table of Contents
Add a Multitenant Notifications Profile
Learn how to add multitenant notifications profiles manually or by using the quick
start template through the Strata Multitenant Cloud Manager.
| Where Can I Use This? | What Do I Need? |
|---|---|
|
|
After you have activated your license, created your multitenant hierarchy, and
managed user access to the Strata Multitenant Cloud Manager, you can add
notifications profiles by using the quickstart template for incidents, quickstart
template for announcements and upgrades, or manually.
When you create a notification profile, you can enable the delivery of aggregated
notifications via emails or webhooks. Without a profile, the notifications display
in the web interface by default.
Incident notifications are only available through webhooks and emails, but
announcement and upgrade notifications are available in the web interface in
addition to webhooks and emails. Because your tenant users don't always come to the
Strata Multitenant Cloud Manager interface, they might need a different way to monitor
incidents, which are more critical and time-sensitive. They might also have a
variety of ticketing systems, so they might prefer to integrate the incident
notifications with those systems using webhooks.
You can add a notifications profile to a top-most,
root-level tenant or to an intermediate parent tenant.
![]()
Add an Announcements and Upgrades Profile Using the Quick Start Template
Use the quick start template. You can add and remove the preselected categories
to suit your needs.
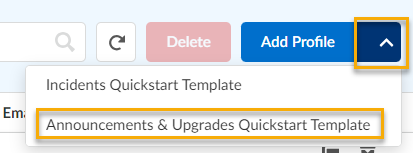
- Access the Strata Multitenant Cloud Manager and select the bell icon.Select the Settings tab.Use the drop-down.
![]() The quickstart template has the categories preselected for you and also the recommended subcategories selected per category. Fill in the required fields to save the profile.Enter a Profile Name (required) and Description (optional).Select Tenants that you want to receive notifications about.
The quickstart template has the categories preselected for you and also the recommended subcategories selected per category. Fill in the required fields to save the profile.Enter a Profile Name (required) and Description (optional).Select Tenants that you want to receive notifications about.- You're required to select at least one tenant.
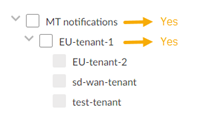
- You will see tenants grayed out if they have an expired Prisma Access (Managed by Strata Cloud Manager) license, if they have a Prisma Access (Managed by Panorama) license, or if they have a standalone Prisma SD-WAN license.
Select Notification Type of:- Announcements — For example: new features.
- Upgrades — For example: scheduled dataplane upgrades and rollbacks. The upgrade statuses of in progress, error, scheduled, canceled, and completed are selected by default.
Select a notification channel. You must select at least one.- Select Email Notification Channel
- Type an email address and press enter.
- Press enter between each email address if you're adding
multiple people. These email addresses don't have to be for people in Identity and Access Management, they can be for anyone.
- Select Webhooks Notification Channel
- Enter a Name for the webhook.
- Enter a URL for the webhook.
- Choose an auth type:
- None
- Token — Enter a token.
- (Optional) Test Connection
Select Save Profile.Add an Incidents Profile Using the Quick Start Template
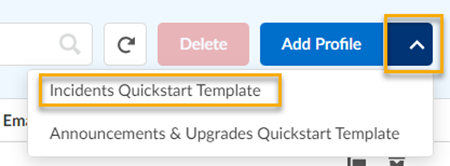
Use the quick start template. You can add and remove the preselected categories and subcategories to suit your needs. - Access the Strata Multitenant Cloud Manager and select the bell icon.Select the Settings tab.Add Profile.Use the drop-down.
![]() The quickstart template has critical categories and subcategories preselected for you. Fill in the required fields to save the profile.Enter a Profile Name (required) and Description (optional).Select Tenants that you want to receive notifications about.
The quickstart template has critical categories and subcategories preselected for you. Fill in the required fields to save the profile.Enter a Profile Name (required) and Description (optional).Select Tenants that you want to receive notifications about.- You're required to select at least one tenant.
- You will see tenants grayed out if they have an expired Prisma Access (Managed by Strata Cloud Manager) license, if they have a Prisma Access (Managed by Panorama) license, or if they have a standalone Prisma SD-WAN license.
Select a notification channel. You must select at least one.- Select Email Notification Channel
- Type an email address and press enter.
- Press enter between each email address if you're adding
multiple people. These email addresses don't have to be for people in Identity and Access Management, they can be for anyone.
- Select Webhooks Notification Channel
- Enter a Name for the webhook.
- Enter a URL for the webhook.
- Choose an auth type:
- None
- Token — Enter a token.
- (Optional) Test Connection
Select Save Profile.Add a Notifications Profile Manually
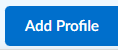
Manually add a notification profile. - Access the Strata Multitenant Cloud Manager and select the bell icon.Select the Settings tab.Select Add Profile.
![]() Enter a Profile Name (required) and Description (optional).Select Tenants that you want to receive notifications about.
Enter a Profile Name (required) and Description (optional).Select Tenants that you want to receive notifications about.- You're required to select at least one tenant.
- You will see tenants grayed out if they have an expired Prisma Access (Managed by Strata Cloud Manager) license, if they have a Prisma Access (Managed by Panorama) license, or if they have a standalone Prisma SD-WAN license.
Select Notification Type.The notification type is either incidents or announcements and upgrades, but not both. You will need different profiles if you need different notification types.- Incidents — Categories marked with a * require additional licenses. If selected, you only receive notifications if you have the necessary licenses.
- Announcements and Upgrades — For example: announcement info such as new features, or upgrade info such as scheduled dataplane upgrades and rollbacks.
Select a notification channel. You must select at least one.- Select Email Notification Channel
- Type an email address and press enter.
- Press enter between each email address if you're adding
multiple people. These email addresses don't have to be for people in Identity and Access Management, they can be for anyone.
- Select Webhooks Notification Channel
- Enter a Name for the webhook.
- Enter a URL for the webhook.
- Choose an auth type:
- None
- Token — Enter a token.
- (Optional) Test Connection
Select Save Profile.