Prisma SD-WAN
Prisma SD-WAN Standard VPN
Table of Contents
Prisma SD-WAN Standard VPN
Prisma SD-WAN ION devices can communicate with other Prisma SD-WAN devices through Prisma SD-WAN Secure Fabric
Links or communicate with standard VPN endpoints through traditional IPsec or GRE
tunnels.
| Where Can I Use This? | What Do I Need? |
|---|---|
|
|
Prisma SD-WAN ION devices can communicate with other Prisma SD-WAN devices through Prisma SD-WAN Secure
Fabric Links or communicate with standard VPN endpoints through traditional IPsec or
GRE tunnels. Similar to all other paths, a standard VPN will be monitored for
application reachability and best path selection. Traffic on a standard VPN is
subject to QoS policies.
A Standard VPN can be of type:
- IPSec
- GRE
A standard VPN has two endpoints—one endpoint is on the Prisma SD-WAN
ION device and the other endpoint is on the remote peer. You can configure a
combination of IPsec and GRE tunnels from an interface on the ION device to a
standard VPN endpoint. However, there cannot be two tunnels of the same type to the
same endpoint from the same interface.
When you connect a Prisma SD-WAN branch with a non-Prisma SD-WAN branch through a private WAN and you select direct
private WAN as a viable route, traffic flows seamlessly between these sites without
any additional configuration. When using an internet WAN, you can manually configure
an IPSec or GRE tunnel to enable direct traffic flow between Prisma SD-WAN branch sites and non-Prisma SD-WAN
sites. For a streamlined autoconfiguration of IPSec or GRE tunnels, explore the
available options provided by CloudBlade. For more details, refer to CloudBlade Integrations.
Create an IPsec Profile
To create and configure an IPsec VPN connection between a branch device and a
cloud security service endpoint, you must configure both endpoints with the same
crypto settings. Since crypto settings required to connect to the cloud security
service are likely to be the same across all ION devices, an IPsec profile can
be configured once and reused across all ION devices.
Before you configure the IPsec profile on Prisma SD-WAN, make sure
you have the IPsec protocols and authentication details required to connect to
the cloud security service endpoint or consult your cloud security service
provider’s documentation for relevant details.
- Select and then select IPsec.
- To add a new IPsec Profile, click Add IPsec Profile.If there are previously created IPsec profiles, these will display.
- On the Info screen, enter a name for the IPsec Profile and optional enter a description and tags.
- Click Next and proceed to define the IKE Group.
- For the Key Exchange field, select IKEv1 or IKEv2.
- Enter a life time for the IKE Group from the
Lifetime drop-down if required.The default lifetime of an IKE Group is 24 hours. The tunnel will have to be re-established after the life time expires.
- Enter the port number of the communication port in the Port
field.The default port is 500. The port number configured in the IKE group has to be the same as the port number configured in the standard VPN endpoint IKE group.
- Select the mode of operation from the Mode
drop-down. The mode for IKEv1 can be Main or Aggressive. Choose the aggressive mode if the source interface or endpoint is behind NAT or there are multiple tunnels to the same remote endpoint.The mode for IKEv2 is ReAuth. If selected, then a new tunnel has to be re-negotiated when the lifetime is reached.
- On the Proposals screen,
select a DH Group,
Encryption and
Hash.Proposals is a list of crypto parameters to be used to secure the IKE and ESP sessions between the ION device and the endpoint.The set of parameters selected in the Proposals screen have to be identical to the set of parameters selected for the standard VPN endpoint. You can add a proposal by clicking Add Proposal. Up to 8 proposals can be added. While establishing the IPsec tunnel, the system checks for a proposal match with the standard VPN endpoint.
- DH Group—The Diffie-Hellman (DH) group is used for certain cryptographic operations. Prisma SD-WAN supports the DH groups specified by IKE.
- Encryption— Select one of the
cryptographic algorithms for encryption. The ION devices
encrypt and decrypt traffic based on the algorithm that you
choose.Only IKEv2 supports the AES-GCM algorithms.
- HASH/PRF—Select the cryptographic
hash function. If you have selected AES-GCM as the Encryption, then the value entered for HASH/PRFwill be used as PRF.If you select any algorithm other than GCM, Hash must be selected. For GCM, Prisma SD-WAN supports only two PRF algorithms— SHA-256 and SHA-512.
- Select if Dead Peer Detection (DPD) is to be enabled from the
DPD tab. If enabled, enter the DPD delay and DPD timeout in seconds for IKEv1. If DPD fails within the configured timeout period, a new tunnel is attempted. For IKEv2, there is no DPD timeout; instead a series of 5 retransmissions is used.
- Click Next and proceed to define the ESP Group.
- Enter a life time for the ESP Group from the Lifetime drop-down if
required. The default lifetime of an ESP Group is 24 hours.
- Choose the type of encapsulation from the Encapsulation
drop-down.You can choose Auto or Force UDP. The type of encapsulation selected has to match the encapsulation configured at the standard VPN endpoint.
- Configure parametersin the Proposal tab, and then click Next.
- Enter a life time for the ESP Group from the Lifetime drop-down if
required.
- On the Authentication screen, select the authentication type as either PSK or Certificates from the Type drop-down.
- For PSK authentication:
- Enter a secret in the Secret
field.This field is mandatory.
- For the Local ID Type, choose between Interface IP Address, Hostname or Custom.
- Enter an optional ID for the standard VPN endpoint in the Remote ID field.
- Enter a secret in the Secret
field.
- For Certificate authentication:
- For the Certificate field, upload the certificate by clicking Import File.
- Similarly upload a CA certificate in the Local CA Certificate field and a private key file in the Private Key field.
- Optional You can choose to upload the standard VPN endpoint CA certificate in the Remote CA Certificate field.
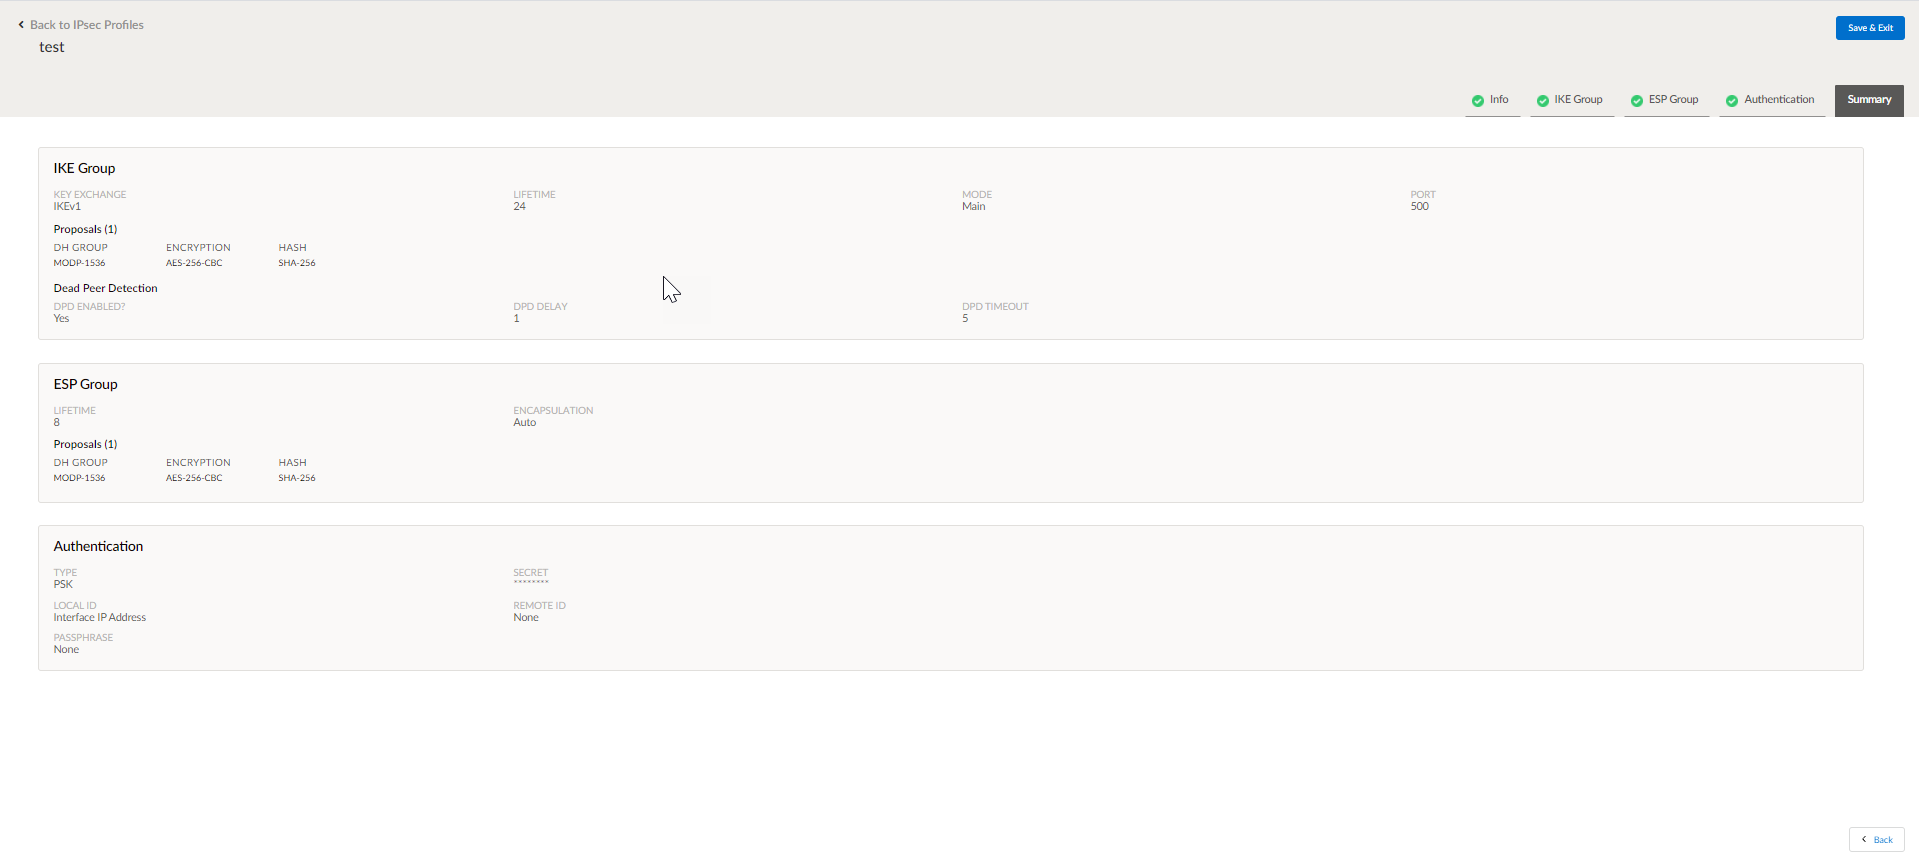
- Click Next to proceed to the Summary screen.
- Review the parameters selected and click Save and Exit.
 All new customer tenants should have the default IPsec profiles allocated which match the best practices of some of our cloud partners. These default profiles can be copied and manipulated to meet the needs specific to standard VPN services. If these default profiles are not present on your tenant, open a support case to have them allocated.
Configure Generic Routing Encapsulation (GRE) Tunnels
Prisma SD-WAN supports Generic Routing Encapsulation (GRE) tunnels
from branch or data center sites to standard VPN endpoints to integrate with
cloud security services. Due to the insecure nature of GRE, as a best practice
we strongly recommend applying a Zone Based Firewall Policy to any traffic using
GRE for transport over an insecure transport, such as the Internet.
Additionally, you should also consider implementing Source Network Address
Translation (NAT) for any traffic going through a GRE tunnel to obscure the
Internal IP addressing scheme. Exposure of the internal addressing scheme along
with unencrypted data over GRE can significantly increase attack vectors at a
site.
- Select .
- From the ellipsis menu, select Configure the device.
- Select Interfaces and click the + add icon to create a new interface as Standard VPN.
- On the Configure Interface: New Standard VPN screen, set up the Main Configuration for the new interface.
- For Admin Up, select
Yes.GRE tunnels are stateless by design, the GRE tunnel is established when the standard VPN interface is created, and the parent interface is up.When Keep-Alive is disabled, the standard VPN interface immediately enters the Up state when:
- The standard VPN interface is created.
- The parent interface is up.
- The Admin Up is set to Yes.
The standard VPN interface may later be moved to the down state due to the failure of a liveliness probe if one or more were configured on the standard VPN endpoint associated with this interface. We strongly recommend to have GRE keep-alive enabled or have a liveliness probe configured on the standard VPN endpoint such that a failure can be detected and avoid traffic being black-holed. - Optional Enter a Name, Description, and Tags.
- Select GRE as the Standard VPN
Type.The Interface Type must display as Standard VPN.
- Select a Parent Interface to establish the
GRE tunnel.For a branch ION device any of, the following ports can be used as a parent interface:
- Internet L3 Port
- Private WAN L3 Port
- Virtual Interface (private and public)
- PPPoE interface
- Bypass Pair - Internet and Private WAN ports
- Sub-Interfaces - Internet and Private WAN ports
For a data center ION device, any of the following ports can be used as a parent interface:- Any Connect to Internet port
- Any Connect to Peer Network port
The following interfaces, which don’t have an IP address can’t be used as a parent interface:- A Private Layer 2 port of a bypass pair
- A Loopback interface
- Toggle Scope to Local or Global.
- For VRF, select
Global or any other custom VRF listed.
VRF Global is enabled only when the associated device supports
VRF.Currently, VRF supports LAN. Two standard VPNs in two different VRFs cannot have the same overlay endpoint IP Address. Example:SL1(Vrf: RED) sl1_ip: 1.1.1.1SL2(Vrf: Blue) sl2_ip: 1.1.1.1
- Enter an Inner Tunnel IP Address or
Mask.The address is the address of the innermost envelope's payload. When the standard VPN peer receives the IP packet from the tunnel interface, the outer IP header and GRE header are removed. The packet is then routed based on the Inner Tunnel IP Address.
- Optional Enter values for Checksum
and Keep Alive. The default value for Keep-Alive Interval is 10 seconds, which implies that a Keep-Alive is sent every 10 seconds. The default value for Keep-Alive Retry Count is 3, which means that the device tries sending a keep alive three times before declaring the interface to be down.
- If you configure Keep-Alive on the ION device, the standard VPN peer device should be capable of replying to the Keep-Alive. If the ION device does not receive a response from the peer device within the configured Keep-Alive Retry Count, it will result in the interface being marked as down.
- If devices act as remote service endpoints, they don't support Prisma SD-WAN GRE Keep-alives. In such cases, you may need to use service endpoint liveliness probes.
- If the Prisma SD-WAN Data Center devices do not support service endpoint configuration, the liveliness probes cannot be configured and multiple remotes, and remote selection cannot be used.
- If NAT performs between the local and remote endpoints of the GRE Tunnel, this may disrupt the use of GRE Keep-Alives.
- If Checksum is configured on the ION device, the standard VPN peer device should also respond with a checksum in its GRE header. If the standard VPN peer device doesn’t support Checksum, the packet drops as a Frame Error.
- Select a Standard VPN Endpoint from the
Endpoint field.The GRE tunnel can only be created if the standard VPN interface has an endpoint or Peer IP configured. The Peer IP must be available either through the endpoint or the Peer IP field.An endpoint must be configured when the ION device is being used at a branch site. This enables the endpoint to be used in path policies to direct traffic. Endpoints can, but aren’t required to, specify IP addresses or host names of the possible peer device(s).The Peer IP overrides any IP addresses provided by the endpoint. If the ION device is being used at a Data Center site, the Peer IP has to be provided.
- Click Create Standard VPN.
- For Admin Up, select
Yes.
