Prisma SD-WAN
Configure IPFIX Profiles and Templates
Table of Contents
Configure IPFIX Profiles and Templates
Create or edit IPFIX profiles and templates in Prisma SD-WAN. An IPFIX template specifies
the information elements to export as part of the flow data records and options data
records.
| Where Can I Use This? | What Do I Need? |
|---|---|
|
|
An IPFIX profile is a global IPFIX configuration
object which identifies collector configuration, filter configuration,
the template for exporting flow information elements, and flow sampler
configuration.
Create or edit an IPFIX profile to apply globally
to all sites and devices using the following workflow.
- Select or create an IPFIX template.
- Configure collectors.
- OptionalConfigure filters.
- OptionalConfigure sampling.
- Select an IPFIX template.AnIPFIX templatespecifies the information elements to export as part of the flow records.
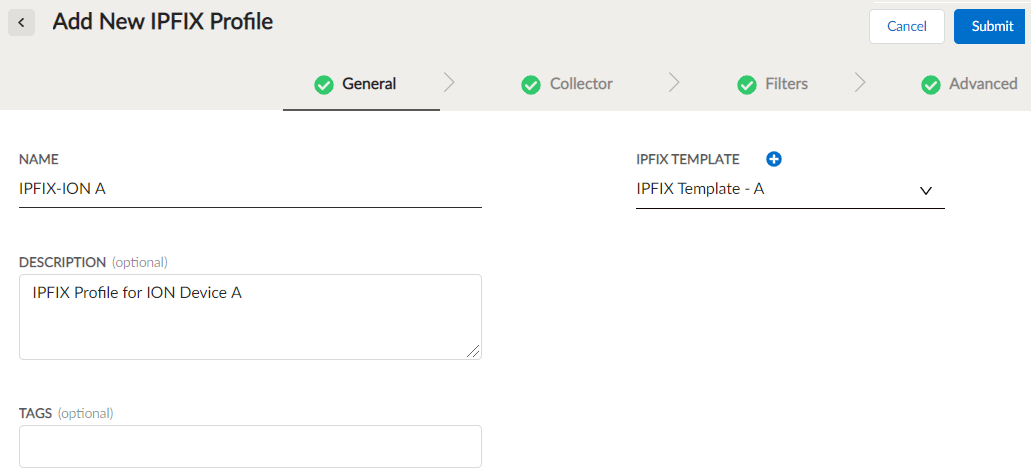
- Select and click Create Profile.

- Enter a name for the IPFIX Profile and optional description and tags.
- Select a template from the IPFIX Template drop-down, and click Next.Optional Click the + icon next to IPFIX Template tocreate a new template.You can configure a maximum of 4 collectors per IPFIX profile.
- Configure collectors.Collectors define the third-party applications which consume the exported flow records.
- On the Collector tab, click Add to configure a new collector.
- Protocol— Select the protocol.
- IPv4 Address/FQDN Schema—Select IPv4 Address to enter an IPv4 address of the collector in the Host field or select FQDN Schema to enter the domain name of the IPFIX collector in the Host field.You can enter either an IPv4 address or an FQDN. Entering one of them is mandatory.
- Optional IPFIX Collector Context—Select a collector context from the drop-down.The device uses the IP address of the interface to which the collector context is bound as the source interface to export IPFIX flow records.If you do not bind a collector context to an interface, the device uses the controller port by default to establish the connection with the third-party collector. For platforms that do not have a controller port, it is mandatory to specify a collector context and bind it to an interface.
- Host Port—Enter a port number to match the port on which the collector is configured to receive IPFIX records.
- Click Done.
- Optional Configure filters.Configure filters to select a subset of flows from all the observed flows to export to a collector. The criteria for filtering can be protocols, applications, source interface filter contexts, and source and destination port ranges. You can configure a maximum of 8 filters per IPFIX profile.
- On the Filters tab, click Add to create a new filter.
- Optional Select a protocol from the Protocols drop-down.If you select TCP or UDP as the protocol, you can associate Source Port Ranges and Destination Port Ranges with the protocols. If you do not select any protocol, the device allows all protocols.
- Optional Select an application from the Applications drop-down to filter flow records for the selected applications.A blank value indicates that flow records from all applications are allowed.If you do not select any application, the device allows all applications.
- Optional Select a Filter Context to map to an interface on the ION device.If you configure a filter context and use it in a profile, you must attach the IPFIX filter context to an interface on the ION device for proper IPFIX export of the flow records.
- Optional Select a Source Prefix and Destination Prefix filter to match.The prefixes can be local or global. If nothing is selected, the device allows flow records from all prefixes.
- Optional Select Source Port Ranges and Destination Port Ranges if applicable for TCP and UDP protocols.The device evaluates the values in these fields only if the flows are TCP or UDP. The device ignores the values for all other protocols.
- Click Done.
- Optional Enable sampling.Enable sampling to select a subset of flows to export from all the observed flows. The device forwards this subset to the filtering process to perform further selection if filters are configured.
- Enter a value for Export Cache Timeout between 10 and 600 seconds.Export Cache Timeout specifies the time for which the ION device should cache a new flow record before exporting it. The default value is 30 seconds.
- Optional Select the Enable Sampling check box to choose a sampling algorithm.Disabling sampling exports IPFIX information for all flows.Select a time-based algorithm to configure the duration for sampling. If you select a time-based Algorithm, enter values in milliseconds for Time Interval and Time Spacing.Time Interval indicates the length of the sampling interval during which flows are selected. The default value is 5 ms.Time Spacing indicates the spacing between the end of one sampling interval and the start of the next sampling interval. The default value is 5 ms.The sampling rate is defined by Time Interval / (Time Interval + Time Spacing). The default values give a 50% sampling rate.
- Submit the configured IPFIX profile.


Configure IPFIX Templates
An IPFIX template specifies the information elements to export as part of the
flow data records and options data records.
- Select .
- On the Add New IPFIX Template tab, enter a name for the IPFIX Template.
- Optional Enter a description and tags.
- Optional Click Default Flow Fields to view the information elements exported by default in the flow record.The default flow fields are as follows:
- TIME_STAMPS—Identifies when a flow has started or ended. It includes the absolute time stamp of the first packet and last packet of this flow in milliseconds. For long lived flows, where delta information is sent, flow end time stamp indicates when the last packet was seen.
- DST_IPV4_ADDRESS—Identifies the destination address for the flow.
- DST_PORT—Identifies the destination port for the flow.
- SRC_IPV4_ADDRESS—Identifies the source address for the flow.
- SRC_PORT—Identifies the source port for the flow.
- PROTOCOL—Identifies the protocol used by the flow. Only IPv4 is currently supported.
- Optional If you want to export additional flow fields in the flow records, select the fields from the Flow Fields drop-down.Use the Prefill from a preset configuration option to select a preset template to export specific flow fields.
- Optional Select fields from the Options drop-down to export additional information.Selecting Options allows export of additional information to the collector that would not be possible with Flow Fields alone.
- Optional Enter a value in seconds for Template Export Timeout.The Template Export Timeout controls how often the device sends flow templates to a collector. This is only applicable when the connection to a collector uses the UDP protocol. The default value is 600 seconds.
- Optional Enter a value in seconds for Option Export Timeout.The Option Export Timeout indicates how often the device sends the option record information to a collector. With this information, the collector can supplement its interpretation of the flow record information. This is only applicable when the connection to a collector uses the UDP protocol. The default value is 600 seconds.
- Click Save.

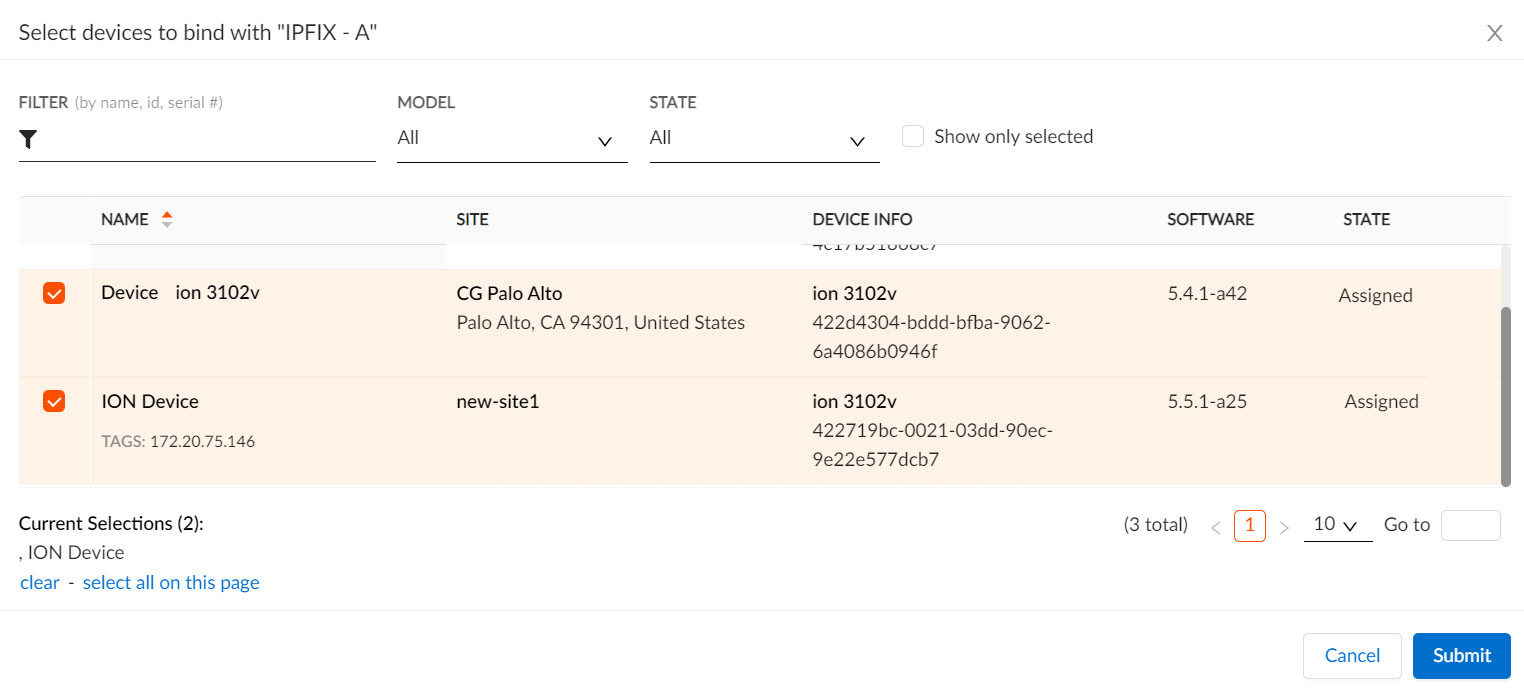
Attach an IPFIX Profile to an ION Device
Attach an IPFIX profile to an ION device or multiple ION devices to push the
IPFIX configuration to the device. You can attach IPFIX profiles only to branch
ION devices.
Multiple ION devices across different sites can use a single IPFIX profile.
- Select .
- Click the ellipsis icon for a profile, select View Device Bindings, and then click Bind Devices.
- Select one or more ION devices from the list to associate with the selected IPFIX profile and Submit.
The name of the IPFIX configuration displays in the form <Profile Name> on <Device Name>.