Set Up the AWS Plugin for VM Monitoring on Panorama
Table of Contents
Set Up the AWS Plugin for VM Monitoring on Panorama
Get started with installing the AWS plugin and configure it for monitoring your EC2
instances on the AWS public cloud.
To find all the virtual machine workloads that your organization has deployed in the
AWS public cloud, you need to install the AWS plugin on Panorama and configure
Monitoring Definitions that enable Panorama to authenticate to your AWS
VPC(s) and retrieve VM information on the workloads. Panorama retrieves the IP
address of the VMs that are running— public IP address, and primary and secondary
private IP addresses—and the associated tags. For a list of the metadata elements
that Panorama supports, see List of Attributes
Monitored on the AWS VPC.
After Panorama fetches the attributes, to push the virtual machine information from
Panorama to the firewalls, you must add the firewalls (hardware or VM-Series) as
managed devices on Panorama, and group the firewalls into one or more Device Groups.
You can then specify which device groups are part of the Notify Group, which
is a configuration element in a Monitoring Definition, that Panorama uses to
register the IP address-to-tag mapping it retrieves from AWS.
Finally, to consistently enforce Security policies across the EC2 instances, you must
set up Dynamic Address Groups and reference them
in policy rules that allow or deny traffic to the IP addresses of the VMs. For
streamlining your configuration and managing policies and objects centrally from
Panorama, you can define the Dynamic Address Groups and Security policy rules on
Panorama and push them to the firewalls instead of managing the Dynamic Address
Groups and Security policy rules locally on each firewall.
The AWS plugin version 3.0.1 or later is for monitoring EC2 instances for up to
1000 VPCs on the AWS public cloud, AWS GovCloud, and AWS China. However, because
Panorama cannot be deployed on AWS China, the IAM role does not support instance
profiles on AWS China; you must provide the AWS credentials.
Planning Checklist for VM Monitoring on AWS
For Panorama to interact with the AWS APIs and collect information on your EC2
instances, you need to create an IAM role and assign the policies that grant the
permissions required to authenticate to AWS and access the EC2 instances within
your VPC. You can add 100 IAM roles to manage up to 1000 VPCs on Panorama.
-
Gather the VPC ID.
-
Tag your EC2 instances on AWS. You can tag (define a name-value pair) the EC2 instances either on the EC2 Dashboard on the AWS management console or using the AWS API or AWS CLI. See List of Attributes Monitored on the AWS VPC for the list of supported attributes.
-
Check for duplicate IP addresses across the VPCs for which you will enable monitoring. If you have duplicate IP addresses across AWS VPCs, the metadata will be appended together or swapped and this may cause unexpected results in policy enforcement.Duplicate IP addresses are written to the plugin_aws_ret.log file that you can access from the CLI on Panorama.
-
Review the requirements for Panorama and the managed firewalls:
-
Minimum system requirements—Panorama virtual appliance or hardware-based Panorama appliance.
Panorama Minimum Requirements System Resources Memory CPUs Number of Monitored VPCs Number of Tags Registered 16GB 4 1-100 Panorama 9.1 or later with AWS plugin v 2.0 is tested to retrieve 10,000 IP addresses with 13 tags for each, or 5000 IP addresses with 25 tags for each, and successfully register them to the firewalls included within a device group.The tag length—includes name and value—for each EC2 instance is assumed to be 64 bytes per tag. For example, the EC2 instance name tag is aws.ec2.tag.Name.prod-web-app-4523-lvss6j.32 GB 8 100-500 64 GB 16 500-1000 Panorama OS version 10.0.5 or later AWS plugin version 3.0.1 or later Licenses Active support license and a device management license on Panorama for managing the firewalls.Next-generation firewalls must also have a valid support license.Roles and Permissions to retrieve metadata on the EC2 instancesSee IAM Roles and Permissions for Panorama -
You must add the firewall as managed devices on Panorama and create Device Groups so that you can configure Panorama to notify these groups with the VM information it retrieves. Device groups can include VM-Series firewalls or virtual systems on the hardware firewalls.
-
If your Panorama appliances are in a high availability configuration, you must manually install the same version of the AWS plugin on both Panorama peers. Additionally, if you are using instance profiles, you must attach the same instance profile to both Panorama peers.You configure the AWS plugin on the active Panorama peer only. On commit, the configuration is synced to the passive Panorama peer. Only the active Panorama peer polls the AWS accounts you have configured for VM Monitoring.
-
Set up the credentials/permissions that Panorama requires to digitally sign API calls to the AWS services.You can choose whether you want to provide the long-term credentials—Access Key ID and Secret Access Key—that enable access to the resources within each AWS account, or set up an Assume Role on AWS to allow access to defined AWS resources within the same AWS account or cross-accounts. With an Assume Role, you must set up a trust relationship and define the permissions while creating the role itself. This is specifically useful in a cross-account deployment where the querying account does not have permissions to see or handle data from the queried account. For the Panorama plugin to successfully authenticate to the VPC and retrieve the tags, you must configure the Assume Role to use the AWS Security Token Service (STS) API to any AWS service. And a user from the querying account must have STS permissions to query the Assume Role and obtain the temporary security credentials to access resources. If your Panorama is deployed on AWS, you can opt to use an instance profile instead of providing the AWS credentials for the IAM role. The instance profile includes the role information and associated credentials that Panorama needs to digitally sign API calls to the AWS services. See IAM Roles and Permissions for Panorama for more details.
-
IAM Roles and Permissions for Panorama
Review the permissions required to enable Panorama to authenticate and retrieve
metadata on the EC2 instances deployed within your AWS account(s).
With the AWS plugin version 2.0, you can use IAM roles or instance profiles to
enable Panorama to authenticate and retrieve metadata on the resources deployed
within your AWS account(s).
-
When your Panorama is not deployed on AWS, you have two options. You can either provide the long-term IAM credentials for the AWS accounts you want to monitor, or set up an Assume Role on AWS to allow access to defined AWS resources within the same AWS account or cross-accounts. An Assume Role is recommended as the more secure option.
-
When your Panorama is deployed on AWS, in addition to the two options listed above, you can also add an instance profile that allows the IAM role to be passed to the EC2 instance. You can use an instance profile where all your monitored resources and Panorama are hosted within the same account, or an instance profile with Assume Role for cross account access where your Panorama and monitored resources are deployed across different AWS accounts. If you use the instance profile, you do not enter your AWS credentials on Panorama.
| Option 1: IAM role with long term credentials | ||
| Roles and Permissions Required |
The AWS credentials associated with the AWS account that
has the VPC/EC2 instances you want to monitor.
The JSON format for the minimum permissions associated
with the IAM role with long-term credentials is as
follows:
| |
| Inputs on Panorama |
Enter the Access Key ID and
Secret Access Key for the
user in .
| |
| Option 2: IAM role with Assume Role | ||
| Roles and Permissions Required |
While you can use this option to monitor VPCs within the
same or cross account, this option is recommended to
enable cross account access by assuming a role that
allows you to access resources to which you may normally
have access.
To assume a role from a different account, your AWS
account must be trusted by that role and defined as a
trusted entity in its trust policy. In addition, a user
who wants to access a role in a different account must
have a policy with secure token service (STS) access
that specifies the role ARN.
On Account 1 that you want to monitor:
| |
| Inputs on Panorama |
| |
| Option 3: Instance profile | ||
| Roles and Permissions Required | Only when Panorama is deployed
as an EC2 instance on AWS Note that when you use the AWS Management console to
create an IAM role, the console automatically creates an
instance profile with the same name as the role. Because
the role and the instance profile has the same name,
when you launch tour Panorama (EC2 instance) with an IAM
role, the instance profile of the same name is
associated with it. Create an IAM role with
AmazonEC2ReadOnlyAccess. | |
| Inputs on Panorama |
Select Instance Profile as the
option in .
| |
| Option 4: Instance profile with Assume Role | ||
| Roles and Permissions Required |
Use instance profile with Assume role when Panorama and
the resources you want to monitor are deployed across
AWS accounts.
For Panorama HA, make sure to attach the same instance
profile to both Panorama peers.
On Account 1, where your EC2 instances are
deployed:
On Account 2, where your Panorama is deployed:
| |
| Inputs on Panorama |
| |
Install or Upgrade the AWS Plugin
To get started with monitoring your EC2 instances on AWS, refer to the
Compatibility Matrix for the Panorama Plugin for AWS and VM-Series
plugin
versionsrequired
to support VM monitoring.
To upgrade a Panorama plugin for AWS version 3.0.1, you must first upgrade the
plugin version to 2.0.2.
After you install the AWS plugin version 3.0.1, you cannot downgrade to
version 2.0.x or below.
If you have a Panorama HA configuration, repeat the installation/upgrade process
on each Panorama peer.
Install or uninstall plugins during a planned maintenance window.
If you currently have a Panorama plugin for any cloud platform installed,
installing (or uninstalling) an additional plugin requires a Panorama reboot
so
commit
changes.
If you have a standalone Panorama or two Panorama appliances installed in an HA
pair with multiple plugins installed, plugins might not receive updated IP-tag
information if one or more of the plugins is not configured. This occurs because
Panorama will not forward IP-tag information to unconfigured plugins.
Additionally, this issue can occur if one or more of the Panorama plugins is not
in the Registered or Success state (positive state differs on each plugin).
Ensure that your plugins are in the positive state before continuing or
executing the commands described below.
If you encounter this issue, there are two workarounds:
-
Uninstall the unconfigured plugin or plugins. It is recommended that you do not install a plugin that you do not plan to configure right away
- You can use the following commands to work around this issue. Execute the following command for each unconfigured plugin on each Panorama instance to prevent Panorama from waiting to send updates. If you do not, your firewalls may lose some IP-tag information.request plugins dau plugin-name <plugin-name> unblock-device-push yesYou can cancel this command by executing:request plugins dau plugin-name <plugin-name> unblock-device-push no
The commands described are not persistent across reboots and must be used again
for any subsequent reboots. For Panorama in HA pair, the commands must be
executed on each Panorama.
- Log in to the Panorama Web Interface, select and click Check Now to get the
AWS plugin version that supports VM
monitoring.
![]()
- Download and Install the plugin.After you successfully install, Panorama refreshes and the AWS plugin displays on the tab.On the Panorama Dashboard General Information widget you can verify the Panorama Plugin for AWS version that is installed.
- (Panorama in HA) .If your Panorama is in HA, commit the changes to the Panorama configuration to ensure that tags are registered to the Panorama peer on failover.

Configure the AWS Plugin for VM Monitoring
Retrieve VM information for your AWS workloads, use the match criteria filters to
define Dynamic Address groups and enforce Security policy.
To begin monitoring the virtual machines in your AWS public cloud deployment,
after you Install the AWS Plugin you must create a Monitoring
Definition. This definition specifies the IAM Role that is authorized to access
the EC2 instances within the AWS VPC you want to monitor and the Notify Group
that includes the firewalls to which Panorama should push all the
IP-address-to-tag mappings it retrieves. In order to enforce policy, you must
then create Dynamic Address Groups and reference them in Security policy. The
Dynamic Address Groups enable you to filter the tags you want to match on, so
that the firewall can get the public and private IP addresses registered against
each tag, and then allow or deny access to traffic to and from the workloads
based on the policy rules you define.
- Log in to the Panorama web interface.
- Set up the following objects for enabling VM Monitoring on AWS.
-
Verify that monitoring is enabled on the plugin. This setting must be enabled for Panorama to communicate with the AWS public cloud for VM Monitoring.The checkbox for Enable Monitoring is on .
![]()
-
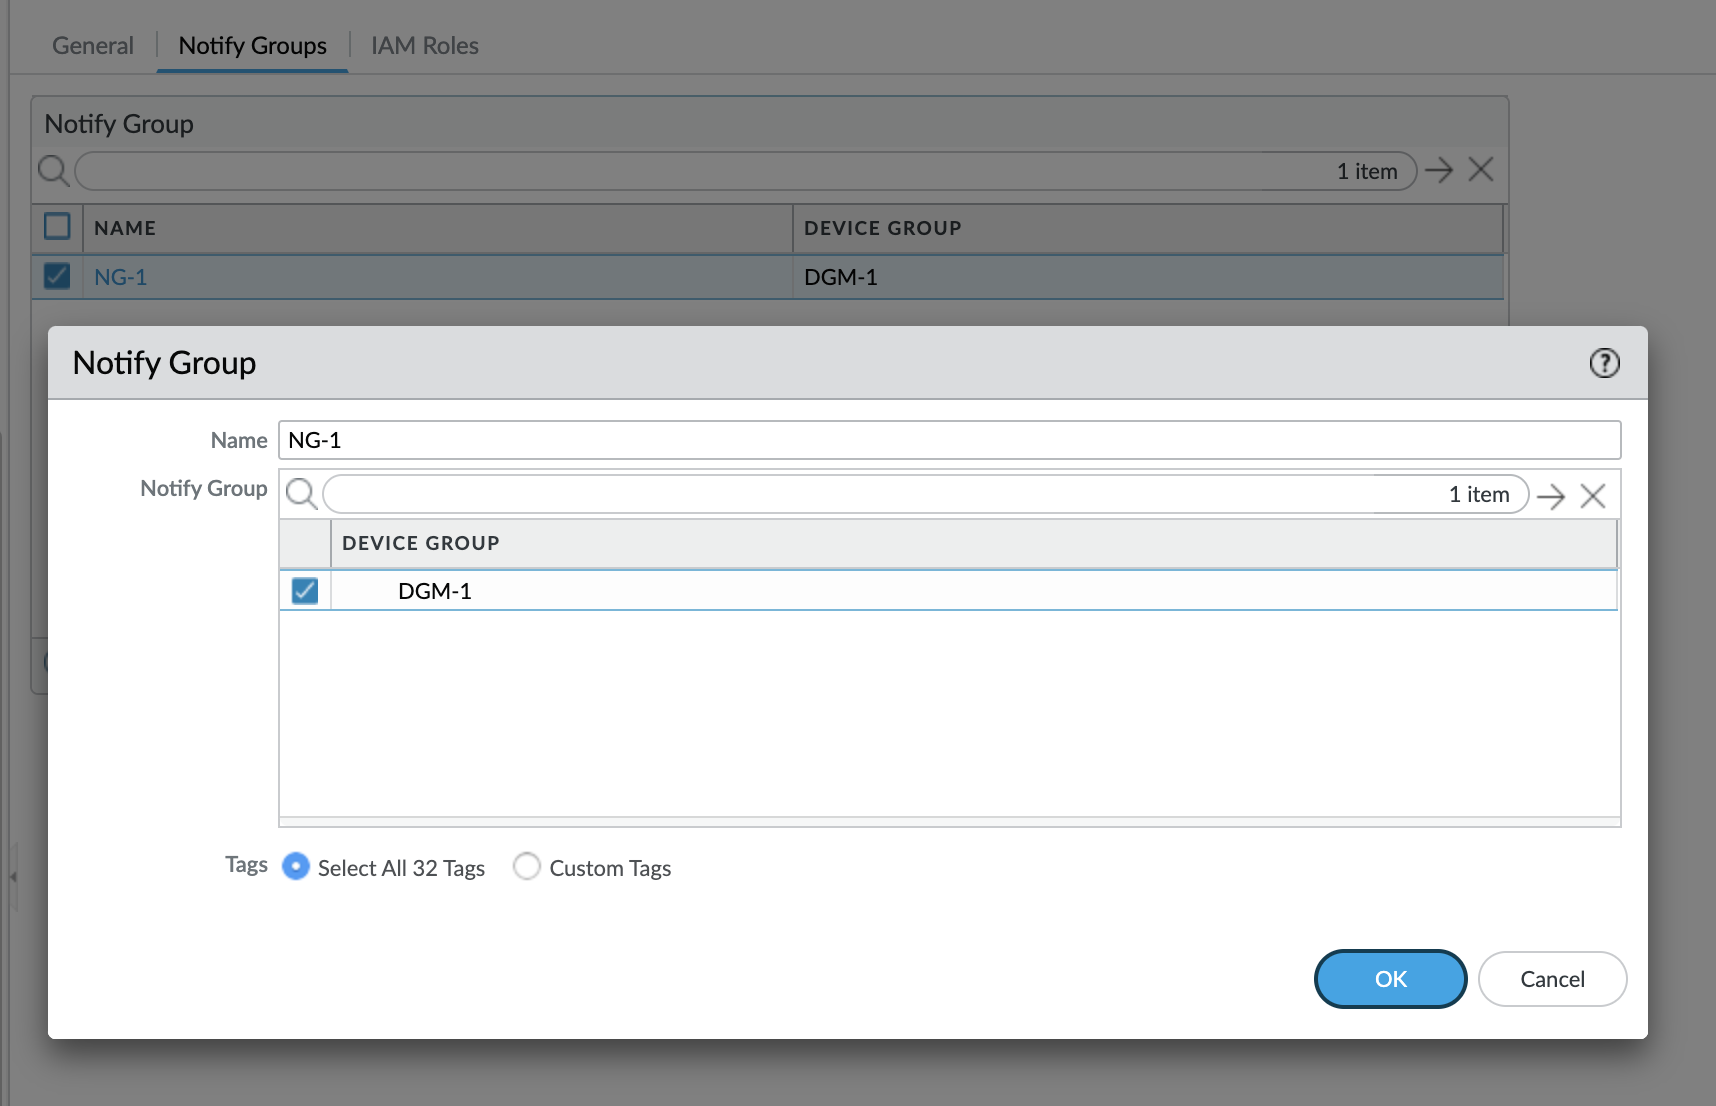
Add a notify group.
-
Select .
![]()
-
Enter a Name to identify the group of firewalls to which Panorama pushes the VM information it retrieves.
-
Select the Device Groups, which are a group of firewalls or virtual systems, to which Panorama will push the VM information (IP address-to-tag mapping) it retrieves from your AWS VPCs. The firewalls use the update to determine the most current list of members that constitute dynamic address groups referenced in policy. If you are using the Panorama plugin for Azure and AWS, you can target the same firewall or virtual system with tags from both environments.Think through your Device Groups carefully.
-
Because a Monitoring Definition can include only one notify group, make sure to select all the relevant Device Groups within your notify group. If you want to unregister the tags that Panorama has pushed to a firewall included in a notify group, you must delete the Monitoring Definition.
-
To register tags to all virtual systems on a firewall enabled for multiple virtual systems, you must add each virtual system to a separate device group on Panorama and assign the device groups to the notify group. If you assign all the virtual systems to one device group, Panorama will register tags to only one virtual system on the firewall.
-
-
Select the tags that you want to retrieve from the AWS VPCs.You can Select All 32 Tags (the default) or pick the Custom Tags you want to retrieve for your instances. With the Custom Tags option, you can Add the predefined tags and the user-defined tags that you want to use as match criteria in Security policy. If you are monitoring a large number of EC2 instances, reducing the number of tags you retrieve ensures more efficient use of the CPU and memory capacity on your Panorama. Refer to Planning Checklist for VM Monitoring on AWS for some guidelines.
![]()
-
-
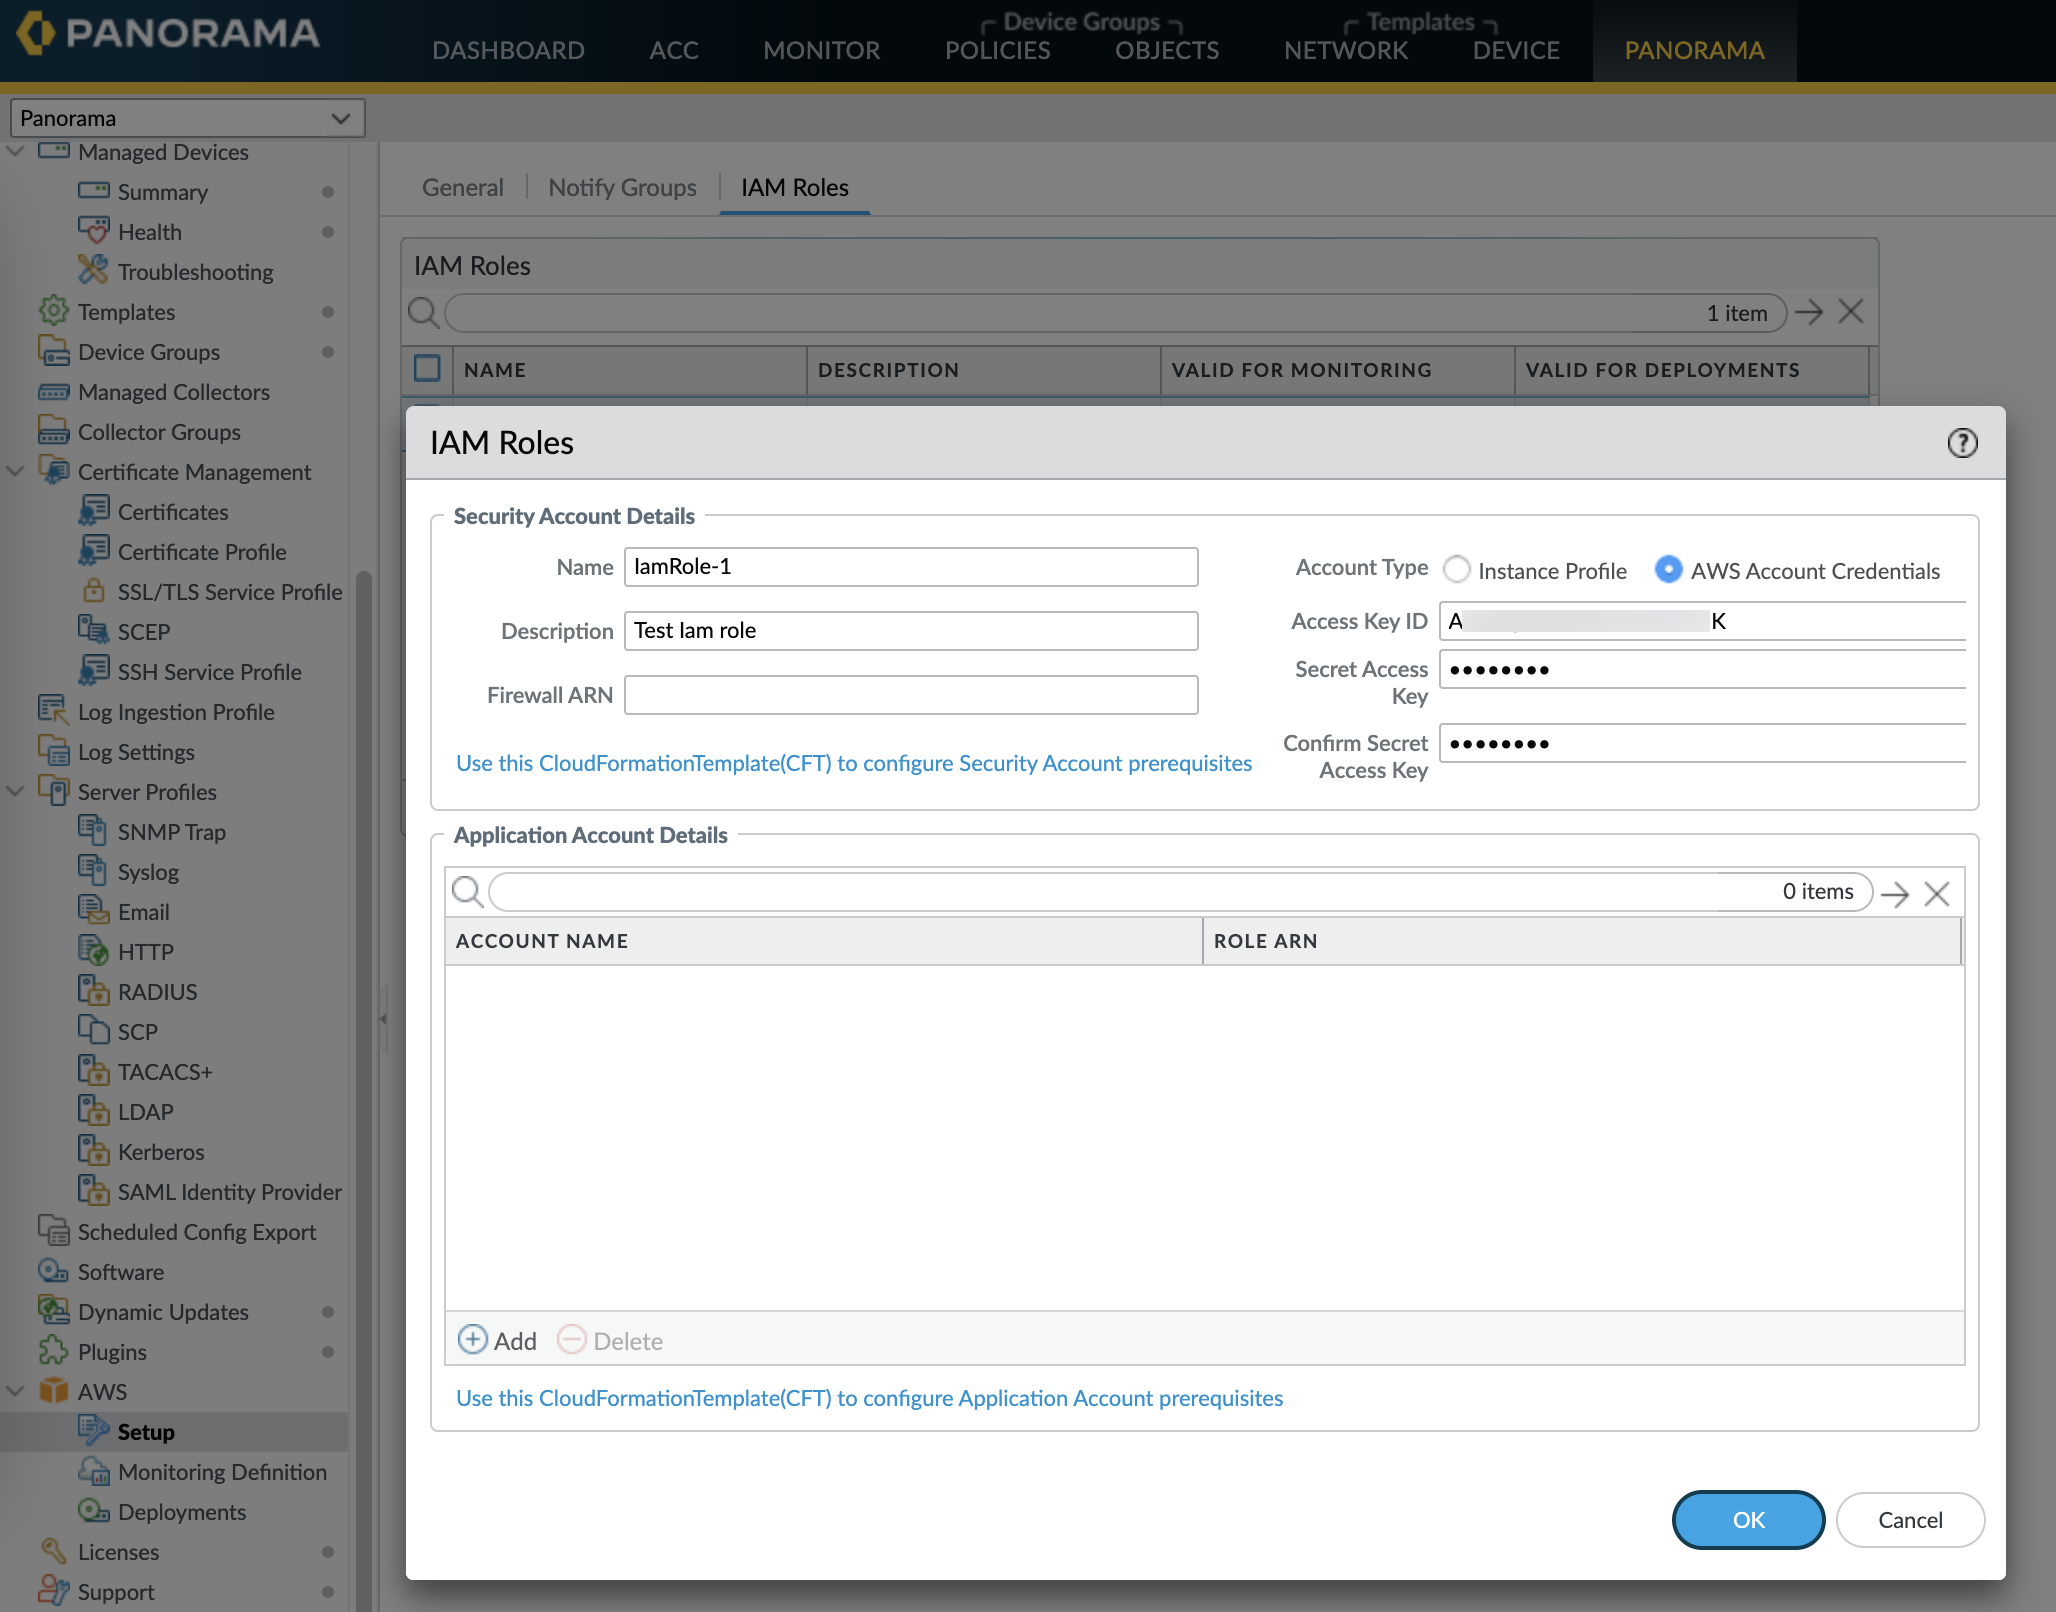
Add an IAM Role.An IAM role is an entity that allows you to delegate access so that Panorama can make service requests on your behalf to the AWS resources (virtual machines that are deployed as EC2 instances).
-
Select .
![]()
-
Enter a Name and optionally a Description to identify the IAM role.
-
Select Account Type—Instance Profile or AWS Account Credentials.If your Panorama is deployed on AWS, you can choose to either attach an instance profile with the correct permissions to your Panorama or add the credentials associated with the IAM role on Panorama. If your Panorama is not deployed on AWS, you must enter the credentials for the IAM role locally on Panorama.
-
(For AWS Account Credentials only) Enter the Secret Access Key and re-enter it to confirm, and click OK.
-
-
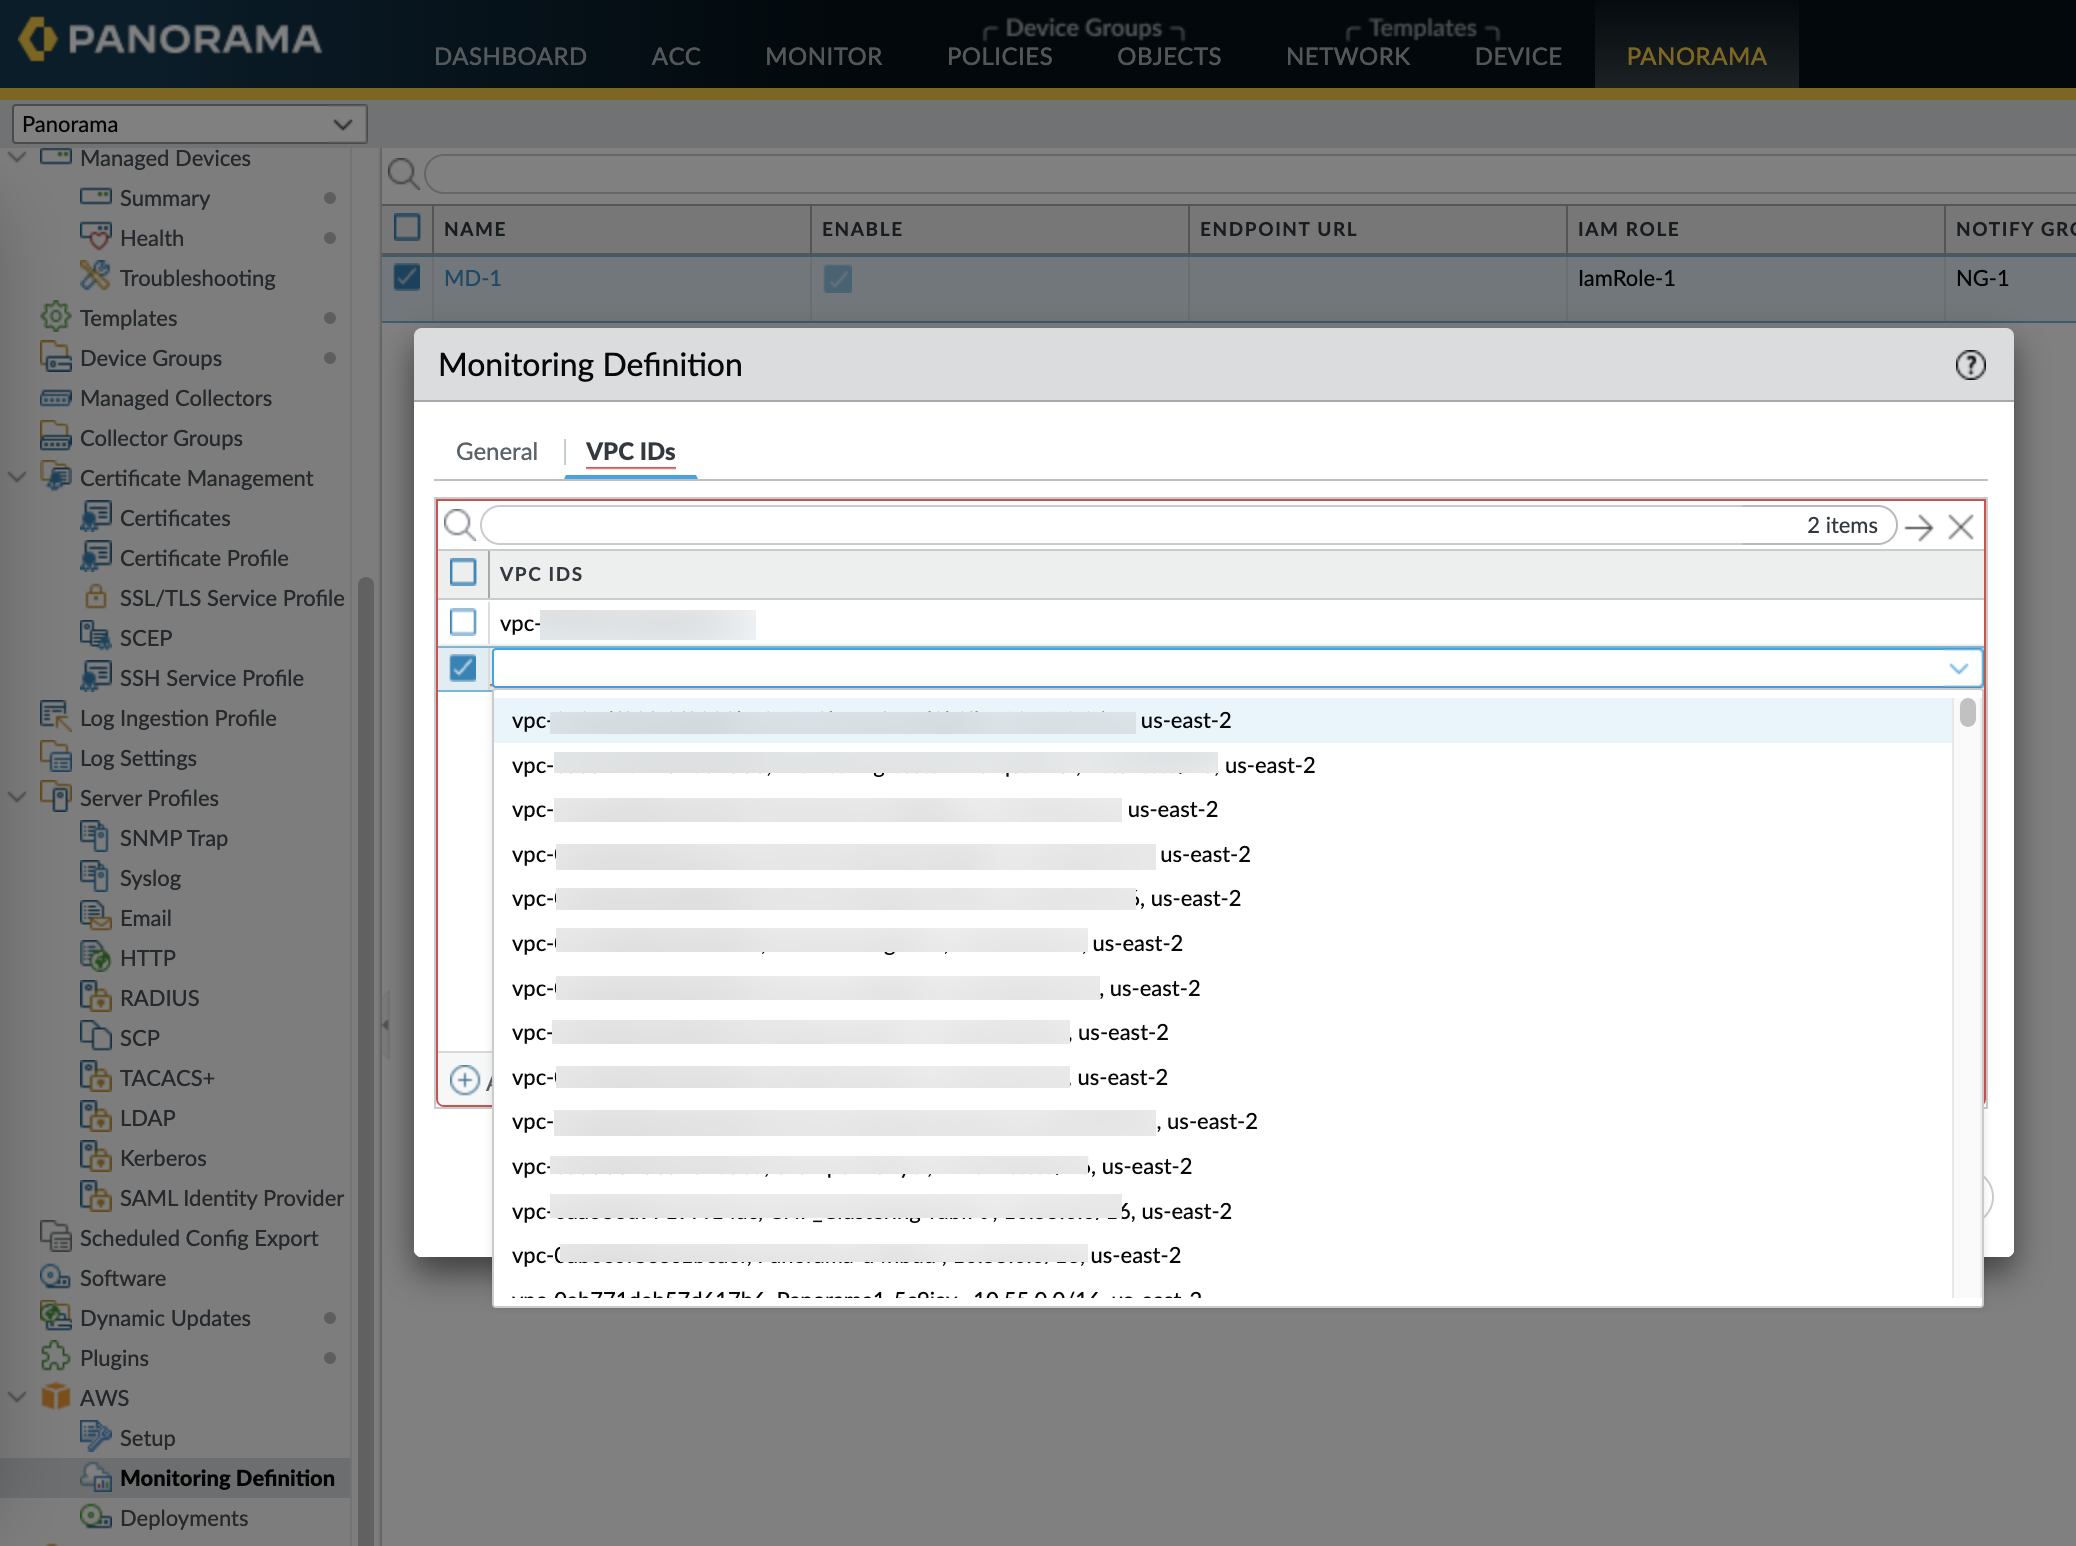
- Create a Monitoring Definition for each VPC you want
to monitor.When you add a new Monitoring definition, it is enabled by default.
-
Select , to Add a new definition.
-
Enter a Name and optionally a Description to identify the AWS VPC for which you use this definition.
-
Select the IAM Role, Add the VPC ID from the VPC Dashboard on the AWS management console, and Notify Group.
-
Select AWS Regions:
- All—Select all AWS regions.
- Select—Select specific AWS regions. Search AWS regions from the Member search bar or Add new regions.
-
(Optional) Enter the Role ARN, if you have set up role chaining and IAM roles with temporary credentials that have permissions to use the AWS STS API to access AWS resources with the same account or cross-account. The Role ARN must belong to the VPC you want to monitor.
-
Select a Notify Group, and Enable monitoring.
![]()
-
On the VPC IDs tab, add the VPC IDs from the VPC dashboard on the AWS Management Console.
![]()
-
- Commit the changes on Panorama.Verify that the status for the Monitoring Definition displays as Success. If it fails, verify that you entered the AWS VPC ID accurately and provided the correct keys and IDs for authorizing access.Click Validate to verify that Panorama can authenticate using the IAM role and keys and to communicate with the AWS VPCs you’ve entered above.
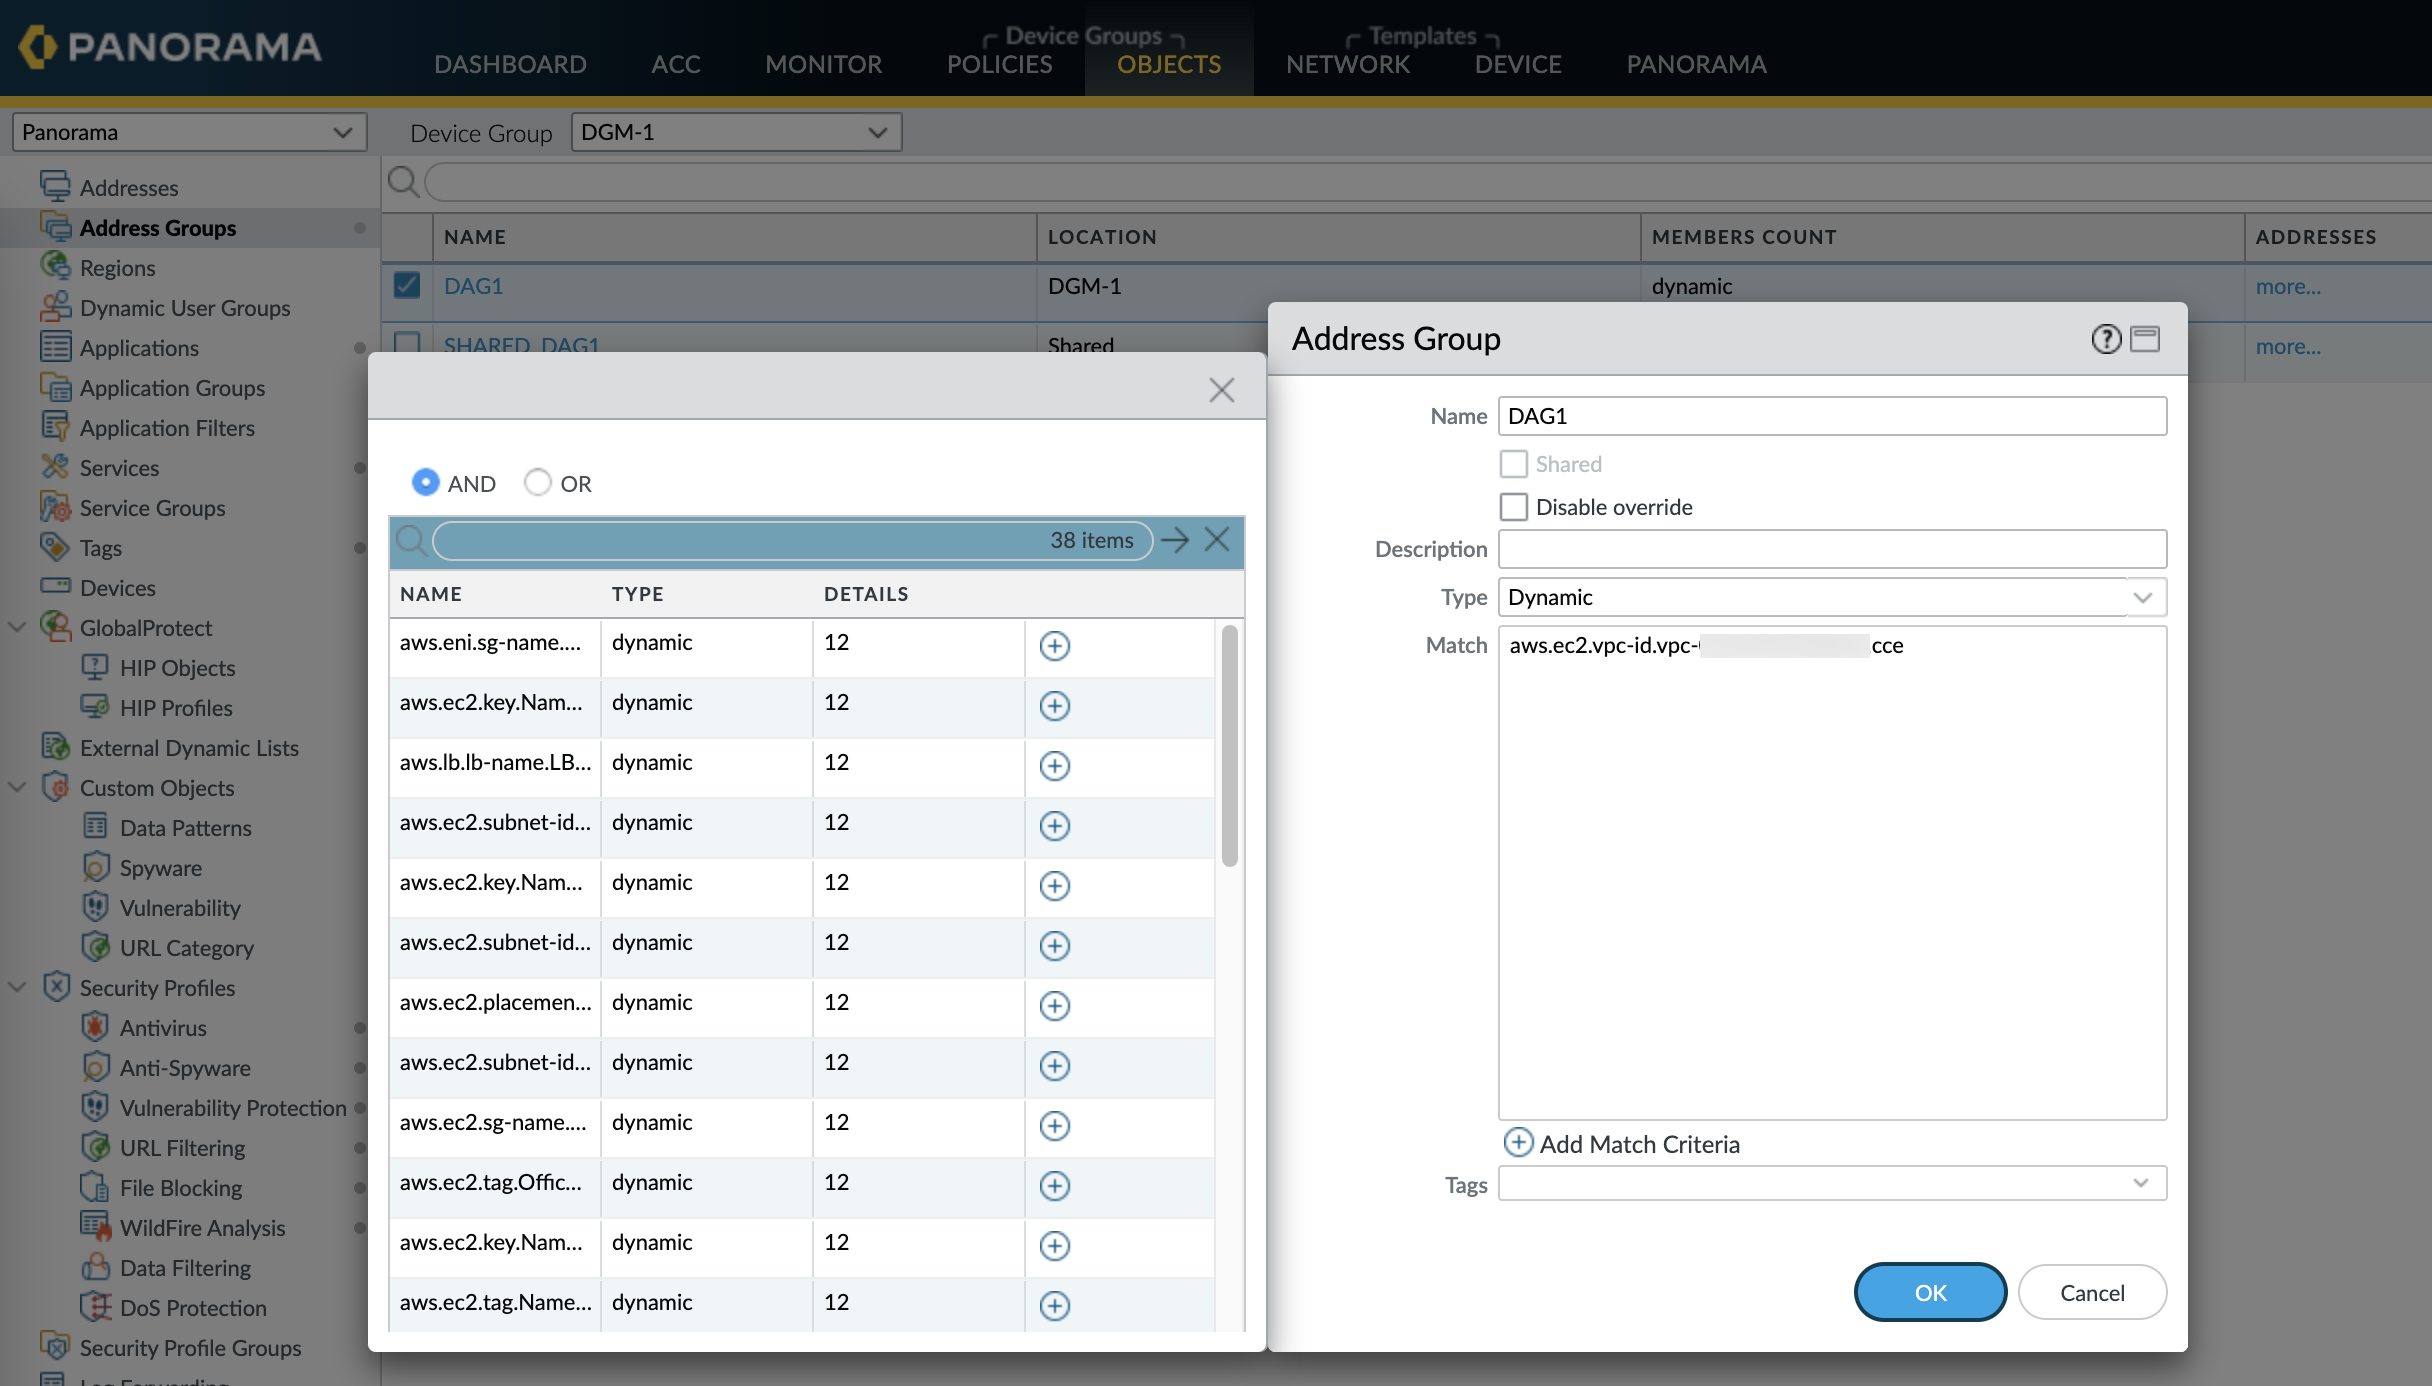
- Verify that you can view the VM information on Panorama, and define the
match criteria for Dynamic Address Groups.
![]() On HA failover, the newly active Panorama attempts to reconnect to the AWS cloud and retrieve tags for all monitoring definitions. If Panorama is unable to reconnect with even one of the monitoring definitions that you have configured and enabled, Panorama generates a system log message
On HA failover, the newly active Panorama attempts to reconnect to the AWS cloud and retrieve tags for all monitoring definitions. If Panorama is unable to reconnect with even one of the monitoring definitions that you have configured and enabled, Panorama generates a system log messageUnable to process accounts after HA switch-over; user-intervention required.
If this happens, you must log into Panorama and verify the monitoring definitions to fix invalid credentials or remove invalid accounts. Although Panorama is disconnected from the AWS cloud, all tags that were retrieved for the monitoring definitions before the failover, are retained and the firewalls can continue to enforce policy on that list of IP addresses. Panorama removes all tags associated with the accounts only when you delete a monitoring definition. As a best practice, to monitor this issue, you can configure action-oriented log forwarding to an HTTPS destination from Panorama so that you can take action immediately. - Know where to find the logs related to the AWS plugin on Panorama for
troubleshooting.
-
Use the CLI command less plugins-log to view a list of all available logsless plugins-log plugin_aws_ret.log displays logs related to IP address and tag retrieval.less plugins-log plugin_aws_proc.log displays logs related to processing of the registered IP address and tags.less plugins-log plugin_aws.log displays logs related to the AWS plugin configuration and daemons.
Use show plugins aws vm-mon-status for the status of the Monitoring Definitions.admin@Panorama> show plugins aws vm-mon-status Mon-Def Name VPC Status Last Updated Time Error Msg ----------------------------------------------------------------------------- MD-Ins-Prof-ARN vpc-07986b091 Success 2019-12-02T10:24:56.007000 MD-gov vpc-7ea1cf1a Success 2019-12-02T10:24:56.008000 MD-IAM-ARN vpc-025a83c123 Success 2019-12-02T10:24:56.012000 -