Prepare to Set Up VM-Series Firewalls on Google Public Cloud
Table of Contents
Prepare to Set Up VM-Series Firewalls on Google Public Cloud
Prepare to set up a VM-Series firewall on Google Cloud
Platform, configure your Google accounts access (including the SSH
key pair), plan VPC networks, and network interfaces for the firewall.
If you are deploying using the Google Marketplace, you must create
your project networks and subnetworks, and plan networks and IP
address assignments for the VM-Series firewall interfaces in advance.
During the deployment, you must choose from existing networks and
subnetworks.
Refer to the following topics when planning your deployment:
General Requirements
The components in this checklist are common to deploying
a VM-Series firewall that you manage directly or with Panorama.
Additional requirements apply for Panorama plugin for services such
as Stackdriver monitoring, VM monitoring, auto scaling or securing
Kubernetes deployments.
Always consult the Compatibility Matrix for Panorama plugin information
for public clouds.This release
requires the following software:
- GCP account—You must have a GCP user account with a linked email address and you must know the username and password for that email address.
- Google Cloud SDK—If you have not done so, install Google Cloud SDK, which includes Google Cloud APIs, gcloud and other command line tools. You can use the command line interface to deploy the firewall template and other templates.
- PAN-OS on VM-Series firewalls on GCP—VM-Series firewalls running a PAN-OS version available from the Google Marketplace.
- VM-Series firewalls—VM-Series firewalls that you want to manage from Panorama must be deployed in Google Cloud Platform using a Palo Alto Networks image from the Google Marketplace. Firewalls must meet the Minimum System Requirements for the VM-Series Firewall.
- VM-Series Licenses—You must license a VM-Series firewall to obtain a serial number. A serial number is required to add a VM-Series firewall as a Panorama managed device. If you are using the Panorama plugin for GCP to deploy VM-Series firewalls you must supply a BYOL auth code. The Google Marketplace handles your service billing, but the firewalls you deploy will directly interface with the Palo Alto Networks licensing server.
- VM-Series plugin on the firewall—VM-Series firewalls running PAN-OS 9.0 and later include the VM-Series plugin, which manages integration with public and private clouds. As shown in the Compatibility Matrix, the VM-Series plugin has a minimum version that corresponds to each PAN-OS release.When there is a major PAN-OS upgrade the VM-Series plugin version is automatically upgraded. For minor releases it is up to you to determine whether a VM-Series plugin upgrade is necessary, and if so, perform a manual upgrade. See Install the VM-Series Plugin on Panorama.
- Panorama running in Management mode—A Panorama physical or virtual appliance running a PAN-OS version that is the same or later than the managed firewalls. Virtual instances do not need to be deployed in GCP.
- You must have a licensed version of Panorama.
- Panorama must have network access to the VPCs in which the VMs you want to manage are deployed.
- If you intend to manage VMs deployed in GCP, or configure features such as auto scaling, your PAN-OS and VM-Series plugin versions must meet the Public Cloud requirements to support the Panorama plugin for GCP.
- VM-Series plugin on Panorama. See Install the VM-Series Plugin on Panorama
- Panorama plugin for GCP version 2.0.0—The GCP plugin manages the interactions required to license, bootstrap and configure firewalls deployed with the VM Monitoring or Auto Scaling templates. The GCP plugin, in conjunction with the VM Monitoring or Auto Scaling templates, uses Panorama templates template stacks, and device groups to program NAT rules that direct traffic to managed VM-Series firewalls.
Install the VM-Series Plugin on Panorama
On Panorama, install or upgrade to the VM-Series
plugin version that supports the GCP features you want to configure,
as detailed in the Compatibility Matrix table for Public Clouds.
Initial
installation—Because the VM-Series plugin is optional on Panorama,
the first time you install you must download the
VM-Series plugin from the Support portal, then go
to to
upload and install.
Upgrade—Go to and click Check
Now. Install a version that meets the requirements in
the Compatibility Matrix table for Public Clouds.
Install the Panorama Plugin for GCP
The Panorama plugin for GCP is required if
you want to use Panorama to manage VM Monitoring or Auto Scaling
deployments created with Palo Alto Networks templates. Install the
plugin version that supports the GCP features you want to configure,
as detailed in the Compatibility Matrix table for Public Clouds.
You
cannot upgrade the Panorama Plugin for GCP from version 1.0.0 to
version 2.0.x. If you have installed version 1.0.0, remove it before
installing 2.0.x.
If you have a standalone Panorama
or two Panorama appliances installed in an HA pair with multiple
plugins installed, plugins might not receive updated IP-tag information
if one or more of the plugins is not configured. This occurs because
Panorama will not forward IP-tag information to unconfigured plugins.
Additionally, this issue can occur if one or more of the Panorama
plugins is not in the Registered or Success state (positive state
differs on each plugin). Ensure that your plugins are in the positive
state before continuing or executing the commands described below.
If
you encounter this issue, there are two workarounds:
- Uninstall the unconfigured plugin or plugins. It is recommended that you do not install a plugin that you do not plan to configure right away
- You can use the following commands to work around this issue. Execute the following command for each unconfigured plugin on each Panorama instance to prevent Panorama from waiting to send updates. If you do not, your firewalls may lose some IP-tag information.request plugins dau plugin-name <plugin-name> unblock-device-push yesYou can cancel this command by executing:request plugins dau plugin-name <plugin-name> unblock-device-push no
The
commands described are not persistent across reboots and must be
used again for any subsequent reboots. For Panorama in HA pair,
the commands must be executed on each Panorama.
- Verify your Panorama installation.On Panorama, ensure that your PAN-OS version meets the requirements to support GCP auto scaling.
- Remove the Panorama plugin for GCP v1.0.If you have the Panorama plugin v1.0 installed you must remove it.
- Install the Panorama plugin for GCP.Select , and type gcp in the search bar. Install the plugin version that supports the features you want to configure (see the Compatibility Matrix table for Public Clouds).After the installation you can see the plugin in the Panorama dashboard General Information list. View and you see the Setup, Monitoring Definition, and AutoScaling interfaces.
- (Optional) If your Panorama appliances are in
a high availability configuration, you must manually install the
same version of the Google plugin on both Panorama peers.Configure the Google plugin on the active Panorama peer only. On commit, the configuration syncs to the passive Panorama peer. Only the active Panorama peer polls Google VMs you have configured for VM Monitoring.
Prepare to Deploy from the GCP Marketplace
Review these requirements to ensure that you have proper
accounts and permissions before you use the Google Marketplace to
deploy the firewall on a Google Compute Engine (GCE) instance.
General Accounts and Permissions
- You, and any users you allow, must have the following minimal roles or equivalent Identity and Access Management (IAM) permissions to connect to the VM-Series firewall:
- Compute Viewer—Compute Viewer enables you to get and list compute engine resources without being able to read the data stored on those resources.
- Storage Object Viewer—Enables you to bootstrap using a Google storage bucket in the same project.
You can also restrict access with service accounts, as described in Google Authentication Methods.Users in your organization might have IAM permissions or predefined roles that are more permissive than required. Ensure that you appropriately restrict VM-Series firewall access. - Monitoring Metric Writer—Required for Stackdriver.
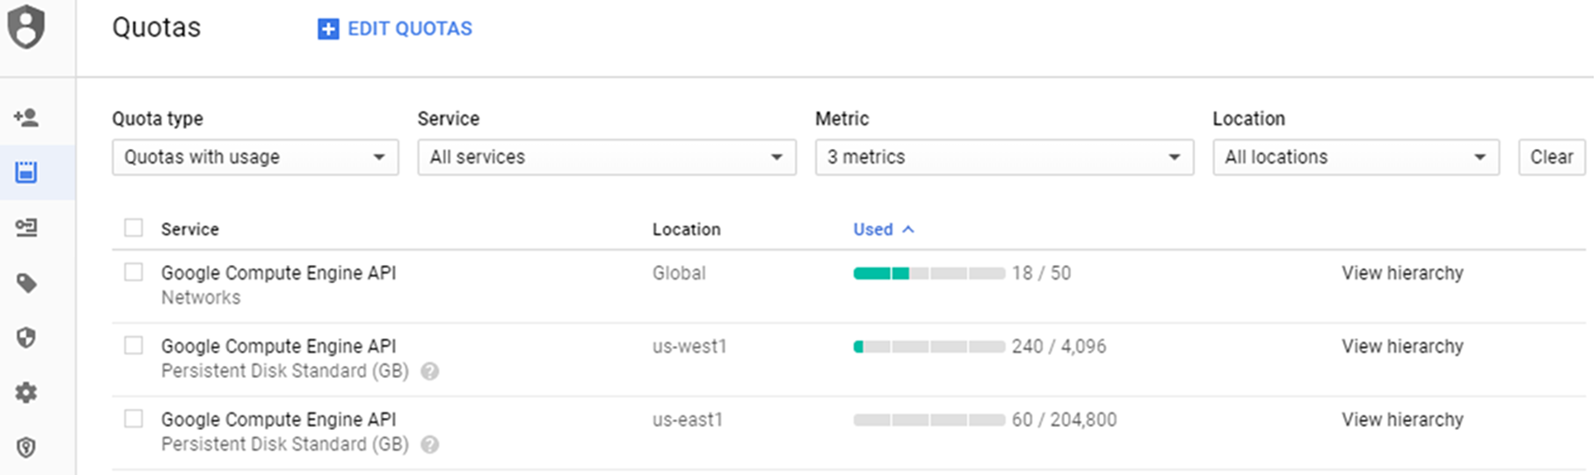
Available Google Resources
Your project must have sufficient resources to deploy
the VM-Series firewall as a Google Compute Engine instance. If you
are deploying a GCP Marketplace solution,
determine whether the solution deploys other VMs in addition to
the firewall. In the Google Cloud Console, select to
review the resource quotas for your project and the networks and
disk space consumed. If you are running out of resources you can
ask Google to allocate more for your organization.
Google Authentication Methods
GCP supports multiple ways to connect to an instance.
You can authenticate with a service account or an SSH key pair.
- Service Accounts—Service Accounts apply to applications or VMs—not to end users. They are commonly used to control access when you use programs or scripts, or when you access the firewall from the gcloud command line. If you are using Google Service Accounts to authenticate instances or applications, you must know the email address for the account(s). Refer to Creating and Managing Service Account Keys.Using a service account is necessary if you want to connect to the VM-Series firewall from outside the project—either from a different project or from the command line. For example, if you want to enable a physical next generation firewall to monitor your VM-Series firewall, you must save the VM-Series firewall service account information to a JSON file. In the physical firewall, you upload the file when you configure the connection.
- Select and choose +Create Service Account.Enter the service account name and description, and click Create.
- Select a role type from the drop menu, and on the right, select an appropriate access level.For example, select Project > Editor. You can select multiple roles for a service account. When you are finished, click Continue.
- Grant specific users permission to access this service account. Select members from the Permissions column on the right to give them permission to access the roles in the previous step.
- SSH Keys—If you deploy the VM-Series firewall from the Marketplace, you must supply one Open SSH key in RSA format for the Google Compute Engine instance metadata.The VM-Series firewall only accepts one key at deployment.At deployment time, you paste the public key into the Marketplace deployment, as described in SSH Key Pair. After deployment you use the private key to SSH in to the firewall to configure the administrator account. To add users, see Manage Firewall Administrators.
You can authenticate in several ways:
- Create service accounts for instances—You can create a service account for a specific instance or instance group, and grant specific permissions, which in turn can be granted to users.
- Use the default service account for your project—If you
are using the Google Cloud Platform (GCP™) Console, then you logged in
with your email address and can access a GCE instance based on whatever
permissions or roles the project administrator assigned to your account. Every Google Compute Engine instance created with the Google Cloud Console or the gcloud command line tool has a default service account with the name in email address format:<project-number>-compute@developer.gserviceaccount.comTo see the service account name for the firewall instance, view the instance details and scroll to the bottom (refer to the Compute Engine default service account).The default service account can manage authentication to VMs in the same project as a VM-Series firewall. Access scopes allow the firewall to initiate API calls to VMs in the Google Cloud project.
- Use IAM permissions and the Google APIs—If you use the Google SDK APIs and gcloud, then you must call the APIs to authenticate.
- You typically use the Google SDK when you want to manage the firewall from a command line or you want to run a script to configure the firewall.
- You need to access the Google APIs if a virtual machine you connect to has a custom image with applications that require Google APIs.
SSH Key Pair
When you deploy the VM-Series firewall from
the Google Marketplace you need an SSH key pair to authenticate
with the VM-Series firewall.
Create the key pair according
to your key generator documentation. Do not edit the public key
file. Editing risks introducing illegal characters.
The
VM-Series firewall manages authentication differently than GCE instances.
After deployment, you first log in with the admin user.
The VM-series firewall default user name is accepted only once.
After a successful login you set an administrator username and password
for the VM-Series web interface (see deploy-the-vm-series-firewall-on-gcp.html#id17CRDM00LH9).
The
Google Marketplace deployment interface SSH key field
displays the following placeholder:
admin:ssh-rsa your-SSH-key
admin is
the VM-Series firewall Administrator user name required to log in
to the firewall for the first time. You add the admin: prefix
into the Marketplace field when you deploy-the-vm-series-firewall-on-gcp.html#id17CRDM00LH9.
You
cannot log in to the VM-Series firewall if you do not supply the
entire public key, or your key has illegal characters when you paste
the key into the Marketplace SSH key field.
When you SSH in to the VM-Series firewall for the first time, the
public key is transferred to the firewall.
If the public
key is corrupted, you must delete the deployment and start over.
Any networks and subnetworks remain, but the firewall rules must be
recreated.
- Create an SSH key pair and store the SSH Key pair
in the default location for your operating system mentioned in Locating an SSH key.
- Linux or MacOS—Use ssh-keygen to create the key pair in your .ssh directory.
- Windows—Use PuTTYgen to create the key pair.The content of the Key comment field does not matter to the VM-Series firewall; you can accept the default (the key creation date) or enter a comment that helps you remember the name of the key pair. Use the Save private key button to store the private key in your .ssh directory.
- Select the full public key.
- Linux or MacOS—Open your public key in a text editor and copy the public key.
- Windows—You must use the PuTTY Key Generator to view the public key. Launch PuTTYgen, click Load, and browse to private key you saved in your .ssh directory.In PuTTYgen, scroll down to ensure you select the entire key, right click, and choose Copy.
![]()
- Enter the
public key in the SSH key field as detailed below.
- In the Marketplace SSH key field,
delete the placeholder text, and type:admin:Make sure there are no extra spaces following the colon.
- Insert the cursor after admin: and
choose Paste as plain text. The key must
be on a single line, as shown below:
![]()
- Move the cursor to the end of the key, add a space,
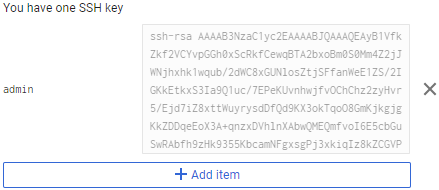
and type: adminThe final contents of the SSH key field must be:admin:ssh-rsa [KEY] admin
- In the Marketplace SSH key field,
delete the placeholder text, and type:
- Check the key.After the deployment, and before you attempt to log in to the firewall, view the management instance and check the key for linefeeds or extra spaces:
![]() If the key is all on one line and the format is admin:ssh-rsa [KEY] admin, you are finished.
If the key is all on one line and the format is admin:ssh-rsa [KEY] admin, you are finished. - (optional) If something is wrong you must replace
the key.
- Click the X to delete the key, then click + Add item.
- Enter the key as described in Step 3. Now the SSH key field must show:admin:ssh-rsa [KEY] admin
- Click Save to deploy the updated deployment.
- Re-check the key.


Virtual Private Cloud (VPC) Network Planning
Before you deploy from the Google Market place, make
a plan for VPC networks (referred
to as networks), subnetworks (also called subnets),
and Google firewall rules. You must create networks and subnetworks
before you start to deploy-the-vm-series-firewall-on-gcp.html#id17CRDM00LH9.
The Marketplace deployment page displays only networks and
subnetworks that exist when you start the deployment. If a network
is missing, you must exit the deployment, create the network, and
start over.
- VPC networks—You must create a custom network specifically for each VM-Series firewall network interface.
- See VM-Series Firewall Licenses for Public Clouds to determine the number of network interfaces needed based on your VM-Series firewall license. At a minimum, set up the three VPC networks and subnets required to launch the VM-Series firewall.
- A GCP project has a default network with preset configurations and firewall rules; you can delete the default network, if unused.
- By default, there are up to five networks in a project. Your GCP administrator can request additional networks for your project.
- To connect to the management interface you must create a GCP firewall rules that allows access. You can do this during the deployment if you choose Enable GCP Firewall rule for connections to Management interface then supply a CIDR block for Source IP in GCP Firewall rule for connections to Management Interface.
Be sure your networks include all instances you want to secure. - Subnetworks—A compute engine instance can support up to eight Layer 3 interfaces on a single instance. The Management, Trust, and Untrust interfaces consume three interfaces and you can create up to five additional dataplane interfaces. Typically the dataplane interfaces represent application networks.
- IP address—You supply IP address ranges when
you create interface subnetworks, and you have the option to enable an
external address when you deploy a subnetwork.
- When you create a network subnet, you must specify an IP address range. This range is used for your internal network, so it cannot overlap with other subnets.
- During deployment, you can choose to enable an external IP address when you create a network interface. By default, you are given an ephemeral IP address. You cannot supply a reserved static IP address during the deployment, but you can promote the ephemeral address to a static IP address after you complete the deployment process (see Promoting an ephemeral external IP address).
Network Interface Planning
Plan network interfaces for a Google Marketplace deployment
or a template deployment.
When you deploy from Google Cloud Platform Marketplace,
the default VM-Series firewall deployment has three interfaces: the
Management plane interface and the Untrust and Trust dataplane interfaces.
You can define additional dataplane instances, depending on the
available compute resources on your VM; see VM-Series Firewall Licenses for
Public Clouds.
All VM-Series
firewall interfaces must be assigned an IPv4 address when deployed
in a public cloud environment. IPv6 addresses are not supported.
During the deployment you have the opportunity to name these
interfaces.
Interface Order
When you deploy with Marketplace, the order of the network
interfaces is predefined. The Management interface maps to eth0, Untrust
to eth1, and Trust to eth2. Marketplace uses this order because
mapping the Management interface to eth0 and the Untrusted interface
to eth1 is a requirement if you need to Swap
the Management Interface for load balancing.
Management Interface
The first network
interface you add is mapped to eth0 on the firewall and includes
the option to enable IP forwarding. You use this network interface to
manage the VM-Series firewall. Typically, this interface has an
external IP address.
An external IP address is only
required if a dataplane interface is attached to the public subnet.
At creation time, you can receive an ephemeral IP address and later
promote it to a static IP address after you complete the deployment
(refer to Promoting an ephemeral external IP address).
Dataplane Interfaces (Untrust, Trust)
When
you deploy from Marketplace, the order in which you add interfaces
is predetermined.
- You configure the Untrust interface after the Management interface. This order means that the untrusted interface is mapped to eth1. The Untrust interfaces are typically attached to the public subnet, and have an external IP address.An external IP address is only required if a dataplane interface is attached to the public subnet. At creation time, you can receive an ephemeral IP address, then promote it to a static IP address, as discussed in Promoting an ephemeral external IP address.
- The Trust interface follows the Untrust interface, and it is mapped to eth2. The Trust network often does not have an external IP address. You can add any additional dataplane interfaces after the Trust interface.
Additional Dataplane Interfaces
Plan interfaces
for applications you must secure, such as web servers, databases,
and other applications in your network. You can create up to five additional
dataplane interfaces in addition to the three required to launch
your firewall. Ensure that the applications you want to secure are
in networks that connect to the VM-Series firewall.