Deploy the VM-Series Firewall on vCloud Air
Table of Contents
Deploy the VM-Series Firewall on vCloud Air
Use the instructions in this section to deploy
your VM-Series firewall in an on-demand or dedicated vDC on vCloud
Air. This procedure assumes that you have set up your vDC, including
the gateways required to allow traffic in and out of the vDC, and
the networks required for routing management traffic and data traffic
through the vDC.
- Obtain the VM-Series OVA image from the Palo Alto Networks Customer Support web site;
the vCloud Air Marketplace does not host the software image currently.
- Go to: www.paloaltonetworks.com/services/support.html.
- Filter by PAN-OS for VM-Series Base Images and download the OVA image. For example, PA-VM-ESX-9.1.0.ova.
- Extract the Open Virtualization Format (OVF) file from
the OVA image and import the OVF file in to your vCloud Air catalog.When extracting files from the OVA image, make sure to place all the files—.mf, .ovf, and .vmdk—within the same directory.For instructions to extract the OVF file from the OVA image, refer to the VMware documentation: https://www.vmware.com/support/developer/ovf/#sthash.WUp55ZyE.dpufWhen you import the OVF file, the software image for the VM-Series firewall is listed in My Organization’s Catalogs.
![]()
- Choose your workflow.A vApp is a collection of templates for preconfigured virtual appliances that contain virtual machines, and operating system images.
- Create
a vDC and a vApp that includes the VM-Series firewall.
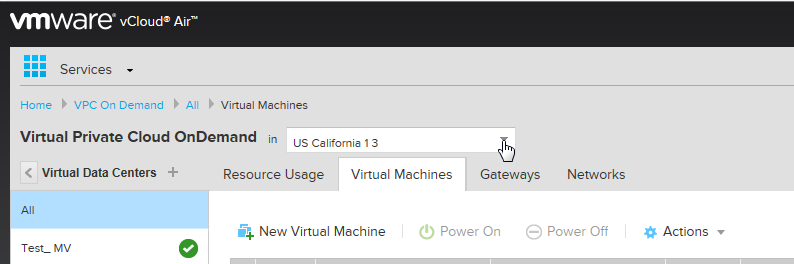
- Log in to vCloud Air.
- Select VPC OnDemand and select
the location in which you want to deploy the VM-Series firewall.
![]()
- Select Virtual Data Centers and click + to add a new Virtual Data Center.
- Select the vDC, right click and select Manage Catalogs in vCloud Director. You will be redirected to the vCloud Director web interface.
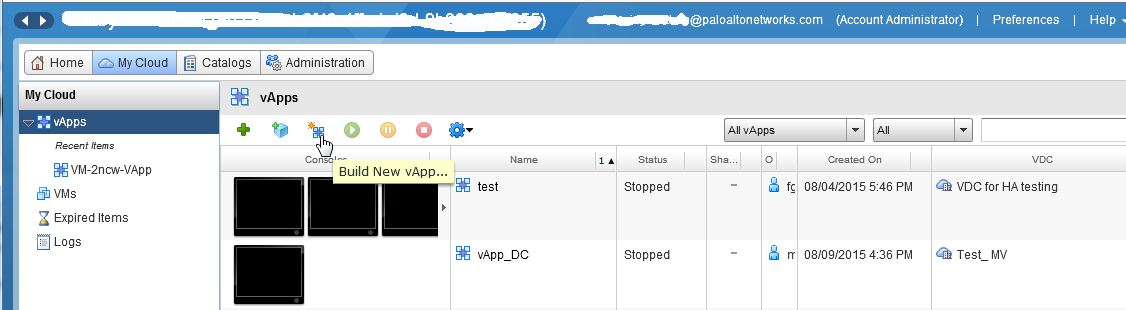
- Create a new vApp that contains one or more virtual
machines including the VM-Series firewall:
- Select , and click Build New vApp.
![]()
- Select Name and Location, and the Virtual Datacenter in which this vApp will run. By default, Leases for runtime and storage never expire and the vApp is not automatically stopped.
- Add Virtual Machines. To add the VM-Series firewall image from the Look in: drop-down, select My Organization’s Catalog, select the image and click Add. Click Next
- Configure Resources to specify the Storage Policies for the virtual machines when deployed. The VM-Series firewall uses the Standard option.
- Configure the Virtual Machines. Name each virtual machine and select the network to which you want it to connect. You must connect NIC 0 (for management access) to the default routed network; NIC 1 is used for data traffic. You can add additional NICs later.
- Verify the settings and click Finish.
- Continue to step 6.
- Add the
VM-Series Firewall into a vApp.
- Log in to vCloud Air.
- Select your existing Virtual Data Center from the left pane, right click and select Manage Catalogs in vCloud Director. You will be redirected to the vCloud Director web interface.
- Select and click the Name of the vApp in which to include the VM-Series firewall.
- Open the vApp (double-click on the name), select Virtual
Machines and click to add a virtual machine.
![]()
- In the Look in: drop-down, choose My Organization’s Catalog, select the VM-Series firewall image and click Add. Click Next.
- Click Next to skip Configure Resources. The VM-Series firewall uses the Standard option and you do not to modify the Storage Policy.
- Enter a Name for the firewall and for management access (NIC 0), select the default routed network and the IP Mode— Static or DHCP. You can configure NIC 1 and add additional NICs in step 6. Click Next.
- Verify how this vApp connects to the vDC— Gateway Address and Network Mask for the virtual machines in this vApp.
- Verify that you have added the VM-Series firewall and click Finish.
- Continue to step 6.
- Connect
the data interface(s) of the VM-Series firewall to an isolated or
a routed network, as required for your deployment.
- In vCloud Director, select and select the vApp you just created or edited.
- Select Virtual Machines and select the VM-Series firewall. Then, right-click and select Properties.
- Select Hardware, scroll to the NICs section and select NIC 1.
- Attach the dataplane network interface to a vApp network
or an organizational VDC network based on your connectivity needs for
data traffic to the VM-Series firewall. To create a new network:
- In the Network drop-down, click Add Network.
- Select the Network Type and give it a name and click OK.
- Verify that the new network is attached to the interface.
- To add additional NICs to the firewall, click Add and repeat step 4 above. You can attach a maximum of seven dataplane interfaces to the VM-Series firewall.
- Verify that the management interface of the VM-Series
firewall is attached to the default routed subnet on the vDC and
at least one dataplane interface is connected to a routed or isolated
network.
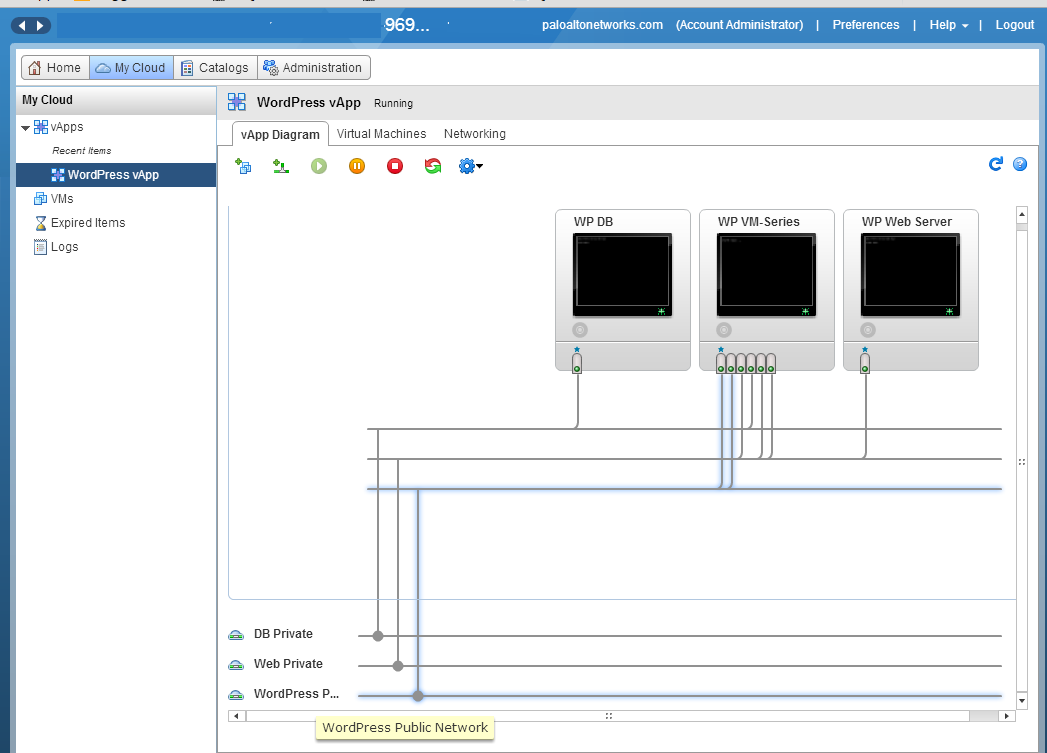
- Select and double-click the Name of the vApp you just edited.
- Verify network connectivity in the vApp Diagram.
![]()
- (Optional) Edit the hardware resources allocated
for the VM-Series firewall.Required only if you need to allot additional CPU, memory, or hard disk to the firewall.
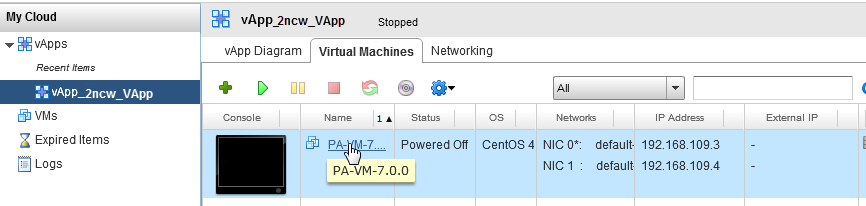
- Select and double-click the Name of
the vApp you just deployed.
![]()
- Select Virtual Machine and
click on the Name of the VM-Series firewall
to access the Virtual Machine Properties.
![]()
- Add additional Hardware resources
for the VM-Series firewall:
- See VM-Series System Requirements for the minimum vCPU, memory, and disk requirements for your VM-Series model.
- NICs: One management and up to seven dataplane interfaces.
- Select and double-click the Name of
the vApp you just deployed.
- Power on the VM-Series firewall.
- Configure an IP address for the VM-Series firewall management
interface.The VM-Series firewall on vCloud Air supports VMware Tools, and you can Use VMware Tools on the VM-Series Firewall on ESXi and vCloud Air to view the management IP address of the VM-Series firewall.
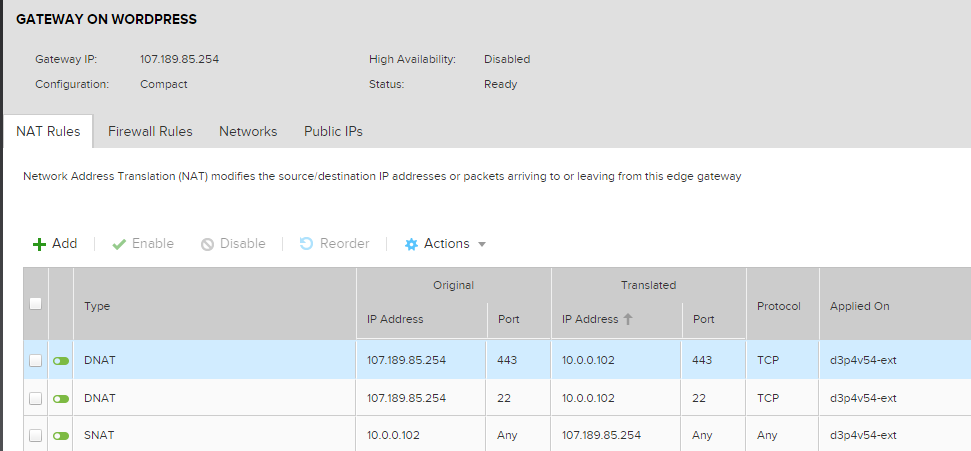
- Define NAT rules on the vCloud Air Edge Gateway to enable
Internet access for the VM-Series firewall.
- Select , select the gateway and double-click to add NAT Rules.
- Create two DNAT rules. One for allowing SSH access and one for HTTPS access to the management port’s IP address on the VM-Series firewall.
- Create a SNAT rule for translating the internal source
IP address for all traffic initiated from the management port on
the VM-Series firewall to an external IP address.To send and receive traffic from the dataplane interfaces on the firewall, you must create additional DNAT and SNAT rules on the vCloud Air Edge Gateway.
![]()
- Log in to the web interface of the firewall.In this example, the URL for the web interface is https://107.189.85.254The NAT rule on the Edge Gateway translates the external IP address and port 107.189.85.254:443 to the private IP address and port 10.0.0.102:443.
- Add the auth code(s) to activate the licenses on the firewall.
- Configure the VM-Series firewall to use the hypervisor assigned MAC address.
- Configure the dataplane interfaces as Layer 3 interfaces.
- Select .
- Click the link for ethernet 1/1 and
configure as follows:
- Interface Type: Layer3
- Select the Config tab, assign the interface to the default router.
- On the Config tab, select New Zone from the Security Zone drop-down. Define a new zone, for example untrust, and then click OK.
- Select IPv4, assign a static IP address.
- On , expand the Management Profile drop-down, and select New Management Profile.
- Enter a Name for the profile, such as allow_ping, and select Ping from the Permitted Services list, then click OK.
- To save the interface configuration, click OK.
- Repeat the process for each additional interface.
- Click Commit to save the changes.