Use Migration Coordinator to Move Your VM-Series from NSX-V to NSX-T
Table of Contents
Use Migration Coordinator to Move Your VM-Series from NSX-V to NSX-T
Learn how to perform a maintenance-mode migration to
move your VM-Series firewall deployment from NSX-V to NSX-T.
Complete the following procedure to migrate
your VM-Series firewall configuration from NSX-V to NSX-T using
the VMware Migration Coordinator tool in
NSX-T. This tool is designed run in-place on the same hardware that
is running NSX-V. By migrating your configuration, you can reuse
policy and dynamic address groups already configured on Panorama.
This procedure refers to information and processes published in VMware documentation as
well as steps specific to PAN.
This procedure supports operations-centric
NSX-V deployments only. An operations-centric deployment
means that your policy rules for redirecting traffic to the VM-Series
firewall were created in NSX-V Manager, not Panorama.
This
procedure requires NSX-T Manager 3.1.0 or later.
It is recommended that plan for security
downtime while performing this migration.
- Before you begin, complete the following preparatory
tasks.
- Enable DRS on the cluster to be migrated.
- VMs should be deployed on shared storage and not a local datastore.
- Prepare NSX-T Manager for migration.
- Log in to the NSX-T Manager CLI via SSH.
- Execute the following command to enable NSX Migration
Coordinator. start service migration-coordinatorThis will now appear in the NSX-T Manager user interface under .
- SSH in to the NSX-T Manager CLI as root or as admin.
- Execute the following command.st e
- Navigate ovf_validation.properties under /config.vmware/auth/
and make the following change.THIRD_PARTY_OVFS_VALIDATION_FLAG=2
- Execute the following command.service cm-inventory restart
- Install the Panorama Plugin for VMware NSX 3.2.0 or later. See the Panorama Plugin for VMware NSX 3.2.0 Release Notes before upgrading.
- Enable Communication Between NSX-T Manager and Panorama.
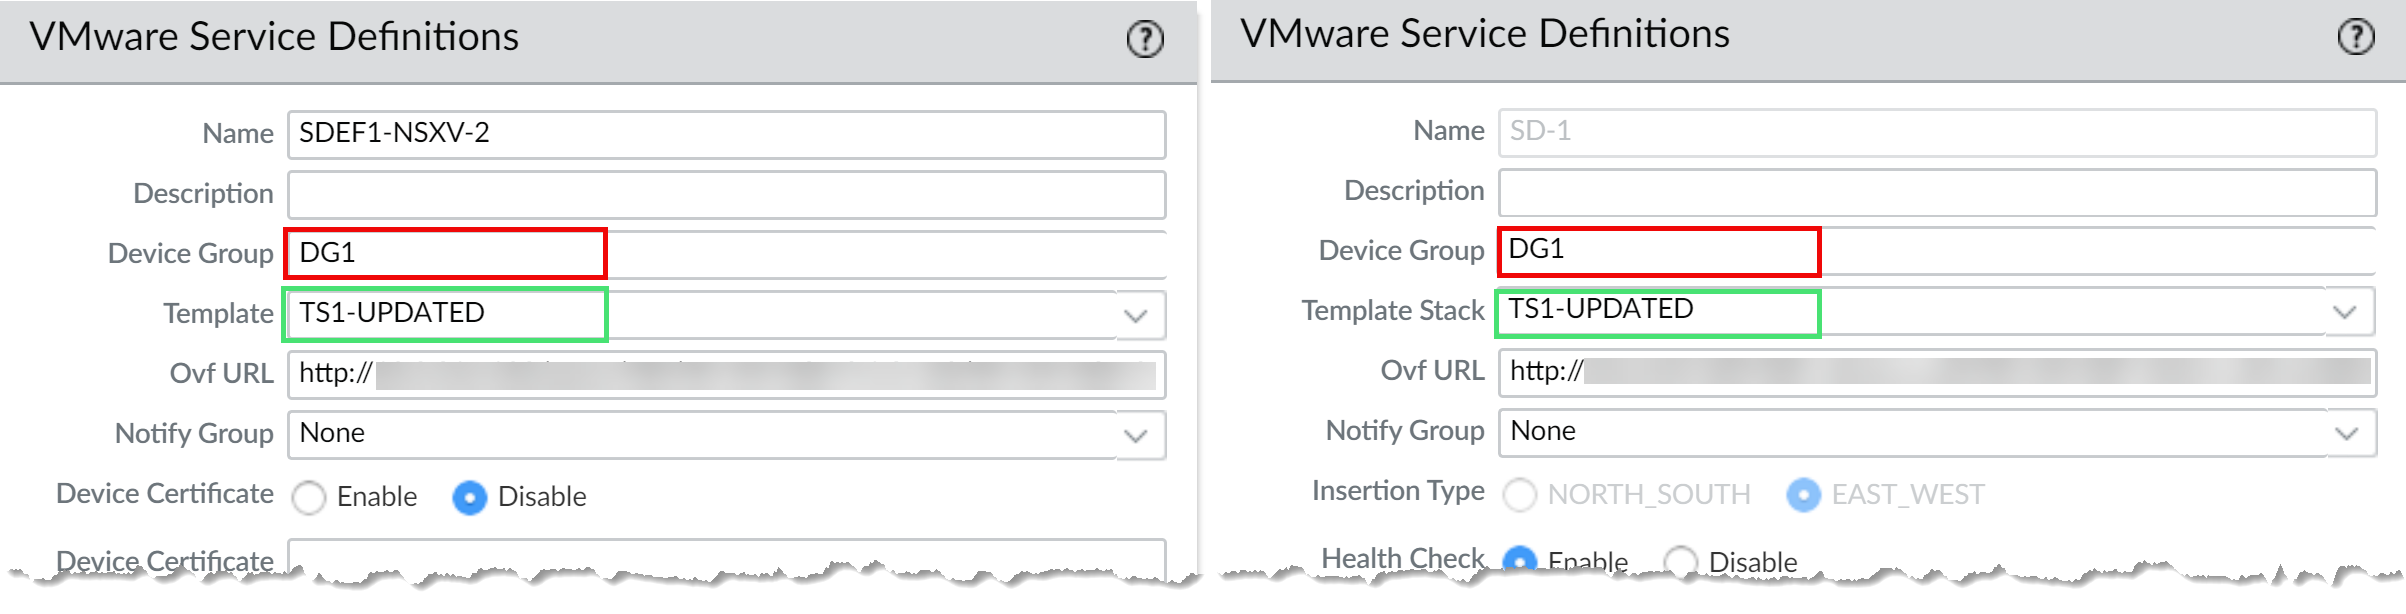
- Configure an NSX-T
service definition for each NSX-V service definition in your
deployment. Do not create new device groups; instead use
your existing NSX-V device groups. Using the existing device groups
allows you to apply the same security policy rules used on NSX-V
to the VM-Series firewalls deployed on NSX-T. If you have policy
that reference a particular zone, add the same template stack from
your NSX-V service definition to your NSX-T service definition.
Additionally, if your device group references a particular template,
ensure that you select the template stack that includes the template
referenced in the device group.
![]()
- Configure an NSX-T service manager and associate the
NSX-T service definitions to the service manager.
![]()
- Verify that your NSX-T configuration is present on NSX-T
Manager.
- Log in to NSX-T Manager.
- Select .
- Confirm that your NSX-T service definition is listed.
- Select .
- Confirm that your zones associated with your NSX-T template are listed.
Steps 8 through 11 detail the migration workflow to be executed on the migration coordinator tool on NSX-T Manager. For more information, refer to VMware migration documentation for more information. - Import the NSX-V configuration to NSX-T.
- Uninstall the service instance from NSX-V.This step will result in traffic disruption.
- Log in to your vSphere client.
- Select .
- Select your service deployment.
- Click Delete.
- Click Delete to confirm.
- Resolve Configuration issues
on NSX-T Manager. While resolving configuration issues, you must
take specific actions to migrate your VM-Series firewall configuration.
In most cases, you can accept the recommendations presented by NSX-T
Manager.
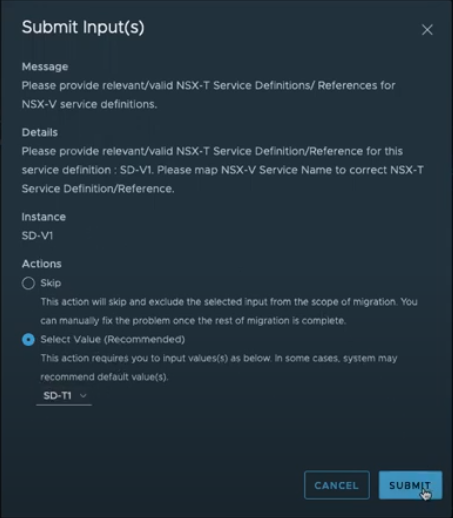
- When resolving service insertion configuration,
verify that you selected the correct service definition that you
previously configured on Panorama for the VM-Series on NSX-T.
![]()
- Continue resolving the remaining configuration.
- Before moving to Migrate Configuration, you will be asked to provide a transport zone for the service insertion.
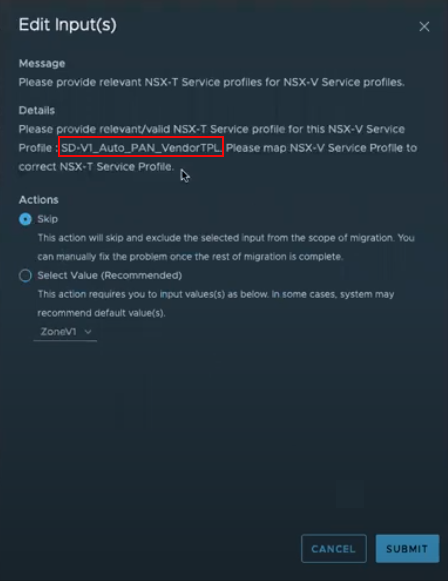
- Map the service profiles on NSX-V to the corresponding
service profiles on NSX-T.
- Auto_PAN_VendorTPL can be skipped.
![]()
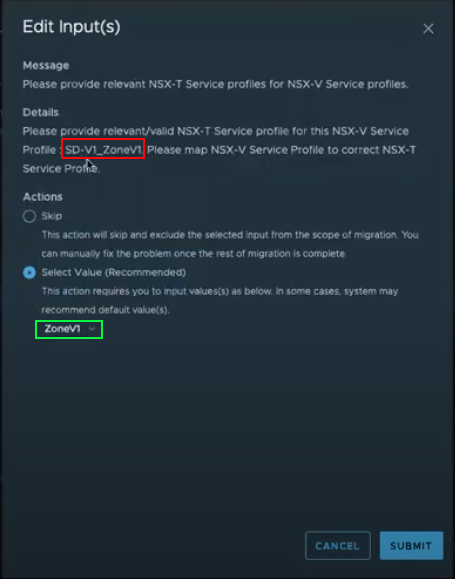
- Map the NSX-T service profile to the corresponding NSX-V service profile.
![]()
- When resolving service insertion configuration,
verify that you selected the correct service definition that you
previously configured on Panorama for the VM-Series on NSX-T.
- Migrate the configuration.
- Verify that your configuration has been migrated successfully.
- Select to verify that your IP sets and security groups are present. You can click on the security group name to see that the correct IP address are a part of the security group.
- Select to confirm that a service segment has been created.
- Select to confirm that a service chain has been created. Click the Profiles link in the Forward Path and Reverse Path columns to view your service profile.
- Select to confirm that a traffic redirection rule has been created to direct traffic to the service profile of the VM-Series firewall.
- If applicable, modify and migrate edges.
- Configure and migrate your hosts.
- Add the NSX-T tags to you existing dynamic address groups.
- Select .
- Click on the name of an existing NSX-V dynamic address group.
- Click Add Match Criteria to display the tags from NSX-V and NSX-T.
- Add the NSX-T tag to the dynamic address groups. If you choose not to remove the NSX-V tags, be sure to use the OR operator between the tags.
- When you have added all the necessary tags, click OK.
- Commit your changes.
- Launch the VM-Series Firewall on NSX-T (East-West). You do not need to create a new service segment; instead select the service segment created during migration.