Deploy GCP Auto Scaling Templates
Table of Contents
Deploy GCP Auto Scaling Templates
Use GCP templates to deploy the VM-Series firewall with
a minimum of three interfaces (Management, Trust, and Untrust).
About the Auto Scaling Templates
Download the Palo Alto Networks auto scaling templates
from https://github.com/PaloAltoNetworks/GCP-AutoScaling.
The zip file contains separate zips for firewall and application
templates. Each zip is a template directory containing several files,
but you only need to edit the YAML files.
Firewall Templates
The firewall directory files create VM-Series firewalls
and other deployment resources. They create new networks and the
familiar subnetworks for the VM-Series firewall: management, untrust,
and trust. They also deploy a Cloud Pub/Sub messaging service to
relay information from GCP to the Panorama plugin for GCP. With
this infrastructure in place, the plugin can leverage dynamic address groups
to apply security policy on inbound traffic routed to services running
on GCP, and use auto scale metrics to deploy VM-Series firewalls
to meet increased demand for application workload resources or to
eliminate firewalls that are no longer needed.
To configure your load balancer, edit the .yaml file
for an external application load balancer (ALB) or network load
balancer (NLB).
- ALB (HTTP External Load Balancer)To customize an ALB, edit vm-series-fw-alb.yaml.HTTP external load balancer is a proxy-based load balancer that performs SNAT and DNAT on the inbound traffic from Internet. The HTTP load balancer is designed to support only the 80 and 8080 TCP ports.To support multiple applications using HTTP load balancer in load balancer sandwich architecture, we can use the GCP HTTP load balancer urlMap and namedPort to map different URLs to different ports in the load balancer. In turn, the VM-Series firewall can translate the ports to different applications, each represented by one internal load balancer per application.
- NLB (TCP Load Balancer)To customize an NLB, edit vm-series-fw-nlb.yaml.TCP load balancer is a non-proxy based load balancer, which means it doesn't perform NATing on inbound traffic from the Internet.TCP load balancer in GCP allows adding multiple frontend IP addresses with an arbitrary port, making it possible to support multiple applications.Another advantage of TCP load balancer is that the original client IP address is preserved, which is desirable for some applications.
Application Template
The application directory provides a sample application.
You configure and deploy an internal load balancer (ILB) to enable
your application servers to subscribe to the Pub/Sub service and
communicate with your VM-Series firewalls and the GCP plugin on
Panorama.
To customize the application template, edit apps.yaml as
described in Deploy the Firewall Template and Application Template.
Deploy the Firewall Template
Edit the Firewall Templates from the
host project.
All VM-Series
firewall interfaces must be assigned an IPv4 address when deployed
in a public cloud environment. IPv6 addresses are not supported.
- Edit the vm-series-fw-nlb.yaml or vm-series-fw-alb.yaml environment
variables to reflect your cloud environment.The sample in this workflow is for the NLB. See vm-series-fw-nlb.yaml and vm-series-fw-alb.yaml for further explanation of the template parameters.
properties:
    region: us-east1
    zones:
    -us-east1-b
    # Do not modify the lb-type field.
    lb-type: nlb
    cloud-nat: yes
    forwarding-rule-port: 80
# Only one app is allowed
    urlPath-namedPort-maps:
    - appName: app1
# ssh key PUBLIC:
    - optional
The autoscaling firewall template requires you to enter the value in single quotes and prepend the key with admin: followed by a space. This is the same convention used for the Google Marketplace template, as detailed in SSH Key Pair. For example:![]()
bootstrap-bucket: bootstrap-autoscale
    image: vmseries-byol-814
    machine-type: n1-standard-4
For the service-account, supply the email address for the host project service account you created earlier (step 3).service-account: sa-pan@gcp-autoscale-kk.iam.gserviceaccount.com
The fw-instance-tag value will be the managed instance group name in the deployment.fw-instance-tag: vm-series-fw
Choose one metric for auto scaling. Possible values are: panSessionActive, panSessionUtilization, DataPlaneCPUUtilizationPct, DataPlanePacketBufferUtilization, or panSessionUtilization.metric: custom.googleapis.com/VMSeries/panSessionActive
max-size: 2
min-size: 1
target-type: GAUGE
util-target: 100
# Greenfield deployment
mgmt-network-cidr: 172.22.2.0/24
untrust-network-cidr: 172.22.1.0/24
trust-network-cidr: 172.22.3.0/24
mgmt-network-access-source-range:
- 199.167.54.229/32
- 199.167.52.5/32
mgmt-network-access-ports:
- 22
- 443
- Deploy
the firewall template.
gcloud deployment-manager deployments create <your-template>
--config apps.yaml
--automatic-rollback-on-error
Take note of the outputs the CLI prints after the deployment—the subnet names, the deployment name, and the Panorama Pub/Sub topic name. You need these values to configure the Shared VPC and for the application template deployment.The firewall deployment name must be configured in the Panorama plugin for GCP auto scaling definition.

Prepare a Service Project
Create a separate service project, or choose
an existing project, for your application.
To learn more
about host and service projects in a shared VPC, see the Shared VPC Overview, and review the Administrators and IAM roles.
A host project administrator must have the proper role to set up the Shared VPC and
make the application project a service project for the host project.
See the instructions in Provisioning Shared VPC.
- Enable the service project APIs from the GCP console
or the CLI.The required APIs are:
- Cloud Deployment Manager API
- Cloud Pub/Sub API
- Compute Engine API
Enable APIs from the GCP console- Select the service project, and from the Navigation menu, select APIs & Services.
- Search for and view each required API.
- ENABLE any APIs that do not display the “API enabled” status.
Enable APIs from the CLI- In the CLI, view your configuration to ensure that you are in the correct project.
gcloud config list
If not, set the project as follows:gcloud config set project <project-name>
- Issue the following commands to enable the required APIs.
gcloud services enable deploymentmanager.googleapis.com
gcloud services enable pubsub.googleapis.com
gcloud services enable compute.googleapis.com
- Confirm that the required APIs are enabled.
gcloud services list --enabled
- Make the application project a service project for the
host project. Add the service account from Service/application project administrator as a member in host project with following roles:
- Compute Network User
- Pub/Sub Admin
- Choose a VPC configuration.
- If the Service project will share the networks in the host project, continue to Configure the Shared VPC.
- If the Service project has its own VPC network for the application deployment, continue to Configure a Peered VPC.
Configure the Shared VPC
After the firewall template is deployed in
the host project, configure the service project that supports your
applications. An administrator with shared VPC credentials performs
these tasks from the host project. To understand more about the
host project and service projects in the context of shared VPC,
see the Shared VPC Overview.
- Create a shared VPC using the Trust VPC created
when you deployed the firewall template.Set up a shared VPC for the host (firewall) project:
gcloud compute shared-vpc enable HOST_PROJECT_ID
- Attach the service/application project to the host project.gcloud compute shared-vpc associated-projects add [SERVICE_PROJECT_ID]--host-project [HOST_PROJECT_ID]Additional options are available to share only specific subnets, rather than all subnets in the host project.
- If you want to use the sample application template to
deploy an application, continue to Deploy the Application Template. If you have already deployed an application and you want to secure it in your auto scaling deployment, go to Manually Onboard an Application to an Existing Auto Scaling Deployment.If you have deployed a service in a GKE cluster, continue to Onboard a GKE Cluster in a Shared VPC.
Configure a Peered VPC
- In the host project, peer the Trust VPC network
of the Firewall deployment with the Application VPC.
gcloud beta compute networks peerings create [PEERING-NAME] \ --network=[MY-LOCAL-NETWORK] \ --peer-project [SERVICE-PROJECT-ID] \ --peer-network [PEER-NETWORK-NAME] \ [--import-custom-routes] \ [--export-custom-routes] - In the service project, peer the Trust VPC network of
the application deployment with the Trust VPC network of the Firewall
deployment.
gcloud beta compute networks peerings create [PEERING-NAME] \ --network=[MY-LOCAL-NETWORK] \ --peer-project [HOST-PROJECT-ID] \ --peer-network [PEER-NETWORK-NAME] \ [--import-custom-routes] \ [--export-custom-routes] - If you want to use the sample application template to
deploy an application, continue to Deploy the Application Template. If you have already deployed an application and you want to secure it in your auto scaling deployment, go to Manually Onboard an Application to an Existing Auto Scaling Deployment.If you have deployed a service in a GKE cluster, continue to Onboard a GKE Cluster in a Peered VPC.
Deploy the Application Template
The Service project administrator deploys
the Application Template from the service project.
- Create a separate application project (service project) to deploy the application (see Prepare a Service Project).
- Prepare the apps.yaml file as outlined in apps.yaml.
- Deploy a new application with the application template
and define a label for the named port.
gcloud deployment-manager deployments create <your-template>
--config apps.yaml
--automatic-rollback-on-error
Onboard a New Application
Manually Onboard an Application to an Existing Auto Scaling Deployment
To secure an application you have deployed
using an external load balancer and an auto-scaled VM-Series firewall
deployment, follow these steps. For each application you onboard,
you must supply the application name, the named ports, and the path.
- Prepare to add a new named port and URL path to the HTTP external load balancer created when you deployed the firewall template.
- Update all instance groups named-ports with an additional
service name and port values. The following sample onboards the
applications app2 and app3.
gcloud compute instance-groups set-named-ports fw-template2-fw-igm-us-east1-b --zone us-east1-b --named-ports=app1:80,app2:81,app3:82 gcloud compute instance-groups set-named-ports fw-template2-fw-igm-us-east1-c --zone us-east1-c --named-ports=app1:80,app2:81,app3:82 - Create a new http-health-check.
gcloud compute backend-services create fw-template2-backend-app3 --protocol="HTTP" --port-name=app3 --http-health-checks=fw-template2-healthcheck-app3 --load-balancing-scheme="EXTERNAL" --global - Create a new backend service with the port-name created
earlier on the HTTP external load balancer.
gcloud compute backend-services create fw-template2-backend-app3
--protocol="HTTP" --port-name=app3
--http-health-checks=fw-template2-healthcheck-app3 --load-balancing-scheme="EXTERNAL"
--global
Check to see if the new backend service is visible.gcloud compute backend-services list - Edit url-maps and add new path rule. For example:
- paths:
    - /app3
    - /app3/*service:
    https://www.googleapis.com/compute/v1/projects/<project-name>/global/backendServices/fw-template2-backend-app3
gcloud compute url-maps edit fw-template2-ext-loadbalancer - To secure this application with the VM-Series firewall,
manually trigger the pub/sub message through the gcloud CLI. This
sends a message to the topic created in the firewall template.
gcloud pubsub topics publish projects/topics/hj-asg-891ca3-gcp-pavmqa-panorama-apps-deployment --attribute ilb-ip=172.22.9.34, app-deployment-name=hj-asg-891ca3-app1, ilb-port=80, named-port=81, network-cidr=172.22.9.0/24, fw-deployment-name=hj-asg-891ca3, host-project=gcp-pavmqa, type=ADD-APP --message "ADD-APP" - View the Onboarded Application in the Panorama Plugin for GCP.
- (Optional) To update application attributes,
such as ilb-ip, ilb-port, or named-port, issue the pubsub command:
gcloud pubsub topics publish projects/gcp-pavmqa/topics/hj-asg-891ca3-gcp-pavmqa-panorama-apps-deployment --attribute ilb-ip=172.22.9.34, app-deployment-name=hj-asg-891ca3-app1, ilb-port=80, named-port=81, network-cidr=172.22.9.0/24, fw-deployment-name=hj-asg-891ca3, host-project=gcp-pavmqa, type=UPDATE-APP --message "UPDATE-APP" - (Optional) To stop securing the application,
issue the following command:
gcloud pubsub topics publish projects/gcp-pavmqa/topics/hj-asg-891ca3-gcp-pavmqa-panorama-apps-deployment
  --attribute ilb-ip=172.22.3.20,app-deployment-name=fw-templ-3-app-1,
    ilb-port=80,
    named-port=80,
    fw-deployment-name=hj-asg-891ca3,
    type=DEL-APP
  --message "DEL-APP"
Onboard a GKE Cluster
To onboard a private GKE cluster, the GCP plugin for
Panorama requires the following information.
- In GCP, expose the ELB frontend for the cluster to the GKE service so the VM-Series firewall can get the named port information for the service.
- The cluster API server address.
- The service account credential for the service in which the cluster is deployed, in JSON format.
The GKE cluster name must not exceed 24 characters. This
ensures that if you deploy auto scaling in a peered VPC configuration
the static route name does not exceed 31 characters.
- Onboard a GKE Cluster in a Shared VPC
- Onboard a GKE Cluster in a Peered VPC
- View the Onboarded Application in the Panorama Plugin for GCP
- View the Deployment Status from the CLI
Onboard a GKE Cluster in a Shared VPC
To onboard the GKE cluster you must share
the Host project Trust network VPC with the Service project. See Configure the Shared VPC.
For security
reasons, only private clusters should be used in an auto scaling deployment.
See Creating a private
cluster.
- Set the Host project ID.
gcloud config set project [HOST_PROJECT_ID] - (optional) Set compute zone or region for clusters.If the cluster is zonal, enter the following:
gcloud config set compute/zone [COMPUTE_ZONE]If the cluster is regional, enter the following:gcloud config set compute/region [COMPUTE_REGION] - In the Host project, update secondary ranges in the Trust
VPC subnet.
gcloud compute networks subnets update [TRUST_SUBNETWORK_NAME]
  --add-secondary-ranges
  [PODS_IP_RANGE_NAME] = [POD_RANGE_CIDR],
  [SERVICE_IP_RANGE_NAME]=[SERVICE_RANGE_CIDR]
Pods and service IP ranges must be within: 10.0.0.0/8, 172.16.0.0/12 or 192.168.0.0/16, and cannot collide with existing IP ranges in the subnetwork. - In the Service project, create a private cluster in the
shared VPC.
- Set the Service project ID.
gcloud config set project [SERVicE_PROJECT_ID] - Create a private cluster in the shared VPC.
gcloud container clusters create  [CLUSTER_NAME]
  --project [SERVICE_PROJECT_ID]
  --zone=[ZONE_NAME]
  --enable-ip-alias
  --enable-private-nodes
  --network projects/[HOST_PROJECT_ID]/global/networks/[NETWORK_NAME]
  --subnetwork projects/[HOST_PROJECT_ID]/regions/[REGION_NAME]
  /subnetworks/[TRUST_SUBNETWORK_NAME]
  --cluster-secondary-range-name=[PODS_IP_RANGE_NAME]
  --services-secondary-range-name=[SERVICE_IP_RANGE_NAME]
  --master-ipv4-cidr=[MASTER_IPV4_CIDR]
  --enable-master-authorized-networks
  --master-authorized-networks=[PANORAMA_MANAGEMENT_IP/32],
  [MY_MANAGEMENT_IP/32]
- Set the Service project ID.
- Check your current cluster context:
kubectl config current-context - Check all cluster contexts.
kubectl config get-context - Change to another cluster.
kubectl config use-context [CONTEXT_NAME]If you created your cluster in the GCP console, generate a kubeconfig entry:gcloud container clusters get-credentials [CLUSTER_NAME] - Create a cluster role in a .yaml file—for
example, gke_cluster_role.yaml.
apiVersion: rbac.authorization.k8s.io/v1beta1 kind: ClusterRole metadata: name: gke-plugin-role rules: - apiGroups: - "" resources: - services verbs: - list - Apply the cluster role.
kubectl apply -f gke_cluster_role.yaml - Create a cluster role binding in a .yaml file—for
example, gke_cluster_role_binding.yaml.
kind: ClusterRoleBinding apiVersion: rbac.authorization.k8s.io/v1beta1 metadata: name: gke-plugin-role-binding subjects: - kind: ServiceAccount name: [SERVICEACCOUNT_NAME] namespace: default roleRef: kind: ClusterRole name: gke-plugin-role apiGroup: rbac.authorization.k8s.io - Apply the cluster role binding.
kubectl apply -f gke_cluster_role_binding.yaml - Create a service account.
kubectl create serviceaccount [SERVICEACCOUNT_NAME] - Export
the service account secret token in JSON format.
MY_TOKEN=`kubectl get serviceaccounts [SERVICEACCOUNT_NAME] -o jsonpath='{.secrets[0].name}'` kubectl get secret $MY_TOKEN -o json > [FILE_NAME].json - Get the
API server address.
kubectl config view --minify | grep server | cut -f 2- -d ":" | tr -d " " - In the
Panorama plugin for GCP, add the service account information.Select .Name the credential, enter a description, and enter the API server address from step 14, and for GKE Service Account Credential, upload the JSON file you exported in step 13.After you add a service account credential, you can validate the credential from your Panorama command line (you cannot validate from the web interface):
request plugins gcp validate-service-account gke_service_account <svc-acct-credential-name> - Set up
auto scaling on the Panorama plugin for GCP.
- In the Panorama context, expand Google Cloud Platform, select AutoScaling, and click Add.
- Supply the Firewall Deployment Name and an optional description for the deployment.
- For the GCP Service Account Credential, supply the GCP service account name created in Prepare a Host Project and Required Service Accounts, step 4.
- Chose the Device Group and the Template Stack you created in when you configured the Panorama plugin.
- Disable License Management Only to ensure traffic is secured.
- Enter the exact GKE Cluster Name.
- (Optional) Enter a Description of the GKE cluster.
- Enter the Network CIDR for the GKE cluster.
- Select the GKE Service Account corresponding to the GKE cluster.
- Commit your changes.
- (Optional) Create and deploy a service template according to Using the Sample GKE Service Templates, or deploy a GKE service in the GCP console. .
Onboard a GKE Cluster in a Peered VPC
To onboard the GKE cluster you must create
and peer the Service VPC with the firewall Trust network in the
Host project, as described in Configure a Peered VPC.
For
security reasons, only private clusters should be used in an auto
scaling deployment. See Creating a private
cluster.
- Set the project ID.
gcloud config set project [PROJECT_ID] - Set compute zone or region for clusters.If the cluster is zonal, enter the following:
gcloud config set compute/zone [COMPUTE_ZONE]If the cluster is regional, enter the following:gcloud config set compute/region [COMPUTE_REGION] - Update the service project VPC network with the secondary
IP ranges for the pods and services.
gcloud compute networks subnets update [GKE_PEERED_VPC_SUBNETWORK] --region=[REGION] --add-secondary-ranges PODS_IP_RANGE_NAME=[ip cidr], SERVICE_IP_RANGE_NAME=[ip cidr] - Enable cloud NAT. Cloud NAT is required to deploy a private cluster.
gcloud compute routers create [ROUTER_NAME]
  --network [NETWORK_NAME]
  --region [REGION_NAME]
gcloud compute routers nats create [NAT_CONFIG_NAME] --router-region [REGION_NAME] --router [ROUTER_NAME] --nat-all-subnet-ip-ranges --auto-allocate-nat-external-ip - Create a new private cluster in the Service VPC.
gcloud container clusters create [CLUSTER_NAME] --project [SERVICE_PROJECT_ID] --zone=[ZONE_NAME] --enable-ip-alias --network [NETWORK_NAME] --subnetwork [SUBNETWORK_NAME] --enable-private-nodes --cluster-secondary-range-name=[PODS_IP_RANGE_NAME] --services-secondary-range-name=[SERVICE_IP_RANGE_NAME] --master-ipv4-cidr=[MASTER_IPV4_CIDR] --enable-master-authorized-networks --master-authorized-networks=[PANORAMA_MANAGEMENT_IP/32], [MY_MANAGEMENT_IP/32] - Check your current cluster context:
kubectl config current-context - Check all cluster contexts.
kubectl config get-context - Change to another cluster.
kubectl config use-context [CONTEXT_NAME]If you created your cluster in the GCP console, generate a kubeconfig entry:gcloud container clusters get-credentials [CLUSTER_NAME] - Create a cluster role in a .yaml file—for
example, gke_cluster_role.yaml.
apiVersion: rbac.authorization.k8s.io/v1beta1 kind: ClusterRole metadata: name: gke-plugin-role rules: - apiGroups: - "" resources: - services verbs: - list - Apply the cluster role.
kubectl apply -f gke_cluster_role.yaml - Create a cluster role binding in a .yaml file—for
example, gke_cluster_role_binding.yaml.
kind: ClusterRoleBinding apiVersion: rbac.authorization.k8s.io/v1beta1 metadata: name: gke-plugin-role-binding subjects: - kind: ServiceAccount name: [SERVICEACCOUNT_NAME] namespace: default roleRef: kind: ClusterRole name: gke-plugin-role apiGroup: rbac.authorization.k8s.io - Apply the cluster role binding.
kubectl apply -f gke_cluster_role_binding.yaml - Create a service account.
kubectl create serviceaccount [SERVICEACCOUNT_NAME] - Export
the service account secret token in JSON format.
MY_TOKEN=`kubectl get serviceaccounts [SERVICEACCOUNT_NAME] -o jsonpath='{.secrets[0].name}'` kubectl get secret $MY_TOKEN -o json >[FILE_NAME].json - Get the
API server address.
kubectl config view --minify | grep server | cut -f 2- -d ":" | tr -d " " - In the Panorama plugin for GCP, add the service account
information.Select .Name the credential and enter the API server address from Step 15, and upload the JSON file you exported in Step 14.After you add a service account credential, you can validate the credential from your Panorama command line:
request plugins gcp validate-service-account <svc-acct-credential-name> - Set up auto scaling on the Panorama plugin for GCP.
- In the Panorama context, expand Google Cloud Platform, select AutoScaling, and click Add.
- Supply the Firewall Deployment Name and an optional description for the deployment.
- For the GCP Service Account Credential, supply the GCP service account name from Step 16.
- Chose the Device Group and the Template Stack you created in when you configured the Panorama plugin.
- Disable License Management Only to ensure traffic is secured.
- Enter the exact GKE Cluster Name.
- (Optional) Enter a Description of the GKE cluster.
- Enter the Network CIDR for the GKE cluster.
- Select the GKE Service Account corresponding to the GKE cluster.
- (Optional) In your service project, create and deploy a GKE template according to Using the Sample GKE Service Templates, or deploy a GKE service use the GCP console. Onboard a GKE Cluster
View the Onboarded Application in the Panorama Plugin for GCP
Select to
view your onboarded application. The Details column
is only visible if you have an onboarded application.
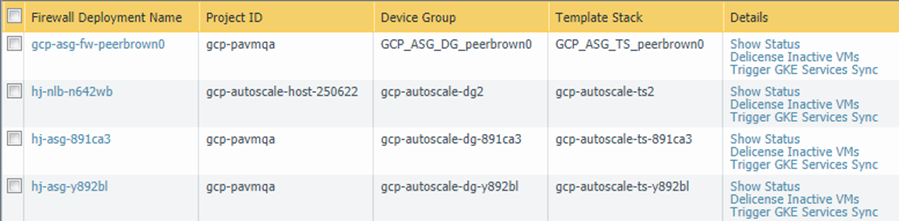
Each link in the Details column triggers an action.
- Show Status— View the details for applications onboarded to a GCP VM-Series firewall deployment.
![]() The following fields display information obtained from the selected deployment. You specified these values in the pub/sub message or through GKE cluster service polling.
The following fields display information obtained from the selected deployment. You specified these values in the pub/sub message or through GKE cluster service polling.- Application/GKE Service Name—An application deployment name, or the name of a GKE service.
- Host Project—The name of the host project.
- Cluster/Namespace—A GKE cluster name followed by the namespace for example, mycluster/namespace9.
- Named Port—The port assigned to the named port for the service.
- ILB IP—The ILB IP address.
- ILB Port—The ILB port number.For autoscaling an application, this property is ilb-port in apps.yaml.For securing a GKE cluster, this value is the port number of the GKE cluster, as specified in the .yaml file you used to deploy the service in your cluster.
- Configuration Programmed— True if a NAT Rule exists, False if not.
- Protected— True when an application is onboarded successfully, or False if onboarding failed. If False, see the Not Protected Reason column for an explanation.
- Not Protected Reason— If Protected is False, displays the reason the application is not protected. Some common reasons are:
- Configuration Programmed—True if a NAT Rule exists, False if not.
- Protected—True when an application is onboarded successfully, or False if onboarding failed. If False, see the Not Protected Reason column for an explanation.
- Not Protected Reason—If Protected is
False, displays the reason the application is not protected. Some
common reasons are:
- You deployed a UDP service in the GKE cluster.
- You specified a named port that is already in use. Only one application can listen on a specific named port.
- You chose the License management only option, so we do not program the configuration.
- No matching label found for GKE services.
- Delicense Inactive VMs—Answer Yes to trigger the delicensing function for inactive VMs.
- Trigger GKE Services Sync—Answer Yes to poll the services running in the clusters, and program the NAT, address, and service objects, and static routes if necessary. By default, Panorama automatically polls 10 minutes after the completion of the previous poll.

View the Deployment Status from the CLI
You can use the Panorama CLI to manage deployed applications.
The command line actions parallel those described in View the Onboarded Application in the Panorama Plugin for GCP. In the following commands, the autoscaling_name is
the Firewall Deployment Name you entered in the auto scaling configuration.
- List the onboarded (protected) applications.
show plugins gcp show-protected-apps autoscaling_name <fw-deployment-name> - Trigger the delicensing function for firewalls in the specified deployment.
request plugins gcp force-delicensing autoscaling_name <fw-deployment-name> - For a GKE deployment, force the plugin to read the pub-sub messages, and sync NAT rules that are programmed based on the pub-sub messages.
request plugins gcp gke-service-discovery autoscaling_name <fw-deployment-name>
Parameters in the Auto Scaling Templates for GCP
You can download the template .zip file
from https://github.com/PaloAltoNetworks/GCP-AutoScaling.
The .zip file contains directories to support
firewall templates for network load balancer and application load
balancer configurations, and the application template.
The template YAML files have the following general format:
#Copyright and license information
    :
    :
imports:                     <do not change>
    :
    :
resources:
    -name: vm-series-fw      <do not change>
    -type:vm-series-fw.py    <do not change
    -properties:
    :
    :
outputs:                     <do not change>
    :
    :
In all .yaml files, you customize the resources properties
for your deployment. Do not change anything in the imports or outputs sections.
Firewall Templates
The following sections detail the parameters for the
NLB and ALB .yaml files.
vm-series-fw-nlb.yaml
In the vm-series-fw-nlb.yaml template,
edit the -properties.
| Parameter | Sample Value | Comment |
|---|---|---|
zones - <list of zones> | zones- us-central1-a | If applicable, list multiple zones as follows: zones- us-central1-a- us-central1-b- us-central1-c- us-central1-f |
lb-type | nlb | Do not change. |
cloud-nat | yes | Do not change. |
forwarding-rule-port | 80 | 80 or 8080 |
| urlPath-namedPort-maps-appname | urlPath-namedPort-maps -MyApplication | Enter your application name. |
sshkey | 'admin:ssh-rsa <PASTE KEY>' | Review SSH Key Pair. In single quotes,
type admin: followed by a space, and paste
in your key. This is the same convention used for the Google Marketplace
template. |
bootstrap-bucket | bootstrap-autoscale | The name of the GCP bucket that contains your bootstrap file. |
image | vm-series-byol-814 | The BYOL image currently available from
the Google marketplace. If you are using PAYG or another license
model, the image might be different. |
machine-type | n1-standard-4 | n1-standard-4 is default for BYOL. If
your license permits it, you can use any machine type in Minimum System Requirements for the VM-Series Firewall. |
service-account | The unique service account name for the host project. | |
fw-instance-tag | vm-series-fw | The instance tag you provided in GCP. |
metric | custom.googleapis.com/VMSeries/panSessionActive | The custom API path for VM-Series, and your
chosen auto scaling metric. Supply only one of the following metrics. panSessionActive panSessionUtilization DataPlaneCPUUtilizationPct DataPlanePacketBufferUtilization panSessionUtilization |
max-size | 2 | |
min-size | 1 | |
target-type | GAUGE | Currently GAUGE is the only valid type. |
util-target | 100 | |
| To deploy the VM-Series firewall you need a dedicated network and subnetwork for the firewall’s managment, untrust, and trust interfaces. Fill out the information for either a greenfield deployment (configure the template to create new networks) or brownfield deployment (use existing networks). Be sure to remove or comment out the network deployment parameters you are not using. | ||
| Greenfield Deployment: Enter values to create management, untrust, and trust networks and subnetworks for the firewall. | ||
| mgmt-network-cidr | 172.22.2.0/24 | |
| untrust-network-cidr | 172.22.1.0/24 | |
| trust-network-cidr | 172.22.3.0/24 | |
| mgmt-network-access-source-range- <permitted-ip-range> | mgmt-network-access-source-range - <permitted-ip-range-1> - <permitted-ip-range-2> | |
| mgmt-network-access-ports- <port-number> | mgmt-network-access-ports
- 22
- 443 | |
| Brownfield Deployment: Enter the name of each existing network or subnetwork | ||
| mgmt-network | my-mgmt-network | |
| mgmt-subnet | my-mgmt-subnet | |
| trust-network | my-trust-network | |
| trust-subnet | my-trust-subnet | |
| untrust-network | my-untrust-network | |
| untrust-subnet | my-untrust-subnet | |
vm-series-fw-alb.yaml
In the vm-series-fw-alb.yaml template,
edit the -properties.
| Parameter | Sample Value | Comment |
|---|---|---|
zones - <list of zones> | zones- us-central1-a | If applicable, list multiple zones as follows: zones- us-central1-a- us-central1-b- us-central1-c- us-central1-f |
lb-type | alb | Do not change. |
cloud-nat | yes | Do not change. |
forwarding-rule-port | 80 | 80 |
| connection-draining-timeout | 300 | The timeout value in seconds. |
urlPath-namedPort-maps: - appname: namedPort: urlMapPaths: - '/app1' - '/app1/*' | urlPath-namedPort-maps: - appName: app1 namedPort: 80 urlMapPaths: - '/app1' - '/app1/*' - appName: app2 namedPort: 81 urlMapPaths: - '/app2' - '/app2/*' | List your apps and the corresponding named port |
sshkey | 'admin:ssh-rsa <PASTE KEY>' | Review SSH Key Pair. In single quotes,
type admin: followed by a space, and paste
in your key. This is the same convention used for the Google Marketplace template. |
bootstrap-bucket | bootstrap-bucket-name | The name of the GCP bucket that contains your bootstrap file. |
image | vm-series-byol-814 | The BYOL image currently available from
the Google marketplace. If you are using PAYG or another license
model, the image might be different |
machine-type | n1-standard-4 | n1-standard-4 is default for BYOL. If
your license permits it, you can use any machine type in Minimum System Requirements for the VM-Series Firewall. |
service-account | The unique service account name for the service project. | |
fw-instance-tag | vm-series-fw | The instance tag you provided in GCP. |
metric | custom.googleapis.com/VMSeries/panSessionActive | The custom API path for VM-Series, and your
chosen auto scaling metric. Supply only one of the following metrics. panSessionActive panSessionUtilization DataPlaneCPUUtilizationPct DataPlanePacketBufferUtilization panSessionUtilization |
max-size | 2 | |
min-size | 1 | |
target-type | GAUGE | Currently GAUGE is the only valid type. |
util-target | 100 | Enter the goal utilization target value for the auto scaling. |
| Greenfield Deployment: Enter values to create management, untrust, and trust networks and subnetworks for the firewall. | ||
| mgmt-network-cidr | 192.168.12.0/24 | |
| untrust-network-cidr | 192.168.11.0/24 | |
| trust-network-cidr | 192.168.11.0/24 | |
| mgmt-network-access-source-range- <permitted-ip-range> | mgmt-network-access-source-range- <permitted-ip-range-1>- <permitted-ip-range-2> | |
| mgmt-network-access-ports- <port-number> | mgmt-network-access-ports- 22- 443 | |
| Brownfield Deployment: Enter the name of each existing network or subnetwork | ||
| mgmt-network | existing-vpc-mgmt | |
| mgmt-subnet | existing-subnet-mgmt | |
| trust-network | existing-vpc-trust | |
| trust-subnet | existing-subnet-trust | |
| untrust-network | existing-vpc-untrust | |
| untrust-subnet | existing-subnet-untrust | |
Application Template
apps.yaml
The application template creates the connection between
the host project (which contains the VM-Series firewalls) and the
service project, which contains the application or services that
the firewall deployment secures.
| Parameter | Sample Value | Comment |
|---|---|---|
| host-project | your-host-project-name | The name of the project containing the VM-Series firewall deployment. |
| fw-deployment-name | my-vm-series-firewall-name | |
zones - <list of zones> | zones- us-central1-a | If applicable, list multiple zones as follows: zones- us-central1-a-
us-central1-b-
us-central1-c-
us-central1-f |
app-machine-type | n1-standard-2 | The machine type for the VM running your application or service. If your license permits it, you can use any machine type in Minimum System Requirements for the VM-Series Firewall. |
| app-instance-tag | web-app-vm | You applied this tag (label) in GCP. |
sshkey | 'admin:ssh-rsa <PASTE KEY>' | Review SSH Key Pair. In single quotes,
type admin: followed by a space, and paste
in your key. This is the same convention used for the Google Marketplace
template. |
| trust-network | <project-name>/<vpc-network-name> | For a shared VPC, the <project-name>
is the host project name. For peered VPCs the <project-name>
is the Service project name. |
| trust-subnet | <project-name>/<subnet-name> | For a shared VPC, the <project-name>
is the host project name. For peered VPCs the <project-name>
is the Service project name. |
| trust-subnet-cidr | 10.2.0.0/24 | For a greenfield deployment, the Host project
Trust subnet CIDR (the trust-network-cidr parameter in the firewall template). For
a brownfield deployment, the CIDR for the Trust network. |
| vm-series-fw-template-topic | <pubsub-topic> | Enter the topic name created by the firewall deployment. The application template posts a message to the topic to program the firewall configuration to forward traffic. |
| ilb-port | 80 | Enter the port number for your application’s internal-load-balancer-port. output. |
| urlPath-namedPort | 83 | Enter the port number for the urlPath-namedPort output. |
Sample GKE Service Templates
These sample templates demonstrate how to configure
a GKE service so it is secured by the VM-Series firewall. For the
basics on creating your own cluster services, see Creating a private
cluster.
- Using the Sample GKE Service Templates
- gke_cluster_role.yaml
- gke_cluster_role_binding.yaml
- web-deployment.yaml
- web-service.yaml
- web-deployment-v2.yaml
- web-service-v2.yaml
- Multiple Ports in a Service
Using the Sample GKE Service Templates
You can create a service template based on the sample
content in the .yaml files that follow. Typically
you create a single .yaml file.
To be secured by the VM-Series firewall, services in the cluster
must be labeled "panw-named-port=<named_port>" as shown in web-service.yaml or web-service-v2.yaml.
- Deploy a .yaml file as follows:
kubectl apply -f [FILE_NAME].yaml - Configure the VPC deployment.
- In a shared VPC deployment, launch the GKE cluster in the shared VPC as described in Configure the Shared VPC.
- In a peered VPC deployment, peer the GKE cluster VPC to the host project Trust network. See Configure a Peered VPC.
After a deployment, you can delete all services deployed
in the service template .yaml file as follows:
kubectl delete -f [FILE_NAME].yamlgke_cluster_role.yaml
apiVersion: rbac.authorization.k8s.io/v1beta1
kind: ClusterRole
metadata:
  name: gke-plugin-role
rules:
  - apiGroups:
      - ""
    resources:
      - services
    verbs:
      - list
gke_cluster_role_binding.yaml
kind: ClusterRoleBinding
apiVersion: rbac.authorization.k8s.io/v1beta1
metadata:
  name: gke-plugin-role-binding
subjects:
  - kind: ServiceAccount
    name: hj-gke-891ca3-cluster1-sa
    namespace: default
roleRef:
  kind: ClusterRole
  name: gke-plugin-role
  apiGroup: rbac.authorization.k8s.io
web-deployment.yaml
apiVersion: extensions/v1beta1
kind: Deployment
metadata:
  name: web
  namespace: default
spec:
  selector:
   matchLabels:
    run: web
  template:
   metadata:
    labels:
      run: web
   spec:
    containers:
    - image: gcr.io/google-samples/hello-app:1.0
      imagePullPolicy: IfNotPresent
      name: web
      ports:
      - containerPort: 8080
       protocol:  TCP
web-service.yaml
apiVersion: v1
kind: Service
metadata:
  name: web
  namespace: default
  annotations:
    cloud.google.com/load-balancer-type: "Internal"
  labels:
    panw-named-port-port1: "80"
spec:
  ports:
  # the port that this service should serve on
  - name: port1
    port: 80
    protocol: TCP
    targetPort: 8080
  selector:
    run: web
  type: LoadBalancer
web-deployment-v2.yaml
apiVersion: extensions/v1beta1
kind: Deployment
metadata:
  name: web2
  namespace: default
spec:
  selector:
    matchLabels:
      run: web2
  template:
    metadata:
      labels:
        run: web2
    spec:
      containers:
      - image: gcr.io/google-samples/hello-app:2.0
        imagePullPolicy: IfNotPresent
        name: web2
        ports:
        - containerPort: 8080
          protocol: TCP
web-service-v2.yaml
apiVersion: v1
  kind: Service
  metadata:
    name: web2
    namespace: default
    annotations:
      cloud.google.com/load-balancer-type: "Internal"
    labels:
      panw-named-port-port2: "81"
  spec:
    ports:
    # the port that this service should serve on
    - name: port2
      port: 81
      protocol: TCP
      targetPort: 8080
    selector:
      run: web2
    type: LoadBalancer
Multiple Ports in a Service
For multiple ports in one service, edit labels and map
the target port name and number in the format panw-named-port-<service-spec-port-name>,
as shown in the sample below.
apiVersion: v1
kind: Service
metadata:
  name: carts
  annotations:
    cloud.google.com/load-balancer-type: "Internal"
  labels:
    panw-named-port-carts-http: "6082"
    panw-named-port-carts-https: "6083"
  namespace: default
spec:
  type: LoadBalancer
  ports:
  # the port that this service should serve on
  - name: carts-http
    protocol: TCP
    port: 80
    targetPort: 80
  - name: carts-https
    protocol: TCP
    port: 443
    targetPort: 443
  selector:
    name: carts