Orchestrate a VM-Series Firewall Deployment in Azure
Table of Contents
Orchestrate a VM-Series Firewall Deployment in Azure
Learn how to orchestrate a VM-Series firewall deployment
in Azure.
You can create a maximum of ten orchestrated
deployments. Additionally, each orchestrated deployment supports
up to 100 applications.
Azure China and Azure Government
are not supported.
All VM-Series
firewall interfaces must be assigned an IPv4 address when deployed
in a public cloud environment. IPv6 addresses are not supported.
- Create
a service principal. Onboard your created service principal credentials to give the Panorama Plugin permissions to make necessary API calls to orchestrate your deployment
- Select .
- Enter a Name and an optional Description to identify the service account.
- Enter the Subscription ID for the Azure subscription you want to monitor.You must login to your Azure portal to get this subscription ID.
- Enter the Client ID.The client ID is the Application ID associated with your Azure Active Directory application.
- Enter the Client Secret and re-enter it to confirm.
- Enter the Tenant ID.The tenant ID is the Directory ID you saved when you set up the Active Directory application.
- Click Validate to verify that the keys and IDs you entered are valid, and Panorama can communicate with the Azure subscription using the API.It can take up to a minute to validate. You can update the page to check your progress.
- When the service principal is valid, commit your changes.The commit ensures the service principal is available when you configure the deployment.
![]()
![]()
- Configure
your Azure deploymenet.
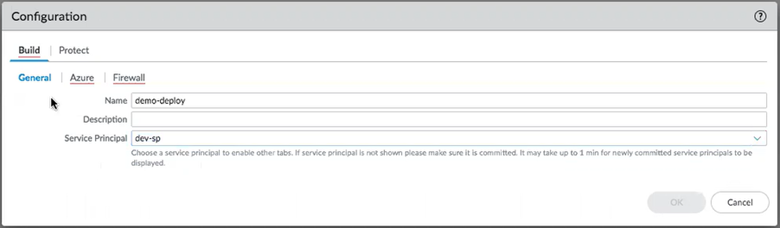
- Select and Add a configuration.
- Select .
- Supply a Name and an optional Description.
- Choose a service principal from the drop list.You must select a valid service principal to enable the Azure tab.If you don’t see your service principal, return to Step 1 and ensure the service principal is valid and committed.
![]()
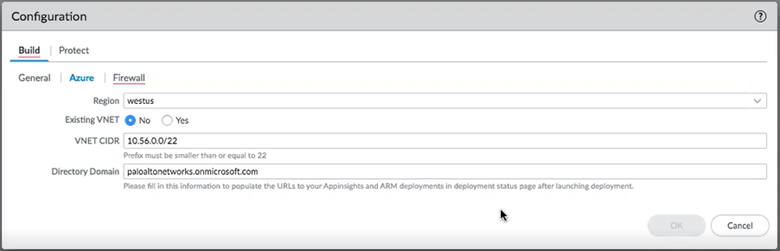
- On the tab,
select a region.The drop list is dynamic—it lists all regions that have a Palo Alto Networks VM-Series Next Generation Firewall image.
- Existing VNET.
- Select No to create a new VNET.The plugin uses the VNET CIDR and Directory Domain to create a VNET for you.
- Select Yes to indicate an existing VNET.
- VNET CIDR—Enter your CIDR range. The prefix must be smaller than or equal to /22. For example, 192.168.0.0/22.
- Directory Domain—See Find Your Azure Directory Domain Name. This string is part of the URL for all resources in the subscription, and it helps the plugin link to your deployments.
![]() If you selectYes the plugin asks for the VNET Resource Group, the VNET Name, the Security CIDR, and the Directory Domain.
If you selectYes the plugin asks for the VNET Resource Group, the VNET Name, the Security CIDR, and the Directory Domain.- VNET Resource Group—Choose from a list of all resource groups in your selected region.
- VNET Name—Choose from a list of VNETS in your chosen resource group.
- Security CIDR—Enter your CIDR range. The prefix must be smaller than or equal to /22. For example, 192.168.0.0/22.
- Directory Domain—See Find Your Azure Directory Domain Name. This string is part of the URL for all resources in the subscription, and it helps the plugin link to your deployments.
The VNET Resource Group and VNET name help the plugin locate your existing VNET. Anything the plugin deploys goes into a resource group that the plugin manages.![]()
- Configure the VM-Series firewall stacks for your deployment.You can deploy the Hub stack to protect Outbound/East-West traffic. You can deploy the Inbound stack to protect inbound traffic. You can also deploy both stacks if all traffic flows need to be protected.Each inbound stack can secure up to 10 applications.The configuration parameters are the same for both stacks.
- License Type—Select BYOL, Bundle 1, or Bundle 2.
- License Authcode—(BYOL only). Enter the authcode sent in your Welcome letter.
- VM Size
- The drop list displays the VM sizes that correlate with the authcode you entered.
- Bundle1 or Bundle2—Choose any VM size.
Existing Device Group—The device group must be unique across both stacks and deployments. That is, you need a separate dedicated device group for each stack in each deployment.If you select No the plugin creates a device group.If you select Yes, select an existing device group from the dropdown list.- Min Firewalls— A value between 1 and 25 for a VMSS.
- Max Firewall— A value between 1 and 25 for a VMSS.
- Select to configure information
common to both Stacks. For Image Type, select Marketplace Image or Custom Image.
- Image—(custom image only) The dropdown list displays all images in your chosen resource group.
- Software Version—(Marketplace Image) Only valid software versions are displayed. Consult the Compatibility Matrix for the minimum PAN-OS version.
- Username—The administrator user name for the firewall you create. The name must be legal for both VM-Series firewall and Azure. Refer to What are the user name requirments when creating a VM?
- Password—The administrator password for the firewall you create. The password must meet the character and length requirements (31 characters) for both VM-Series firewall and Azure. Refer to What are the password requirements when creating a VM?.
- Confirm Password—Re-enter your password.
- Primary Panorama IP—Specify the Panorama IP address the firewall can use to connect to the Panorama when it boots up. Choose between the public or private IP address displayed in the dropdown list, or type in the Panorama IP address.
- Secondary Panorama IP—(Only if Panorama is in HA setup.) Specify the Secondary Panorama IP the firewall can use to connect to the Panorama when it boots up. Choose from dropdown list or type in the correct IP.
- Configure Device Certificate PIN. Because these values are encrypted you must enter and confirm each value.
- Device Certificate PIN ID—The device certificate ID.
- Confirm Device Certificate PIN ID
- Device Certificate PIN Value—The certificate PIN value.
- Confirm Device Certificate PIN Value
- Select optional default values.Check Advanced to edit the default values.
- Autoscaling Metric—Default is Data Plane CPU Util Percent.
- Scale In Threshold—Accept the default or define a scale in thresholdt.
- Scale Out Threshold—Accept the default or define a scale in threshold.
- Jumbo Frame—Disabled by default.
Click OK and commit your changes. Refresh the page until you can see the Deploy button, and click Deploy to launch the deployment. Once the deployment starts, information is written to the Deployments page.Deployment takes 15-20 minutes to complete. - Select to
view deployment status.
- The Resource Group column displays resource groups the plugin has created.
- The firewall’s management interface uses the Firewall Access IP to connect to Panorama. You must whitelist this address to ensure that Panorama can connect with Panorama to get the needed configuration.If Panorama is deployed in a Public Cloud, make sure to add the Firewall Access IP to the Panorama security group.See Ports Used for Panorama to determine which ports you need to open to allow traffic.
- Open the link in the Deployment Status column for additional details for each stack.
- Hub-Stack—The Hub stack Public IP matches the Firewall Access IP in the deployment summary because the NAT gateway is the same for egress traffic from the deployment and the management traffic from the firewalls.All outbound and East-West traffic should be routed to the Egress Private IP for inspection. You can direct traffic to this address if you configured UDRs.
- Inbound-Stack—The Private IP is the address on the Azure internal load balancer that fronts the firewalls. You can direct traffic to this address if you are configuring UDRs.
- Follow the links to view deployment information and Application Insights on Azure.
- The Deployment details can show Success, Warning, and Failure messages
- Configure inbound protection for backend TCP/UDP applications.The public load balancer that fronts the inbound firewall stack is the entry point for any back-end UDP or TCP applications. Add the following configuration to allow the plugin to manage the necessary load balancer and firewall configuration to route to your backend application.
- Select and select your deployment.
- Select the Protect tab and click Add.
- Supply the application Name and
choose a Protocol.Enter the protection details:
- Frontend IP Type—Select one of New Public IP, Existing Frontend, and Existing Public IP.If you select Existing Frontend, the Frontend Name lists all known front ends on the load balancer.
- Resource Group—(Existing Public IP only) From the dropdown list, select the resource group where your desired frontend IP address exists.
- IP Name—(Existing Public IP only) Use to map IP to a frontend on the load balancer, configure the load balancer, and create a NAT rule.
- Frontend Port—Add the frontend port that should be configured to receive traffic on the public load balancer.
- Backend IP—Add the IP address of your backend application.
- Backend Port—Add the port your backend application is expecting to receive traffic on.
Click OK. - Commit to add the configuration on the load balancer and push to the firewalls.