Configure the Cisco ACI Plugin
Table of Contents
Configure the Cisco ACI Plugin
Establish a connection between Panorama and the APIC.
After installing the plugin, you must set
the monitoring interval, configure a notify group, and establish
a connection between Panorama and the APIC fabric.
- (Optional) Configure the full-sync interval.
- Log in to the Panorama CLI.
- Enter configure mode.admin@Panorama> configure
- Use the following command to set the full-sync interval.
The default interval is 600 seconds (10 minutes). The range is 600
seconds to 86,400 seconds (one day).admin@Panorama# set plugins cisco full-sync-interval <interval-in-seconds>
- Log in to the Panorama web interface.
- You must add the firewalls as managed devices on Panorama and create Device Groups so that you can configure Panorama to notify these groups with the VM information it retrieves. Device groups can include VM-Series firewalls or virtual systems on the hardware firewalls.
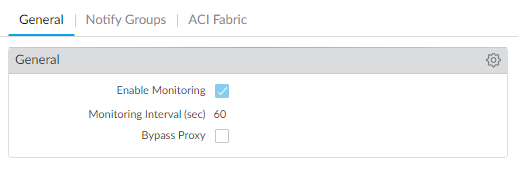
- Enable monitoring, set the monitoring interval, and enable
bypass proxy.
- Select .
- Select Enable Monitoring. This enables monitoring for all clusters in your deployment.
- Set the Monitoring Interval in seconds. The monitoring interval is how often Panorama retrieves updated network information from the APIC. The default value is 60 seconds and the range is 60 seconds to 86,400 seconds (one day).
- (Optional) Select Bypass Proxy to Bypass proxy server settings, configured on Panorama under , for communication between Panorama and the APIC. This allows Panorama to communicate directly with the APIC while maintaining proxied communication for other services.
![]()
- Create a notify group.
- Select .
- Click Add.
- Enter a descriptive Name for your notify group.
- Select the device groups in your ACI deployment.
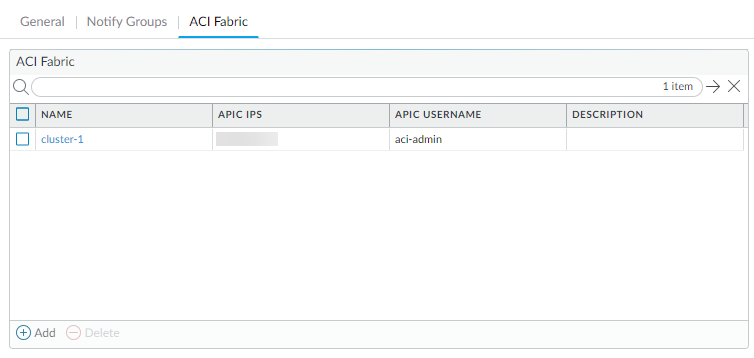
- Add ACI fabric information.
- Select .
- Enter a descriptive Name for your cluster.
- Enter the IP address or FQDN for each APIC in the
cluster as a comma-separated list.When using FQDN, do not include https:// in the URL.
- Enter your APIC username.
- Enter and confirm your APIC password.
- Click OK.
![]()
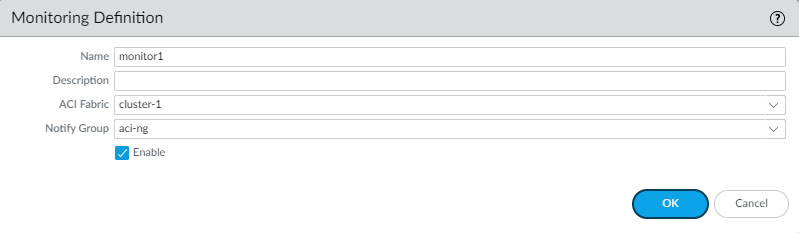
- Configure the Monitoring Definition.
- Select and click Add.
- Enter a descriptive Name and optionally a description to identify the Cisco ACI cluster for which you use this definition.
- Select the Cluster Info and Notify Group.
- Click OK.
![]()
- Commit your changes.
- Verify that you can view the EPG information on Panorama,
and define the match criteria for Dynamic Address Groups.Some browser extensions may block API calls between Panorama and the APIC which prevents Panorama from receiving match criteria. If Panorama displays no match criteria and you are using browser extensions, disable the extensions and Synchronize Dynamic Objects to populate the tags available to Panorama.Panorama does not immediately process new monitoring definitions and populate the match criteria available to dynamic address. You should wait for the duration of your configured monitoring interval before verifying that EPG information.
- Verify that addresses in your EPGs are added to dynamic
address groups.
- Select .
- Click More in the Addresses
column of a dynamic address group. Panorama displays a list of IP addresses added to that dynamic address group based on the match criteria you specified.
- Use dynamic address groups in policy.
- Select .
- Click Add and enter a Name and a Description for the policy.
- Add the Source Zone to specify the zone from which the traffic originates.
- Add the Destination Zone at which the traffic is terminating.
- For the Destination Address, select the Dynamic address group you just created.
- Specify the action— Allow or Deny—for the traffic, and optionally attach the default security profiles to the rule.
- Repeats Steps 1 through 6 to create another policy rule.
- Click Commit.See Use Dynamic Address Groups in Policy for more information.
- You can update the dynamic objects from the APIC at any
time by synchronizing dynamic objects. Synchronizing dynamic objects
enables you to maintain context on changes in the virtual environment
and allows you to enable applications by automatically updating
the Dynamic Address Groups used in policy rules.
- Select .
- Click Synchronize Dynamic Objects.
On HA failover, the newly active Panorama attempts to reconnect to the APIC and retrieve tags for all monitoring definitions. If there is an error with reconnecting even one monitoring definition, Panorama generates a system log messageUnable to process subscriptions after HA switch-over; user-intervention required.
When you see this error, you must log in to Panorama and fix the issue, for example remove an invalid APIC IP or provide valid credentials, and commit your changes to enable Panorama to reconnect and retrieve the tags for all monitoring definitions. Even when Panorama is disconnected from the APIC, the firewalls have the list of all tags that had been retrieved before failover, and can continue to enforce policy on that list of IP addresses. If you perform a commit before resolving the failover error, the newly active Panorama will not push any IP-to-tag mapping information and clearing the mapping information from the firewalls. As a best practice, to monitor this issue, configure action-oriented log forwarding to an HTTPS destination from Panorama so that you can take immediate action.