Prisma Access Agent
Set Up the Infrastructure for Prisma Access Agents
Table of Contents
Set Up the Infrastructure for Prisma Access Agents
Set up the infrastructure to provision the Prisma Access Agent environment on a
Prisma Access tenant.
| Where Can I Use This? | What Do I Need? |
|---|---|
|
|
Start onboarding your mobile users by setting up the infrastructure and selecting Prisma
Access locations. You can onboard mobile
users on Prisma Access and NGFW deployments.
Set Up the Infrastructure for Prisma Access Agents (Prisma Access Deployment)
Set up the infrastructure to provision the Prisma Access Agent environment on a
tenant that already has the GlobalProtect app configured.
Onboard your mobile users to Prisma Access by setting up the infrastructure and selecting Prisma Access
locations using Strata Cloud Manager or Panorama.
Then, you can configure the Prisma Access agent
settings, set up staged rollouts of the agent,
configure general global settings for the
agent, and configure HIP notifications.
On a Prisma Access Agent and GlobalProtect coexistence tenant, you will need
to manually configure the infrastructure settings for the Prisma Access Agent.
There is no mechanism to migrate the GlobalProtect app settings to the Prisma Access Agent.
Set Up the Infrastructure for Prisma Access Agents (Prisma Access Deployment on Strata Cloud Manager)
Onboard your users by configuring the infrastructure and selecting Prisma Access
locations in Strata Cloud Manager.
On a Strata Cloud Manager Managed Prisma Access tenant, configure the infrastructure settings that are
specific to the Prisma Access Agent so that Prisma Access can provision
your mobile user environment.
On an existing tenant where GlobalProtect is already
configured, some infrastructure settings are shared between the Prisma Access Agent and the GlobalProtect app. The shared settings include
Client DNS and Client IP Pool. To
use the Client DNS and Client IP Pool
settings that have been set up for the GlobalProtect app, you can skip the steps for
configuring those settings.
- In Strata Cloud Manager, select ConfigurationNGFW and Prisma AccessConfiguration ScopeAccess AgentSetupInfrastructure.Edit the infrastructure settings for the Prisma Access Agent.
![]() Because the Infrastructure Settings page is shared between the Prisma Access Agent and the GlobalProtect app, select Filter ByPrisma Access Agent to show only the settings that are related to the Prisma Access Agent.
Because the Infrastructure Settings page is shared between the Prisma Access Agent and the GlobalProtect app, select Filter ByPrisma Access Agent to show only the settings that are related to the Prisma Access Agent.![]() Add a hostname to the Domain Name for the service that Prisma Access Agents connect to.By default, users can access the service using an FQDN based on your hostname and the .epm.gpcloudservice.com domain.
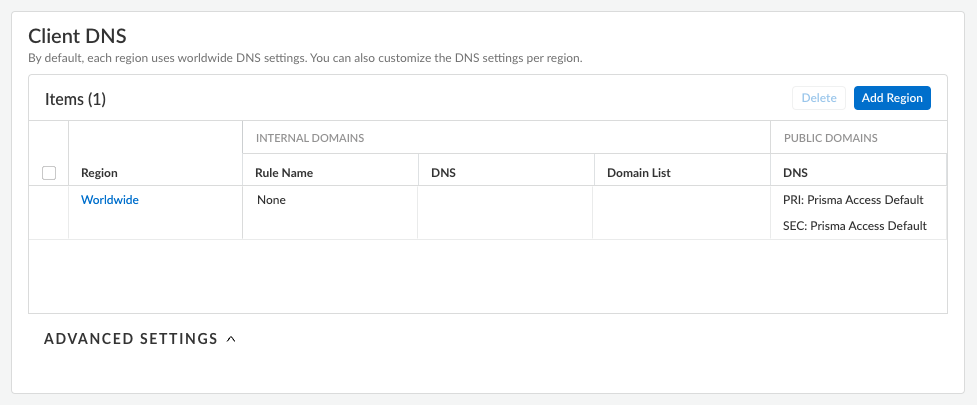
Add a hostname to the Domain Name for the service that Prisma Access Agents connect to.By default, users can access the service using an FQDN based on your hostname and the .epm.gpcloudservice.com domain.![]() Enter Client DNS resolution settings for your Prisma Access Agent deployment.By default, each region uses worldwide DNS settings. You can customize DNS settings based on region if needed.
Enter Client DNS resolution settings for your Prisma Access Agent deployment.By default, each region uses worldwide DNS settings. You can customize DNS settings based on region if needed.- Select a region for the DNS Servers (Add Region).Select Worldwide or a theater. If you specify multiple proxy settings with a mix of Worldwide and theater settings, Prisma Access uses the settings for the location group (a group of locations that is smaller than the theater), then theater, then Worldwide. Prisma Access evaluates the rules from top to bottom in the list.
![]() Edit or add the region settings.
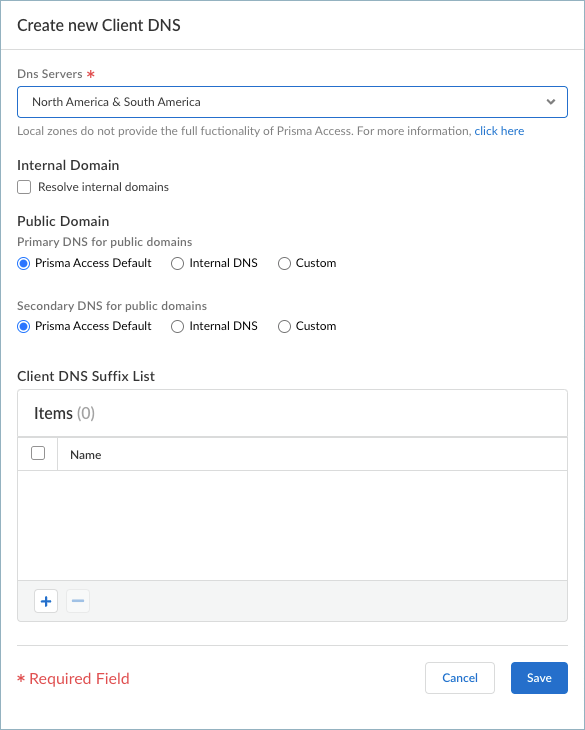
Edit or add the region settings.- If you are adding a region, enter a name in Dns Servers.
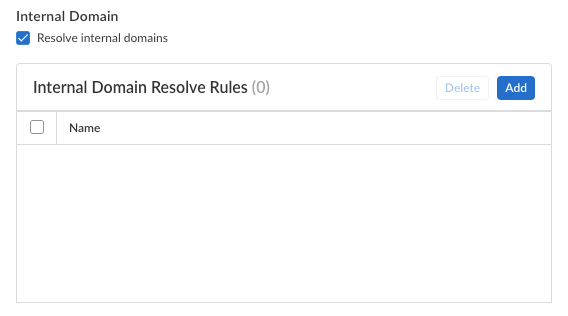
- Choose whether or not you want Prisma Access to
Resolve internal domains; if you
do, Add one or more
Internal Domain Resolve Rules.
![]()
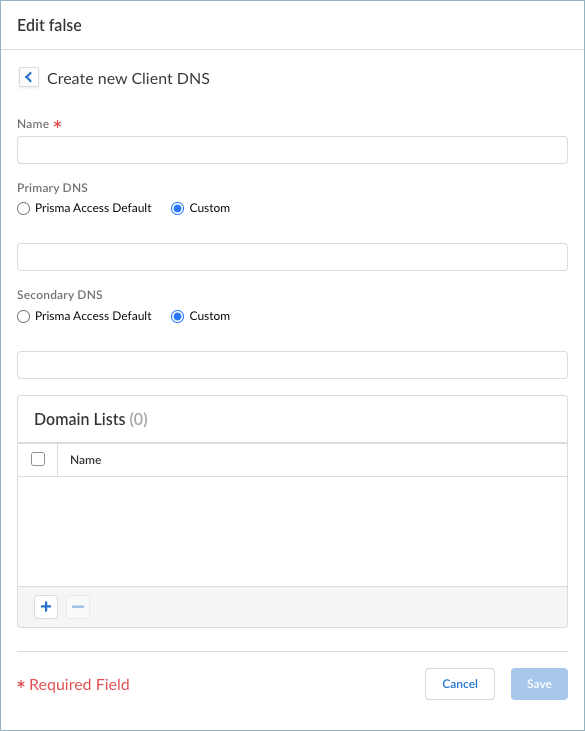
- Enter a unique Name for the rule.
- Select Prisma Access Default to use the default Prisma Access DNS server to resolve internal domains.
- If you have a Custom DNS server that can access your internal domains, specify the Primary DNS and Secondary DNS server IP addresses.
- If you want your internal DNS server to only resolve the domains you specify, click + and enter the domains to resolve in the Domain Lists. Specify an asterisk in front of the domain; for example, *.acme.com. You can specify a maximum of 1,024 domain entries.
- Save your changes when
finished.
![]()
Specify the DNS settings for Primary DNS for public domains and Secondary DNS for public domains.- Prisma Access Default—Use the default Prisma Access DNS server to resolve requests for public domains.
- Internal DNS—Use the same server that you use to resolve internal domains.
- Custom—If you have a DNS server that can access your public (external) domains, enter the primary DNS server address in that field.
- (Optional) You can add a Client DNS Suffix List to specify the suffix that the client should use locally when an unqualified hostname is entered that it can't resolve, for example, acme.local. Don't enter a wildcard (*) character before the domain suffix (for example, acme.com). You can add multiple suffixes.
![]() Configure the Advanced Settings.
Configure the Advanced Settings.- If you want Prisma Access to proxy DNS requests, configure the values for UDP Queries Retries. Specify the Interval (Sec) to retry the query in seconds and the number of retry Attempts to perform.
- Select Advanced RCODE Support to allow the primary DNS server to fail over to the secondary DNS server if an RCODE 2 (SERVFAIL) and RCODE 5 (REFUSED) DNS return code is received.A DNS response code of SERVFAIL refers to a communication error with the primary DNS server, and a DNS response code of REFUSED means that the primary DNS server refused to provide the requested information. In both cases, the service fails over to the secondary DNS server.
![]() Configure the IP address pools used to assign IP addresses to Prisma Access Agent endpoints by clicking Add IP Pool.
Configure the IP address pools used to assign IP addresses to Prisma Access Agent endpoints by clicking Add IP Pool.![]() By default, each region uses the Worldwide IP pool. You can opt to use a set of IP pools that are dedicated to regions or locations. For regions or locations where you don’t specify an IP pool, Prisma Access uses the Worldwide IP pool.
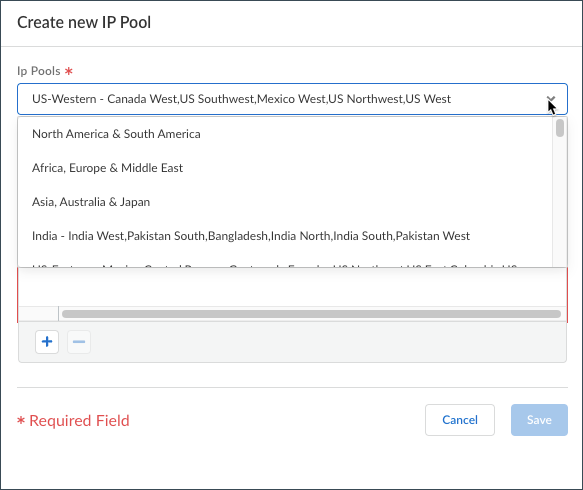
By default, each region uses the Worldwide IP pool. You can opt to use a set of IP pools that are dedicated to regions or locations. For regions or locations where you don’t specify an IP pool, Prisma Access uses the Worldwide IP pool.- Specify a region for the Ip Pools.You can use a single IP address pool for all Prisma Access Agent endpoints in the world (Worldwide), you can use separate pools for each theater where you have mobile users, or you can specify pools per location group (a group of locations that is smaller than the theater). You can also specify a combination of worldwide, per-theater, or per-location group IP pools. For example, you could add a pool for a specific location group and then add a Worldwide pool to use for all other locations.Use location group-specific IP address pools if you have services that depend on the source IP address of the user to identify the user’s details, such as location-based services or services based on a user group or function. This way, you can apply access control policies, or to perform routing or policy operations on different countries if the countries are in different compute regions. For example, you could use a separate IP address pool for Canada and one for Brazil, which are in different compute locations, to provide distinct access and security controls. To use location group-specific IP address pools, you must also specify a Worldwide or theater-specific pool.Prisma Access Agent users consume the IP addresses in the location group first, then theater-specific IP addresses, then Worldwide IP addresses. For example, if you specify a pool for a location group and Worldwide, and you then exhaust the available IP addresses in the location group pool, Prisma Access then takes IP addresses from the Worldwide pool to use in that location group.
- To specify IP pools that can be used by all Prisma Access Agent users, select Worldwide.
- To specify IP pools that can be used by Prisma Access Agent users in a specific theater, select the theater.
- To specify IP pools that are specific to the location group, select it from the list.
![]()
- To assign to the endpoints in the region you selected, click + to enter one or more IP Pools.You can enter a minimum required subnet of /23 (512 IP addresses) per location. Additional locations require a minimum /23 subnet. If you specify a Worldwide subnet, the minimum required subnet is /23. However, for best results, use these IP address pools for mobile users deployment to allocate a set of IP addresses that is equal to or greater than the number of licensed mobile users so that they can log in at the same time.Don't specify addresses that overlap with other networks that you use internally or with the pools that you assigned when you set up the Prisma Access service infrastructure. In addition, do not use the following IP addresses and subnets, because Prisma Access reserves those IP addresses and subnets for its internal use:
- 169.254.0.0/16
- 100.64.0.0/10
For best results, use an RFC 1918-compliant IP address pool. While non-RFC 1918-compliant (public) IP addresses are supported for mobile users, avoid using them due to possible conflicts with internet public IP address space. - Save your IP pool settings.After establishing the tunnel, the Prisma Access location allocates IP addresses in this range to all endpoints that connect through that tunnel.
(Optional) Select Force IPv6 Sinkhole to force Prisma Access to sink hole all mobile user IPv6 traffic.In a dual stack endpoint that can process both IPv4 and IPv6 traffic, the Prisma Access Agent sends mobile user IPv4 traffic to be protected through the tunnel to Prisma Access. However, mobile user IPv6 traffic isn't sent to Prisma Access by default and is sent to the local network adapter on the endpoint instead. To reduce the attack surface for IPv6-based threats, you can configure Prisma Access to sinkhole IPv6 traffic. Because endpoints can automatically fall back to an IPv4 address, you can enable a secure and uninterrupted user experience for mobile user traffic to the internet.When you enable this functionality, Prisma Access assigns an IPv6 address to the connecting endpoint in addition to an IPv4 address; then, it routes the IPv6 traffic to Prisma Access and discards it using a built-in security policy. Prisma Access uses fc00:0:0:0:0:0:0:0/64 as the sinkhole address.![]() The default IPv6 route has priority over other routes. However, if more specific IPv6 routes exist through the physical network interface or if you specify the IPv6 source address of the physical interface, such traffic will be sent to the local network adapter.(Optional) If needed, Reset the infrastructure to their default settings. If you do this, all your custom settings will be replaced by the default settings.Save the infrastructure settings.
The default IPv6 route has priority over other routes. However, if more specific IPv6 routes exist through the physical network interface or if you specify the IPv6 source address of the physical interface, such traffic will be sent to the local network adapter.(Optional) If needed, Reset the infrastructure to their default settings. If you do this, all your custom settings will be replaced by the default settings.Save the infrastructure settings.Select Prisma Access Locations
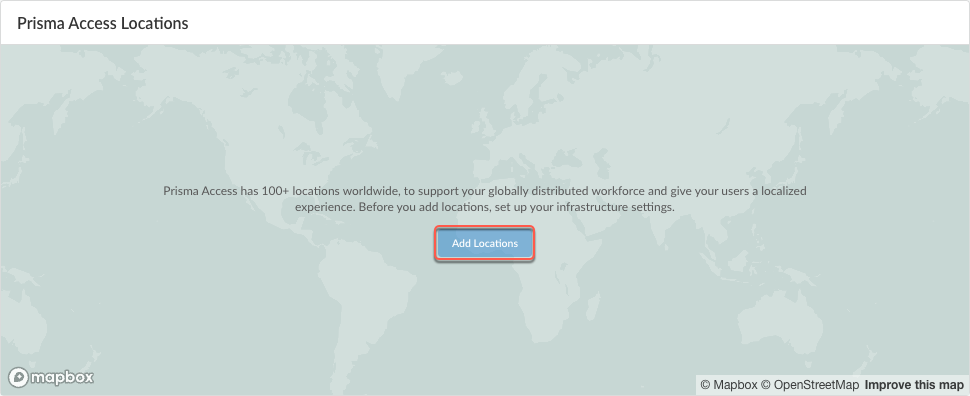
Add the Prisma Access locations where you want to support Prisma Access Agent users.Select the Prisma Access locations where you want to support Prisma Access Agent users.- In Strata Cloud Manager, select ConfigurationNGFW and Prisma AccessConfiguration ScopeAccess AgentSetupInfrastructure.If you are setting up the infrastructure for the first time, Add Locations. Otherwise, edit the Prisma Access Locations.
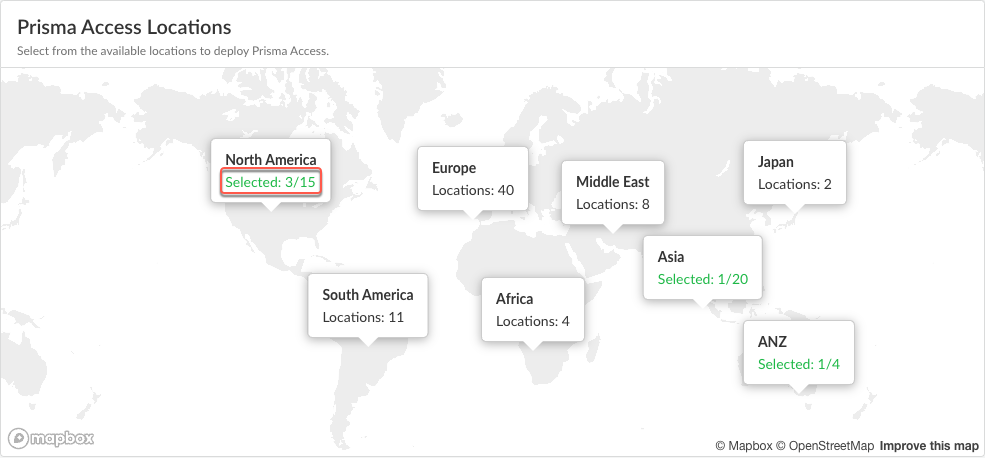
![]() Select the Prisma Access locations where your mobile users will connect to.Depending on your license agreement, you can select either Local or Worldwide locations. The map shows the regions where you can deploy Prisma Access for Users. In addition, Prisma Access provides multiple locations within each region to ensure that your users can connect to a location that provides a user experience tailored to the users’ locale. For the best performance, Select All. Alternatively, select specific locations within each selected region where your users will need access. By limiting your deployment to a single region, you can have more granular control over your deployed regions and exclude regions required by your policy or industry regulations.You can view the list of supported locations for Prisma Access Agent.The images in this section are provided for illustrative purposes only.
Select the Prisma Access locations where your mobile users will connect to.Depending on your license agreement, you can select either Local or Worldwide locations. The map shows the regions where you can deploy Prisma Access for Users. In addition, Prisma Access provides multiple locations within each region to ensure that your users can connect to a location that provides a user experience tailored to the users’ locale. For the best performance, Select All. Alternatively, select specific locations within each selected region where your users will need access. By limiting your deployment to a single region, you can have more granular control over your deployed regions and exclude regions required by your policy or industry regulations.You can view the list of supported locations for Prisma Access Agent.The images in this section are provided for illustrative purposes only.- Select an available region on the map.
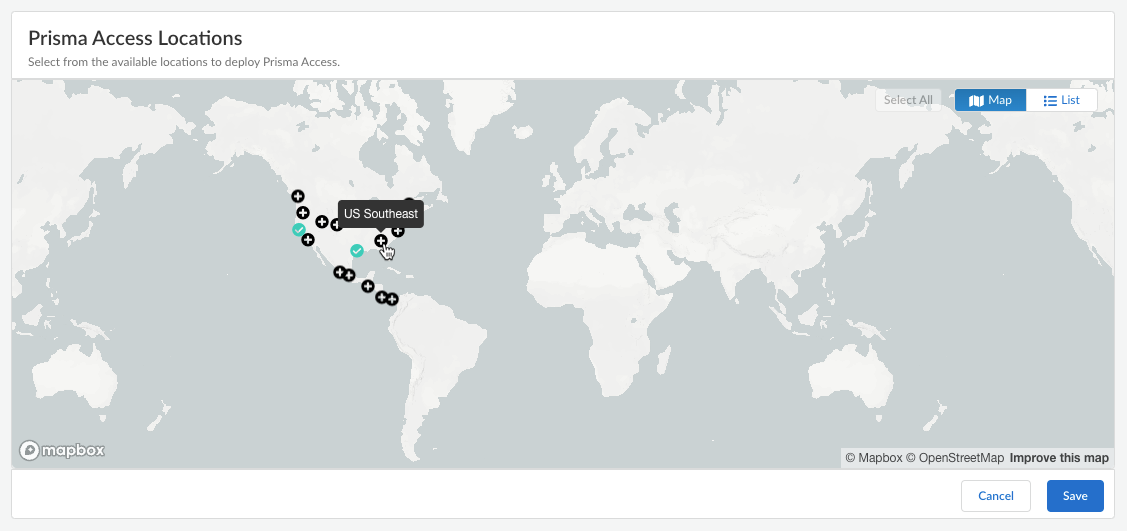
![]() Click the plus sign + on the locations that you want to add.You can switch between the Map and List views. You can also Select All locations.
Click the plus sign + on the locations that you want to add.You can switch between the Map and List views. You can also Select All locations.![]() In the list view, you can select from the list of available locations to deploy Prisma Access. You can select All sites within a region.
In the list view, you can select from the list of available locations to deploy Prisma Access. You can select All sites within a region.![]() Save your Prisma Access location settings.(Optional) Restrict access to your SaaS applications from unauthorized users.You can enable the egress IP allow lists for existing mobile user deployments and during new user onboarding. If you enable egress IP allow lists for existing Prisma Access deployments, Prisma Access migrates all the egress IP addresses already allocated for your locations to the egress IP allow lists. For new Prisma Access deployments, enable the egress IP allow list while onboarding the Prisma Access Agent mobile users. Every time you add a location or have an auto scaling event, you should retrieve the new egress IP addresses that Prisma Access allocates and add them to allow lists in your SaaS applications. You can then push the configuration to your Prisma Access deployment to confirm the egress IP allow lists allocated for your locations.
Save your Prisma Access location settings.(Optional) Restrict access to your SaaS applications from unauthorized users.You can enable the egress IP allow lists for existing mobile user deployments and during new user onboarding. If you enable egress IP allow lists for existing Prisma Access deployments, Prisma Access migrates all the egress IP addresses already allocated for your locations to the egress IP allow lists. For new Prisma Access deployments, enable the egress IP allow list while onboarding the Prisma Access Agent mobile users. Every time you add a location or have an auto scaling event, you should retrieve the new egress IP addresses that Prisma Access allocates and add them to allow lists in your SaaS applications. You can then push the configuration to your Prisma Access deployment to confirm the egress IP allow lists allocated for your locations.- Enable Egress IP Allowlist to display the IP addresses for onboarded Prisma Access locations.
![]() Copy and add the allocated addresses to the allow lists of your SaaS applications.Migrate to confirm the IP addresses allocated for the onboarded locations in Prisma Access.Retrieve the IP addresses for new onboarded locations or during an auto scaling event.
Copy and add the allocated addresses to the allow lists of your SaaS applications.Migrate to confirm the IP addresses allocated for the onboarded locations in Prisma Access.Retrieve the IP addresses for new onboarded locations or during an auto scaling event.- Select the Location name to find the new egress IP addresses allocated to the location.
- Add these IP addresses to the allow lists for your SaaS applications before you confirm them in Prisma Access.
- Save the allocated egress IP addresses.
Set Up the Infrastructure for Prisma Access Agents (Prisma Access Deployment on Panorama)
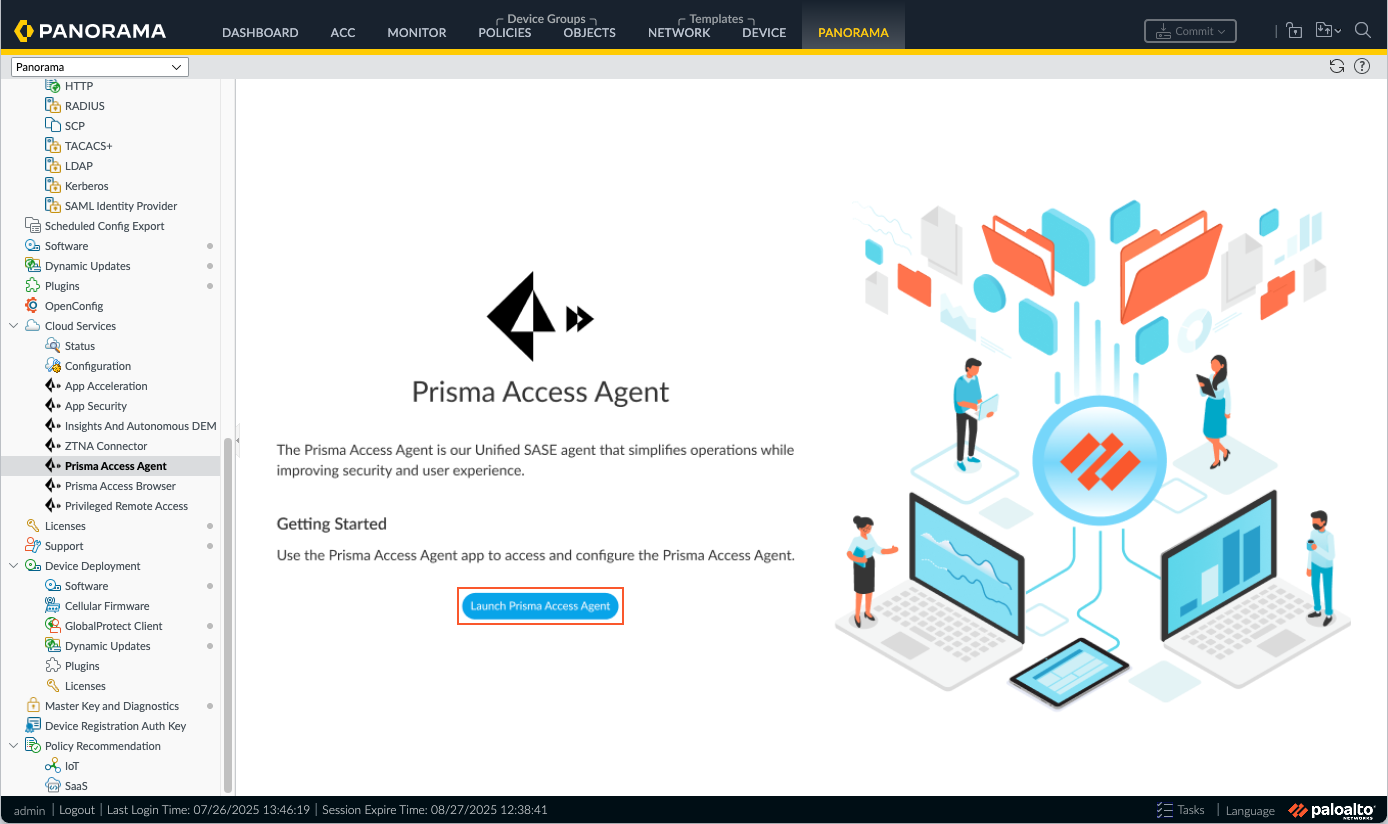
Onboard your users by configuring the infrastructure and selecting Prisma Access locations in Panorama.On a Panorama Managed Prisma Access tenant, set up the infrastructure settings that are specific to the Prisma Access Agent so that Prisma Access can provision your mobile user environment.You will configure the infrastructure settings using a configuration app accessible through the Strata Cloud Manager.- Launch the Prisma Access Agent configuration tool.
- From the Cloud Services plugin in Panorama, select PanoramaCloud ServicesPrisma Access Agent.Click Launch Prisma Access Agent.
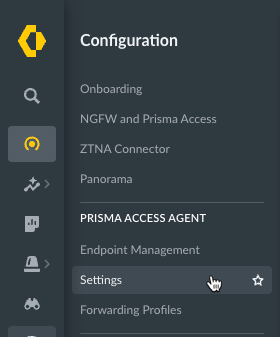
![]() Configure the infrastructure settings.
Configure the infrastructure settings.- Select ConfigurationPrisma Access AgentSettings.
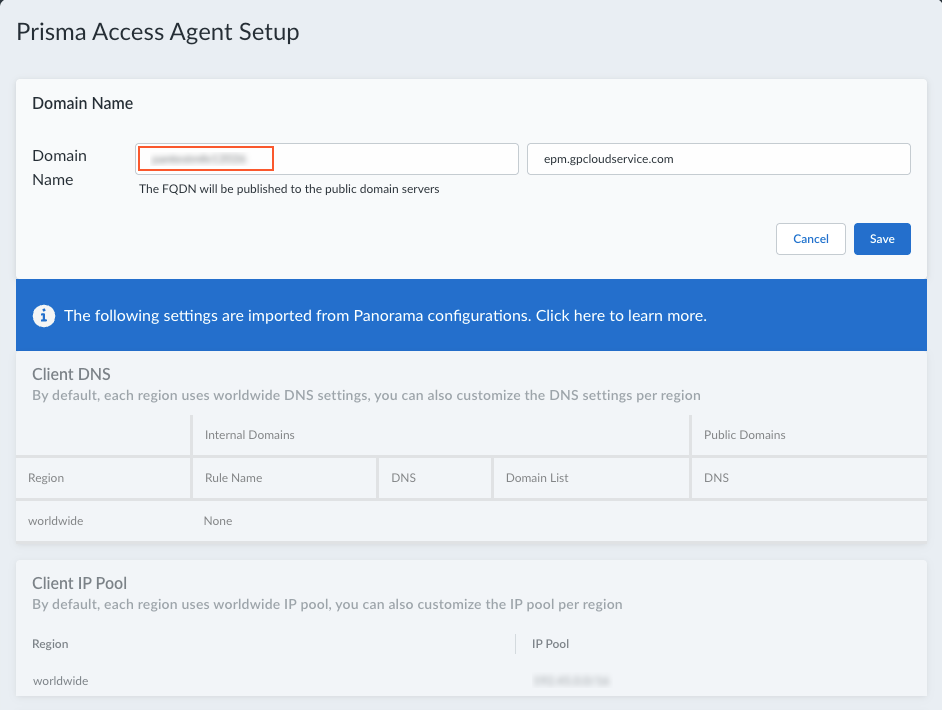
![]() Select Infrastructure.Select the Domain Name settings.
Select Infrastructure.Select the Domain Name settings.![]() Add a hostname to the Domain Name for the service that the Prisma Access Agent connects to.By default, users can access the service using an FQDN based on your hostname and the .epm.gpcloudservice.com domain. This FQDN will be published to the public domain name servers.
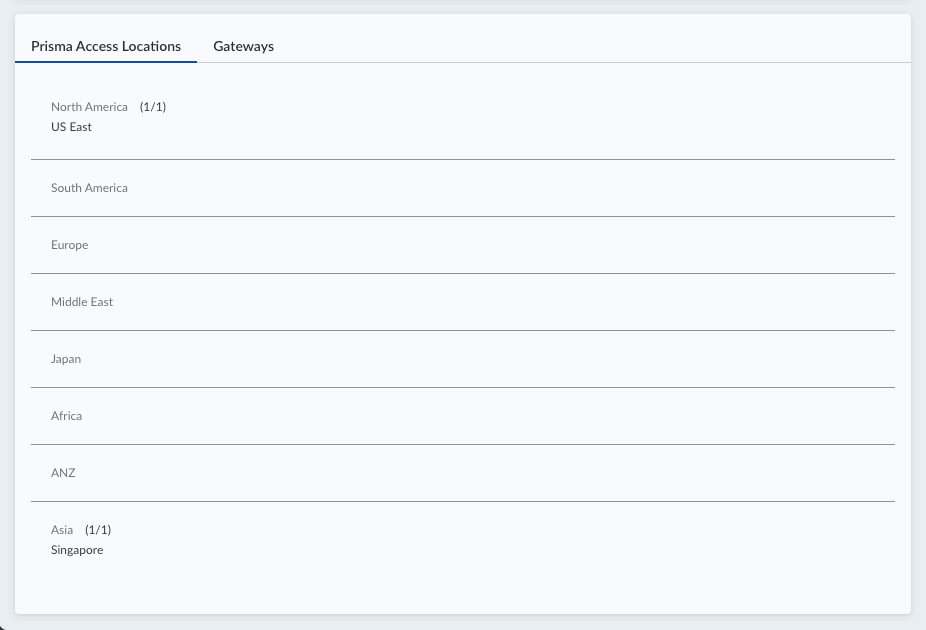
Add a hostname to the Domain Name for the service that the Prisma Access Agent connects to.By default, users can access the service using an FQDN based on your hostname and the .epm.gpcloudservice.com domain. This FQDN will be published to the public domain name servers.![]() The Client DNS and Client IP Pool are imported from your configurations in Panorama. You can't configure them here.Save your domain name settings.The Prisma Access Locations and Gateways are imported from Panorama. You can't configure them here.
The Client DNS and Client IP Pool are imported from your configurations in Panorama. You can't configure them here.Save your domain name settings.The Prisma Access Locations and Gateways are imported from Panorama. You can't configure them here.![]()
Set Up the Infrastructure for Prisma Access Agents (NGFW Deployment)
Onboard your users in NGFW deployments by configuring the infrastructure and selecting Prisma Access locations in Panorama.For Panorama managed NGFW deployments, set up the infrastructure settings that are specific to the Prisma Access Agent to provision your mobile user environment.You will configure the infrastructure settings using a configuration app accessible through Strata Cloud Manager.Before you begin, ensure that you have the following information:- Certificates that are generated and managed on the gateway on Panorama.
Because using authentication override cookie certificate is the only method for gateway authentication, you need to use the same authentication override cookie certificate on the gateway, portal, and Prisma Access Agent management plane (EPM). Only when all the certificates match can the gateway authenticate the user using the existing cookie that the portal generated. In addition, certificates are needed for HIP checks.
- The FQDN or IP address for internal or external gateways managed on Panorama that you want your users to access.
- Log in to Strata Cloud Manager as the administrator.To configure the infrastructure settings in the configuration app in Strata Cloud Manager, select ConfigurationPrisma Access AgentSettings.
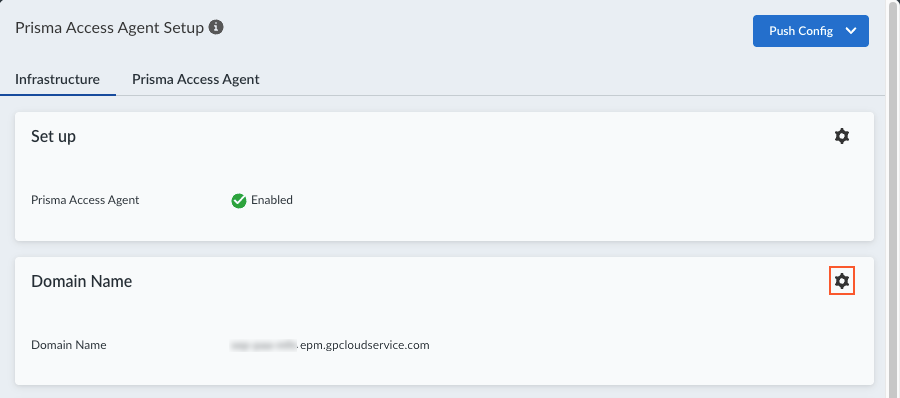
![]() Select Infrastructure.Configure the Prisma Access Agent domain FQDN. This is similar to the GlobalProtect portal FQDN.
Select Infrastructure.Configure the Prisma Access Agent domain FQDN. This is similar to the GlobalProtect portal FQDN.- Edit the Domain Name settings.
![]() Add a hostname to the Domain Name for the service (Endpoint Manager) that the Prisma Access Agent connects to.By default, users can access the service using an FQDN based on your hostname and the .epm.gpcloudservice.com domain. This FQDN will be published to the public domain name servers.
Add a hostname to the Domain Name for the service (Endpoint Manager) that the Prisma Access Agent connects to.By default, users can access the service using an FQDN based on your hostname and the .epm.gpcloudservice.com domain. This FQDN will be published to the public domain name servers.![]() Save your domain name setting.Import the authentication override cookie certificates that are used for gateway authentication.
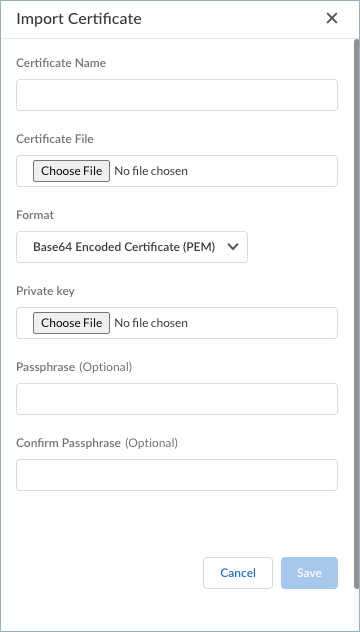
Save your domain name setting.Import the authentication override cookie certificates that are used for gateway authentication.- Click Add Certificate.
![]() Enter the Certificate Name.Choose File to select and upload the certificate file. This certificate file was generated and managed by the gateway.Select the Format for the certificate and choose the file for the Private key.(Optional) Enter and confirm a Passphrase.Save the certificate settings.
Enter the Certificate Name.Choose File to select and upload the certificate file. This certificate file was generated and managed by the gateway.Select the Format for the certificate and choose the file for the Private key.(Optional) Enter and confirm a Passphrase.Save the certificate settings.![]() Create certificate profiles based on the certificates that you imported in the previous step. These certificate profiles will be used for the authentication override cookie settings and for HIP matches.
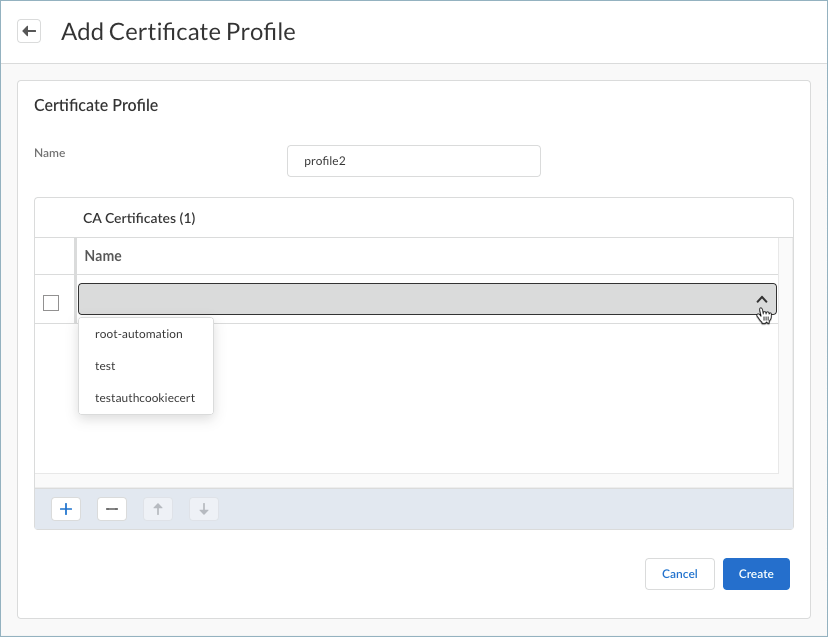
Create certificate profiles based on the certificates that you imported in the previous step. These certificate profiles will be used for the authentication override cookie settings and for HIP matches.- Click Add Certificate Profile.
![]() Enter a Name for the certificate profile.Click the + sign and open the drop-down to show the list of certificates that you imported in the previous step.Select a certificate from the list. You can add one or more certificates to the profile.Create the certificate profile.
Enter a Name for the certificate profile.Click the + sign and open the drop-down to show the list of certificates that you imported in the previous step.Select a certificate from the list. You can add one or more certificates to the profile.Create the certificate profile.![]() Add the internal and external gateways that you want your users to access. The gateways are configured on the NGFW firewall but you need to add the same details (gateway FQDN or IP address) here.
Add the internal and external gateways that you want your users to access. The gateways are configured on the NGFW firewall but you need to add the same details (gateway FQDN or IP address) here.- Add a gateway.
- For internal gateways, select Add GatewayInternal Gateway.
- For external gateways, select Add GatewayExternal Gateway.
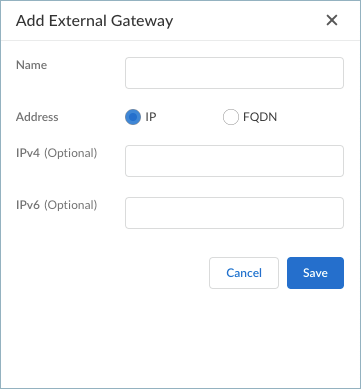
![]() Enter the Name for the gateway.Enter the IP address or FQDN for the gateway.
Enter the Name for the gateway.Enter the IP address or FQDN for the gateway.- For IP address, select IP and enter the IPv4 or IPv6 address for the gateway.
- For FQDN, select FQDN and enter the FQDN for the gateway.
![]() Save your gateway settings.
Save your gateway settings.


