Prisma Access Agent
Deploy Prisma Access Agents to Windows Endpoints Using Microsoft Intune
Table of Contents
Deploy Prisma Access Agents to Windows Endpoints Using Microsoft Intune
Learn how to deploy Prisma Access Agents to your Windows endpoints using
Microsoft Intune. You can also learn how to uninstall Prisma Access Agents.
| Where Can I Use This? | What Do I Need? |
|---|---|
|
|
Use Microsoft Intune to deploy and install the Prisma Access Agent on managed
Windows devices in your organization. These instructions also apply if you plan to
use Endpoint DLP with Prisma Access Agent.
If you need to uninstall Prisma Access Agent for specific user groups, you can create a script for uninstalling the Prisma Access Agent
that Intune can deploy to the specific user groups.
To deploy the Prisma Access Agent for Windows using Intune:
- Download the Windows Prisma Access Agent package and configuration file (config.json) from ConfigurationEndpoint Management in Strata Cloud Manager.Open the config.json file in a text editor and make sure that it contains the correct server URL and Prisma Access tenant ID.The config.json file should have at minimum the following elements:
{
    "server_url":"xxx.epm.gpcloudservice.com",
    "tenant_id":"xxxxxxxxxx"
}
You can add other predeployment options in the config.json file such as enabling pre-logon support and disabling the GlobalProtect app (if installed on the endpoint) during the installation of the Prisma Access Agent. For example:{ "server_url":"xxx.epm.gpcloudservice.com", "tenant_id":"xxxxxxxxxx", "pre_logon_supported": true, "unload_gp": true }Create an .intunewin packager that includes the Prisma Access Agent installer and configuration file.- Create a source folder on your Windows machine and copy and paste the installer package (PrismaAccessAgent_x64_xx.x.xxxxx.xxxx.msi) and configuration file (config.json) to this folder.For example, create a folder called PAA_in and put the Prisma Access Agent installer and config.json file in this folder.Create a PowerShell wrapper script in this source folder that tells Microsoft Intune how to install the Prisma Access Agent. The script must contain the name of the Prisma Access Agent installer file.For example, create a PowerShell script called paa.ps1 that includes the following statements:
$MSIFileName = 'PrismaAccessAgent_x64_xx.x.xxxxx.xxxx.msi'
$MSISwitches = '/quiet /norestart'

$ScriptPath = Split-Path -Path $MyInvocation.MyCommand.Path

$InstallProcess = Start-Process -FilePath "msiexec" -ArgumentList ("/i " + [char]34 + $ScriptPath + "\" + $MSIFileName + [char]34 + " " + $MSISwitches) -PassThru -Wait

Write-Host ("Installation completed, exiting with last return code (" + $InstallProcess.ExitCode + ")")
Exit $InstallProcess.ExitCode
Create a batch file in this source folder to invoke the wrapper script. For example, create a batch file called InstallPAA.cmd that includes the following statements:@ECHO OFF @SystemRoot@\SysNative\WindowsPowershell\v1.0\powershell.exe -ExecutionPolicy Bypass .\paa.ps1 EXIT /B %ERRORLEVEL%
Ensure that your source folder contains all the necessary files. For example:![]() Use the Microsoft Win32 Content Prep Tool to create the intunewin packager.
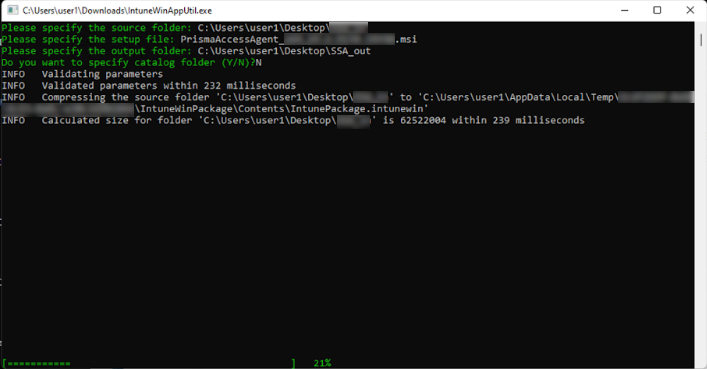
Use the Microsoft Win32 Content Prep Tool to create the intunewin packager.- Download the Win32 Content Prep Tool (IntuneWinAppUtil.exe).
- Run the IntuneWinAppUtil.exe app on Windows.
- When prompted, specify the following:
- Source folder—Enter the name of the source folder that you created. For example, enter C:\<your_path>\PAA_in.
- Setup file—Enter the name of the Prisma Access Agent installer (PrismaAccessAgent_x64_xx.x.xxxxx.xxxx.msi).
- Output folder—Enter the name of the folder where the .intunewin file will go. For example, enter C:\<your_path>\PAA_out.
- Catalog folder—Enter N.
![]()
The Microsoft Win32 Content Prep Tool will create the PrismaAccessAgent_x64_xx.x.xxxxx.xxxx.intune file in the output folder you specified.Create a custom Win32-based app using the intunewin packager that you created in the previous step.- Log in to the Microsoft Intune admin center from your web browser.Select AppsWindowsAdd.Select the Windows app (Win32) app type and click Select.
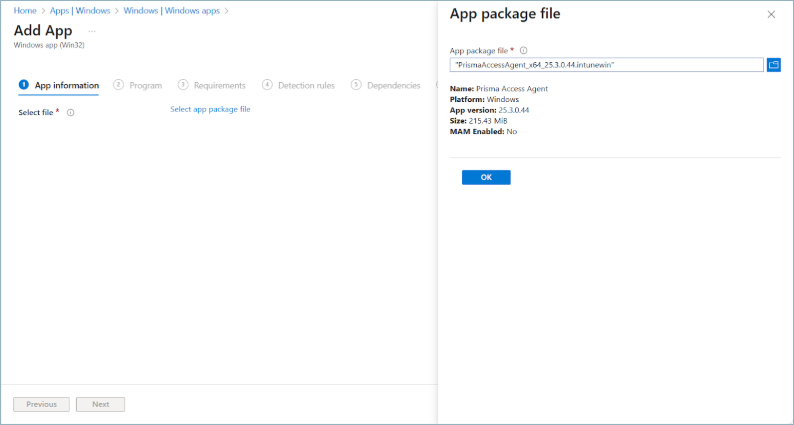
![]() Click Next.In App information, upload the app package file (.intunewin) that you created.
Click Next.In App information, upload the app package file (.intunewin) that you created.- In App package file, select
PrismaAccessAgent_x64_xx.x.xxxxx.xxxx.intune
and click OK.
![]()
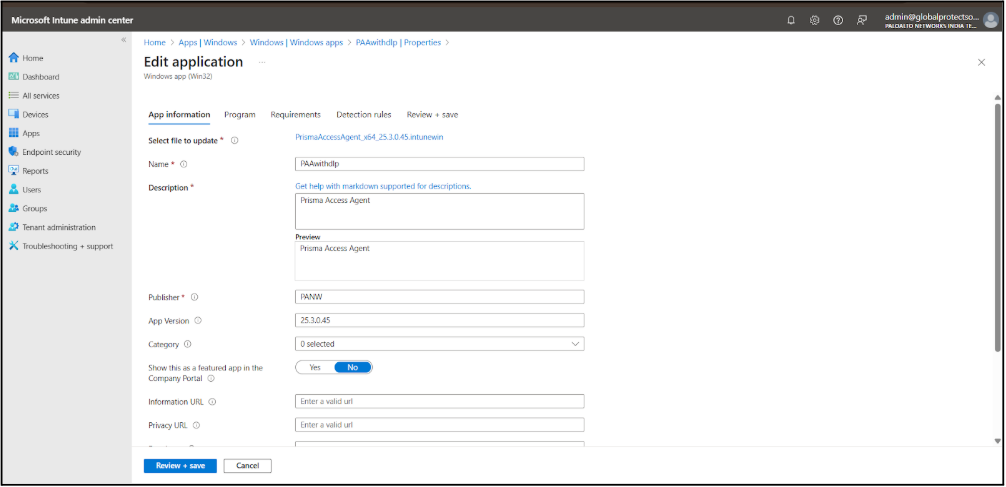
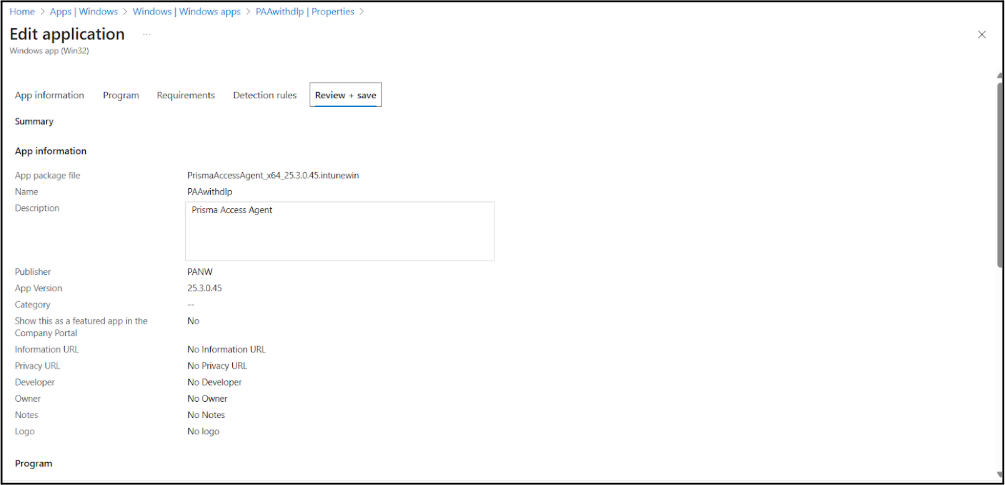
- Enter basic information for the app:
- Give the app a Name, such as PAA or PAAwithdlp.
- Enter a Description, such as Prisma Access Agent.
- For Publisher, enter PANW.
![]()
- Click Next.
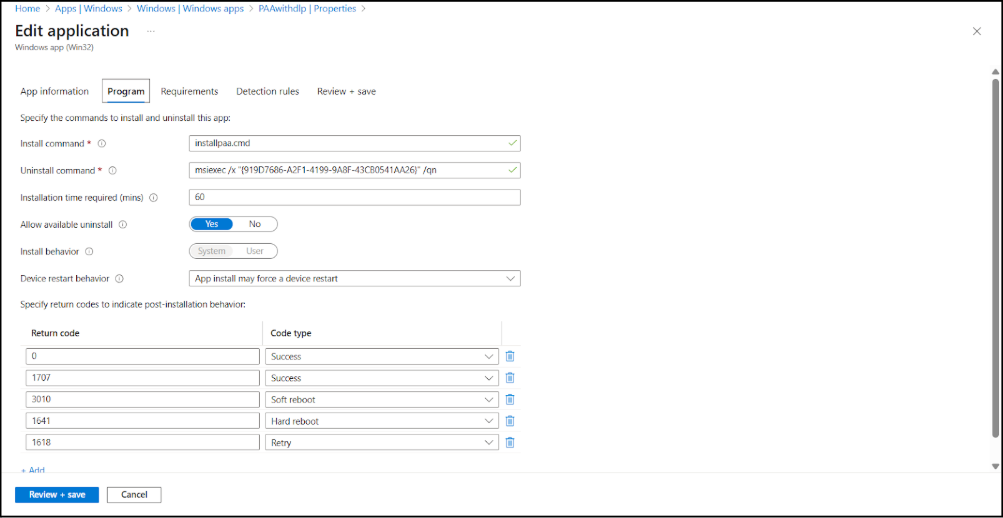
For the Install command in the Program tab, enter the name of the batch file (.cmd) that you created. For example, enter InstallPAA.cmd and click Next.![]() In Requirements, select 64-bit for the operating system architecture and select Windows 10 1607 as the minimum operating system. Click Next.In Detection rules, select Manually configure detention rules and specify the following values:
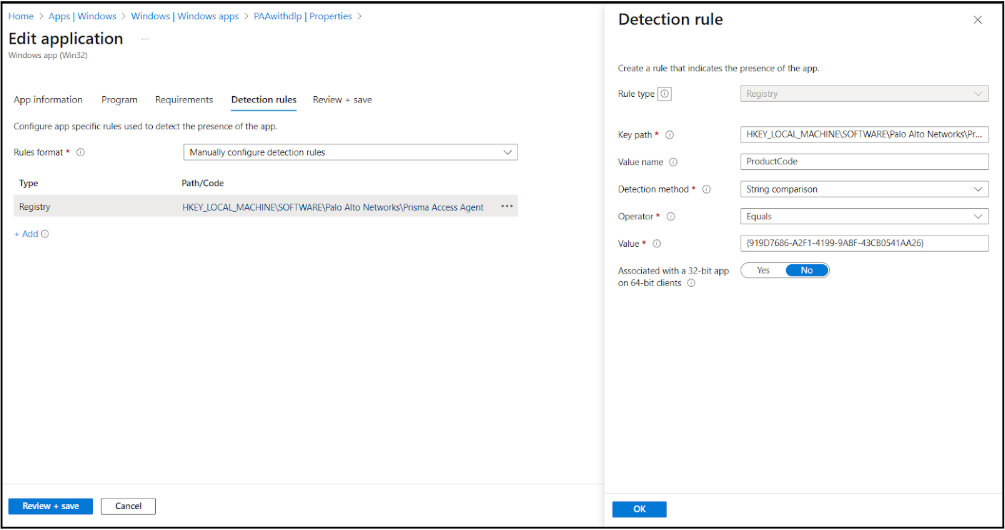
In Requirements, select 64-bit for the operating system architecture and select Windows 10 1607 as the minimum operating system. Click Next.In Detection rules, select Manually configure detention rules and specify the following values:- Rule type—Registry
- Key path—HKEY_LOCAL_MACHINE\SOFTWARE\Palo Alto Networks\Prisma Access Agent
- Value name—ProductCode
- Detection method—String comparison
- Operator—Equals
- Value—{919D7686-A2F1-4199-9A8F-43CB0541AA26}This value will change based on the Prisma Access Agent version you're deploying.
- Associated with a 32-bit app on 64-bit
clients—No
![]()
- Click OK and Next.
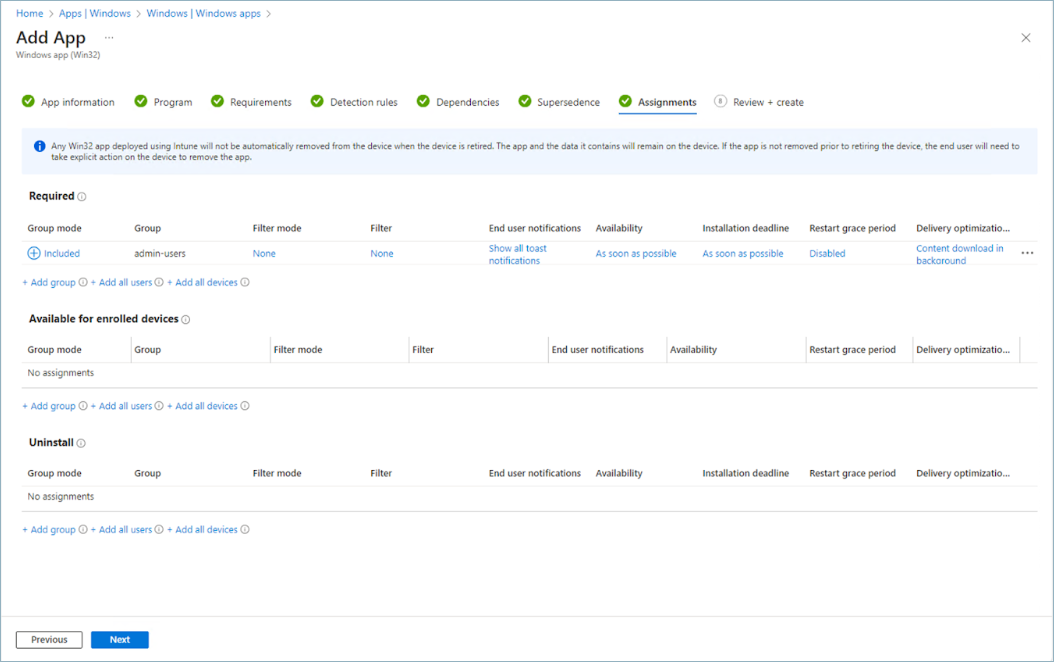
In Dependencies, click Next.In Supersedence, click Next.In Assignments, specify the user groups that will use the app.![]()
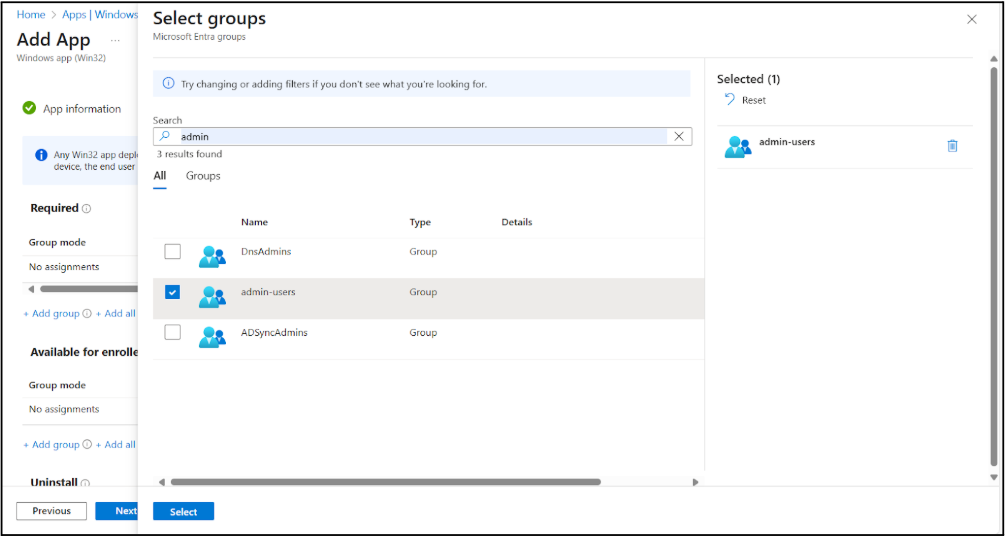
- Click Add group and select the groups
that you wan to deploy the app to.
![]()
- Click Select and Next.
In Review + create, review your settings for the app, and Create the app in Intune.The Prisma Access Agent will be deployed to the user groups that you assigned.![]() To view the app installation status from Intune, select AppsAll Apps and select the Prisma Access Agent app that you added. You can get an overview of the app status and the Device install status and User install status.
To view the app installation status from Intune, select AppsAll Apps and select the Prisma Access Agent app that you added. You can get an overview of the app status and the Device install status and User install status.Uninstall the Prisma Access Agent on Windows Endpoints Using Microsoft Intune
You can create a script for uninstalling the Prisma Access Agent from Windows endpoints and then upload the script to Microsoft Intune. You can assign the uninstall script to specific user groups, which uninstalls the Prisma Access Agent on their devices.Before you begin, you will need the anti-tamper unlock (supervisor) password that you set up in the general global Prisma Access Agent settings.- Create a PowerShell script that uninstalls the Prisma Access Agent.The following sample script is provided as a reference. Customize the script as needed for your environment:
# Uninstall_PAA.ps1

# Check if running as Administrator
$currentPrincipal = New-Object Security.Principal.WindowsPrincipal([Security.Principal.WindowsIdentity]::GetCurrent())
$isAdmin = $currentPrincipal.IsInRole([Security.Principal.WindowsBuiltInRole]::Administrator)
if (-not $isAdmin) {
    Write-Host "Script is not running as administrator."
	Exit -1
}

# Disable the anti tampering. For now the password needs to be echoed
Write-Host ("Disabling the anti-tampering")
$password = "example_supervisor_password"
echo $password | & 'C:\Program Files\Palo Alto Networks\Prisma Access Agent\PACli.exe'  protect disable /run /exit /SlientMode

# Retrieving the Prisma Access Agent product code
Write-Host ("Retrieving the Prisma Access Agent product code")
$prodCode = Get-ItemPropertyValue 'HKLM:\SOFTWARE\Palo Alto Networks\Prisma Access Agent' 'ProductCode'
Write-Host ("Prisma Access Agent product code: " + $prodCode)

# Uninstall the agent using Msiexec.exe
Write-Host ("Executing the uninstaller")
$UnInstallProcess = Start-Process -FilePath "${env:SystemRoot}\System32\msiexec" -ArgumentList ("/x " + $prodCode + " /quiet /norestart") -PassThru -Wait

Write-Host ("UnInstallation completed, exiting with last return code (" + $UnInstallProcess.ExitCode + ")")
Exit $UnInstallProcess.ExitCode
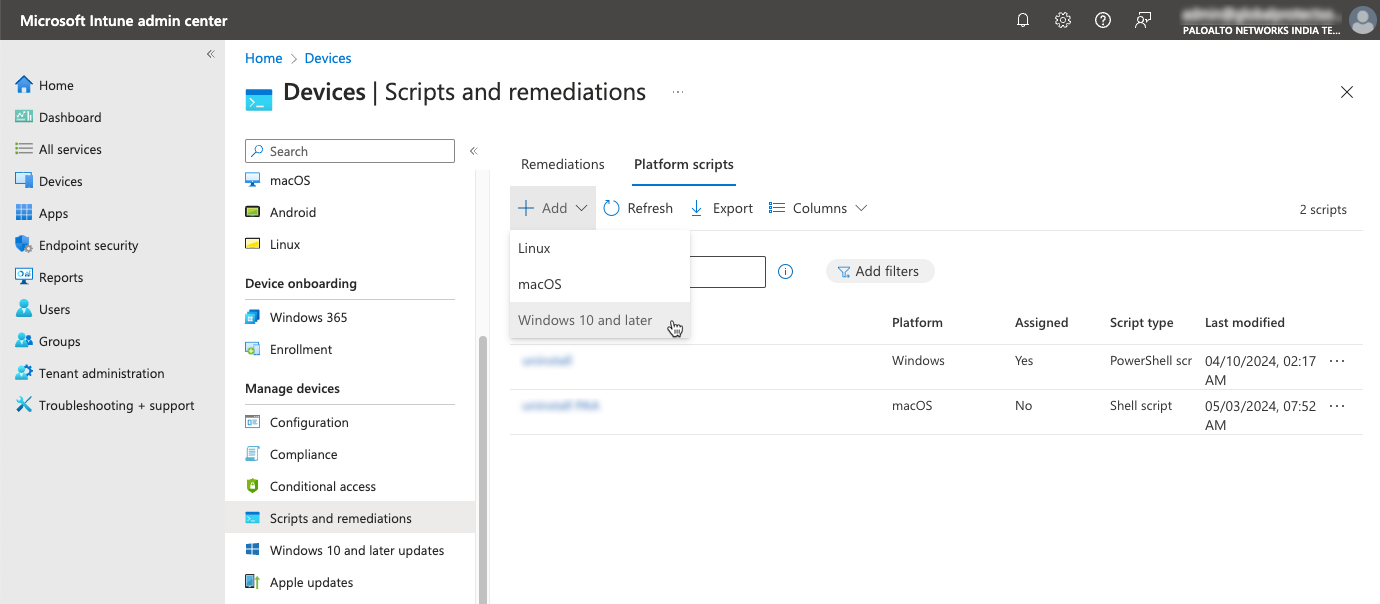
Upload and assign the script to specific user groups in Intune.- Log in to the Microsoft Intune admin center from your web browser.Select DevicesScripts and remediationsPlatform scripts.Add a Windows 10 and later script.
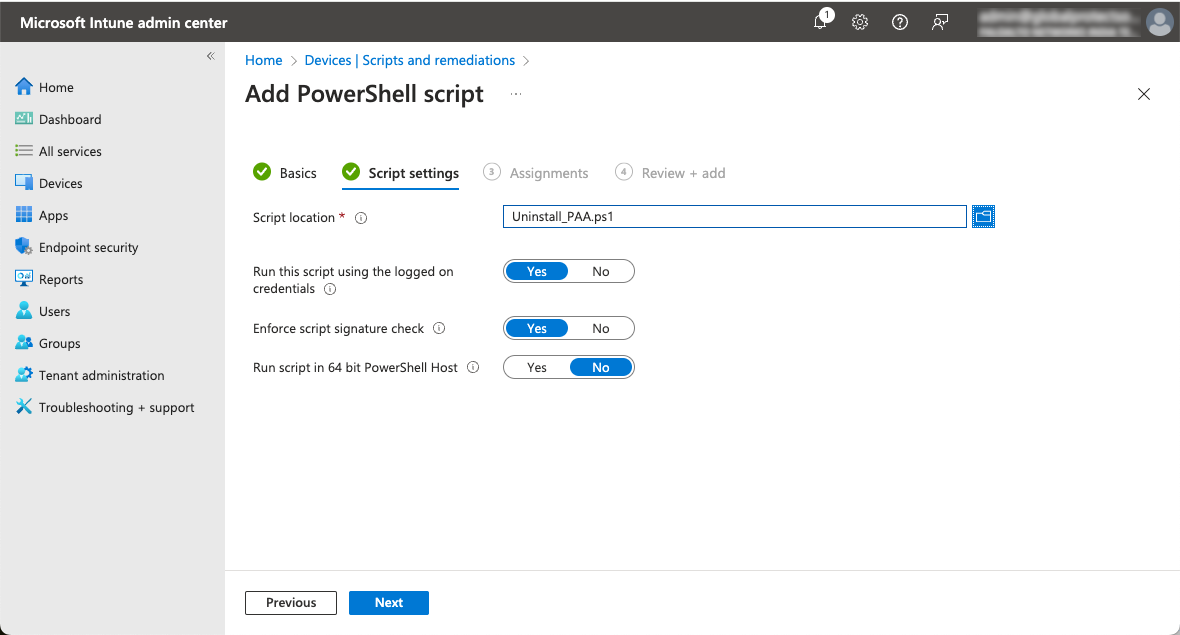
![]() Enter a Name for the script.In the Script location, select the uninstall script that you created.
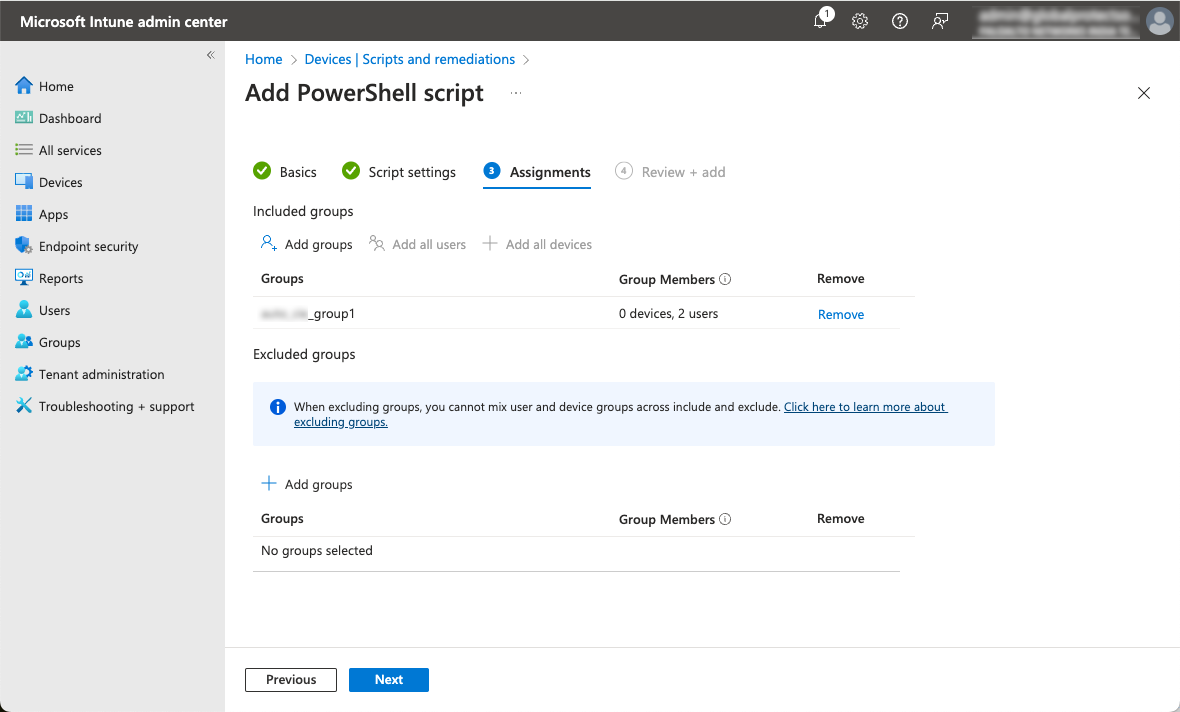
Enter a Name for the script.In the Script location, select the uninstall script that you created.![]() In Assignments, specify the user groups that will receive the uninstall script.
In Assignments, specify the user groups that will receive the uninstall script.![]() In Review + add, review the settings for the script, and Add the script to Intune.The Prisma Access Agent will be uninstalled from the devices in the user groups that you assigned.
In Review + add, review the settings for the script, and Add the script to Intune.The Prisma Access Agent will be uninstalled from the devices in the user groups that you assigned.


