SaaS Security
Begin Scanning a Google Cloud Storage App
Table of Contents
Begin Scanning a Google Cloud Storage App
Add the Google Cloud Storage app for GCP (Global Cloud
Platform) to Data Security to begin scanning and monitoring
assets for possible security risks.
| Where Can I Use This? | What Do I Need? |
|---|---|
|
Or any of the following licenses that include the Data Security license:
|
Before you begin scanning a Google Cloud Storage app, you must create a service account and
enable administrator and client API access.
To connect the Google Cloud Storage app to Data Security and begin scanning assets, you need
to:
- Create a service account from Google Cloud Console or use an existing service account.
- Enable administrator and client API access from Google Admin Console.
- Add the Google Cloud Storage app to Data Security.
- Configure initial scan settings.
Support for automated remediation capabilities varies by SaaS application.
- Create a Service Account for Google Cloud Storage
- Use an Existing Project and Service Account
- Add Google Cloud Storage App
- Identify Risks
- View Scan Settings for Project and Buckets
- Customize Google Cloud Storage App
Create a Service Account for Google Cloud Storage
You must create a service account before you
can add the Google Cloud Storage app; alternatively, you can
Use an Existing Project and Service Account
instead. As you prepare
the Google Cloud Storage account, take note of the following values,
as they are required to add the Google Cloud
Storage app
on Data Security. Each web interface might
refer to the value by a different name.Item | Web interface | Description | ||
|---|---|---|---|---|
Google Cloud Console | Google Admin Console | SaaS Security | ||
Google administrator email | Google account | Google account | Administrator email | The Google account you used to log in to Google Cloud Console to create the service account in
Google Cloud Storage. You will use this same Google account
to log in to the Google Admin Console when to enable API
client access. You specify this email on Data Security
when adding the Google Cloud Storage app. |
Private Key | Private key | n/a | Certificate | A P12 format private key certificate issued
from your Google service account. This required certificate is uploaded
on Data Security when adding the Google Cloud Storage app. |
Private Key Password | Private key password | n/a | n/a | The default password for the new private
key. |
Client ID | Client ID and Unique ID | Client ID | n/a | The client ID automatically displays on
Google Cloud Console when enabling Google Cloud Storage domain-wide
delegation, on Data Security when you add the Google Cloud Storage app,
and on Google Admin Console when enable API client access. |
Service Account ID | Email and Service account ID | n/a | Service account ID | The service account ID is automatically generated on the Google Cloud Console when you create the
service project and is partly based on the service account
name you assign. You will specify the service account ID on
SaaS Security web interface when you add the Google Cloud
Storage app. |
- Log in to Google Cloud Console as the Google Cloud Storage administrator.If you have not used the Google Cloud Console before, Agree to the Google Cloud Platform Terms of Service. Otherwise, proceed to the next step.
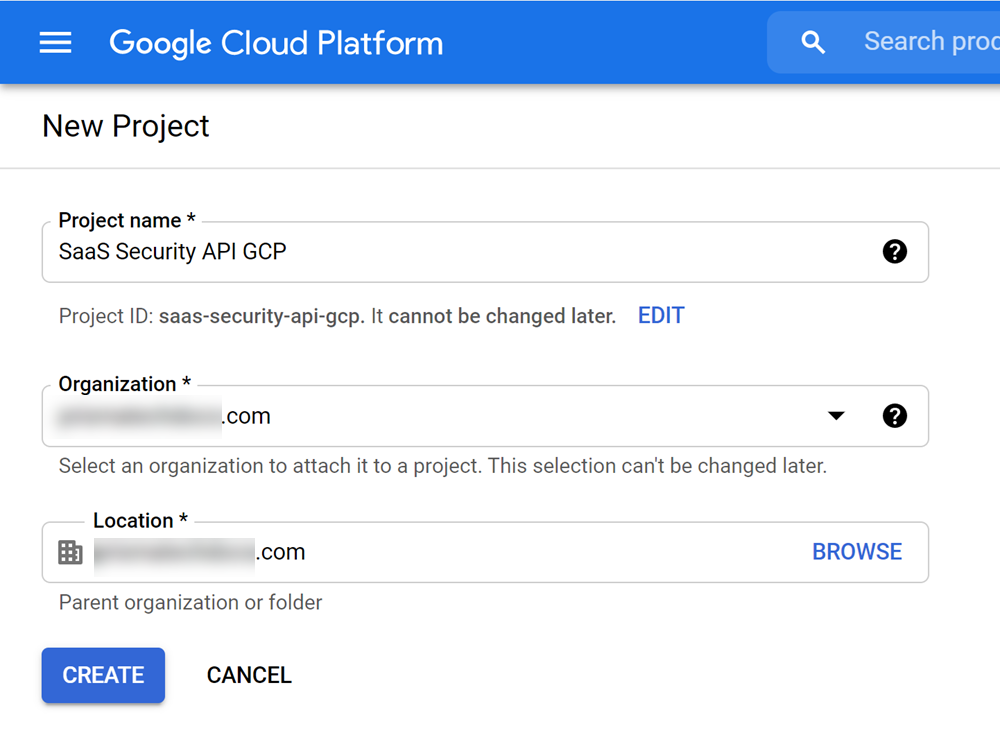
- Create a new project from GCP.
- In the drop-down at the top of the screen, open your project list, then .
- Name your project (for example, Data Security GCP), select your organization (domain), then CREATE the project.

- Authorize OAuth consent for the new project.
- Select .
- Select the project you created above.
- Select Internal user type, then CREATE.
- Specify an App name (for example, Data Security) and User support email.
- Click + ADD DOMAIN, then specify Authorized domain—the domain name for your Google administrator email, to authorize.
- Specify Developer contact information, then SAVE AND CONTINUE.
- Create the Service Account Key for the new project.
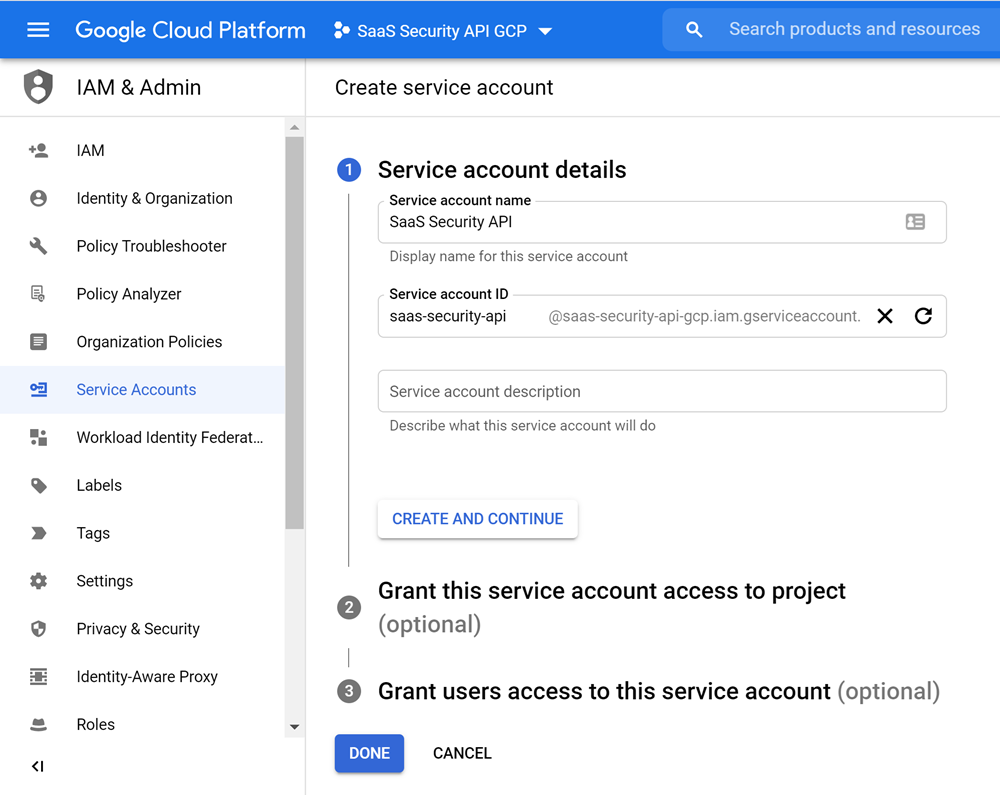
- Select .
- Select Service account and specify a Service account name (for example, Data Security), which automatically populates the Service account ID, then , authorizing no optional permissions or access.
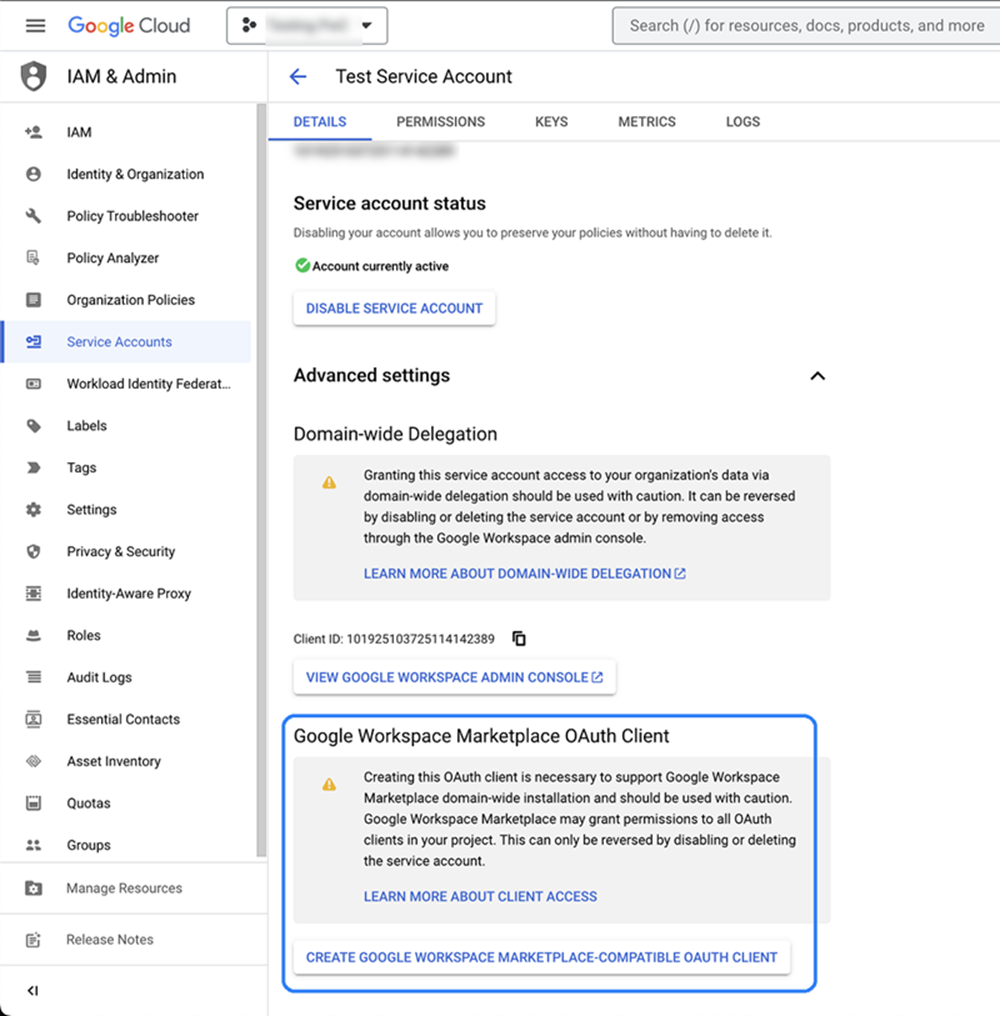
- Enable Domain-wide Delegation for the new service account.GCP creates a service account client when domain-wide delegation is enabled on a service account.
- Select .
- In Service Accounts, locate the service account, then .
- Record the Email, which you’ll use to specify the Service account ID later on SaaS Security web interface.
- Select Enable Google Domain-wide Delegation, then SAVE.If prompted to provide a value in Product name for the consent screen field, you did not perform3and4as instructed. GCP is very particular.
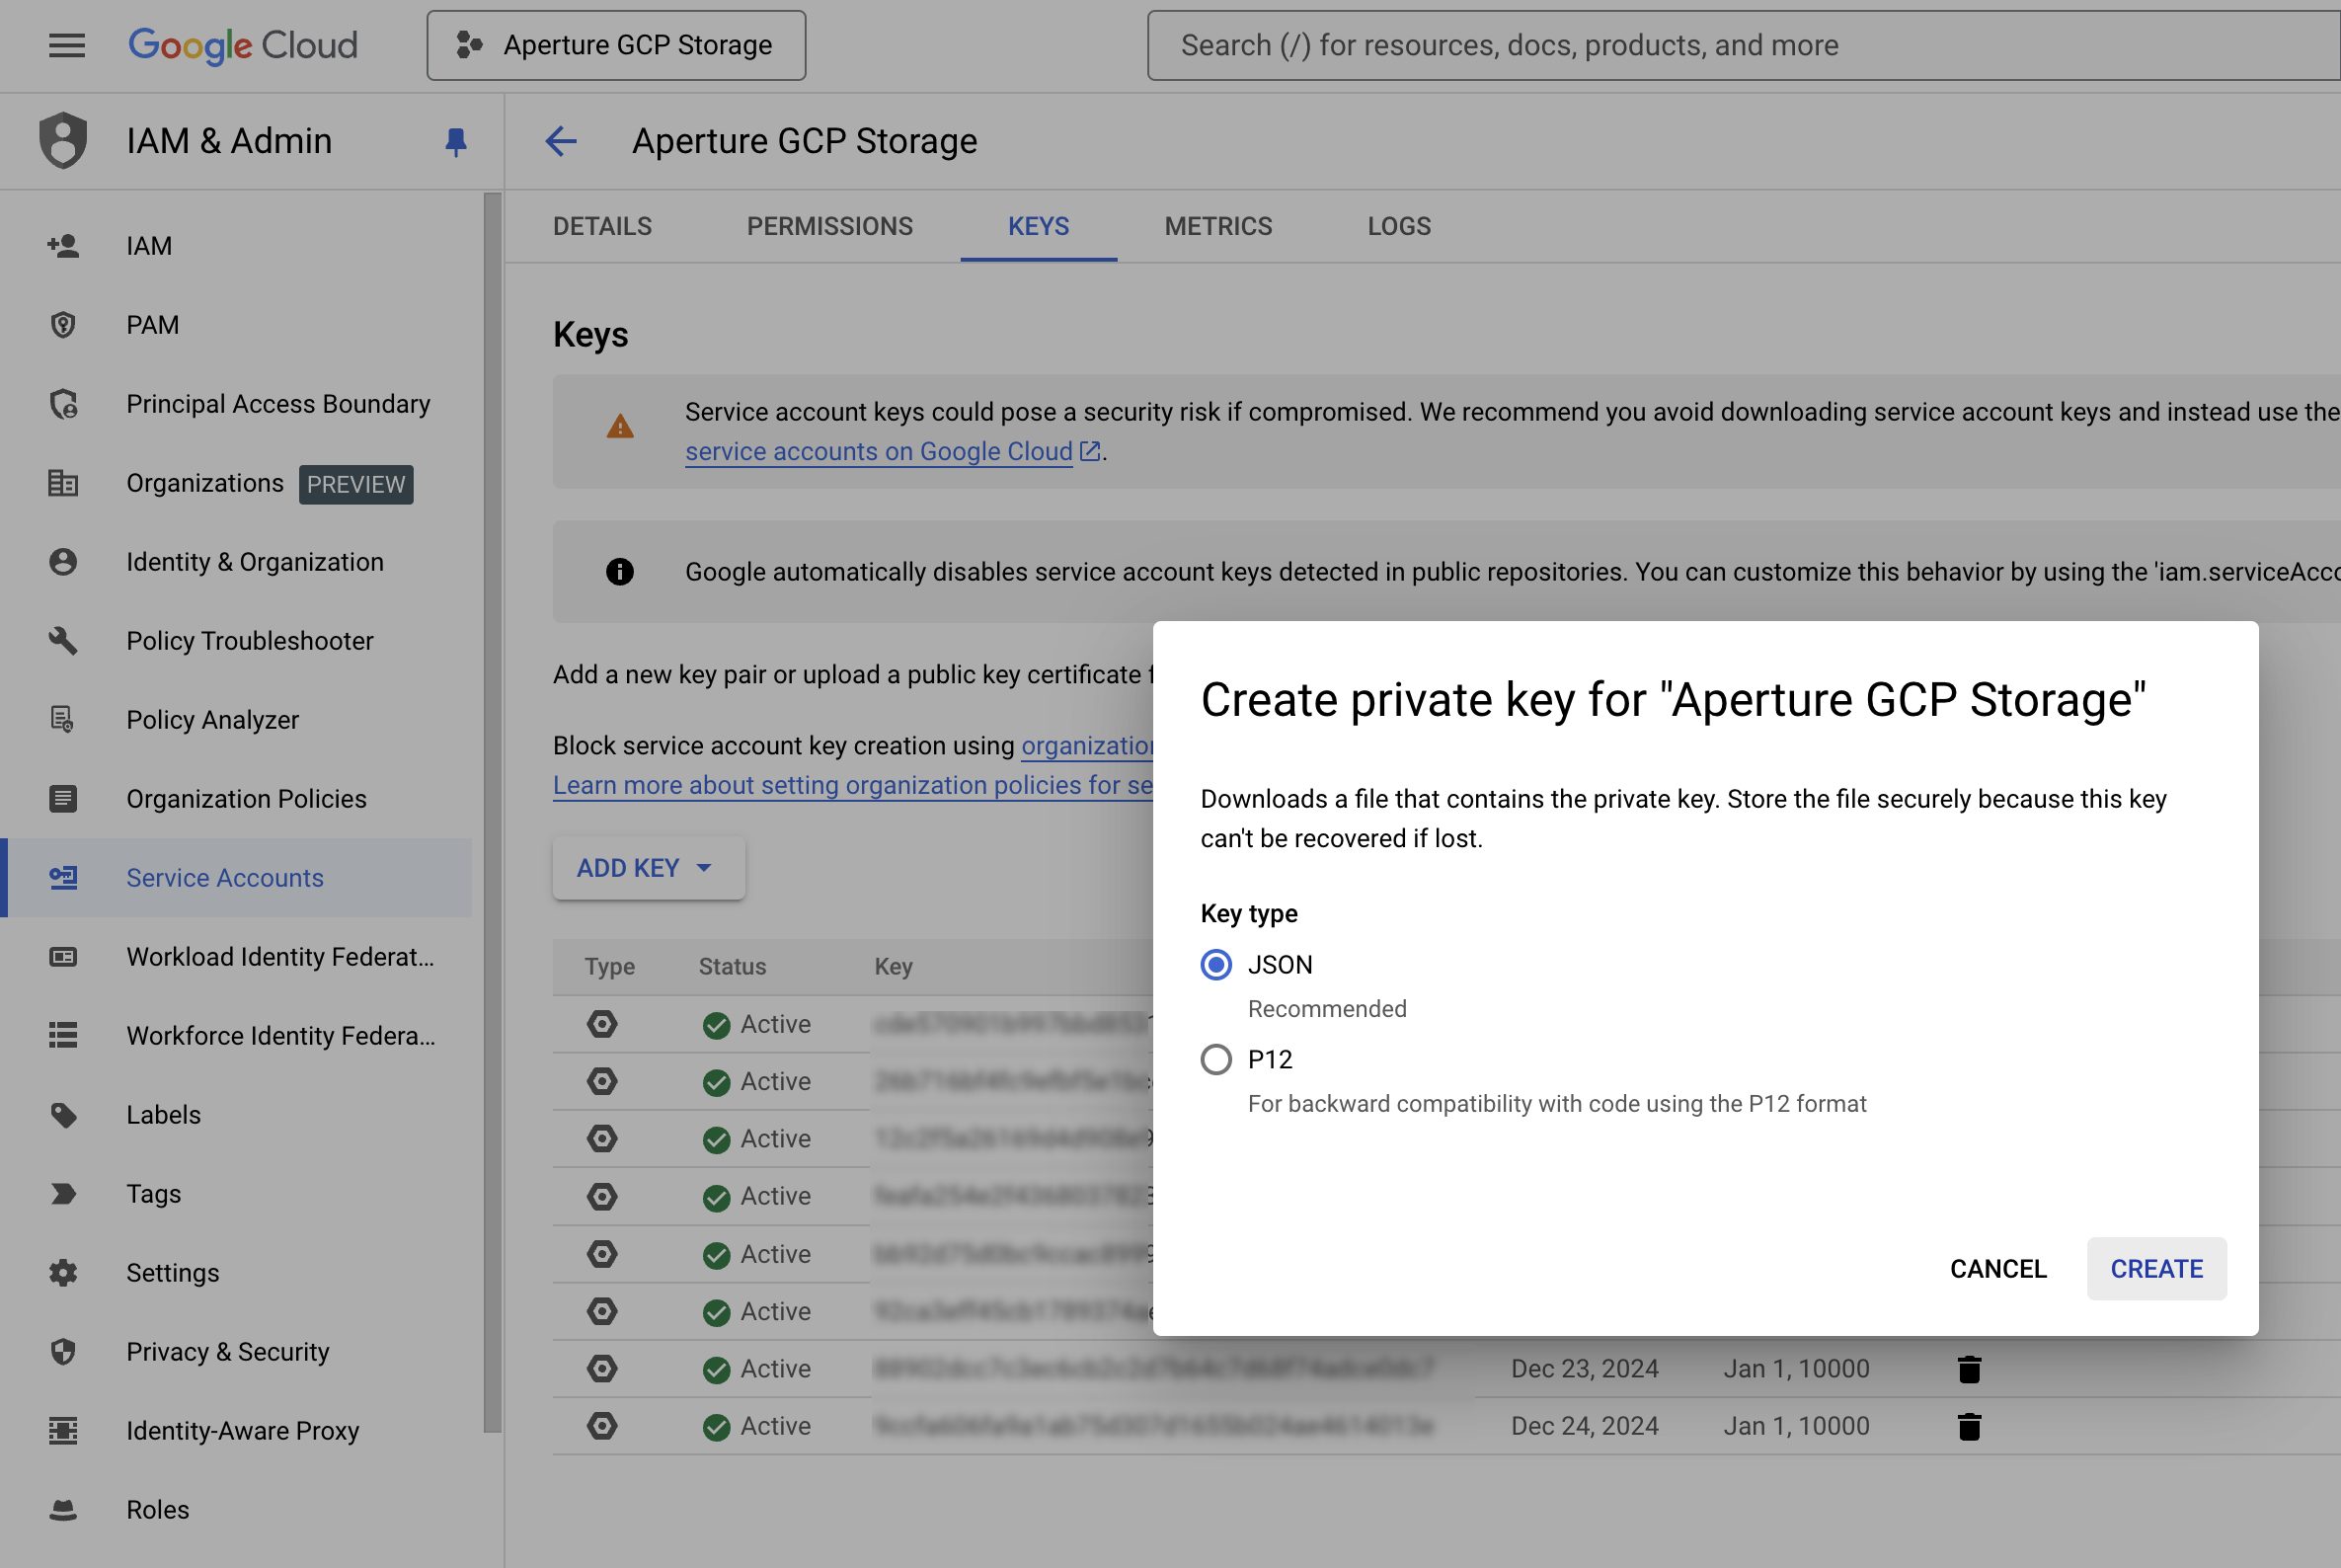
- Select .The key is downloaded automatically on your device. Upload the key during onboarding.
- Store the JSON key in a secure location as the key can't be recovered if lost.Data Security requires this key when youAdd Google Cloud Storage App.
- Save your changes.
- To create a service account client, select . Click CREATE GOOGLE WORKSPACE MARKETPLACE-COMPATIBLE OAUTH CLIENT. You’ll then be able to see the same client in the OAuth 2.0 Client IDs list.
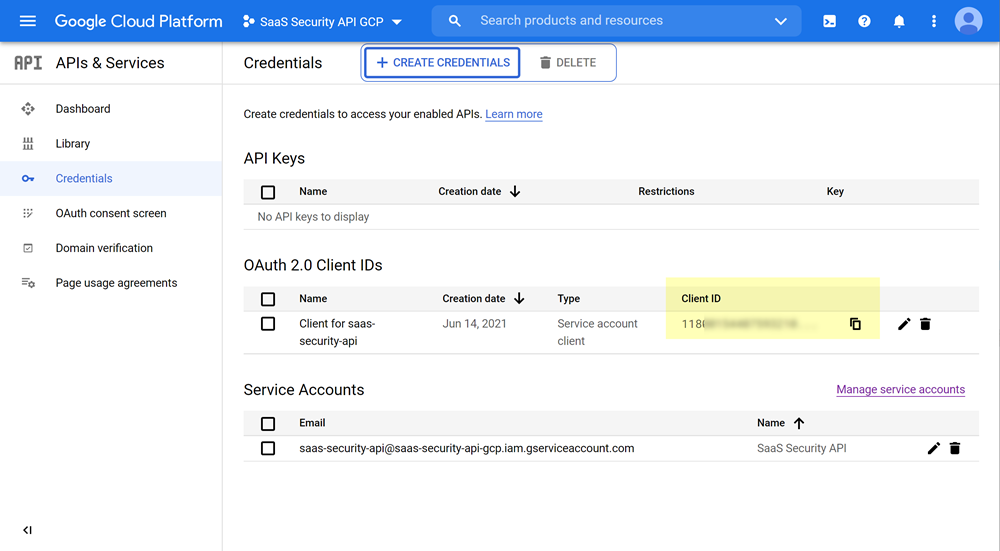
- Retrieve and save the Client ID for the new service account client.
- Select .
- In OAuth 2.0 Client IDs, locate the client, then copy and save the Client ID.
- Enable API access for the new service account.
- Select the project.
- Select .
- Search for and ENABLE the following APIs:
- Google Admin SDK API
- Google Cloud Resource Manager API
- Google Cloud Storage API
- Google Cloud Pub or Sub API
- Google Identity and Access Management (IAM) API
- Google Cloud Logging API
- Provide the local admin account with the required roles.You’ll use this admin account to onboard Data Security. This admin account does not need to be a Super Admin; however, the admin account does require minimum permissions at the organization level—Storage Admin and Security Admin permissions.
- Log in to Google Cloud Console as Super Admin.
- At the top of the screen and in the project list, select your organization.
- Select , then + ADD.
- Add your account as Security Admin and Storage Admin.
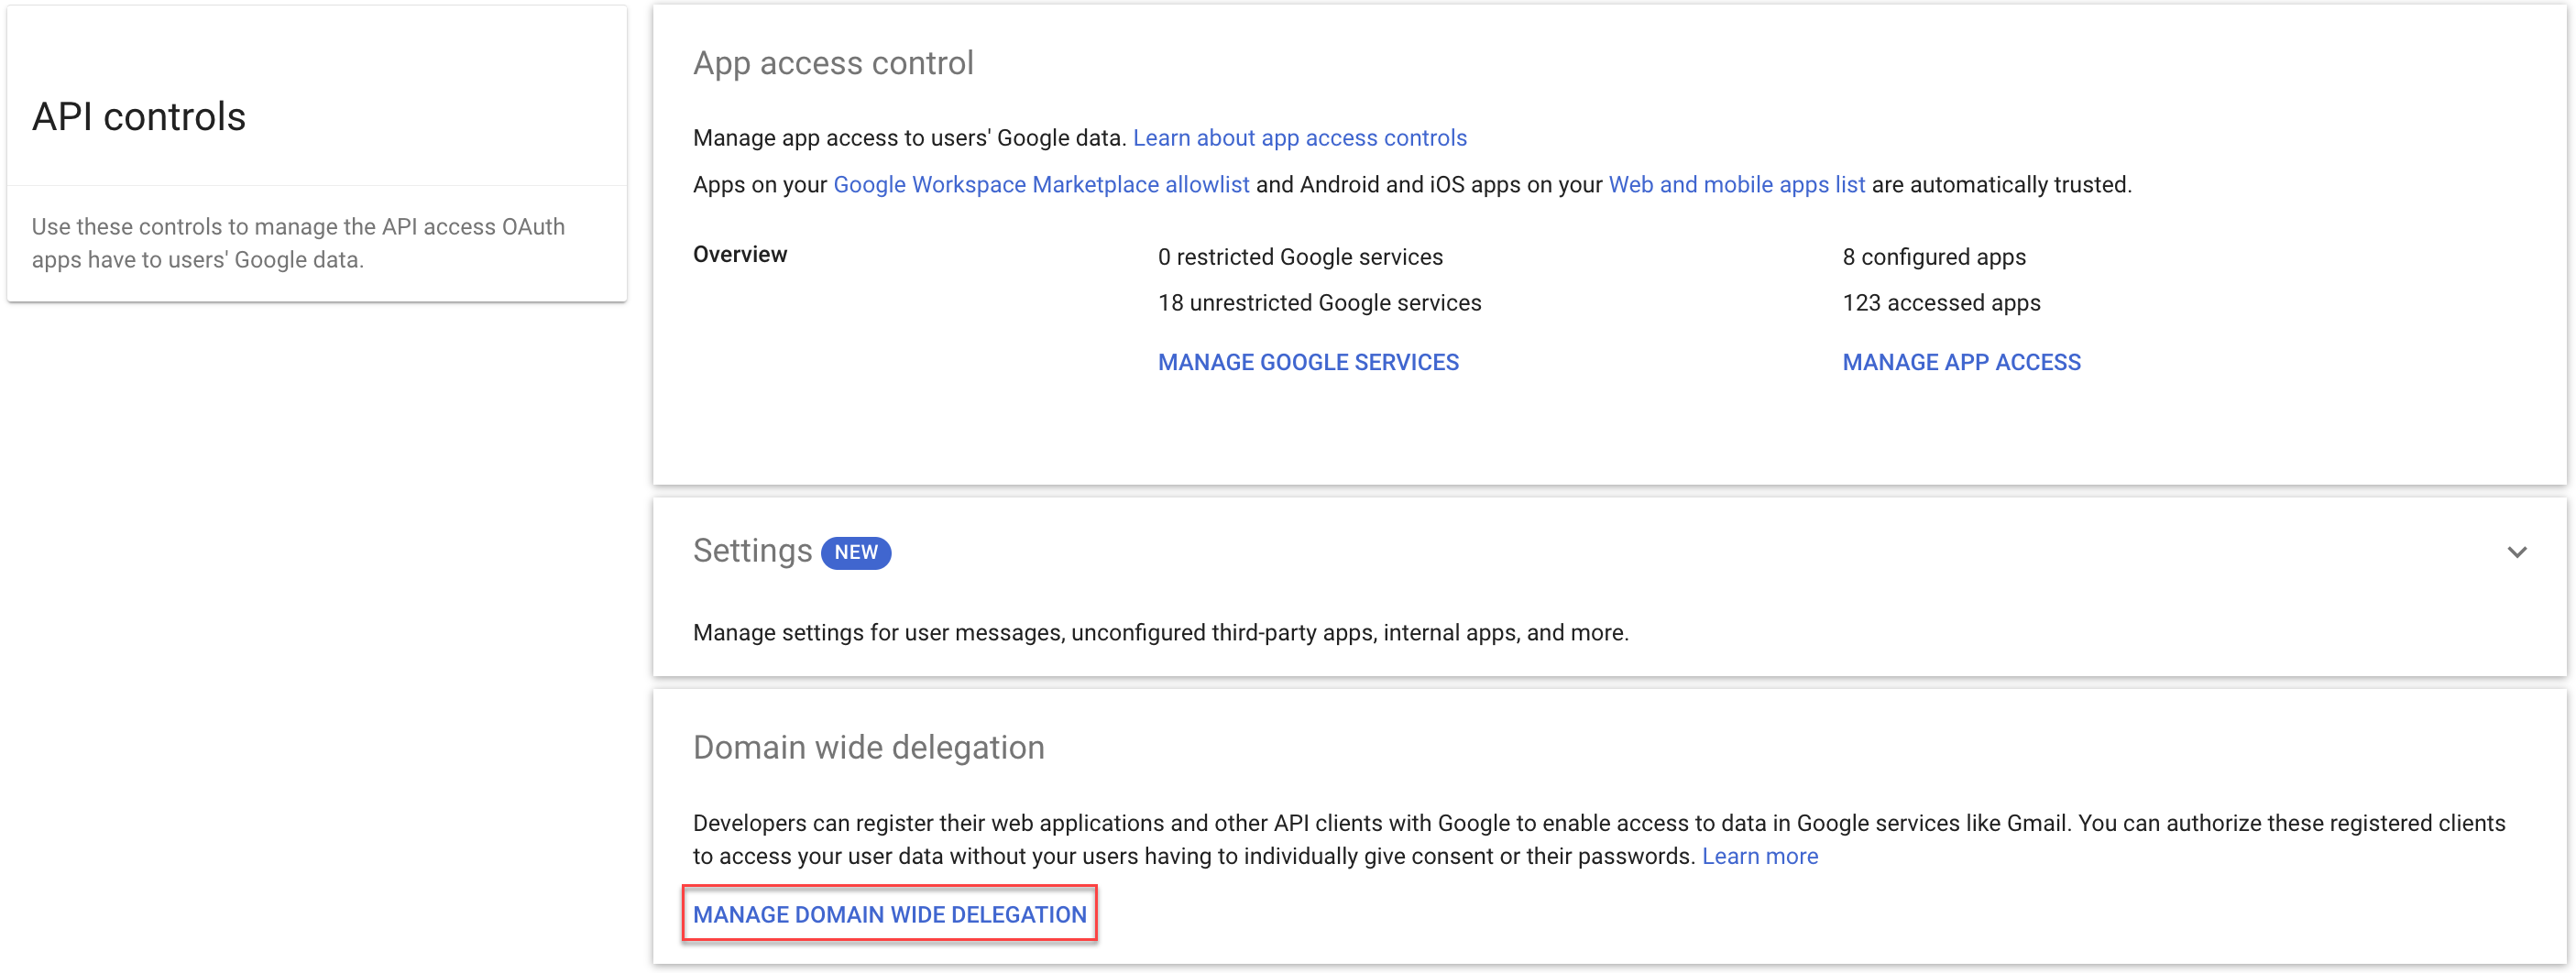
- Enable API client access to Google Cloud Storage.
- Log in to Google Admin Console as the Google Cloud Storage administrator.The admin console isn't the same as the cloud console that you’ve been accessing up to this point in this procedure; rather, the admin console is a different console.
- Select .Trust internal, domain-owned apps isn't needed for onboarding the Google Cloud Storage app; however, GCP web interface enables this setting by default. You can safely disable this setting if you want.
- Click Add new, then specify Client ID and required scopes.
- In Client Name, specify the Client
ID that you recorded in 7.
- In One or More API S copes, copy and
paste the following scope, then AUTHORIZE access
to data in Google services.https://www.googleapis.com/auth/admin.directory.user.security,https://www.googleapis.com/auth/cloud-platform,https://www.googleapis.com/auth/devstorage.read_write,https://www.googleapis.com/auth/admin.directory.group
- In Client Name, specify the Client
ID that you recorded in
- Proceed toAdd Google Cloud Storage App


Use an Existing Project and Service Account
If you want to onboard the Google Cloud Storage app using an existing GCP project and service
account, set up your admin account as the project IAM owner and service account
owner. If you don’t have an existing project or service account,
Create a Service Account for Google Cloud Storage
instead.- Log in to Google Cloud Console as Super Admin.
- Set permissions for the existing project.
- In the drop-down at the top of the screen, open your project list, then select your existing project.
- Select .
- In , locate and Edit your membership, which is your admin account.If you can't quickly locate your admin account in the Members table, click + ADD to use the New members search tool.
- Set Role to Owner.
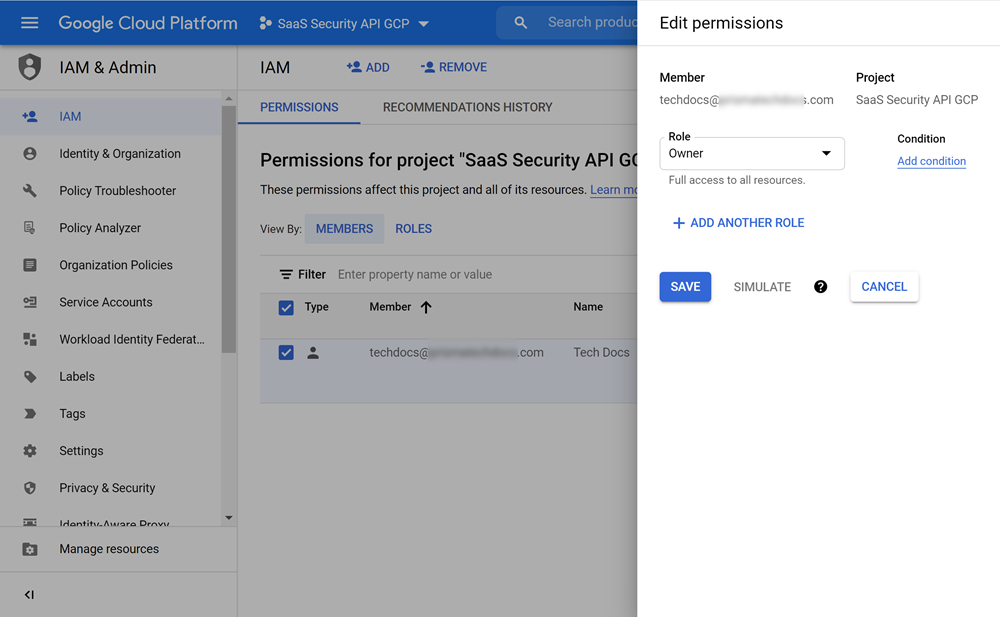
- Set permissions for the existing service account.
- Select .
- Click on your service account, then .
- In Members table, locate and Edit your membership, which is your admin account.If you can't quickly locate your admin account in the Members table, click + GRANT ACCESS to use the New members search tool.
- Set Role to Owner.
- Verify that the Oauth Consent settings outlined in3are correct.
- Proceed toAdd Google Cloud Storage App.
Add Google Cloud Storage App
Before you add the Google Cloud Storage app,
you must
Create a Service Account for Google Cloud Storage
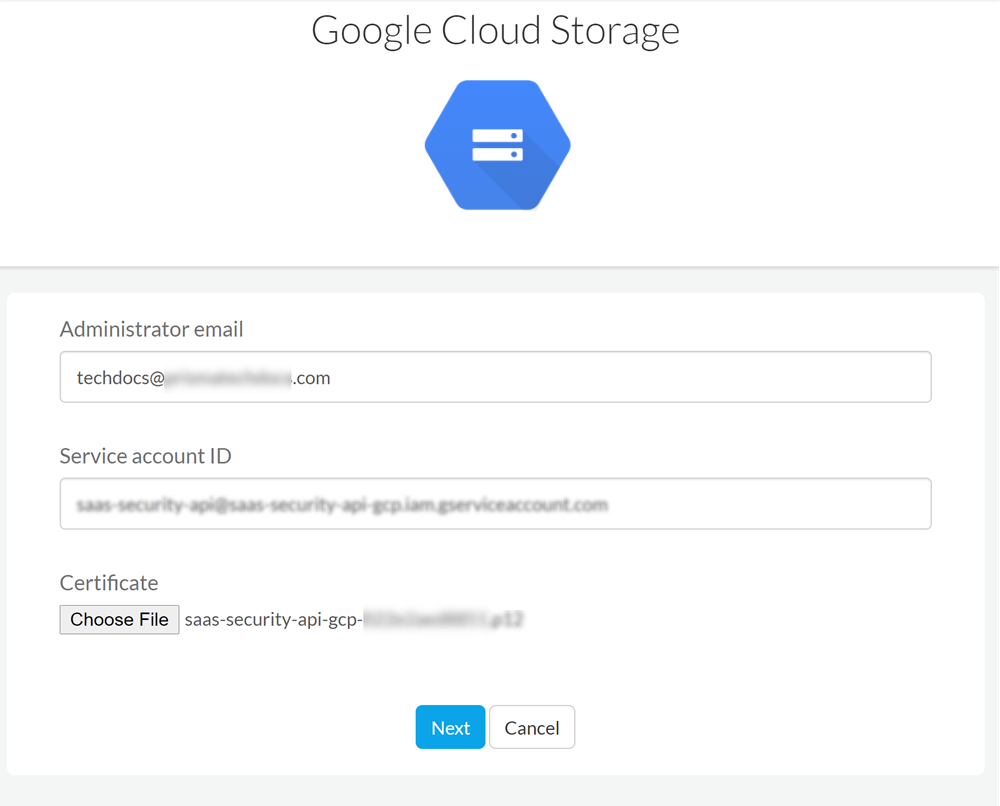
.- Select Google Cloud Storage and then Connect to Account.
- Enter the Google Administrator email to which you granted roles in9.d.
- Enter Service account ID that you created in4.b.
- Upload P12 Certificate GCP issued in5.e.
- Click Next to add the cloud app.
- Review the initial project scan discoveries and select the projects to monitor.If you Cancel the setup at any time, you must start over again.
- Enable Automatically scan new projects to scan all new projects.
- To select individual projects, select the Project to scan from the list.
- Save your scan setting to proceed scanning all discovered projects.
- Cancel if you don't want to proceed with scanning the discovered projects.
- Review the initial bucket scan discoveries and select the buckets to monitor.
- Enable Scan all current and any new buckets to scan all new buckets.
- To select individual buckets, select the Bucket to scan from the list.
- Save your scan setting to proceed scanning all discovered buckets.
- Cancel if you don't want to proceed with scanning the discovered buckets.After authentication, Data Security adds the new Google Cloud Storage app to the Cloud Apps list as Google Cloud Storage n, where n is the number of Google Cloud Storage app instances that you have connected to Data Security. For example, if you added one Google Cloud Storage app, the name displays as Google Cloud Storage 1. You’llspecify a descriptive namesoon.From this point forward, keep this project exclusively for Data Security. Don't revoke, disable authorization, or change the project in any way. If you do, Data Security stops scanning.
- Proceed toIdentify Risks.
Identify Risks
Select the projects and buckets that you want
Data Security to monitor.
When you add a new cloud app
and enable scanning,
Data Security automatically scans the cloud app against the
default data patterns and displays the match occurrences. You can
take action now to improve your scan results and identify risks.
- Start scanning the new Google Cloud Storage app for risks.
- Monitor the scan results.During the discovery phase, Data Security scans files and matches them against enabled default policy rules.Verify that your default policy rules are effective. If the results don’t capture all risks or you see false positives, proceed to the next step.
- (Optional) Add new policy rules.Consider the business use of your app, then identify risks unique to your enterprise. As necessary, add new:
- (Optional) Configure or edit a data pattern.You can Configure Data Patterns to identify specific strings of text, characters, words, or patterns to make it possible to find all instances of text that match a data pattern you specify.
- Proceed toView Scan Settings for Project and Buckets.
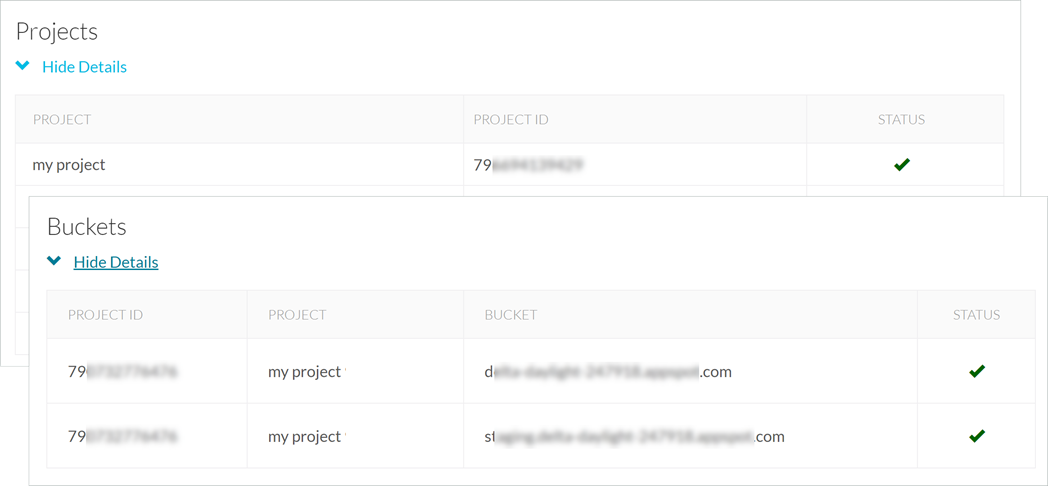
View Scan Settings for Project and Buckets
When you added the cloud app, you configured
the projects and buckets you want Data Security to monitor.
You can view the scan settings for the Projects and Buckets that
are currently being scanned.
- Log in to SaaS Security.
- Select .
- Select a Google Cloud Storage app from the list of Cloud Apps and expand the Projects Buckets to view the scan details.
- Proceed toCustomize Google Cloud Storage AppandFix Google Cloud Storage Onboarding Issues, if necessary.
Customize Google Cloud Storage App
If you plan to manage more than one instance
of Google Cloud Storage app, consider differentiating your instances.
- (Optional) Give a descriptive name to this app instance.
- Select the Google Storage n link on the Cloud Apps list.
- Enter a descriptive Name.
- Click Done to save your changes.
- Proceed toFix Google Cloud Storage Onboarding Issues.
Fix Google Cloud Storage Onboarding Issues
The most common issues related to onboarding the Google
Cloud Storage app are as follows:
Symptom | Explanation | Solution |
|---|---|---|
There are no known issues. | ||