Prisma SD-WAN
Replace an ION Device in Strata Cloud Manager
Table of Contents
Expand All
|
Collapse All
Prisma SD-WAN Docs
-
-
- Prisma SD-WAN Controller
-
- CloudBlade Integrations
- CloudBlades Integration with Prisma Access
-
-
-
-
- 6.5
- 6.4
- 6.3
- 6.1
- 5.6
- Prisma SD-WAN Controller
- Prisma SD-WAN On-Premises Controller
- Prisma SD-WAN CloudBlades
- Prisma Access CloudBlade Cloud Managed
- Prisma Access CloudBlade Panorama Managed
Replace an ION Device in Strata Cloud Manager
Prisma SD-WAN ION Devices are now supporting a like-like and like-unlike RMA process,
which allows users to replace failed or malfunctioning ION devices with new or
reused.
| Where Can I Use This? | What Do I Need? |
|---|---|
|
|
The Returned Merchandise Authorization (RMA) process enables the replacement of
failed or malfunctioning ION devices—whether due to chip failure, misconfiguration,
or general wear and tear—with functional units at either a branch or data center.
This ensures continuous operation by allowing users to efficiently swap out unusable
devices.
- Currently, we don't support the replacement of ION devices that are FIPS enabled. For RMA operations, a persistent connection to the cloud controller is required. At this time, configurations using bypass pairs with sub-interfaces are not supported for maintaining this connection. To ensure uninterrupted controller communication during RMA workflows, we recommend provisioning a dedicated physical port outside of the bypass pair for cloud connectivity.
- Before onboarding a new device via the RMA workflow, ensure there are no pre-existing logical interfaces (like PPPoE or sub-interfaces) configured on the device. The RMA will fail to onboard devices with these interfaces already present.
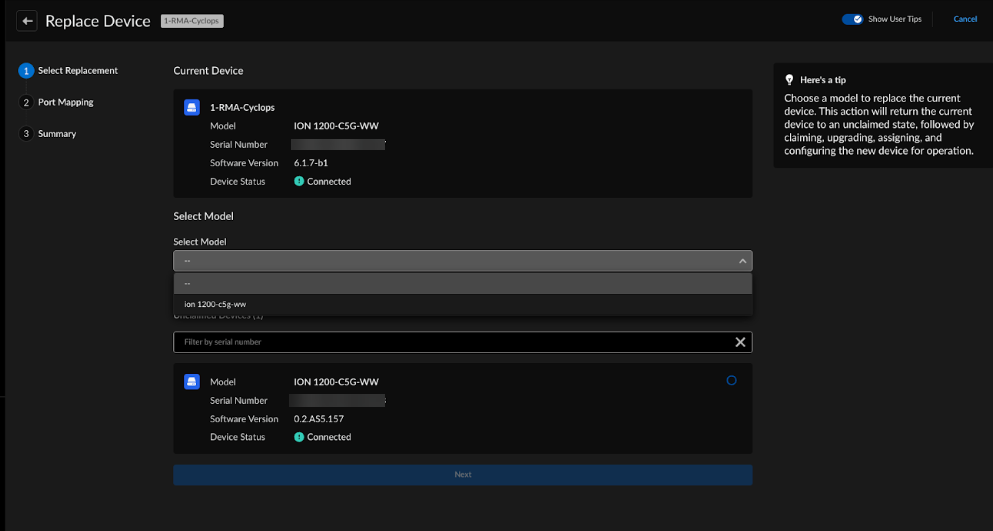
- Log in to Strata Cloud Manager, select ConfigurationPrisma SD-WANION DevicesUnClaimed.When replacing a device, it's essential to ensure that the replacement device is in an unclaimed and online state. Check this by navigating to ConfigurationPrisma SD-WANION DevicesUnClaimed. Additionally, ensure the replacement device connects to the Prisma SD-WAN controller. To do this, test its connectivity by verifying it can connect with the device. This will allow you to troubleshoot and resolve any issues that could arise during the connection process.Multiple replacement devices might be available in the Unclaimed devices list, so choose the one with the device status online.Select ConfigurationPrisma SD-WANION DevicesClaimed and select the device you want to replace. Select Replace the device from the ellipsis menu to initiate the return merchandise authorization (RMA) process. This comprehensive process ensures a smooth transition when replacing the device, providing you with a sense of security.When replacing ION devices, you have the power to choose. You can opt for a (same ION Device model) replacement or a (different ION Device model) replacement. This flexibility allows you to select a replacement device that best suits your needs. Remember that multiple replacement devices might be available, so choose the one with the device status online.Contact Palo Alto Network Support when replacing with a different model ION devices.
*For example: if you are replacing the ION 2000 -> ION 7000, the ION 7000 should be in Unclaimed device and ION 2000 should be in Claimed device list.Replace From Replace With ION 1000 ION 1000 ION 1200 ION 1200 ION 1200 ION 1200-S ION 1200-S ION 2000 ION 2000 ION 7000 ION 9000 ION 1200 ION 1200-S ION 3000 ION 3000 ION 7000 ION 9000 ION 3200 ION 3200 Layer 2 ION 3200 Layer 2 ION 3200 Layer 3 ION 3200 Layer 3 ION 5200 ION 5200 ION 7000 ION 7000 ION 9000 ION 5200 ION 9200 ION 9000 ION 9000 ION 9200 ION 9200 ION 9200 For a same ION Device model, on the Select Replacement screen, select the ION device model from the list of devices and click Next.![]()
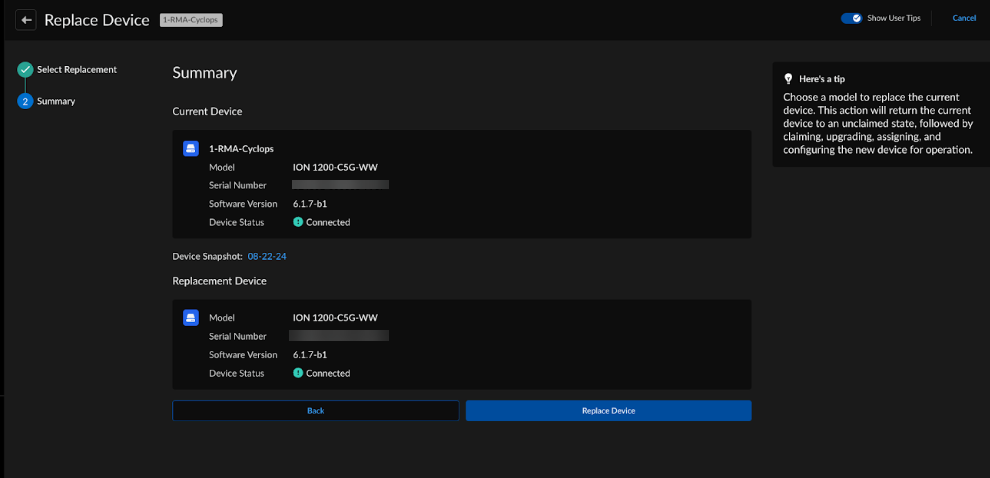
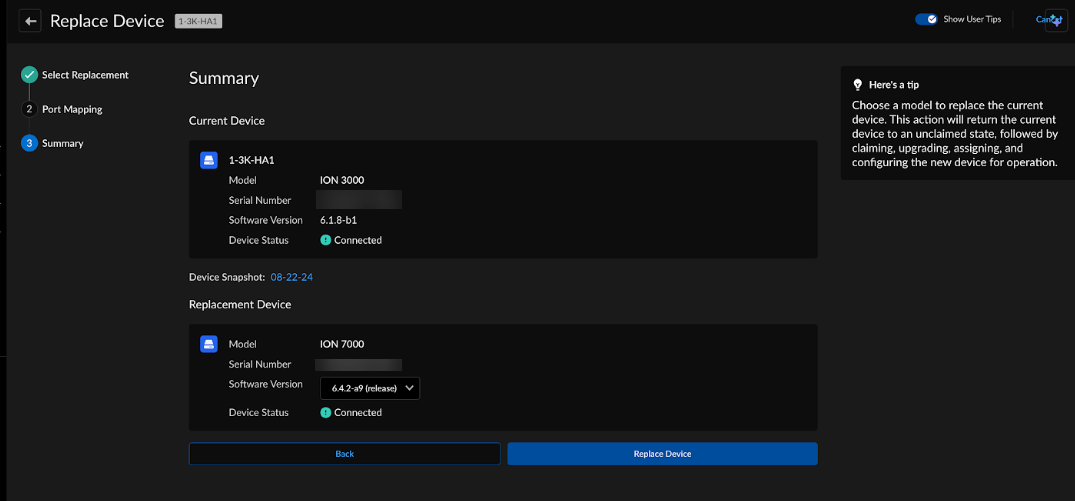
- On the Summary screen, select Replace Device to proceed with the replacement.Click the Device Snapshot before clicking the Replace Device button. This will download a snapshot of the device in your local system and you can apply the configurations in the replaced device in case RMA is unsuccessful.
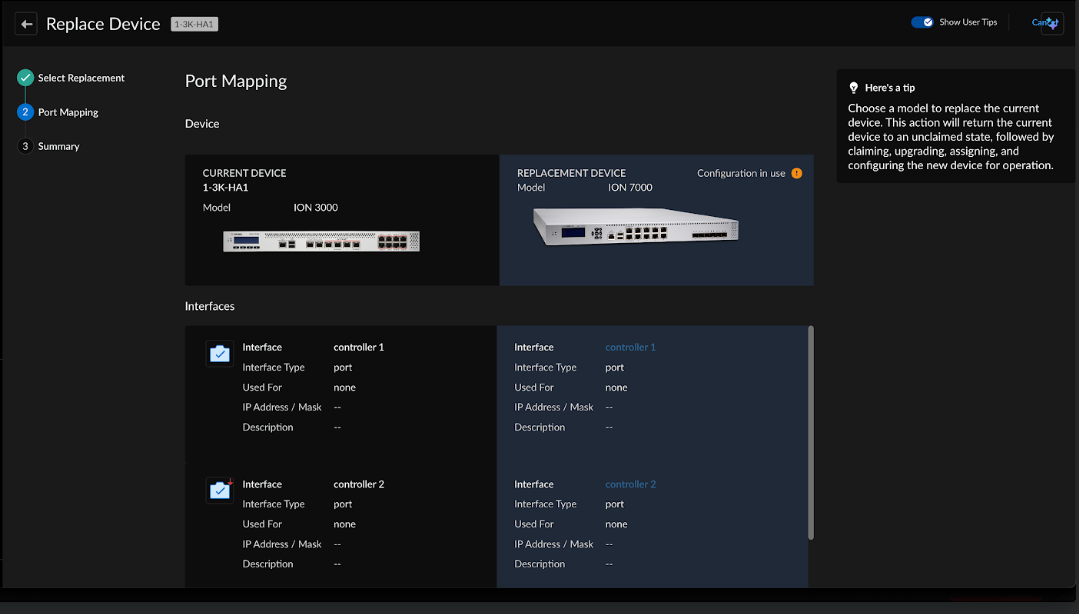
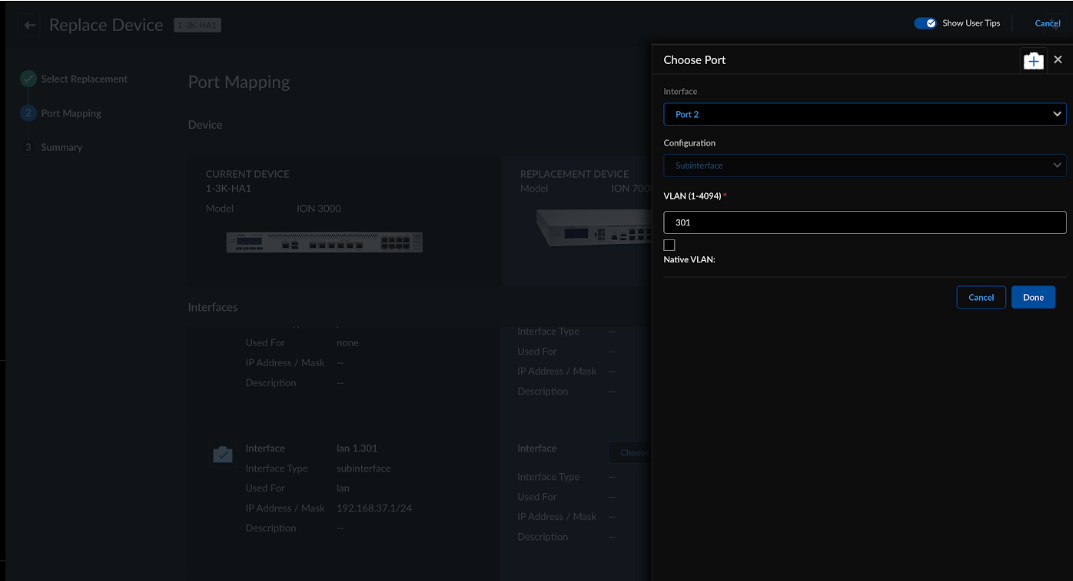
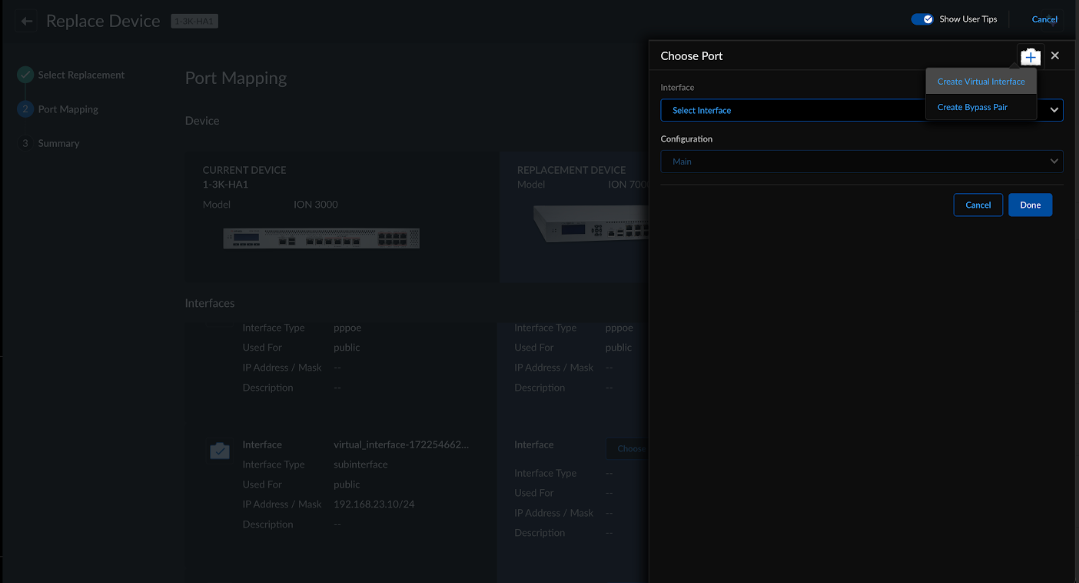
![]() Once the Replacement Successful status is displayed, you can click Return to Site to check the status of the replacement device in the configuration tab. This straightforward process should reassure you that the replacement has been successful.The device will be rebooted to match the source device. If the target device has a different build, it will take 10-15 minutes to complete the replacement process.If the replacement is unsuccessful, choose the Device Snapshot option. This will download a snapshot of the device in your local system and you can apply all the configurations in the snapshot later.Click the device to check the software version of the replaced device. Check that the port and other configurations are correctly displayed on the Interfaces tab and ensure that all the settings have been correctly transferred to the new device.You can make the necessary updates to change any other configurations.For a different ION Device model, on the Select Replacement screen, select the ION device model from the list of devices and click Replace. You can review all your changes and configurations on the Port Mapping tab. When you are replacing from a lower ION Device model to a higher ION Device model, if required change the ports for physical connections, Interfaces and Sub-interfaces.Only if the device has Virtual Interface and Bypass pair, then you need to manually create and configure in port mapping.
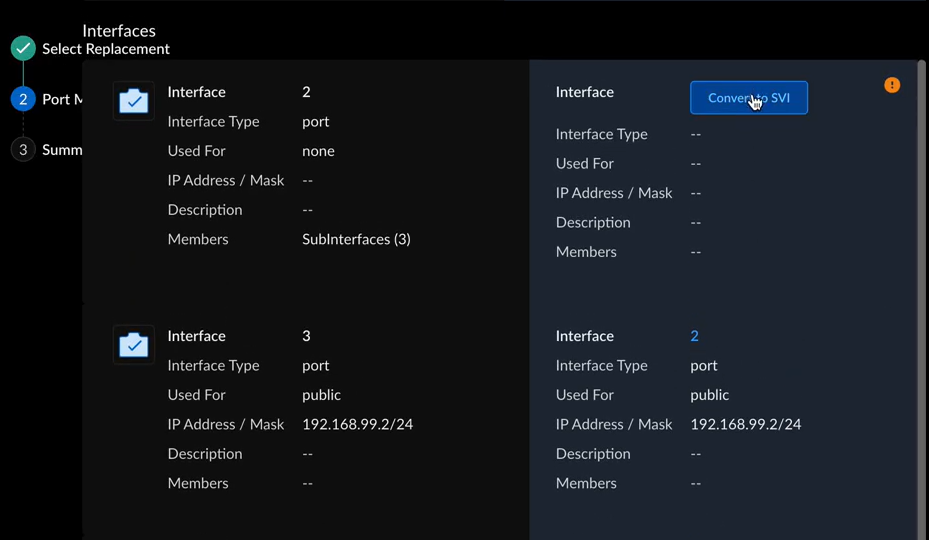
Once the Replacement Successful status is displayed, you can click Return to Site to check the status of the replacement device in the configuration tab. This straightforward process should reassure you that the replacement has been successful.The device will be rebooted to match the source device. If the target device has a different build, it will take 10-15 minutes to complete the replacement process.If the replacement is unsuccessful, choose the Device Snapshot option. This will download a snapshot of the device in your local system and you can apply all the configurations in the snapshot later.Click the device to check the software version of the replaced device. Check that the port and other configurations are correctly displayed on the Interfaces tab and ensure that all the settings have been correctly transferred to the new device.You can make the necessary updates to change any other configurations.For a different ION Device model, on the Select Replacement screen, select the ION device model from the list of devices and click Replace. You can review all your changes and configurations on the Port Mapping tab. When you are replacing from a lower ION Device model to a higher ION Device model, if required change the ports for physical connections, Interfaces and Sub-interfaces.Only if the device has Virtual Interface and Bypass pair, then you need to manually create and configure in port mapping.- Bypass Pair—During the RMA process for the ION 3000 to ION 3200 devices, map bypass ports at the end of the port mapping screen to prevent a blank screen issue with the user interface. First, map all regular ports, then proceed with the bypass port configuration.
- PPPoE—If the replacement device is pre-configured with PPPoE interfaces, then you need to manually create or remove any existing PPPoE interfaces from the replacement device.
![]()
![]()
![]() When replacing ION 2000 to ION 1200-S, should consider below points:
When replacing ION 2000 to ION 1200-S, should consider below points:- Check VLAN IDs: If VLAN IDs are more significant than 4000-4094, update them to less than 4000 before starting the RMA.
- Handling Port Availability: If no more ports are available on ION
1200-S, subsequent sub-interfaces on ION 2000 will be mapped to SVIs.
![]()
- Assigning SVIs/VLANs: All SVIs/VLANs (config used-for LAN/None) will be attached to all switch ports and set as Trunk.
- Loopback interfaces will not be transferred when replacing an ION 2000 device with an ION 1200-S, as the ION 1200-S do not support loopback interfaces.
Click Next to proceed with the replacement.- On the Summary screen, you can select the software version of your choice before replacing the different model devices and select Replace Device to proceed with the replacement.Click the Device Snapshot before clicking the Replace Device button. This will download a snapshot of the device in your local system and you can apply the configurations in the replaced device in case RMA is unsuccessful.
![]() Once the Replacement Successful status is displayed, you can click Return to Site to check the status of the replacement device in the configuration tab. This straightforward process should reassure you that the replacement has been successful.The device will be rebooted to match the source device. If the target device has a different build, it will take 10-15 minutes to complete the replacement process.If the replacement is unsuccessful, choose the Device Snapshot option. This will download a snapshot of the device in your local system and you can apply all the configurations in the snapshot later.Click the device to check the software version of the replaced device. Check that the port and other configurations are correctly displayed on the Interfaces tab and ensure that all the settings are correctly transferred to the new device.You can make the necessary updates to change any other configurations.
Once the Replacement Successful status is displayed, you can click Return to Site to check the status of the replacement device in the configuration tab. This straightforward process should reassure you that the replacement has been successful.The device will be rebooted to match the source device. If the target device has a different build, it will take 10-15 minutes to complete the replacement process.If the replacement is unsuccessful, choose the Device Snapshot option. This will download a snapshot of the device in your local system and you can apply all the configurations in the snapshot later.Click the device to check the software version of the replaced device. Check that the port and other configurations are correctly displayed on the Interfaces tab and ensure that all the settings are correctly transferred to the new device.You can make the necessary updates to change any other configurations.Device Claiming Issues - Stuck in Other States (Not Assigned): Click Put back in Inventory on the new device on the Claimed Devices page. The device moves from Claimed to Unclaimed list and reboots when Put back in Inventory is selected.
- Element Shell Creation: A shell (SHELL#) is created under Claimed Devices, storing the saved configuration.
- Assigning Device to Shell: On the new device (Unclaimed state), Click Assign the device to shell and select the (SHELL#) which is created under Claimed Devices. Configuration is pushed to the new device (10-15 min process).
Recover the Machine: Device Recovery from Claiming or Claim_Failed States. If a device is stuck in a claiming or claim_failed state during assignment or onboarding to Element Shell, it can be recovered by clicking Recover the device. This recovery option is available from both the Unclaimed and Claimed Devices tabs.

