Prisma SD-WAN
Add a New User on Prisma SD-WAN
Table of Contents
Add a New User on Prisma SD-WAN
Let us learn more about adding a new user on Prisma SD-WAN.
| Where Can I Use This? | What Do I Need? |
|---|---|
|
|
Add a new user with system role as per the
requirements of your enterprise. An IAM administrator assigns roles to users
responsible for administering the network in your enterprise.
Use the following links to add users based on your web interface.
- Migrated to.
- Using the
- Migrated to Strata Cloud ManagerIf your Prisma SD-WAN tenant has migrated to Strata Cloud Manager (SCM), your users are now a part of the Tenant Service group (TSG). As part of the migration, you now manage, add, and edit users through the Strata Cloud Manager Identity and Access settings.However, you will continue to see the migrated users in Strata Cloud Manager under .You cannot add or edit users here, you can onlymodify the IP session lockfor users for API access.
- Using the stand-alone Prisma SD-WAN web interface (Non-TSG Tenants)
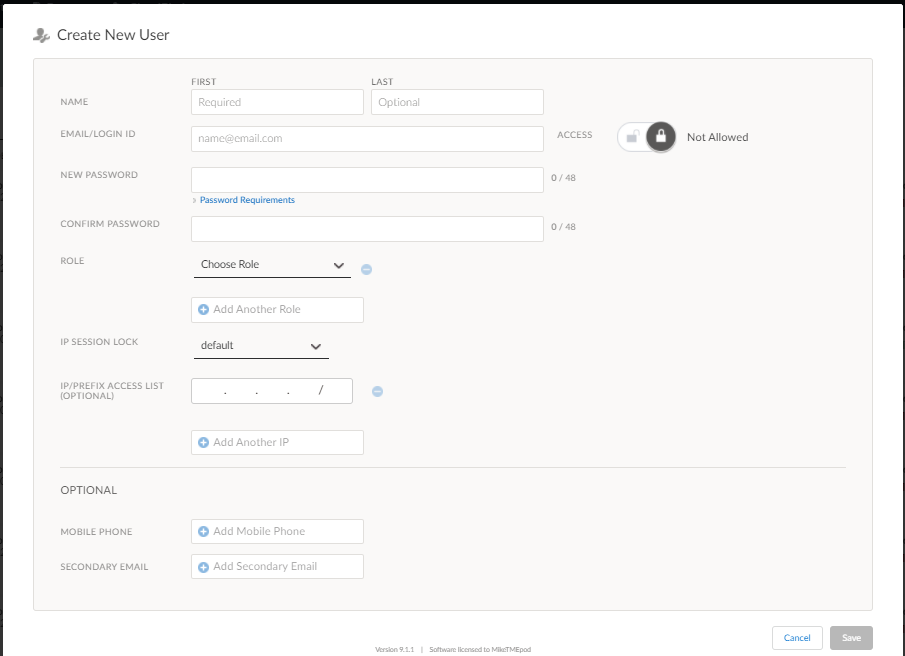
- Select .
- For Create New User, enter the First Name and optionally the Last Name of the user.
- Toggle Access to allow the user to access the Prisma SD-WAN web interface.By default, access is disabled.
- Add the Email/Login ID.
- Enter a New Password and confirm the password for the user.
- Choose a Role for the user.Assign one or more roles to the user. Select from the available system or custom roles. Or create custom roles.
- Select the IP Session Lock.IP Session Lock checks the client source IP address from where a login request originates. By default it is enabled.
- If IP session lock is enabled, the auth tokens generated from this user is locked to the user's IP address.
- If auth tokens are generated and IP session lock for a user is left as Default or Enabled, the auth token is usable only from the source IP address from which it was generated.
- If auth tokens from this user is only used on machines that they are generated on, and the source IP address used to connect to the API remains the same, then you can choose the Enabled or Default.
- If the auth tokens are intended to be used on different systems and/or systems that may connect to the API from different IP Addresses, choose Disabled.
- Optional Enter the IP/Prefix Access List.IP/Prefix Access List enables the login for the entered IP addresses. Add multiple IP addresses by selecting Add Another IP to the list.Optional Add Mobile Phone and Secondary Email to the user profile.

- Save to add the user details.