SaaS Security
Onboard an Office 365 App to SSPM Using a Service Principal
Table of Contents
Expand All
|
Collapse All
SaaS Security Docs
Onboard an Office 365 App to SSPM Using a Service Principal
Connect an Office 365 instance to SSPM to detect posture risks.
For SSPM to detect posture risks in your Office 365 instance, you must onboard your
Office 365 instance to SSPM. Through the onboarding process, SSPM connects to a
Microsoft API and, through the API, scans your Office 365 instance at regular
intervals for misconfigured settings. If there are misconfigured settings, SSPM
suggests a remediation action based on best practices.
SSPM can get access to your Office 365 instance through a Microsoft Entra (formerly
Azure) service principal, which represents a Microsoft Entra application that you
create. You configure the application's permissions to give SSPM access to the API
scopes that SSPM requires. You can limit SSPM's access to read-only scopes, which
will enable SSPM to complete its scans. Or you can give SSPM additional access to
enable SSPM to complete actions, such as automated remediation of misconfigured
settings or user-access revocation to a third-party plugin. When you register this
application, Microsoft Entra creates the associated service principle that SSPM will
use to connect to the API.
| Item | Description |
|---|---|
| Tenant ID | A globally unique identifier (GUID) for your Microsoft Entra tenant. |
| Client ID | SSPM will access a Microsoft API through a Microsoft Entra service principal that represents an application that you create. Microsoft Entra generates the client ID to uniquely identify the application and its associated service principal. |
| Client Secret | SSPM will access a Microsoft API through a Microsoft Entra service principal that represents an application that you create. Microsoft Entra generates the client Secret, which SSPM uses to authenticate to the service principal. |
To onboard your Office 365 instance, you complete the following actions:
- Log in to the administrator account that you will use to create your Microsoft Entra application and its associated service principal.Required Permissions: The administrator must be able to grant access to the API scopes required by SSPM. These scopes will differ depending on whether you want to grant SSPM read and write permissions, or if you want to grant SSPM read permissions only. In SSPM, the Office 365 onboarding screen lists the scopes that SSPM requires.After SSPM connects to your Office 365 instance, it will perform an initial scan of your instance, and will then run scans at regular intervals. For SSPM to run these scans, the service principal must remain available. If you delete the service account, the scans will fail and you will need to onboard Office 365 again.
- Open a web browser to the Microsoft Entra admin center.Log in to the administrator account.Create and register your Microsoft Entra application.
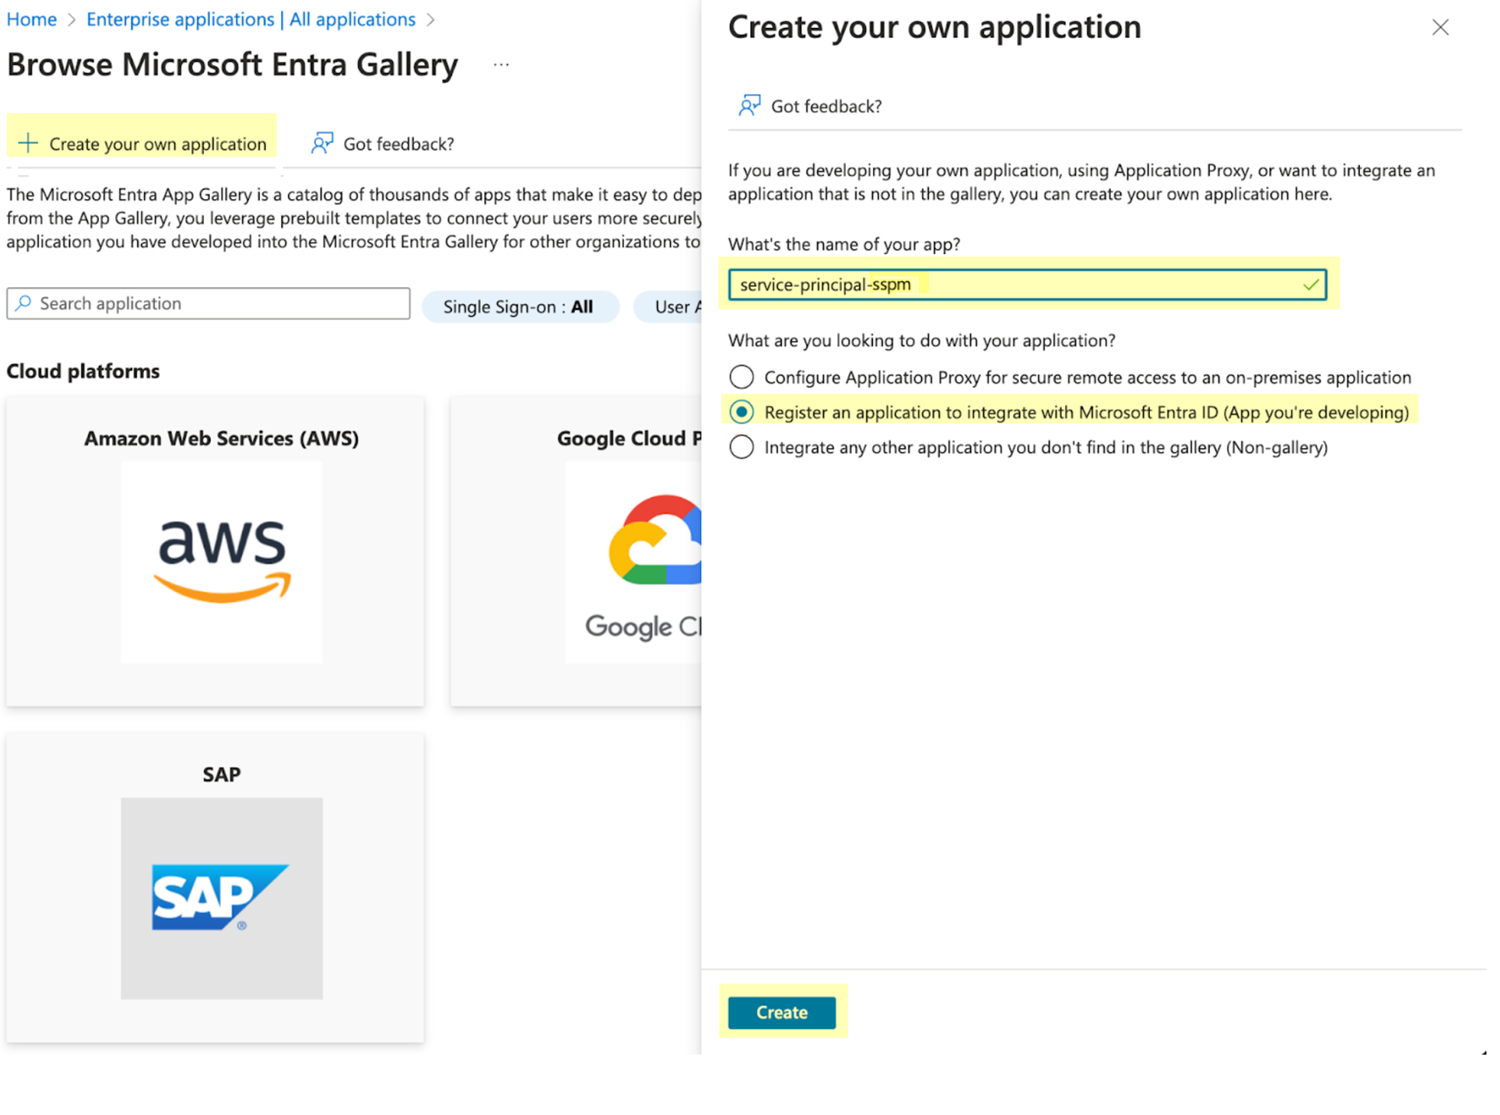
- From the left navigation pane in the Microsoft Entra admin center, select Enterprise applications.On the Enterprise applications page, select the action to create a New application.On the All applications page, select Create your own application.On the Create your own application flyout dialog, complete the following actions:
- Specify a name for the application.
- Select Register an application to integrate with Microsoft Entra ID (App you're developing).
- Create.
![]() On the Register an application window, complete the following actions:
On the Register an application window, complete the following actions:- For supported account types, select Accounts in this organizational directory only.
- Register.
Registering the application automatically creates its associated service principal.Configure API permissions for your application.Configure your application to enable access only to the scopes that SSPM requires. The API permissions that you will configure for your application depend on whether you want SSPM to have read-permissions only or read and write permissions.- Identify the scopes that SSPM requires.In SSPM, the Office 365 onboarding screen lists the scopes that SSPM requires. To get the required scopes, you will begin the onboarding process in SSPM, but you will not complete the process.
- From the Add Application page in SSPM (Posture SecurityApplicationsAdd Application), click the Office 365 tile.
- On the Posture Security tab, Add New instance.
- Select the option for Service
Principal.The onboarding page lists the API scopes that SSPM requires for read access and for read and write access. Copy the API scopes that you want to allow. You will add these permissions to your application.Don’t continue to the next step unless you have copied the permissions. Later, you will add these permissions to your application.
- Because you won't be completing the onboarding process until after you have finished configuring your application, Cancel Onboarding.
From the left navigation pane in the Microsoft Entra admin center, select Enterprise applications.From the list of applications on the All applications page, open your application.From the details page for your application, select Permissions.On the Permissions page for your application, click the Application registration link, which will take you to the API permissions page for your application.On the API permissions page, Add a permission.On the Request API permissions flyout dialog, select Microsoft GraphApplication Permissions.Select each of the API scopes that you obtained from the Office 365 onboarding screen in SSPM and Add permissions.On the API permissions page, verify that all the scopes were added as application permissions.The scopes you added should all have a type of Application. Only the User.Read permission, which Microsoft Entra added automatically when you registered the application, will have a type of Delegated.On the API permissions page, select Grant admin consent for your organization.Copy the application credentials (client ID and client secret) for your application.- Copy the client ID.
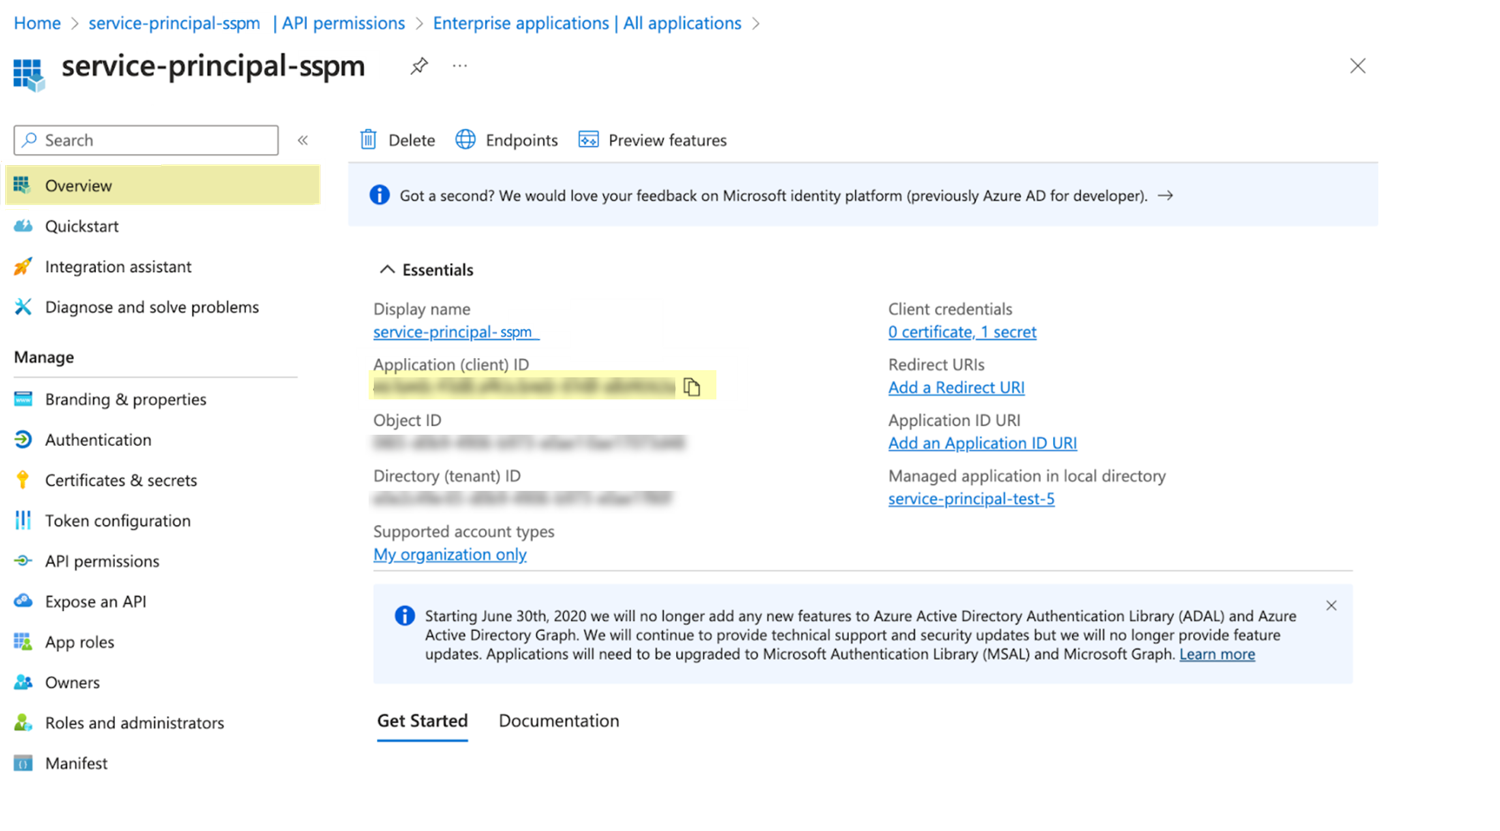
- From the details page for your application, select Overview.
- From the overview page, copy the client ID from the
Application (client) ID field and
paste it into a text file.Don’t continue to the next step unless you have copied the client ID. You will provide this information to SSPM during the onboarding process.
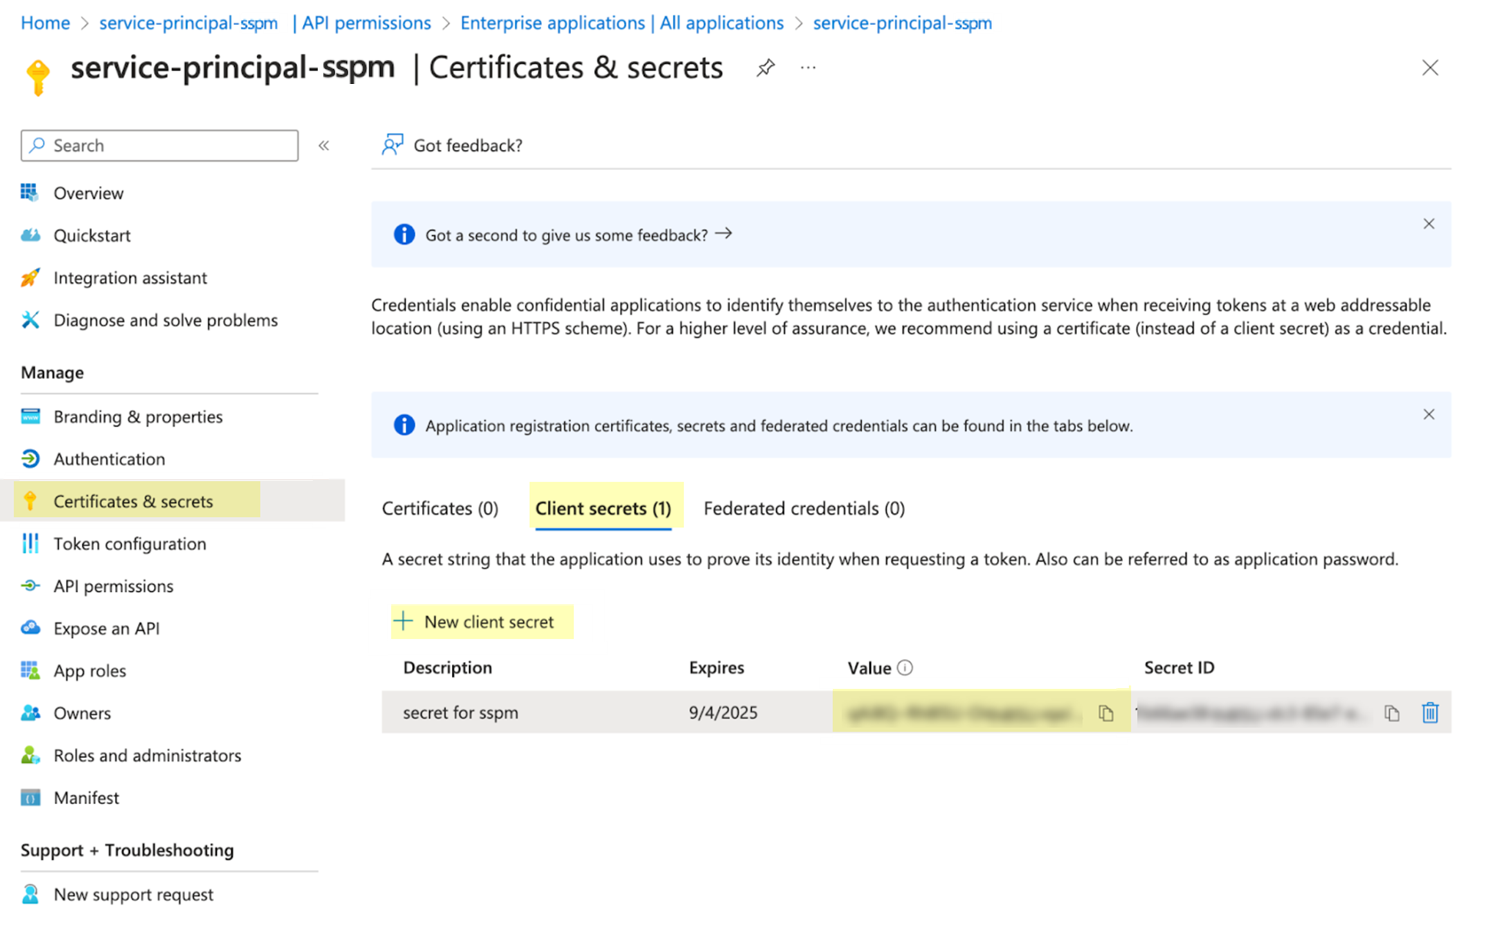
![]() Create and copy the client secret.
Create and copy the client secret.- From the details page for your application, select Certificates & secretsClient secrets.
- Create a New client secret.
- Copy the Value of the new client secret
and paste it into a text file.Don’t continue to the next step unless you have copied the client secret. You will provide this information to SSPM during the onboarding process.
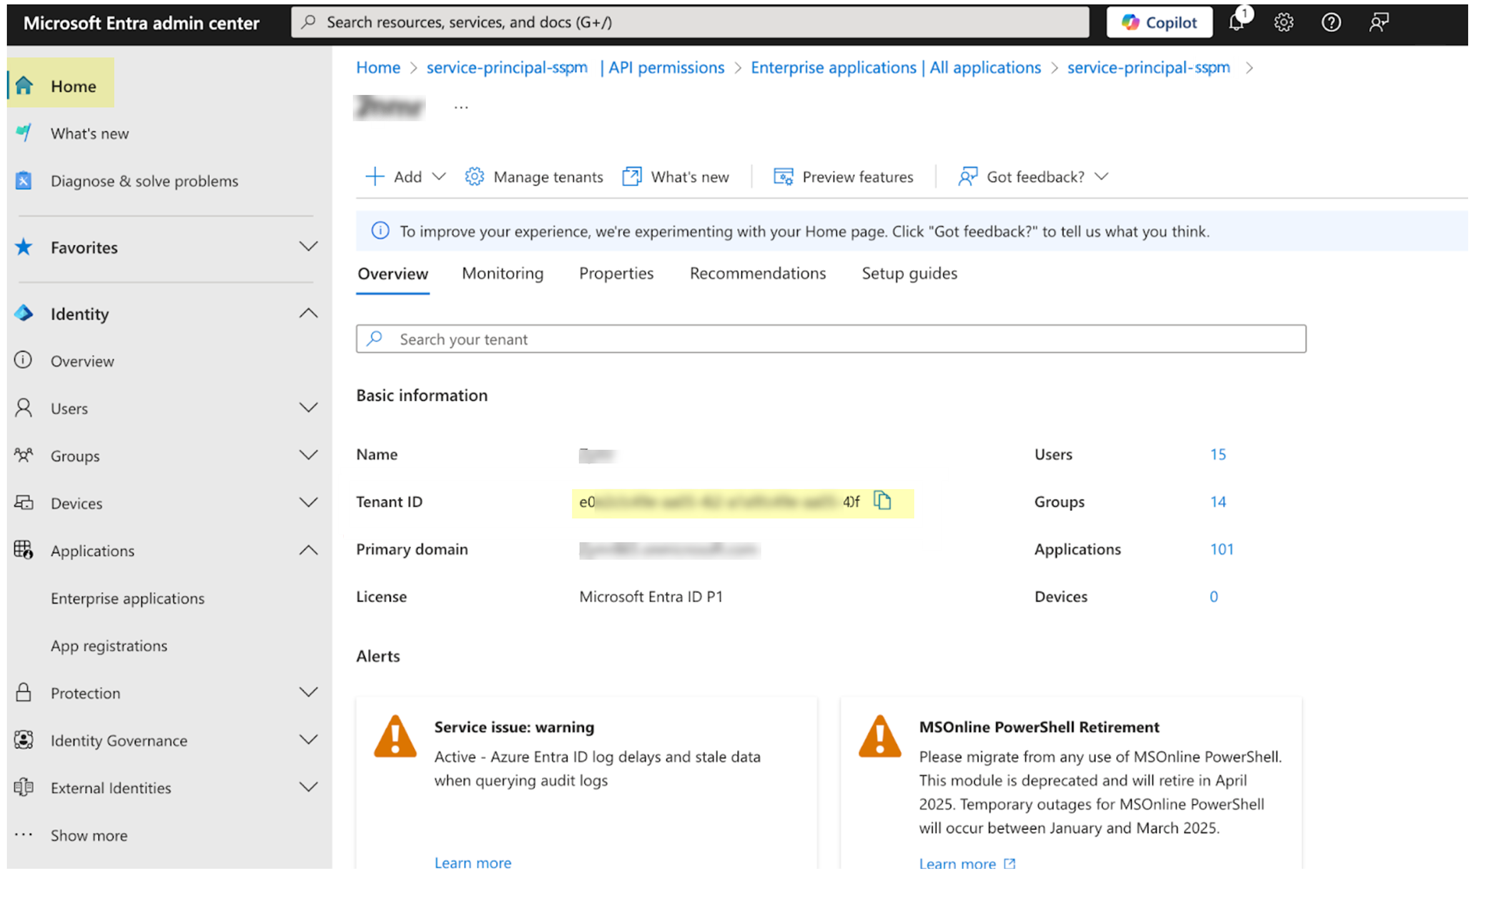
![]() Identify your tenant ID.
Identify your tenant ID.- From the left navigation pane in the Microsoft Entra admin center, select Home.Copy the tenant ID and paste it into a text file.Don’t continue to the next step unless you have copied your tenant ID. You will provide this information to SSPM during the onboarding process.
![]() Connect SSPM to your Office 365 instance.In SSPM, complete the following steps to enable SSPM to connect to your Office 365 instance.
Connect SSPM to your Office 365 instance.In SSPM, complete the following steps to enable SSPM to connect to your Office 365 instance.- Log in to Strata Cloud Manager.Select ConfigurationSaaS SecurityPosture SecurityApplicationsAdd Application and click the Office 365 tile.On the Posture Security tab, Add New instance.Select the option for Service Principal.Enter the application credentials (client ID and client secret) and your tenant ID.Depending on the API permissions that you configured for your application, specify whether you want SSPM to connect with Read Permissions only or with Read and Write Permissions.Connect.


