Activate ELA for IoT Security Through Common Services
Table of Contents
Activate ELA for IoT Security Through Common Services
Learn how to activate an add-on Enterprise License Agreement (ELA) for IoT Security
on a tenant through Common Services.
- Start the ELA activation process from either the hub or Customer Support Portal.Hub: Log in to the hub and, from the tenant view, click at the top of the page.
![]() orCustomer Support Portal: Log in to your customer support portal account, select , and then click ELA-IoT Activation.
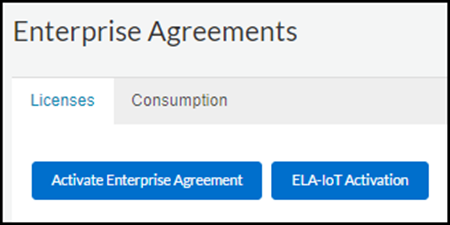
orCustomer Support Portal: Log in to your customer support portal account, select , and then click ELA-IoT Activation.![]() Whether you start in the hub or Customer Support Portal, both actions load a magic link that opens the Activate IoT Security page on the hub.Activate the IoT Security ELA for a tenant service group.
Whether you start in the hub or Customer Support Portal, both actions load a magic link that opens the Activate IoT Security page on the hub.Activate the IoT Security ELA for a tenant service group.- Choose an existing tenant service group (TSG) tenant or create a new one. A TSG essentially associates firewalls with applications such as IoT Security.Choose the firewall deployment region.Create a new IoT Security tenant URL by entering a unique subdomain to complete <subdomain>.iot.paloaltonetworks.com.This is the URL where you'll log in to your IoT Security portal.If you want to convert an existing IoT Security tenant from using one or more IoT Security licenses to an IoT Security Enterprise License Agreement, contact your Palo Alto Networks sales representative.Agree to the terms and conditions and then Activate.
![]() Go to the tab to add firewalls to the TSG tenant, associate them with the IoT Security app, and then apply the Enterprise IoT Security ELA to them: Device Associations.In the Customer Support Portal, select and view the entries in the License column for your firewalls to confirm that IoT Security is now applied to them.Continue setting up IoT Security to work with your firewalls.To log in to your IoT Security portal, return to Common Services on the hub and select the IoT Security link on either the Tenant Management page or the Device Associations page.For IoT Security (Enterprise IoT Security Plus, Industrial IoT Security, or Medical IoT Security), see Onboard IoT Security.For Enterprise IoT Security, see Onboard Enterprise IoT Security.(Optional) Manage identity and access to IoT Security.To create an IoT Security user with owner privileges plus the ability to generate one-time passwords (OTPs) and pre-shared keys (PSKs), add a user account in the Customer Support Portal and assign a Superuser role in the relevant tenant service group (TSG) in Identity & Access (this is described in the following steps.) To create an IoT Security user with all owner privileges except the ability to generate OTPs and PSKs, add the new user account in Identity & Access and assign a Superuser role in Identity & Access. To create an IoT Security user with read-only privileges, add a user account in Identity & Access and assign a View Only user role in Identity & Access.
Go to the tab to add firewalls to the TSG tenant, associate them with the IoT Security app, and then apply the Enterprise IoT Security ELA to them: Device Associations.In the Customer Support Portal, select and view the entries in the License column for your firewalls to confirm that IoT Security is now applied to them.Continue setting up IoT Security to work with your firewalls.To log in to your IoT Security portal, return to Common Services on the hub and select the IoT Security link on either the Tenant Management page or the Device Associations page.For IoT Security (Enterprise IoT Security Plus, Industrial IoT Security, or Medical IoT Security), see Onboard IoT Security.For Enterprise IoT Security, see Onboard Enterprise IoT Security.(Optional) Manage identity and access to IoT Security.To create an IoT Security user with owner privileges plus the ability to generate one-time passwords (OTPs) and pre-shared keys (PSKs), add a user account in the Customer Support Portal and assign a Superuser role in the relevant tenant service group (TSG) in Identity & Access (this is described in the following steps.) To create an IoT Security user with all owner privileges except the ability to generate OTPs and PSKs, add the new user account in Identity & Access and assign a Superuser role in Identity & Access. To create an IoT Security user with read-only privileges, add a user account in Identity & Access and assign a View Only user role in Identity & Access.- (Optional) Add a user account in the Customer Support Portal. New users only need to be added to the Customer Support Portal accounts if they need access to operate onboarding or offboarding tasks, such as generating OTPs and PSKs. To create a new user in the Customer Support Portal:
- Log in to the Customer Support Portal with superuser permissions, which allow you to create new user accounts.
- Select , enter the required information, and then Submit.
A new user account is created and added to the account as a member. An email notification is sent to the new user with login credentials.Log in to the hub, navigate to .Add Identity.Users added in the Customer Support Portal are separate from users added in Identity & Access.To assign a role to the user you created, select the user, Assign Roles, choose IoT Security in Apps & Services, choose one of the options in Role, and then Assign Role.