Prisma Access Agent
Set Up Forwarding Profiles (Panorama Managed Deployments)
Table of Contents
Set Up Forwarding Profiles (Panorama Managed Deployments)
Provide
consistent security for internet, SaaS, and private app access across locations, using
traffic forwarding rules to optimize traffic routing and policy enforcement.
To configure forwarding profiles on Prisma Access (Managed by Panorama) and NGFW (Managed by Panorama) deployments, complete the following steps:
- Navigate to the Prisma Access Agent setup.
- Prisma Access (Managed by Panorama)From the Cloud Services plugin in Panorama, select PanoramaCloud ServicesPrisma Access AgentLaunch Prisma Access Agent.
- NGFW (Managed by Panorama)Log in to Strata Cloud Manager as the administrator.
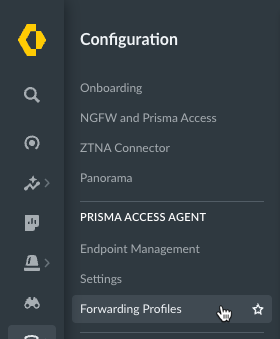
Select ConfigurationForwarding Profiles.![]() Set up Source Applications if you want to direct application traffic through or outside the tunnel by creating a split tunnel based on the SaaS or public cloud application name.
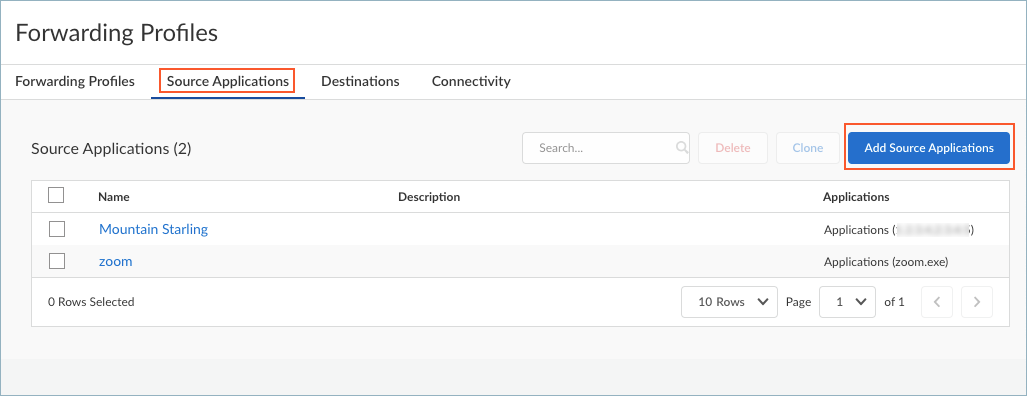
Set up Source Applications if you want to direct application traffic through or outside the tunnel by creating a split tunnel based on the SaaS or public cloud application name.- Select Source ApplicationsAdd Source Application.
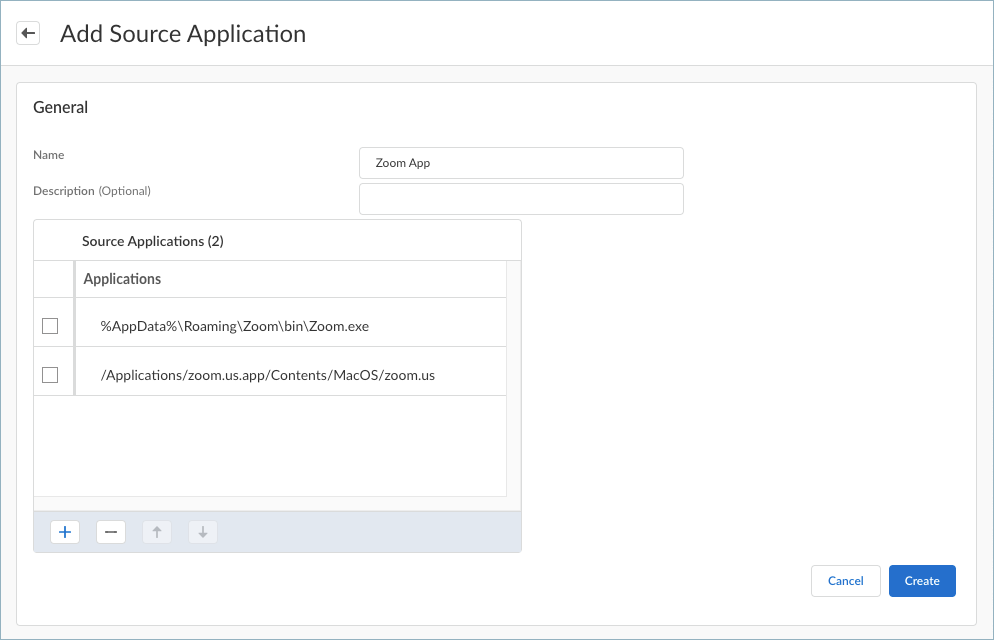
![]() Enter a meaningful Name for the application that you want to add.Click + in the Source Applications table and enter the complete path of the application. You can add one or more applications to manage whether to exclude or include the application traffic in the tunnel.You will select these applications when setting up the forwarding rules in a forwarding profile. To exclude application traffic, select Direct connectivity when configuring the forwarding rule. Prisma Access Agent sends these applications through the physical adapter on the endpoints rather than the tunnel (the virtual adapter). If you choose to include application traffic, select the Best Available - Fail Safe, Best Available - Fail Open, or your own configured connectivity option when configuring the forwarding rule. Traffic from these applications is routed to Prisma Access, even if it meets the excluded traffic criteria.
Enter a meaningful Name for the application that you want to add.Click + in the Source Applications table and enter the complete path of the application. You can add one or more applications to manage whether to exclude or include the application traffic in the tunnel.You will select these applications when setting up the forwarding rules in a forwarding profile. To exclude application traffic, select Direct connectivity when configuring the forwarding rule. Prisma Access Agent sends these applications through the physical adapter on the endpoints rather than the tunnel (the virtual adapter). If you choose to include application traffic, select the Best Available - Fail Safe, Best Available - Fail Open, or your own configured connectivity option when configuring the forwarding rule. Traffic from these applications is routed to Prisma Access, even if it meets the excluded traffic criteria.![]() For example, to manage traffic from the Zoom application, add the following complete paths:
For example, to manage traffic from the Zoom application, add the following complete paths:- Windows endpoints: %AppData%\Roaming\Zoom\bin\Zoom.exe
- macOS endpoints: /Applications/zoom.us.app/Contents/MacOS/zoom.us
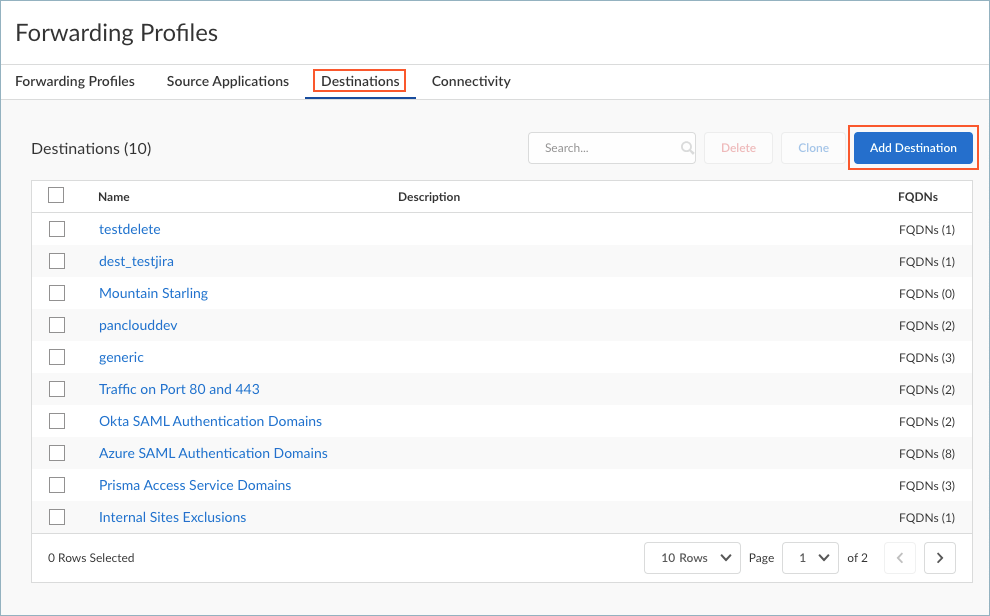
Create the source application.Repeat these steps to add more source applications.Set up Destinations if you want to create a split tunnel based on the destination domain or access routes.- Select DestinationsAdd Destination.
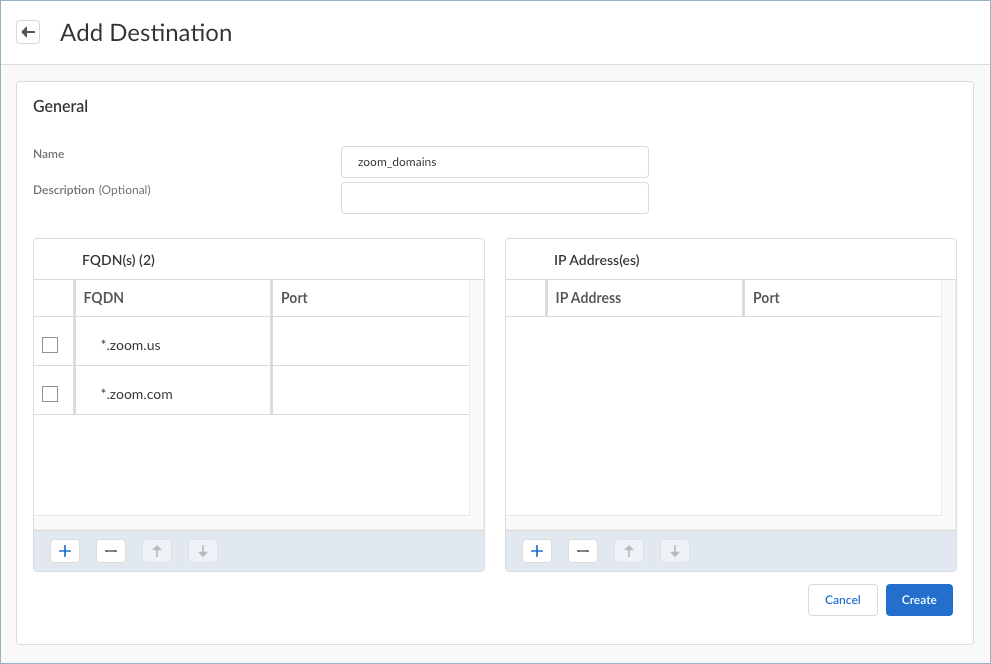
![]() Prisma Access Agent also offers predefined destination domains, such as Okta SAML Authentication Domains, Azure SAML Authentication Domains, Microsoft Client Authentication Domains, and Video Traffic so that you can easily create forwarding rules for these destination domains.Enter a meaningful Name for the destination that you want to add.Add a destination by specifying the domain name, access route, or both.
Prisma Access Agent also offers predefined destination domains, such as Okta SAML Authentication Domains, Azure SAML Authentication Domains, Microsoft Client Authentication Domains, and Video Traffic so that you can easily create forwarding rules for these destination domains.Enter a meaningful Name for the destination that you want to add.Add a destination by specifying the domain name, access route, or both.![]()
- To add a destination domain, click + in
the FQDNs table and enter the FQDN for
the destination domain. You can optionally add a port. If you
don't specify a port, all ports for the specified domain are
subjected to the forwarding rule. You can add one or more
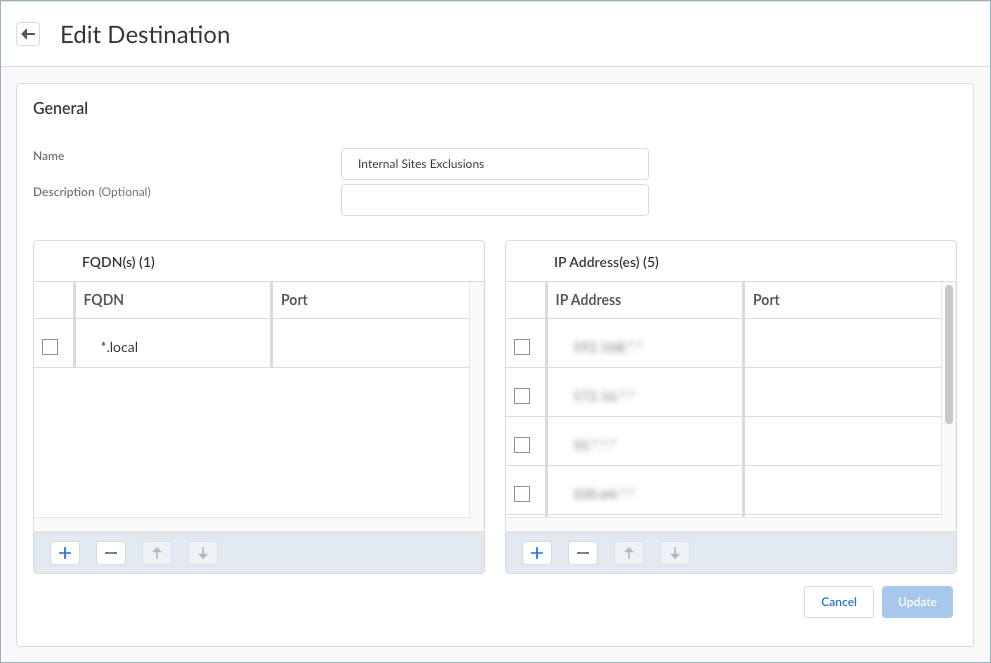
domains for traffic management.You can enter alphanumeric characters for the FQDN. You can also specify a wildcard domain by including a wildcard character (*) in the FQDN. However, the wildcard must appear only once and must be the first character of the string, and a period must follow the wildcard.The following are valid FQDN examples:
- example.com (exact domain)
- *.local (wildcard domain)
The following FQDN examples are not valid:- .example.com (missing characters before the first period)
- *example.com (missing period after the wildcard)
- my*.example.* (only one wildcard allowed and it must appear at the start of the string)
- *.example.*.com (wildcard not allowed in middle of string)
Prisma Access Agent will check whether your FQDN entry is valid or not. For invalid domain inputs, the "Invalid FQDN format" message appears.If you add a port, the port can only contain positive numbers. The range is 1-65535.You will select these destinations when setting up the forwarding rules in a forwarding profile. To exclude traffic based on the domain name, select Direct connectivity when configuring the forwarding rule. Prisma Access Agent will send traffic from the domain through the physical adapter on the endpoints rather than the tunnel (the virtual adapter). If you choose to include traffic based on the domain name, select the Best Available - Fail Safe, Best Available - Fail Open, or your own configured connectivity option when configuring the forwarding rule. Traffic from the domain is routed to Prisma Access, even if it meets the excluded traffic criteria. - To add an access route, click + in the
IP Addresses table and enter a
destination subnet. You can add one or more access routes for
traffic management.
Enter a valid IPv4 address. You can also include a wildcard character (*) in the IP address, but the wildcard must not appear in the middle of the IP address. Once a wildcard is used, all the following octets must also be wildcards.The following are some examples of valid IP addresses:
- 1.2.3.4 (exact IP address)
- 1.4.3.* (wildcard IP address)
- 1.*.*.*
- *.*.*.* (full wildcard IP address)
- 1.2.3.4/32 (exact IP address followed by CIDR)
The following are examples of an invalid IP address:- 1.2.3.300 (each byte must be 0-255)
- 3.3.3.3/255.255.255.256 (invalid subnet mask)
Prisma Access Agent will check whether your IP address entry is valid or not. For invalid inputs, a message appears indicating that the IP address is not valid.In some cases (such as 1.2.*.4 and 7.7.7.7/33), the configuration validator will allow the entry, but the agent will ultimately reject it because the entry does not adhere to a supported format. In this case, the agent will reject the forwarding profile rule and fall back to the fail-safe mode, forwarding all traffic to the tunnel.If you don't include or exclude routes or applications, every request is routed through the tunnel (without a split tunnel). Also, all traffic is inspected and subjected to policy enforcement whenever users connect to Prisma Access.When you define split tunnel traffic to exclude access routes (by selecting Direct connectivity in the forwarding rule), Prisma Access Agent sends these routes through the physical adapter on the endpoint instead of being sent through the tunnel via the virtual adapter (the tunnel). By excluding split tunnel traffic by access routes, you can send latency-sensitive or high-bandwidth traffic outside of the tunnel, while all other traffic is routed through the tunnel for inspection and policy enforcement by the gateway.When you define split tunnel traffic to include access routes (by selecting Best Available - Fail Safe, Best Available - Fail Open, or your own configured connectivity option in the forwarding rule), the gateway pushes these routes to the remote users’ endpoints to specify what traffic these endpoints can send through the tunnel.Specify exclude routes that are more specific than include routes; otherwise, you might exclude more traffic than intended. For example:![]()
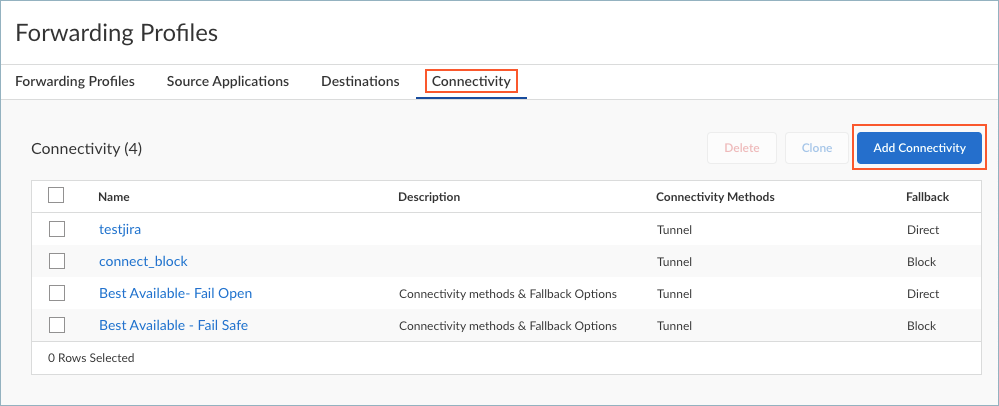
Create the destinations.Repeat these steps to add more destinations.Set up Connectivity options to direct traffic based on the connectivity method.- In the Forwarding Profiles Setup page, select ConnectivityAdd Connectivity.
![]() Prisma Access Agent also offers predefined connectivity options when users are using the best available location but the tunnel and proxy (if enabled) are not available or the traffic type is unsupported (such is IPv6 traffic).
Prisma Access Agent also offers predefined connectivity options when users are using the best available location but the tunnel and proxy (if enabled) are not available or the traffic type is unsupported (such is IPv6 traffic).- (Not supported on Prisma Access Agent Linux) Best Available - Fail Safe—Connect to the nearest gateway or Prisma Access location but block access if the user can’t connect to the tunnel and proxy (when enabled) or the traffic type is unsupported, such as proxy-only UDP traffic.
- Best Available - Fail Open—Connect to the nearest gateway or Prisma Access location but allow direct access even if the user can’t connect to the tunnel and proxy (when enabled) or the traffic type is unsupported, such as proxy-only UDP traffic.
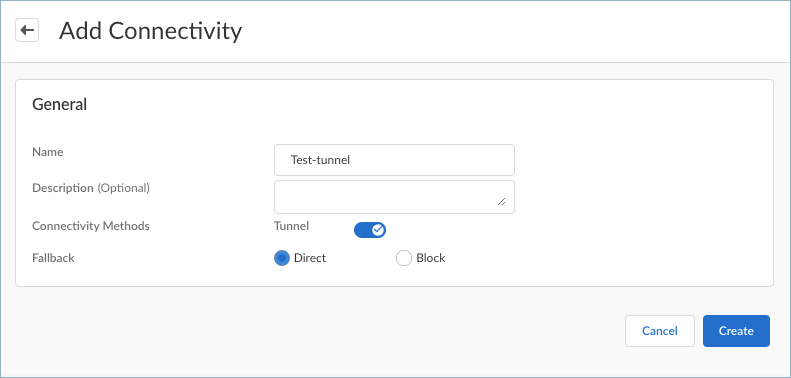
Enter a meaningful Name for the connectivity option you want to add.Configure the Connectivity Methods. By default, only the Tunnel connectivity method is enabled, but you can also send traffic to a proxy by enabling Proxy.- To direct internet traffic only through the tunnel, enable Tunnel and disable Proxy.
- To direct internet traffic only to the proxy, disable Tunnel and enable Proxy.
- To direct internet traffic to the proxy only when the tunnel is disconnected or unavailable, enable both Tunnel and Proxy. Prisma Access Agent will send traffic through the tunnel, and if the tunnel becomes disconnected, will send traffic to the proxy.
Select a Fallback behavior if the user isn’t connected using the specified connectivity method. You can prevent access (Block) or allow access (Direct). The default is Direct.![]() Create your connectivity settings.Repeat these steps to add more connectivity settings.Create a forwarding profile that allows or excludes traffic based on the source applications, destination, or connectivity options that you defined.
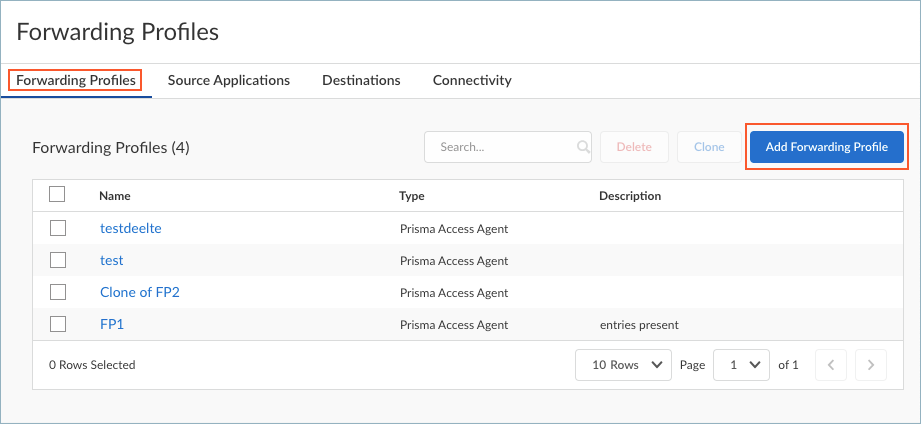
Create your connectivity settings.Repeat these steps to add more connectivity settings.Create a forwarding profile that allows or excludes traffic based on the source applications, destination, or connectivity options that you defined.- From the Forwarding Profiles page, select Forwarding ProfilesAdd Forwarding Profile.
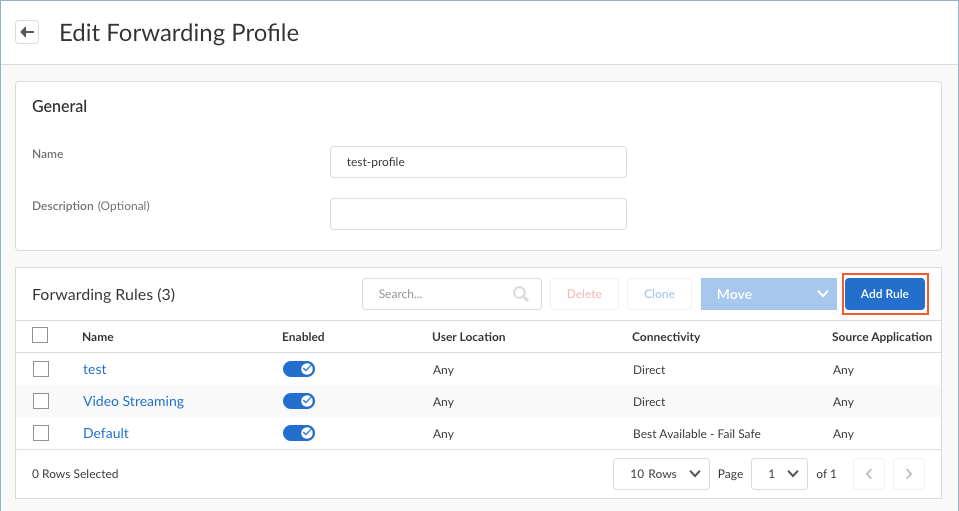
![]() Enter a meaningful Name for the forwarding profile.Click Add Rule to add one or more forwarding rules.
Enter a meaningful Name for the forwarding profile.Click Add Rule to add one or more forwarding rules.![]() The Forwarding Rules table shows the rules that make up the forwarding profile. By default, all forwarding profiles contain the following rules:
The Forwarding Rules table shows the rules that make up the forwarding profile. By default, all forwarding profiles contain the following rules:- (Not supported on Prisma Access Agent Linux) The Video Streaming forwarding rule, which sends all network traffic from video streaming apps outside the tunnel (direct connectivity). By excluding lower risk video streaming traffic (such as YouTube and Netflix) from the tunnel, you can decrease bandwidth consumption on the gateway.
- The Default forwarding rule, which sends all DNS and network traffic through the tunnel. Any new rules that you add are placed above the default rule. You can’t delete or move the default forwarding rule, but you can disable it or change its Connectivity setting.
- An implicit forwarding rule for basic endpoint connectivity that allows traffic such as DHCP, loopback, Prisma Access Agent management plane, ADEM, and Remote Browser Isolation (RBI) traffic. The implicit forwarding rule isn’t displayed and can’t be changed.
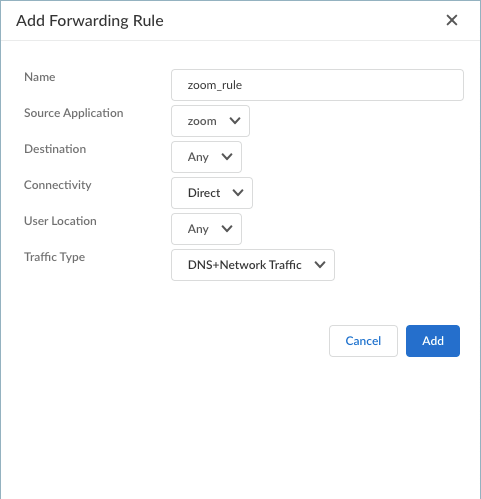
Traffic forwarding rules are applied from the top down in the forwarding profile. Therefore, configure the forwarding profile in a top-down manner, such as configuring the most specific rules first and the least specific rules last.Enter the specifications for the forwarding rule.![]()
- Enter a Name for the rule.
- Select a Source Application that you
defined previously. If you select Any,
the forwarding rule will apply to traffic from any source
applications.The rule will match only if the specified source application makes the connection.
- Select a Destination. If you select
Any, the forwarding rule will apply
to traffic from any destination domain or IP address.The rule will match only if the connection destination matches the specified destination domain or IP address.
- Select a Connectivity option that you
configured, or select one of the following predefined
connectivity options:
- Direct—Sends the traffic outside of the tunnel. All traffic for the selected application or destination is sent directly to the physical adapter on the endpoint without inspection.
- Block—Blocks traffic at the endpoint.
- (macOS and Windows agents only) Bypass—Bypasses the
traffic to allow third-party agents on endpoints to
process the connections if they are active
and configured to handle the designated traffic. If no
third-party agent is present or configured to handle the
traffic, the system sends the traffic to the tunnel (if
present) or directly to its destination if the tunnel is
not present. On Windows endpoints, the bypass feature cannot steer UDP traffic based on destination criteria. This limitation prevents destination-based routing configurations for UDP traffic when using bypass rules with third-party agents on Windows systems.
- (Not supported on Prisma Access Agent Linux) Best Available - Fail Safe—Connects to the nearest gateway or Prisma Access location but blocks all traffic when the tunnel is down or for unsupported traffic types.
- Best Available - Fail Open—Connects to the nearest gateway or Prisma Access location but allows traffic to go directly to its destination when the tunnel is down or for unsupported traffic types. This is the default.
- Select the Traffic Type:Specify whether to use split DNS to allow users to direct their DNS queries for applications and resources over the tunnel or outside the tunnel in addition to network traffic.
- DNS—Includes or excludes rules that are applied only to DNS traffic and not to network application traffic. All network application traffic goes through the tunnel regardless of the split tunnel based on the destination domain that you specified for inclusions or exclusions.
- DNS + Network Traffic—Ensures that the split tunnel based on the destination domain you specified for inclusions or exclusions are applied to the DNS traffic and the associated network application traffic for that domain. This is the default.
- Network Traffic—Includes or excludes rules that are applied only to network application traffic and not to DNS traffic. All DNS traffic goes through the tunnel regardless of the split tunnel based on the destination domain that you specified for inclusions or exclusions.
For Windows agents, the DNS + Network Traffic split tunnel option is not supported for source application-based split tunnel rules. If you set up split tunneling to include or exclude traffic from the tunnel based on application names and select DNS + Network Traffic, DNS query packets for excluded and included apps will not honor the split tunnel rule.
Click Add to save the forwarding rule.(Not supported on Prisma Access Agent Linux) Configure the Traffic Enforcement options to determine how you want traffic to be enforced.![]()
- Block outbound LAN access when connected to the
tunnel—When enabled, the agent blocks direct access to
the local network when the agent is connected to the tunnel. Blocking access to your local network causes all traffic from being sent to the local adapter. In addition, your users won't be able to access resources on the local subnet, such as printers. Split tunnel traffic based on access route, destination domain, and application still works as expected.If you disable this option, your end users can access local resources without requiring them to first connect to Prisma Access using the Prisma Access Agent. The default setting is disabled.
- Block inbound access when connected to the tunnel—When enabled, the agent blocks all inbound connections from the tunnel. The default setting is disabled.
Create your forwarding profile.Push the configuration by selecting Push ConfigPush. This action will make your forwarding profile available for selection in the Prisma Access Agent Setup page.
- Prisma Access (Managed by Panorama)

