Prisma Access Agent
Configure Agent Settings for the Prisma Access Agent (Panorama)
Table of Contents
Configure Agent Settings for the Prisma Access Agent (Panorama)
For Panorama Managed Prisma Access and NGFW deployments, follow the instructions to
customize how your end users interact with the Prisma Access Agent.
The Prisma Access Agent provides default agent configurations that apply to all user
groups. You can add an agent configuration to customize how your end users interact
with the Prisma Access Agent.
Stale Configuration Notification
(Prisma Access Agent 25.4) Your Prisma Access Agent configurations can
become outdated when dependent objects, such as gateway settings or
certificates, are updated on Panorama but not in the Prisma Access Agent
configuration interface. When this happens, real-time alerts will appear in the
configuration interface, informing you of outdated configurations that could
create service outages if not handled immediately. The notifications will appear
in a prominent banner across the Prisma Access Agent Setup page, alerting you of
stale configurations such as:
- Gateways that have been deleted on Panorama but actively used in the configuration interface
- Expired or deleted authentication override certificate on Panorama that is still being used in the configuration interface
- Outdated certificate profile in the HIP section of Agent Settings
The banner can’t be dismissed until you resolve the issue and push the
configuration.
Use the following instructions for Panorama Managed
Prisma Access or NGFW deployments.
- Navigate to the Prisma Access Agent setup.
- For Panorama Managed
Prisma Access deployments:
- From the Cloud Services plugin in Panorama, select PanoramaCloud ServicesPrisma Access AgentLaunch Prisma Access Agent.
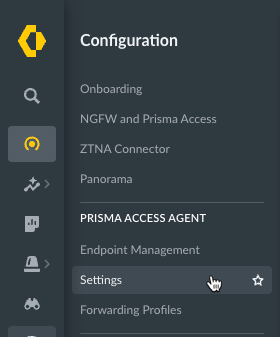
- Select ConfigurationPrisma Access AgentSettings.
- For Panorama Managed NGFW deployments:
- Log in to Strata Cloud Manager as the administrator.
- Select ConfigurationPrisma Access AgentSettings.
![]() Select Prisma Access AgentAdd Agent Settings.
Select Prisma Access AgentAdd Agent Settings.![]() Create an app configuration rule. The configuration rule associates users or user groups with app settings that are specific to those users or groups.
Create an app configuration rule. The configuration rule associates users or user groups with app settings that are specific to those users or groups.- In the Detail section, enter a Name for the rule.Specify the Match Criteria. Users and groups that match the OS and User Groups criteria will receive the Prisma Access Agent app settings that you specify.
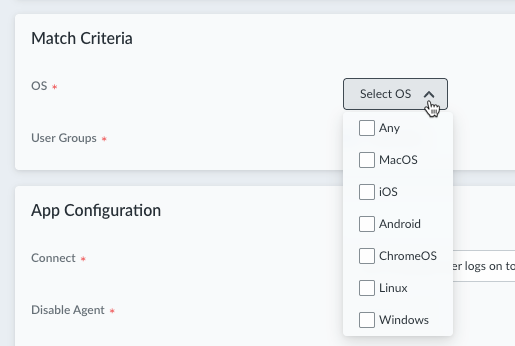
- Select the endpoint OS that the app settings apply to. Selecting Any will apply the app settings to all supported operating systems. The default is Any.
![]()
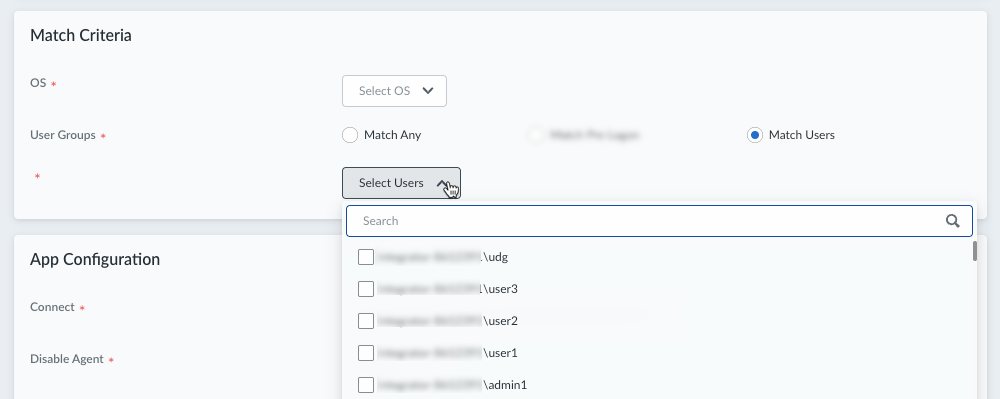
- To deploy the configuration to all users, set User Groups to Match any. This setting is the default.
- To deploy the configuration to specific user groups or users, select Match Users. Then, Select Users from the list of user entities. Examples of user entities include usernames and user groups, which are available in cloud directory attributes such as Common Name (CN) and Domain Component (DC).
![]() Configure the app settings for the Prisma Access Agent.
Configure the app settings for the Prisma Access Agent.![]() You can configure the following app settings:
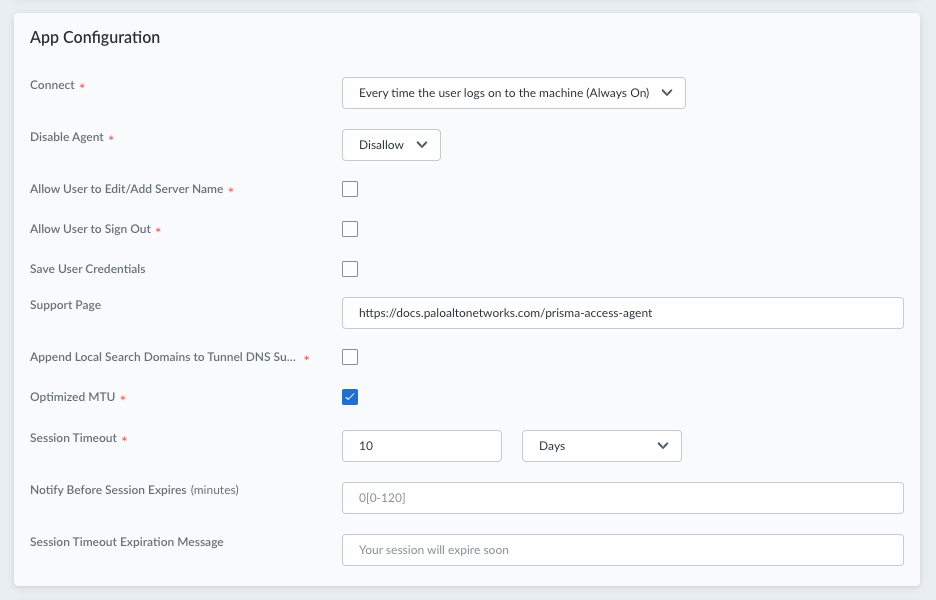
You can configure the following app settings:- Connect—Specify how the Prisma Access Agent connects to Prisma Access. This setting is required.
- Select Every time the user logs on to the machine (Always On) to automatically establish a connection to Prisma Access every time the user logs on to an endpoint.
- Select Only when the user clicks Connect (On-Demand) to connect to Prisma Access only when the user clicks Connect (the lock icon) in the Prisma Access Agent app.
- Disable Agent—Specify whether to give your users the ability to disable the Prisma Access Agent on their devices. In cases where users have the GlobalProtect™ app installed on their device along with the Prisma Access Agent, they can conveniently disable the Prisma Access Agent so that they can switch to the GlobalProtect app to avoid interference between the two software. Select one of the following options:
- Disallow—Does not allow users to disable the agent. The Disable option is not available in the Prisma Access Agent app.
- Allow—Users can disable the Prisma Access Agent using the Disable option in the settings page in the Prisma Access Agent app.
After disabling the agent, the user can switch to the GlobalProtect app. You can learn about the Prisma Access Agent behavior after disabling the agent and after switching to GlobalProtect. - Allow user to sign out—Enable this setting to permit your users to sign out of the Prisma Access Agent. Default: Disabled.
- Support Page—Enter the website that users can access for assistance when they click Support Resources in the Prisma Access Agent.Default: The website for the Prisma Access Agent documentation.
- Append Local Search Domains to Tunnel DNS Suffixes (Mac only)—Enable this setting to append tunnel DNS search domains to local DNS search domains on macOS endpoints. Appending tunnel search domains to an endpoint's local DNS search domains enables users to quickly access local and remote corporate websites and servers that they visit frequently without entering the complete address.
- Optimized MTU—The maximum transmission unit (MTU) is the largest packet size that Prisma Access Agent can send in a packet during a transmission. When enabled, Prisma Access Agent will automatically determine the best MTU to use for packet transmissions.Default: Enabled. You can disable this option to manually configure the MTU. The Configurable MTU (bytes) range is 576-1500 bytes. If you set a value outside this range or don't specify a value, the system will default to 1400 bytes.
- Session timeout—Prisma Access Agent user sessions are created when a user connects to the gateway (location) and successfully authenticates. The session is then assigned to a specific gateway that determines which traffic to tunnel based on any defined split tunnel rules.Specify the amount of time that elapses before the session ends. During the session, the user stays logged in as long as the gateway receives a HIP check from the endpoint. After this time, the session ends automatically. The default is 10 days. This setting is required.Learn how to Customize Prisma Access Agent Session Timeout Settings.
- (Not supported on Prisma Access Agent Linux) Notify Before Session Expires—Specify when to notify the user before a session expires. You can enter a value between 0-120 minutes. The default is 0 minutes. The value must be less than the value for Session timeout.For example, if you set the value to 120 minutes, the Prisma Access Agent will display the notification to the user two hours before their session expires. If you don't want any notification to be displayed, set the value to 0.For the notification to appear on the endpoint, PAN-OS must be at version 11.2 or later.
- (Not supported on Prisma Access Agent Linux) Session Timeout Expiration Message— Enter a message to display to the users when their sessions are about to expire. The maximum length for the message is 127 alphanumeric characters. The user will receive the notification as part of the system notification framework on the endpoint.
(Optional) (Not supported on Prisma Access Agent Linux) Configure the Proxy settings.![]()
- Local Proxy Port (Optional)—Configure the local proxy port used for transparent proxy support. The Prisma Access Agent uses a local proxy to route outgoing connections to Prisma Access explicit proxy servers based on customizable forwarding profiles.Default: 9999. Range: 1024-65534.If the default port isn't available, Prisma Access Agent will try 50 other ports in the range of 9999-10009 and use the port that’s available. If none is available, Prisma Access Agent will use a random port assigned by the operating system. You can also enter your own port number within the range.
- Detect Proxy for each Connection (Windows Only)—Enable this setting to automatically detect the proxy at every connection. Disable this setting if you want to automatically detect the proxy for the gateway connection and use that proxy for subsequent connections to the gateway. Default: Disabled.
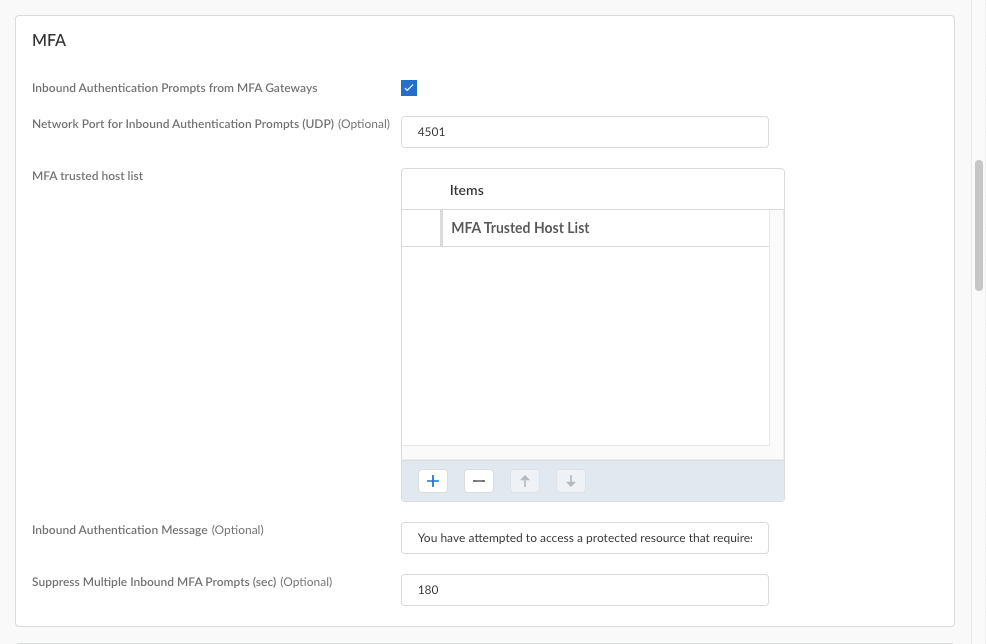
(Not supported on Prisma Access Agent Linux) Configure MFA settings.![]()
- Inbound Authentication Prompts from MFA Gateways—To support multi-factor authentication (MFA), a Prisma Access Agent endpoint must receive and acknowledge UDP prompts that are inbound from the gateway. Enable this setting to allow a Prisma Access Agent endpoint to receive and acknowledge the UDP prompts. This setting is enabled by default. Disable this setting to block UDP prompts from the gateway.
- Network Port for Inbound Authentication Prompts (UDP)—Specifies the port number a Prisma Access Agent endpoint uses to receive inbound authentication prompts from MFA gateways. The default port is 4501. To change the port, specify a number 1-65535.
- MFA Trusted Host list—Add the hosts for firewalls or authentication gateways that a Prisma Access Agent endpoint can trust for multi-factor authentication. When an endpoint receives a UDP message on the specified network port, the Prisma Access Agent displays an authentication message only if the UDP prompt comes from a trusted gateway.
- Inbound Authentication Messages—Customize a notification message to display when users try to access a resource that requires additional authentication.When users try to access a resource that requires additional authentication, Prisma Access Agent receives a UDP packet containing the inbound authentication prompt and displays this message. The UDP packet also contains the URL for the Authentication Portal page you specified when you configured multi-factor authentication. Prisma Access Agent automatically appends the URL to the message.For example:
You have attempted to access a protected resource that requires additional authentication. Do you want to continue?
The message can have 255 or fewer characters. - Suppress Multiple Inbound MFA Prompts (sec)—Specify the number of seconds to wait before Prisma Access Agent can suppress multiple inbound UDP prompts. The default is 180 seconds.
(Not supported on Prisma Access Agent Linux) Configure Endpoint Insights settings.- Enable Endpoint Insights to collect comprehensive troubleshooting endpoint data for analysis.
![]() (Prisma Access Agent 25.7) Enable User Consent Required to display a consent dialog to the end user requesting permission to collect diagnostic data. (Default: Disabled)If the user approves the request, the diagnostic collection proceeds. If the user denies the consent, the diagnostic collection fails.(Not supported on Prisma Access Agent Linux) Configure ADEM settings.
(Prisma Access Agent 25.7) Enable User Consent Required to display a consent dialog to the end user requesting permission to collect diagnostic data. (Default: Disabled)If the user approves the request, the diagnostic collection proceeds. If the user denies the consent, the diagnostic collection fails.(Not supported on Prisma Access Agent Linux) Configure ADEM settings.![]()
- Access Experience (Optional)—Specify whether to install the ADEM Access Experience agent during the Prisma Access Agent app installation and to let end users enable or disable user experience tests from the app.
- Install
- No action (The agent state remains as is)
- Uninstall
- Display ADEM update notifications—Enable this setting to display notifications from ADEM when an update is available on the endpoint.
Enable Internal Host Detection if you don’t require your Prisma Access Agent users to connect to the gateway when they are on the internal network. This option will enable the Prisma Access Agent to determine if it's on an internal or external network. This determination enables the Prisma Access Agent to decide whether a tunnel is required and to apply the appropriate security policies.Default: Disabled![]()
- Enable Internal Host Detection.Enter the IPv4 IP Address of a host that Prisma Access Agent can resolve from the internal network only. The IP address you specify must be compatible with the IP address type. For example, 198.51.100.0 for IPv4.Enter the DNS Hostname that resolves to the IP address within the internal network that you entered.When the user connects to a network, the Prisma Access Agent does a reverse DNS lookup using the specified IP Address to the specified Hostname. The host serves as a reference point that does not have to be reachable, but the reverse DNS lookup should be successful only when the endpoint is inside the enterprise network. If the agent finds the host, the endpoint is inside the network and the agent connects to an internal gateway, if configured, or the agent shows the connection status as internal. If the agent fails to find the internal host, the endpoint is outside the network and the agent establishes a tunnel to one of the external gateways.Configure external and internal gateways for the Prisma Access Agent by selecting the external and internal gateways that you configured in the Infrastructure tab.(Optional) Select a Forwarding Profile that you configured previously to manage how traffic flows between the agent and Prisma Access. For example, you can set up split tunnels to exclude traffic from certain applications or destinations from the tunnel while routing all other traffic through the tunnel.(Optional) Configure HIP Data Collection Settings for the Prisma Access AgentWhen you have finished setting up the Prisma Access Agent settings, click Create.
- For Panorama Managed
Prisma Access deployments:

