GlobalProtect
Configure HIP Process Remediation
Table of Contents
Expand All
|
Collapse All
GlobalProtect Docs
-
10.1 & Later
- 10.1 & Later
- 9.1 (EoL)
-
- How Does the App Know Which Certificate to Supply?
- Set Up Cloud Identity Engine Authentication
- Configure GlobalProtect to Facilitate Multi-Factor Authentication Notifications
- Enable Delivery of VSAs to a RADIUS Server
- Enable Group Mapping
-
-
- GlobalProtect App Minimum Hardware Requirements
- Download the GlobalProtect App Software Package for Hosting on the Portal
- Host App Updates on the Portal
- Host App Updates on a Web Server
- Test the App Installation
- Download and Install the GlobalProtect Mobile App
- View and Collect GlobalProtect App Logs
-
-
- Deploy App Settings in the Windows Registry
- Deploy App Settings from Msiexec
- Deploy Scripts Using the Windows Registry
- Deploy Scripts Using Msiexec
- Deploy Connect Before Logon Settings in the Windows Registry
- Deploy GlobalProtect Credential Provider Settings in the Windows Registry
- SSO Wrapping for Third-Party Credential Providers on Windows Endpoints
- Enable SSO Wrapping for Third-Party Credentials with the Windows Registry
- Enable SSO Wrapping for Third-Party Credentials with the Windows Installer
- Deploy App Settings to Linux Endpoints
- GlobalProtect Processes to be Whitelisted on EDR Deployments
-
-
- Mobile Device Management Overview
- Set Up the MDM Integration With GlobalProtect
- Qualified MDM Vendors
-
-
- Set Up the Microsoft Intune Environment for Android Endpoints
- Deploy the GlobalProtect App on Android Endpoints Using Microsoft Intune
- Create an App Configuration on Android Endpoints Using Microsoft Intune
- Configure Lockdown Mode for Always On Connect Method on Android Endpoints Using Microsoft Intune
-
- Deploy the GlobalProtect Mobile App Using Microsoft Intune
- Configure an Always On VPN Configuration for iOS Endpoints Using Microsoft Intune
- Configure a User-Initiated Remote Access VPN Configuration for iOS Endpoints Using Microsoft Intune
- Configure a Per-App VPN Configuration for iOS Endpoints Using Microsoft Intune
-
-
-
- Create a Smart Computer Group for GlobalProtect App Deployment
- Create a Single Configuration Profile for the GlobalProtect App for macOS
- Deploy the GlobalProtect Mobile App for macOS Using Jamf Pro
-
- Enable GlobalProtect System Extensions on macOS Endpoints Using Jamf Pro
- Enable GlobalProtect Network Extensions on macOS Big Sur Endpoints Using Jamf Pro
- Add a Configuration Profile for the GlobalProtect Enforcer by Using Jamf Pro 10.26.0
- Verify Configuration Profiles Deployed by Jamf Pro
- Remove System Extensions on macOS Monterey Endpoints Using Jamf Pro
- Non-Removable System Extensions on macOS Sequoia Endpoints Using Jamf Pro
- Uninstall the GlobalProtect Mobile App Using Jamf Pro
-
- Configure HIP-Based Policy Enforcement
- Configure HIP Exceptions for Patch Management
- Collect Application and Process Data From Endpoints
- Redistribute HIP Reports
-
- Identification and Quarantine of Compromised Devices Overview and License Requirements
- View Quarantined Device Information
- Manually Add and Delete Devices From the Quarantine List
- Automatically Quarantine a Device
- Use GlobalProtect and Security Policies to Block Access to Quarantined Devices
- Redistribute Device Quarantine Information from Panorama
- Troubleshoot HIP Issues
-
-
- Enable and Verify FIPS-CC Mode on Windows Endpoints
- Enable and Verify FIPS-CC Mode on macOS Endpoints
- Enable and Verify FIPS-CC Mode Using Workspace ONE on iOS Endpoints
- Enable FIPS Mode on Linux EndPoints with Ubuntu or RHEL
- Enable and Verify FIPS-CC Mode Using Microsoft Intune on Android Endpoints
- FIPS-CC Security Functions
- Resolve FIPS-CC Mode Issues
-
-
- Remote Access VPN (Authentication Profile)
- Remote Access VPN (Certificate Profile)
- Remote Access VPN with Two-Factor Authentication
- GlobalProtect Always On VPN Configuration
- Remote Access VPN with Pre-Logon
- User-Initiated Pre-Logon Connection
- GlobalProtect Multiple Gateway Configuration
- GlobalProtect for Internal HIP Checking and User-Based Access
- Mixed Internal and External Gateway Configuration
- Captive Portal and Enforce GlobalProtect for Network Access
- GlobalProtect on Windows 365 Cloud PC
-
- About GlobalProtect Cipher Selection
- Cipher Exchange Between the GlobalProtect App and Gateway
-
- Reference: GlobalProtect App Cryptographic Functions
-
- Reference: TLS Ciphers Supported by GlobalProtect Apps on macOS Endpoints
- Reference: TLS Ciphers Supported by GlobalProtect Apps on Windows Endpoints
- Reference: TLS Ciphers Supported by GlobalProtect Apps on Android 6.0.1 Endpoints
- Reference: TLS Ciphers Supported by GlobalProtect Apps on iOS 10.2.1 Endpoints
- Reference: TLS Ciphers Supported by GlobalProtect Apps on Chromebooks
- Ciphers Used to Set Up IPsec Tunnels
- SSL APIs
-
- View a Graphical Display of GlobalProtect User Activity in PAN-OS
- View All GlobalProtect Logs on a Dedicated Page in PAN-OS
- Event Descriptions for the GlobalProtect Logs in PAN-OS
- Filter GlobalProtect Logs for Gateway Latency in PAN-OS
- Restrict Access to GlobalProtect Logs in PAN-OS
- Forward GlobalProtect Logs to an External Service in PAN-OS
- Configure Custom Reports for GlobalProtect in PAN-OS
-
6.3
- 6.3
- 6.2
- 6.1
- 6.0
- 5.1
-
- Download and Install the GlobalProtect App for Windows
- Use Connect Before Logon
- Use Single Sign-On for Smart Card Authentication
- Use the GlobalProtect App for Windows
- Report an Issue From the GlobalProtect App for Windows
- Disconnect the GlobalProtect App for Windows
- Uninstall the GlobalProtect App for Windows
- Fix a Microsoft Installer Conflict
-
- Download and Install the GlobalProtect App for macOS
- Use the GlobalProtect App for macOS
- Report an Issue From the GlobalProtect App for macOS
- Disconnect the GlobalProtect App for macOS
- Uninstall the GlobalProtect App for macOS
- Remove the GlobalProtect Enforcer Kernel Extension
- Enable the GlobalProtect App for macOS to Use Client Certificates for Authentication
-
6.1
- 6.1
- 6.0
- 5.1
-
6.3
- 6.3
- 6.2
- 6.1
- 6.0
- 5.1
Configure HIP Process Remediation
HIP Process Remediation allows configuring custom checks and scripts to automatically
remediate failed process checks on GlobalProtect endpoints.
Where Can I Use This? | What Do I Need? |
---|---|
|
|
Use the following procedure to configure the GlobalProtect app to run a remediation
script whenever a GlobalProtect endpoint fails one or more process checks to help
the endpoint recover from a HIP check failures. With this feature enabled, the
GlobalProtect app will provide a specified timeout period in which the endpoint can
run the remediation script if it fails a process check. After the timeout period
expires, the GlobalProtect app resubmits the HIP report.
- Set up custom process checks.The remediation scripts you write should check whether the processes you have set up in the Custom Checks are running and, if not, execute the script and start the process.
- Configure a HIP remediation timeout on the portal.
- Select NetworkGlobalProtectPortals.
- Select the portal configuration to which you are adding the agent configuration, and then select the Agent tab.
- Select the agent configuration that you want to modify, or Add a new one.
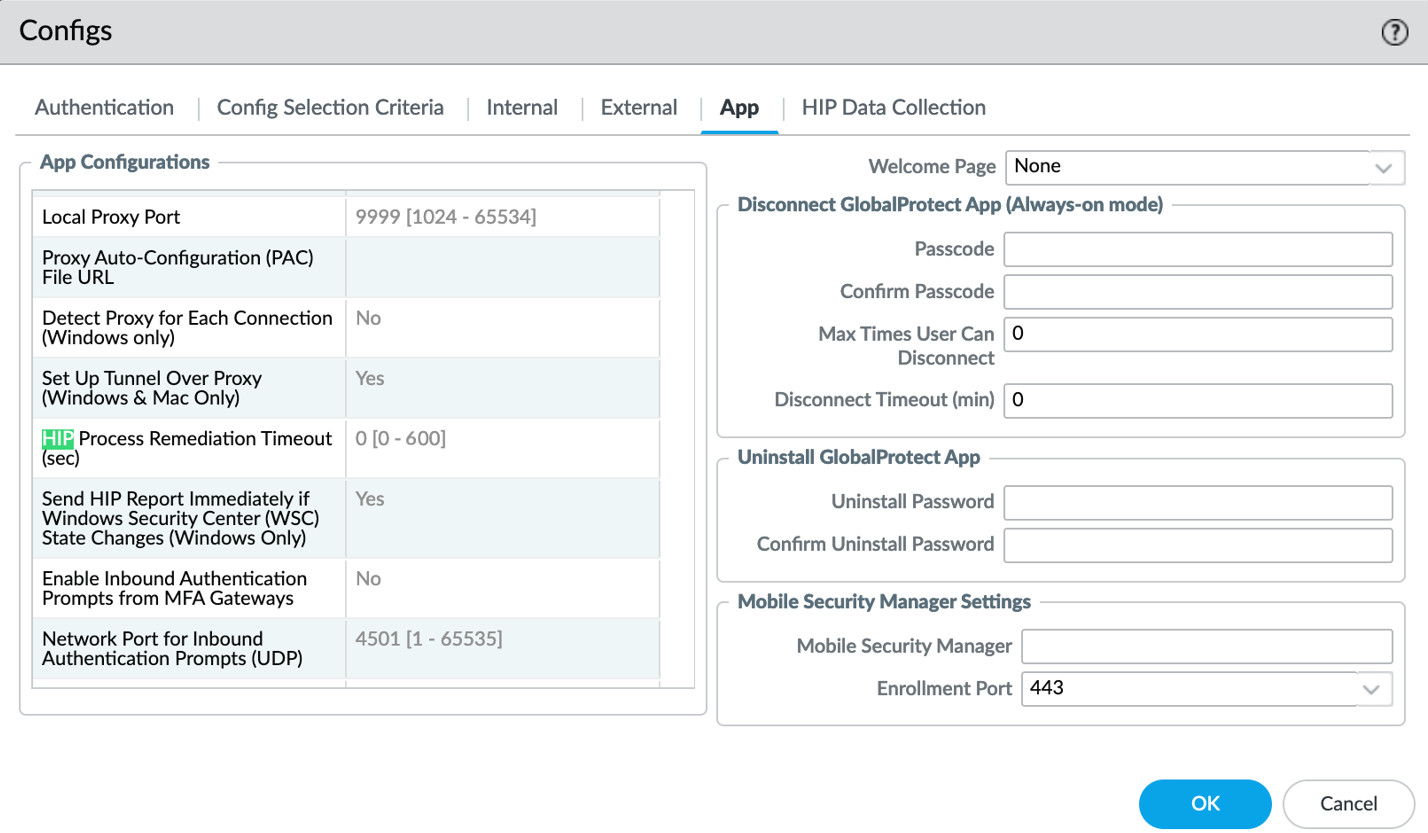
- Select the App tab.
- To enable the HIP remediation feature, set a HIP Remediation Process Timeout (sec).By default, this field is set to 0, indicating that the feature is disabled. Enter a value from 1-600 seconds to indicate the amount of time you want to allow for the remediation script to finish.
- Click OK twice to save your app and portal configurations.
- Commit the changes.
- Deploy the remediation script to your endpoints using mobile device management (MDM).As a best practice, use standard formats for the scripts you deploy (for example, deploy shell scripts on macOS endpoints and batch scripts on Windows endpoints). The name of the script is case sensitive and must use the predefined name and location as follows:
- WindowsLocation: \Program Files\Palo Alto Networks\GlobalProtect\Naming convention: hip-remediation-script.bat
- macOSLocation: /Applications/GlobalProtect.app/Contents/Resources/Naming convention: hip-remediation-script.sh
- Windows
- (Optional) Customize how the script runs on the endpoint by setting a checksum and/or a custom error message and defining the context in which the script will run.
- macOS
- Calculate the sha 256 checksum: shasum -a 256 hip-remediation-script.sh.
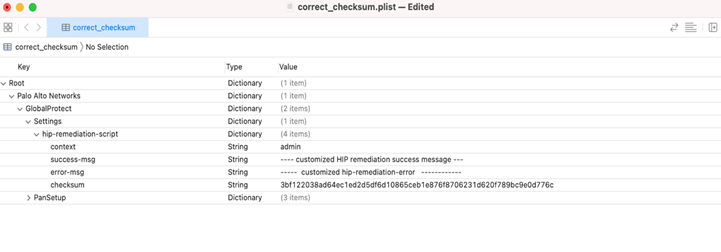
- Edit the following values in the plist as needed:
- checksum—Specify the checksum you generated
- error-msg—Enter the custom error message you want to display to the end user when remediation fails
- success-msg—Enter the custom error message you want to display to the end user when remediation succeeds
- context—set to admin or user to specify the context in which to run the remediation script. By default, the script runs in the user context.
- Replace the GlobalProtect plist by copying the modified.plist to
overwrite the default plist: sudo cp
modified.plist
/Library/Preferences/com.paloaltonetworks.GlobalProtect.settings.plist.
- Stop/start PanGPS:launchctl stop com.paloaltonetworks.gp.pangpslaunchctl start com.paloaltonetworks.gp.pangps
- Windows
- Create the checksum for the remediation script: certutil -hashfile hip-remediation-script.bat HASH256 .
- Deploy the registry setting using the Windows default registry
editor.In the Windows Registry, go to: \HKEY_LOCAL_MACHINE > SOFTWARE> Palo Alto Networks > GlobalProtect > Settings > hip-remediation-script and set the following keys:In the Windows Registry, go to: \HKEY_LOCAL_MACHINE > SOFTWARE> Palo Alto Networks > GlobalProtect > Settings > hip-remediation-script and set the following keys:
- checksum—Specify the checksum you generated
- error-msg—Enter the custom error message you want to display to the end user when remediation fails
- success-msg—Enter the custom error message you want to display to the end user when remediation succeeds
- context—set to admin or user to specify the context in which to run the remediation script. By default, the script runs in the user context.
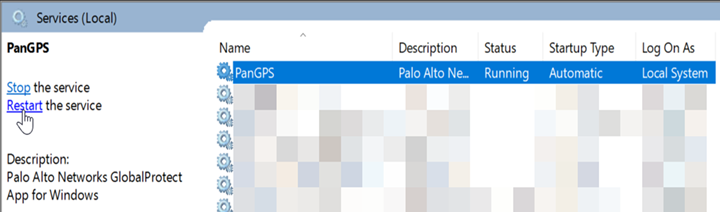
- To restart GlobalProtect, in the Windows Services screen, find the PanGPS service and click Restart the service.
- macOS