Set Up a Basic Security Policy
Table of Contents
Set Up a Basic Security Policy
Now that you defined some zones and attached
them to interfaces, you are ready to begin creating your Security
Policy. The firewall will not allow any traffic to flow from
one zone to another unless there is a Security policy rule that
allows it. When a packet enters a firewall interface, the firewall
matches the attributes in the packet against the Security policy
rules to determine whether to block or allow the session based on
attributes such as the source and destination security zone, the
source and destination IP address, the application, user, and the
service. The firewall evaluates incoming traffic against the Security
policy rulebase from left to right and from top to bottom and then
takes the action specified in the first Security rule that matches
(for example, whether to allow, deny, or drop the packet). This
means that you must order the rules in your Security policy rulebase
so that more specific rules are at the top of the rulebase and more
general rules are at the bottom to ensure that the firewall is enforcing
policy as expected.
Even though a Security policy rule allows
a packet, this does not mean that the traffic is free of threats.
To enable the firewall to scan the traffic that it allows based on
a Security policy rule, you must also attach Security
Profiles—including URL Filtering, Antivirus, Anti-Spyware,
File Blocking, and WildFire Analysis—to each rule (the profiles
you can use depend on which Subscriptions you purchased).
When creating your basic Security policy, use the predefined security
profiles to ensure that the traffic you allow into your network
is being scanned for threats. You can customize these profiles later
as needed for your environment.
Use the following workflow
set up a very basic Security policy that enables access to the network
infrastructure, to data center applications, and to the internet. This
enables you to get the firewall up and running so that you can verify
that you have successfully configured the firewall. However, this
initial policy is not comprehensive enough to protect your network.
After you verify that you successfully configured the firewall and
integrated it into your network, proceed with creating a Best Practice Internet Gateway Security Policy that
safely enables application access while protecting your network
from attack.
- (Optional) Delete the default Security policy rule.By default, the firewall includes a Security policy rule named rule1 that allows all traffic from Trust zone to Untrust zone. You can either delete the rule or modify the rule to reflect your zone-naming conventions.Allow access to your network infrastructure resources.
- Select and click Add.In the General tab, enter a descriptive Name for the rule.In the Source tab, set the Source Zone to Users.In the Destination tab, set the Destination Zone to IT Infrastructure.As a best practice, use address objects in the Destination Address field to enable access to specific servers or groups of servers only, particularly for services such as DNS and SMTP that are commonly exploited. By restricting users to specific destination server addresses, you can prevent data exfiltration and command and control traffic from establishing communication through techniques such as DNS tunneling.In the Applications tab, Add the applications that correspond to the network services you want to safely enable. For example, select dns, ntp, ocsp, ping, and smtp.In the Service/URL Category tab, keep the Service set to application-default.In the Actions tab, set the Action Setting to Allow.Set Profile Type to Profiles and select the following security profiles to attach to the policy rule:
- For Antivirus, select default
- For Vulnerability Protection, select strict
- For Anti-Spyware, select strict
- For URL Filtering, select default
- For File Blocking, select basic file blocking
- For WildFire Analysis, select default
Verify that Log at Session End is enabled. Only traffic that matches a Security policy rule will be logged.Click OK.![]() Enable access to general internet applications.This is a temporary rule that allows you to gather information about the traffic on your network. After you have more insight into which applications your users need to access, you can make informed decisions about which applications to allow and create more granular application-based rules for each user group.
Enable access to general internet applications.This is a temporary rule that allows you to gather information about the traffic on your network. After you have more insight into which applications your users need to access, you can make informed decisions about which applications to allow and create more granular application-based rules for each user group.- Select and Add a rule.In the General tab, enter a descriptive Name for the rule.In the Source tab, set the Source Zone to Users.In the Destination tab, set the Destination Zone to Internet.In the Applications tab, Add an Application Filter and enter a Name. To safely enable access to legitimate web-based applications, set the Category in the application filter to general-internet and then click OK. To enable access to encrypted sites, Add the ssl application.In the Service/URL Category tab, keep the Service set to application-default.In the Actions tab, set the Action Setting to Allow.Set Profile Type to Profiles and select the following security profiles to attach to the policy rule:
- For Antivirus, select default
- For Vulnerability Protection, select strict
- For Anti-Spyware, select strict
- For URL Filtering, select default
- For File Blocking, select strict file blocking
- For WildFire Analysis, select default
Verify that Log at Session End is enabled. Only traffic that matches a security rule will be logged.Click OK.![]() Enable access to data center applications.
Enable access to data center applications.- Select and Add a rule.In the General tab, Enter a descriptive Name for the rule.In the Source tab, set the Source Zone to Users.In the Destination tab, set the Destination Zone to Data Center Applications.In the Applications tab, Add the applications that correspond to the network services you want to safely enable. For example, select activesync, imap, kerberos, ldap, ms-exchange, and ms-lync.In the Service/URL Category tab, keep the Service set to application-default.In the Actions tab, set the Action Setting to Allow.Set Profile Type to Profiles and select the following security profiles to attach to the policy rule:
- For Antivirus, select default
- For Vulnerability Protection select strict
- For Anti-Spyware select strict
- For URL Filtering select default
- For File Blocking select basic file blocking
- For WildFire Analysis select default
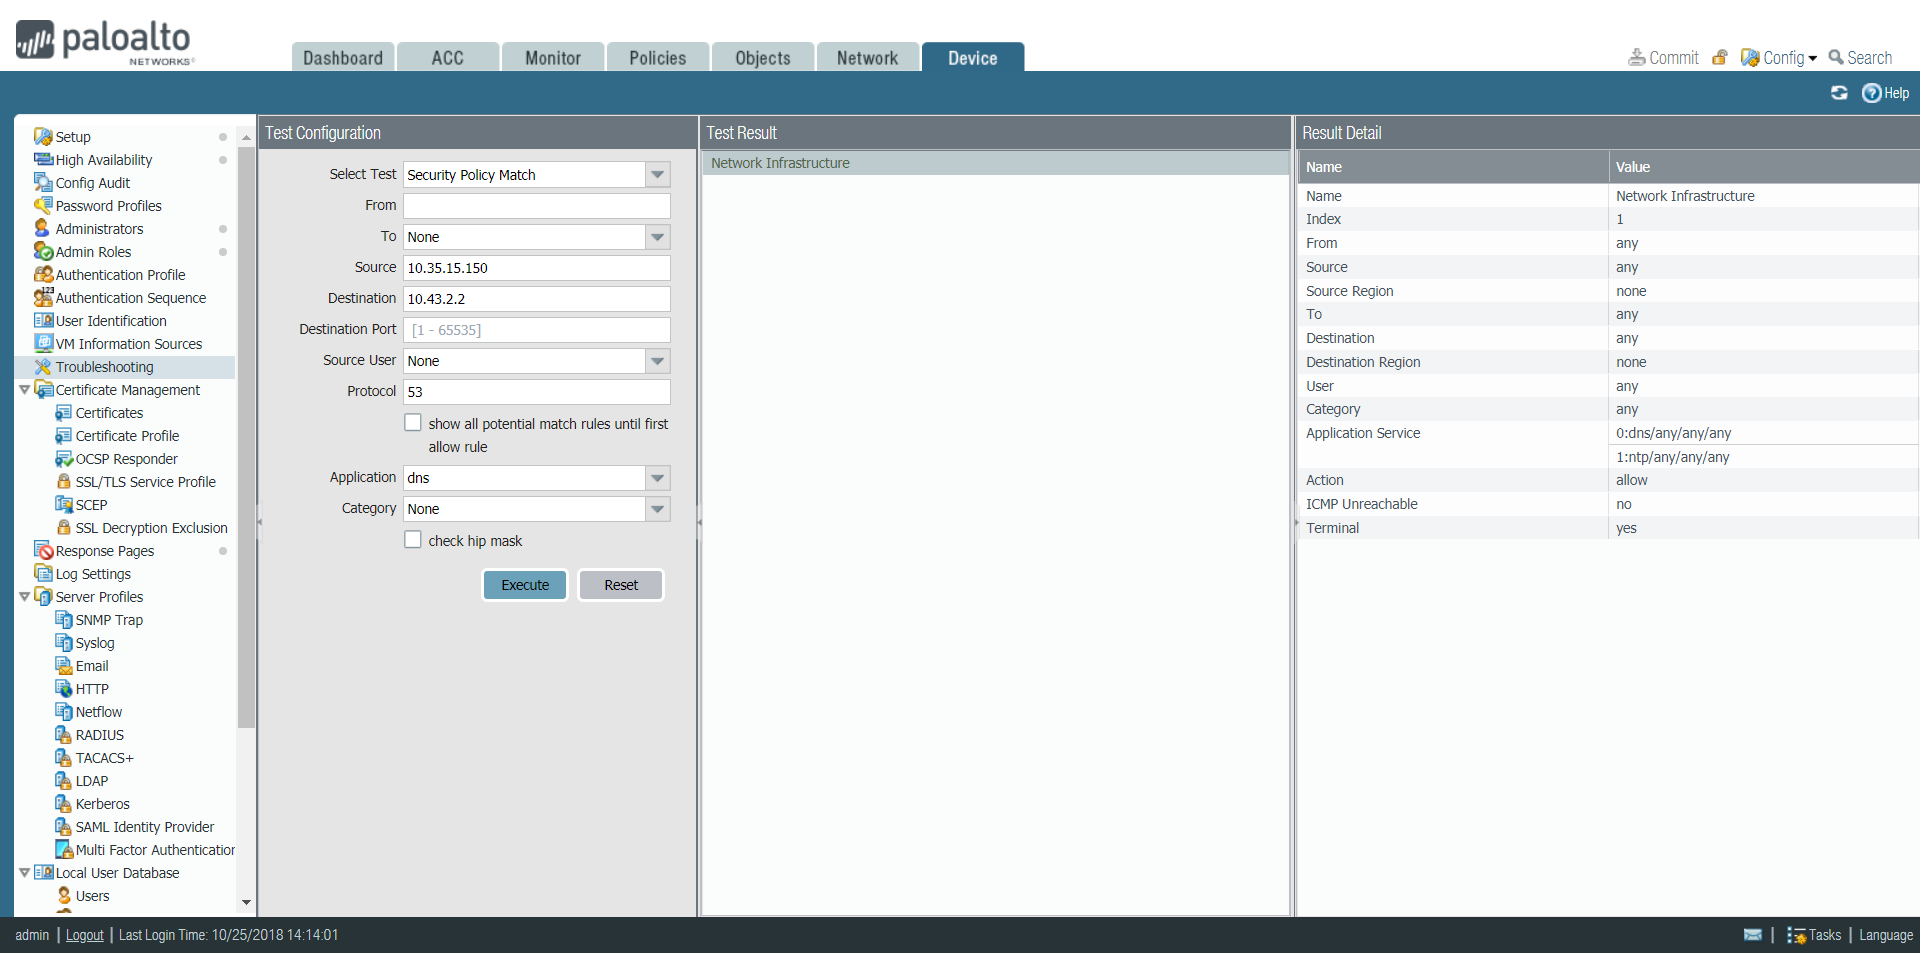
Verify that Log at Session End is enabled. Only traffic that matches a security rule will be logged.Click OK.![]() Save your policy rules to the running configuration on the firewall.Click Commit.To verify that you have set up your basic policies effectively, test whether your Security policy rules are being evaluated and determine which Security policy rule applies to a traffic flow.For example, to verify the policy rule that will be applied for a client in the user zone with the IP address 10.35.14.150 when it sends a DNS query to the DNS server in the data center:
Save your policy rules to the running configuration on the firewall.Click Commit.To verify that you have set up your basic policies effectively, test whether your Security policy rules are being evaluated and determine which Security policy rule applies to a traffic flow.For example, to verify the policy rule that will be applied for a client in the user zone with the IP address 10.35.14.150 when it sends a DNS query to the DNS server in the data center:- Select and select Security Policy Match (Select Test).Enter the Source and Destination IP addresses.Enter the Protocol..Select dns (Application)Execute the Security policy match test.
![]()