Configure QoS
Table of Contents
Configure QoS
Follow these steps to configure Quality of
Service (QoS), which includes creating a QoS profile, creating a
QoS policy, and enabling QoS on an interface.
Before you create
a QoS policy rule, make sure you understand that the set of IPv4
addresses is treated as a subset of the set of IPv6 addresses, as
described in detail in Policy.
- Identify the traffic you want to manage with QoS.This example shows how to use QoS to limit web browsing.Select ACC to view the Application Command Center page. Use the settings and charts on the ACC page to view trends and traffic related to Applications, URL filtering, Threat Prevention, Data Filtering, and HIP Matches.Click any application name to display detailed application information.Identify the egress interface for applications that you want to receive QoS treatment.The egress interface for traffic depends on the traffic flow. If you are shaping incoming traffic, the egress interface is the internal-facing interface. If you are shaping outgoing traffic, the egress interface is the external-facing interface.Select to view the Traffic logs.To filter and only show logs for a specific application:
- If an entry is displayed for the application, click the underlined link in the Application column then click the Submit icon.
- If an entry is not displayed for the application, click the Add Log icon and search for the application.
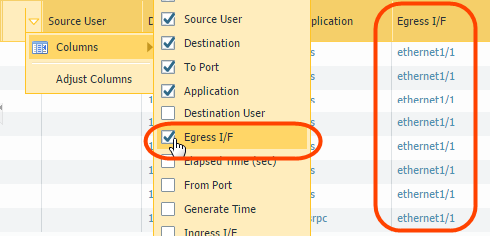
The Egress I/F in the traffic logs displays each application’s egress interface. To display the Egress I/F column if it is not displayed by default:- Click any column header to add a column to the log:
![]()
- Click the spyglass icon to the left of any entry to display a detailed log that includes the application’s egress interface listed in the Destination section:
![]() Add a QoS policy rule.A QoS policy rule defines the traffic to receive QoS treatment. The firewall assigns a QoS class of service to the traffic matched to the policy rule.Because QoS is enforced on traffic as it egresses the firewall, your QoS policy rule is applied to traffic after the firewall has enforced all other security policy rules, including Network Address Translation (NAT) rules. If you want to apply QoS treatment to traffic based on source, you must specify the pre-NAT source address (such as pre-NAT source IP, pre-NAT source zone, pre-NAT destination IP, and post-NAT destination zone) in a QoS policy rule. Do not configure the QoS policy with the post-NAT source address if you want to apply QoS treatment for the source traffic.
Add a QoS policy rule.A QoS policy rule defines the traffic to receive QoS treatment. The firewall assigns a QoS class of service to the traffic matched to the policy rule.Because QoS is enforced on traffic as it egresses the firewall, your QoS policy rule is applied to traffic after the firewall has enforced all other security policy rules, including Network Address Translation (NAT) rules. If you want to apply QoS treatment to traffic based on source, you must specify the pre-NAT source address (such as pre-NAT source IP, pre-NAT source zone, pre-NAT destination IP, and post-NAT destination zone) in a QoS policy rule. Do not configure the QoS policy with the post-NAT source address if you want to apply QoS treatment for the source traffic.- Select and Add a new policy rule.On the General tab, give the QoS Policy Rule a descriptive Name.Specify traffic to receive QoS treatment based on Source, Destination, Application, Service/URL Category, and DSCP/ToS values (the DSCP/ToS settings allow you to Enforce QoS Based on DSCP Classification).For example, select the Application, click Add, and select web-browsing to apply QoS to web browsing traffic.(Optional) Continue to define additional parameters. For example, select Source and Add a Source User to provide QoS for a specific user’s web traffic.Select Other Settings and assign a QoS Class to traffic matching the policy rule. For example, assign Class 2 to the user1’s web traffic.Click OK.Add a QoS profile.A QoS profile allows you to define the eight classes of service that traffic can receive, including priority, and enables QoS Bandwidth Management.You can edit any existing QoS profile, including the default, by clicking the QoS profile name.
- Select and Add a new profile.Enter a descriptive Profile Name.Set the overall bandwidth limits for the QoS profile:
- Enter an Egress Max value to set the overall bandwidth allocation for the QoS profile.
- Enter an Egress Guaranteed value to set the guaranteed bandwidth for the QoS Profile.
Any traffic that exceeds the Egress Guaranteed value is best effort and not guaranteed. Bandwidth that is guaranteed but is unused continues to remain available for all traffic.You can configure the Egress Guaranteed and Egress Max values in Mbps or percentages. The following considerations should be taken into account when configuring these values in percentages:- The Egress Guaranteed (%) per class is calculated using the Egress Max value, not the Egress Guaranteed value.
- Profile Egress Guaranteed equals the sum of the Egress Guaranteed (%) per class multiplied by the Egress Max.
For example: The Egress Max is configured as 100Mbps. The guaranteed percentage configured for Class 1 is 30%, for Class 2 it is 20%, for Class 3 it is 5%, and for Class 4 it is 1%. This configuration results in a total percentage guaranteed as 56%. In this case, profile Egress Guaranteed is 56Mbps (56% x Egress Max). This also means that Class 1 Egress Guaranteed is 30Mbps, Class 2 Egress Guaranteed is 20Mbps, and so on.In the Classes section, specify how to treat up to eight individual QoS classes:- Add a class to the QoS Profile.
- Select the Priority for the class: real-time, high, medium, or low.
- Enter the Egress Max and Egress Guaranteed bandwidth for traffic assigned to each QoS class.
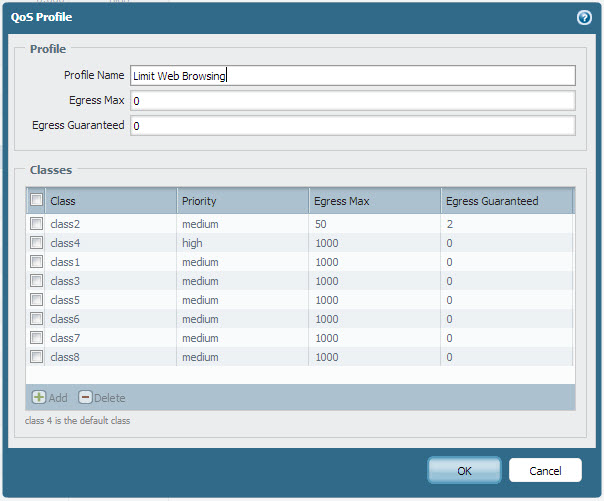
Click OK.In the following example, the QoS profile Limit Web Browsing limits Class 2 traffic to a maximum bandwidth of 50Mbps and a guaranteed bandwidth of 2Mbps.![]() Enable QoS on a physical interface.Part of this step includes the option to select clear text and tunneled traffic for unique QoS treatment.Check if the firewall model you’re using supports enabling QoS on a subinterface by reviewing a summary of the Product Specifications.
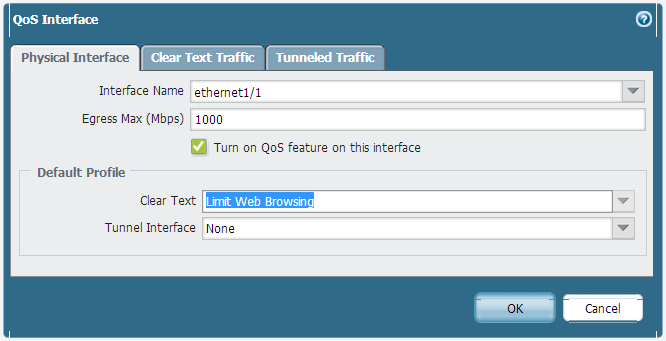
Enable QoS on a physical interface.Part of this step includes the option to select clear text and tunneled traffic for unique QoS treatment.Check if the firewall model you’re using supports enabling QoS on a subinterface by reviewing a summary of the Product Specifications.- Select and Add a QoS interface.Select Physical Interface and choose the Interface Name of the interface on which to enable QoS.In the example, Ethernet 1/1 is the egress interface for web-browsing traffic (see Step 2).Set the Egress Max bandwidth for all traffic exiting this interface.It is a best practice to always define the Egress Max value for a QoS interface. Ensure that the cumulative guaranteed bandwidth for the QoS profile attached to the interface does not exceed the total bandwidth allocated to the interface.Select Turn on QoS feature on this interface.In the Default Profile section, select a QoS profile to apply to all Clear Text traffic exiting the physical interface.(Optional) Select a default QoS profile to apply to all tunneled traffic exiting the interface.For example, enable QoS on ethernet 1/1 and apply the bandwidth and priority settings you defined for the QoS profile Limit Web Browsing (Step 4) to be used as the default settings for clear text egress traffic.
![]()
- (Optional) Continue to define more granular settings to provide QoS for Clear Text and Tunneled Traffic. Settings configured on the Clear Text Traffic tab and the Tunneled Traffic tab automatically override the default profile settings for clear text and tunneled traffic on the Physical Interface tab.
- Select Clear Text Traffic and:
- Set the Egress Guaranteed and Egress Max bandwidths for clear text traffic.
- Click Add and apply a QoS profile to enforce clear text traffic based on source interface and source subnet.(PA-3200 Series, PA-5200 Series, PA-7000 Series only) You must also select a destination interface when configuring a QoS policy rule if the rule is applied to a specific subinterface.
- Select Tunneled Traffic and:
- Set the Egress Guaranteed and Egress Max bandwidths for tunneled traffic.
- Click Add and attach a QoS profile to a single tunnel interface.
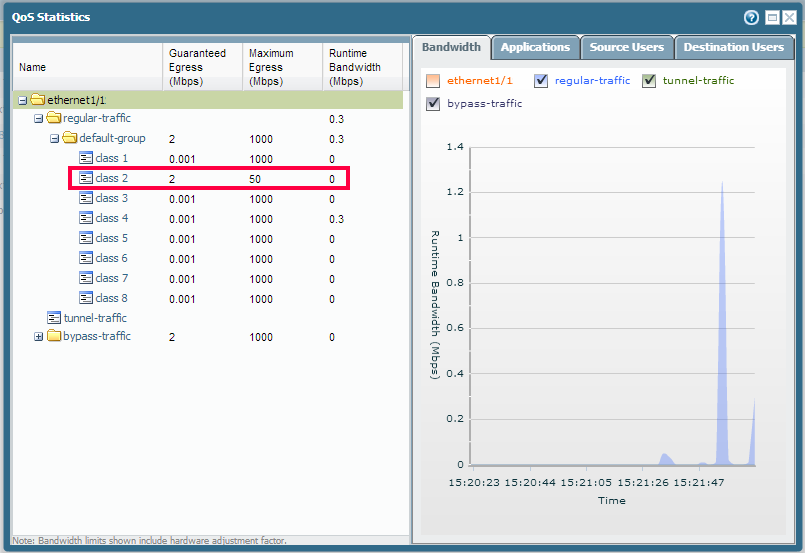
Click OK.Commit your changes.Click Commit.Verify a QoS configuration.Select and then Statistics to view QoS bandwidth, active sessions of a selected QoS class, and active applications for the selected QoS class.For example, see the statistics for ethernet 1/1 with QoS enabled:![]() Class 2 traffic limited to 2Mbps of guaranteed bandwidth and a maximum bandwidth of 50Mbps.Continue to click the tabs to display further information regarding applications, source users, destination users, security rules and QoS rules.Bandwidth limits shown on the QoS Statistics window include a hardware adjustment factor.
Class 2 traffic limited to 2Mbps of guaranteed bandwidth and a maximum bandwidth of 50Mbps.Continue to click the tabs to display further information regarding applications, source users, destination users, security rules and QoS rules.Bandwidth limits shown on the QoS Statistics window include a hardware adjustment factor.