Create a Dedicated Service Account for the User-ID Agent
Table of Contents
Create a Dedicated Service Account for the User-ID Agent
To use the Windows-based User-ID agent or
the PAN-OS integrated User-ID agent to map users as they log in
to your Exchange servers, domain controllers, eDirectory servers,
or Windows clients, create a dedicated service account for the User-ID
agent on a domain controller in each domain that the agent will
monitor.
The User-ID agent maps users based on logs for security
events. To ensure that the User-ID agent can successfully map users,
verify that the source for your mappings generates logs for Audit Logon, Audit Kerberos Authentication
Service, and Audit Kerberos Service Ticket
Operations events. At a minimum, the source must generate
logs for the following events:
- Logon Success (4624)
- Authentication Ticket Granted (4768)
- Service Ticket Granted (4769)
- Ticket Granted Renewed (4770)
The required permissions
for the service account depend on the user mapping methods and settings
you plan to use. For example, if you are using the PAN-OS integrated
User-ID agent, the service account requires Server Operator privileges
to monitor user sessions. If you are using the Windows-based User-ID
agent, the service account does not require Server Operator privileges
to monitor user sessions. To reduce the risk of compromising the
User-ID service account, always configure the account with the minimum
set of permissions necessary for the agent.
- If you are installing the Windows-based User-ID agent on a supported Windows server, Configure a Service Account for the Windows User-ID Agent.
- If you are using the PAN-OS integrated User-ID agent on the firewall, Configure a Service Account for the PAN-OS Integrated User-ID Agent.
User-ID provides many methods for safely collecting
user mapping information. Some legacy features designed for environments that
only required user mapping on Windows desktops attached to the local
network require privileged service accounts. If the privileged service account
is compromised, this would open your network to attack. As a best
practice, avoid using legacy features that require privileges that
would pose a threat if compromised, such as client probing, NTLM
authentication, and session monitoring.
Configure a Service Account for the Windows User-ID Agent
Create a dedicated Active Directory (AD) service
account for the Windows User-ID agent to access the services and
hosts it will monitor to collect user mappings. You must create
a service account in each domain the agent will monitor. After you
enable the required permissions for the service account, Configure
User Mapping Using the Windows User-ID Agent.
The
following workflow details all required privileges and provides
guidance for the User-ID features which require privileges that could
pose a threat so that you can decide how to best identify users
without compromising your overall security posture.
- Create an AD service account for the User-ID agent.You must create a service account in each domain the agent will monitor.
- Log in to the domain controller.Right-click the Windows icon (), Search for Active Directory Users and Computers, and launch the application.
![]() In the navigation pane, open the domain tree, right-click Managed Service Accounts and select .Enter the First Name, Last Name, and User logon name of the user and click Next.Enter the Password and Confirm Password, then click Next and Finish.Configure either local or group policy to allow the service account to log on as a service.The permission to log on as a service is only needed locally on the Windows server that is the agent host.
In the navigation pane, open the domain tree, right-click Managed Service Accounts and select .Enter the First Name, Last Name, and User logon name of the user and click Next.Enter the Password and Confirm Password, then click Next and Finish.Configure either local or group policy to allow the service account to log on as a service.The permission to log on as a service is only needed locally on the Windows server that is the agent host.- To assign permissions locally:
- select .
![]()
- Select .
![]()
- Add User or Group to add the service account.
![]()
- Enter the object names to select (the service account name) in domain\username format and click OK.
![]()
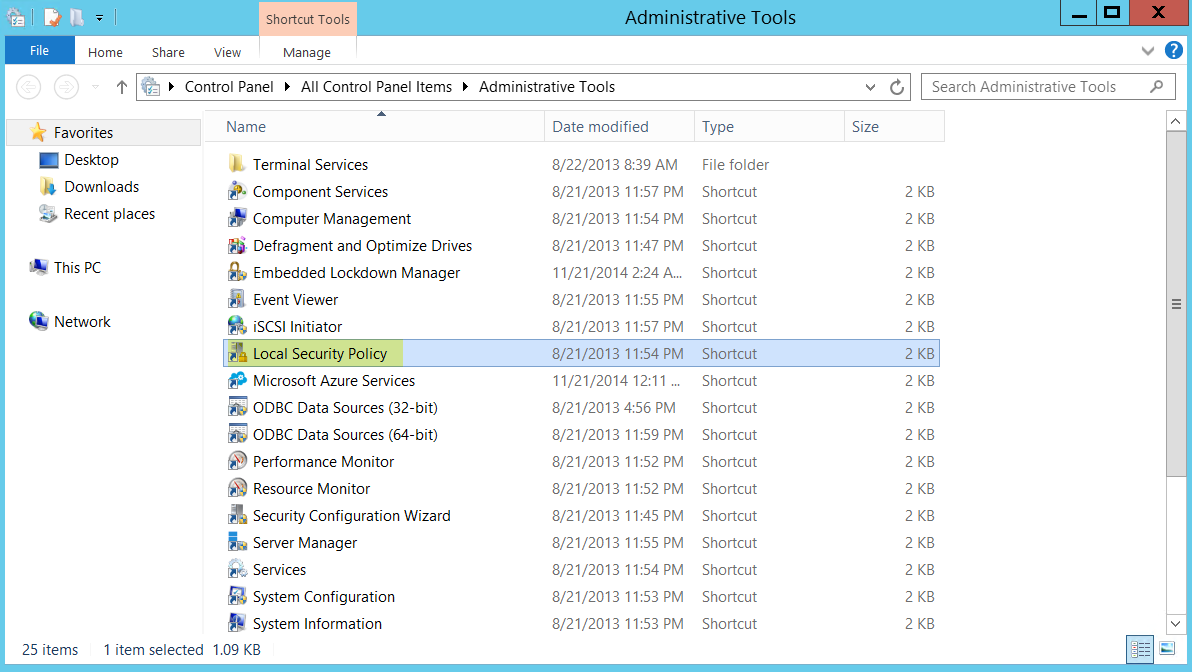
- To configure group policy if you are installing Windows User-ID agents on multiple servers, use the Group Policy Management Editor.
- Select for the Windows server
that is the agent host.
![]()
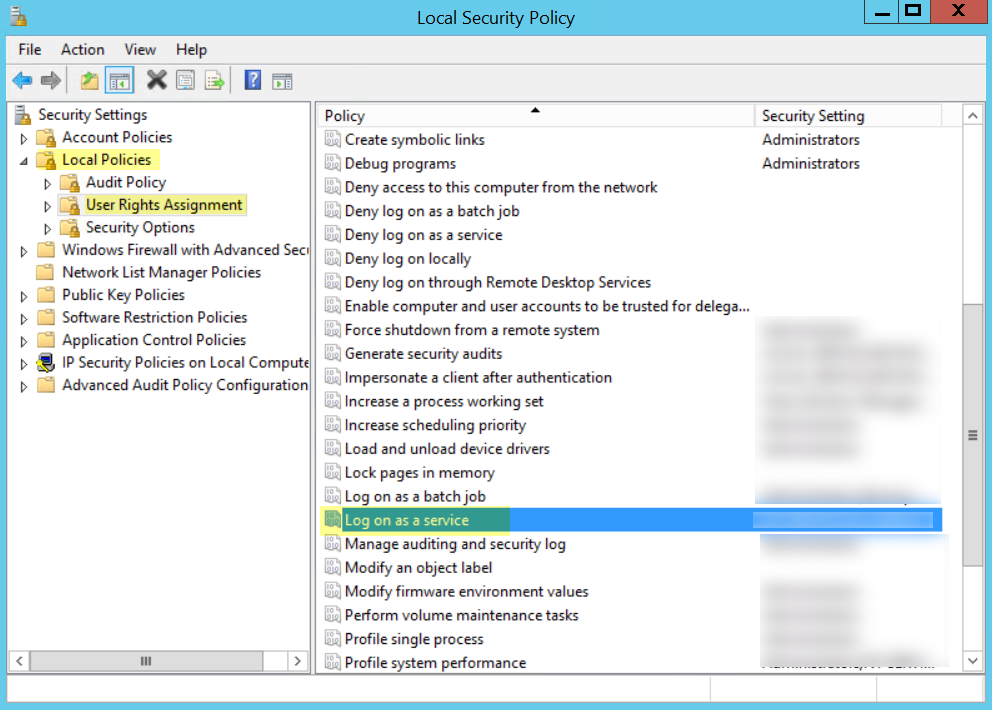
- Select .
![]()
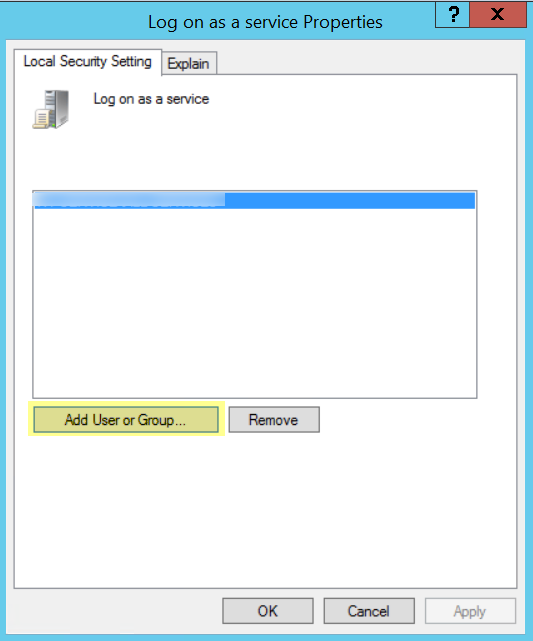
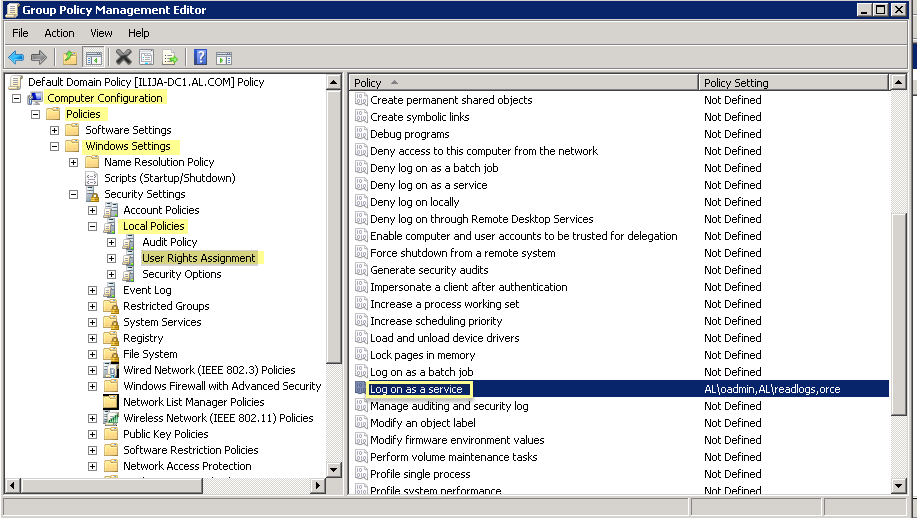
- Right-click Log on as a service, then select Properties.
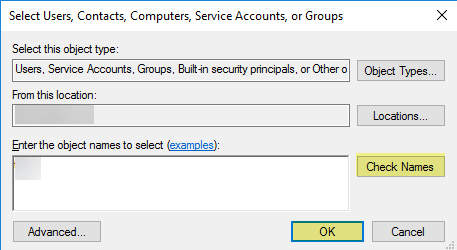
- Add User or Group to add the service
account username or builtin group, then click OK twice.Administrators have this privilege by default.
![]()
- Select for the Windows server
that is the agent host.
If you want to use WMI to collect user data, assign DCOM privileges to the service account so that it can use WMI queries on monitored servers.- Select .Right-click and enter the service account name.If you plan to use WMI probing, enable the account to read the CIMV2 namespace and assign the required permissions on the client systems to be probed.Do not enable client probing on high-security networks. Client probing can generate a large amount of network traffic and can pose a security threat when misconfigured. Instead collect user mapping information from more isolated and trusted sources, such as domain controllers and through integrations with Syslog or the XML API, which have the added benefit of allowing you to safely capture user mapping information from any device type or operating system, instead of just Windows clients.Perform this task on each client system that the User-ID agent will probe for user mapping information:
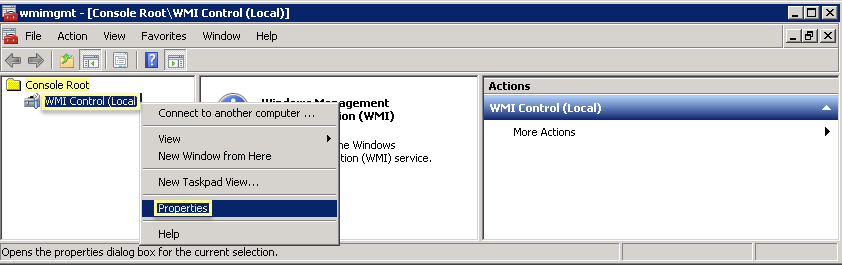
- Right-click the Windows icon (), Search for wmimgmt.msc, and launch the WMI Management Console.
![]() In the console tree, right-click WMI Control and select Properties.
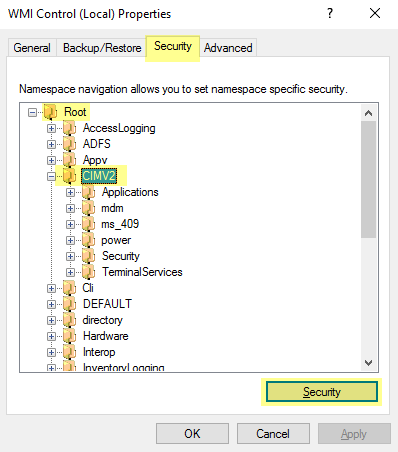
In the console tree, right-click WMI Control and select Properties.![]() Select the Security tab, then select , and click the Security button.
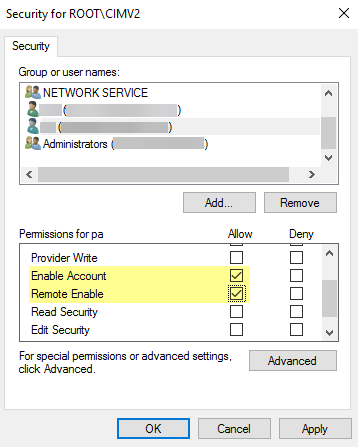
Select the Security tab, then select , and click the Security button.![]() Add the name of the service account you created, Check Names to verify your entry, and click OK.You might have to change the Locations or click Advanced to query for account names. See the dialog help for details.In the Permissions for <Username> section, Allow the Enable Account and Remote Enable permissions.
Add the name of the service account you created, Check Names to verify your entry, and click OK.You might have to change the Locations or click Advanced to query for account names. See the dialog help for details.In the Permissions for <Username> section, Allow the Enable Account and Remote Enable permissions.![]() Click OK twice.Use the Local Users and Groups MMC snap-in (lusrmgr.msc) to add the service account to the local Distributed Component Object Model (DCOM) Users and Remote Desktop Users groups on the system that will be probed.If you want to use Server Monitoring to identify users, add the service account to the Event Log Reader builtin group to allow the service account to read the security log events.
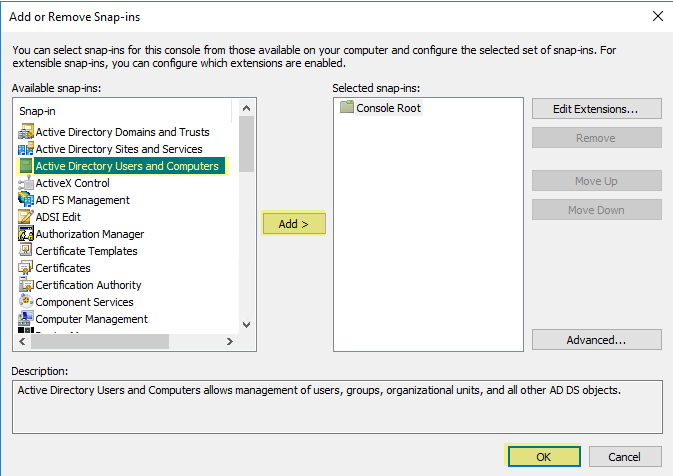
Click OK twice.Use the Local Users and Groups MMC snap-in (lusrmgr.msc) to add the service account to the local Distributed Component Object Model (DCOM) Users and Remote Desktop Users groups on the system that will be probed.If you want to use Server Monitoring to identify users, add the service account to the Event Log Reader builtin group to allow the service account to read the security log events.- On the domain controller or Exchange server that contains the logs you want the User-ID agent to read, or on the member server that receives events from Windows log forwarding, select , enter MMC.Select , then click OK to run the MMC and launch the Active Directory Users and Computers snap-in.
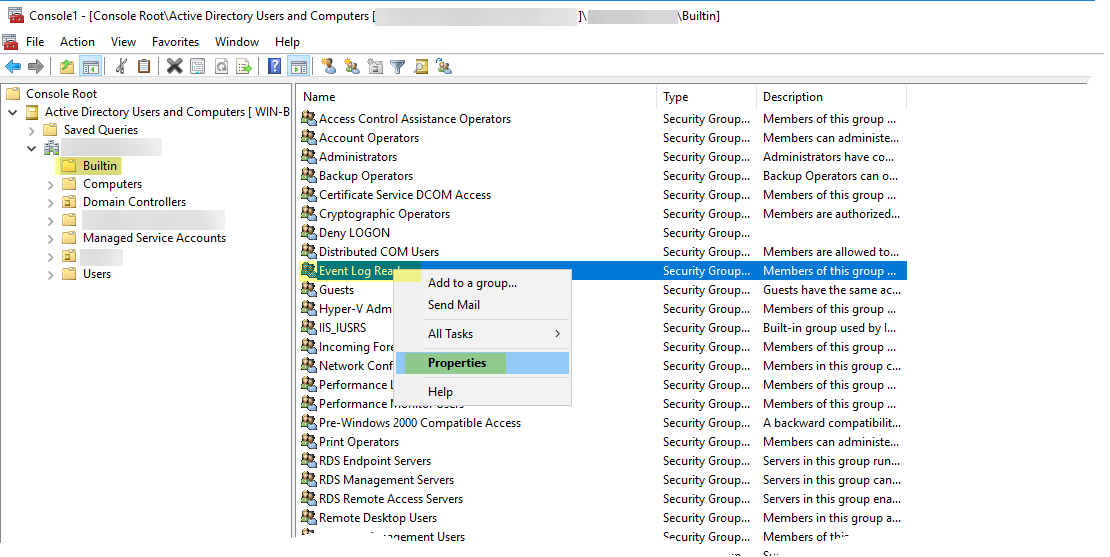
![]() Navigate to the Builtin folder for the domain, right-click the Event Log Readers group, and select .
Navigate to the Builtin folder for the domain, right-click the Event Log Readers group, and select .![]() Add the service account then click Check Names to validate that you have the proper object name.
Add the service account then click Check Names to validate that you have the proper object name.![]() Click OK twice to save the settings.Confirm that the builtin Event Log Reader group lists the service account as a member ().Assign account permissions to the installation folder to allow the service account to access the agent’s installation folder to read the configuration and write logs.You only need to perform this step if the service account you configured for the User-ID agent is not either a domain administrator or a local administrator on the User-ID agent server host.
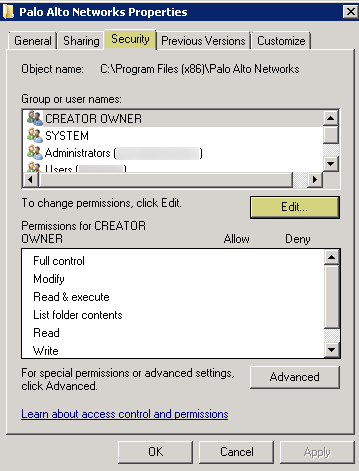
Click OK twice to save the settings.Confirm that the builtin Event Log Reader group lists the service account as a member ().Assign account permissions to the installation folder to allow the service account to access the agent’s installation folder to read the configuration and write logs.You only need to perform this step if the service account you configured for the User-ID agent is not either a domain administrator or a local administrator on the User-ID agent server host.- From the Windows Explorer, navigate to C:\Program Files(x86)\Palo Alto Networks, right-click the folder, and select Properties.On the Security tab, click Edit.
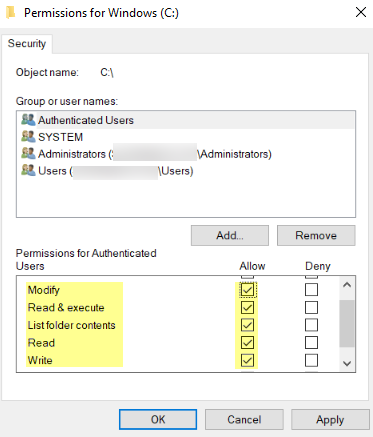
![]() Add the User-ID agent service account and Allow permissions to Modify, Read & execute, List folder contents, Read, and Write, and then click OK to save the account settings.
Add the User-ID agent service account and Allow permissions to Modify, Read & execute, List folder contents, Read, and Write, and then click OK to save the account settings.![]() If you do not want to configure individual permissions, you can Allow the Full Control permission instead.To allow the agent to make configuration changes (for example, if you select a different logging level), give the service account permissions to the User-ID agent registry sub-tree.
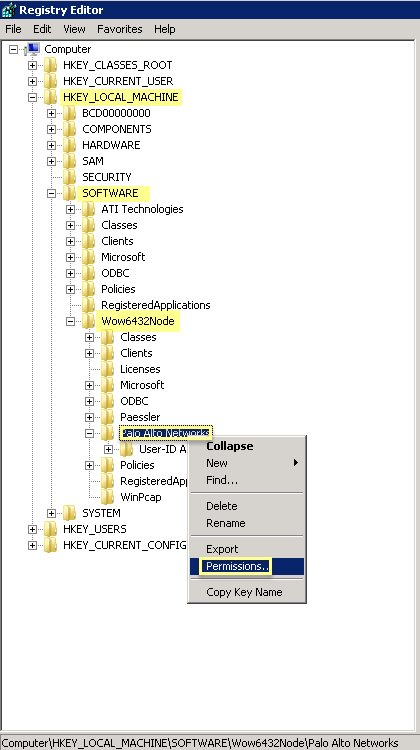
If you do not want to configure individual permissions, you can Allow the Full Control permission instead.To allow the agent to make configuration changes (for example, if you select a different logging level), give the service account permissions to the User-ID agent registry sub-tree.- Select and enter regedt32 and navigate to the Palo Alto Networks sub-tree in one of the following locations:
- 32-bit systems—HKEY_LOCAL_MACHINE\Software\Palo Alto Networks
- 64-bit systems—HKEY_LOCAL_MACHINE\Software\WOW6432Node\PaloAlto Networks
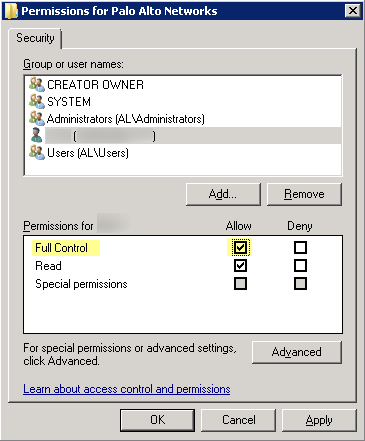
Right-click the Palo Alto Networks node and select Permissions.![]() Assign the User-ID service account Full Control and then click OK to save the setting.
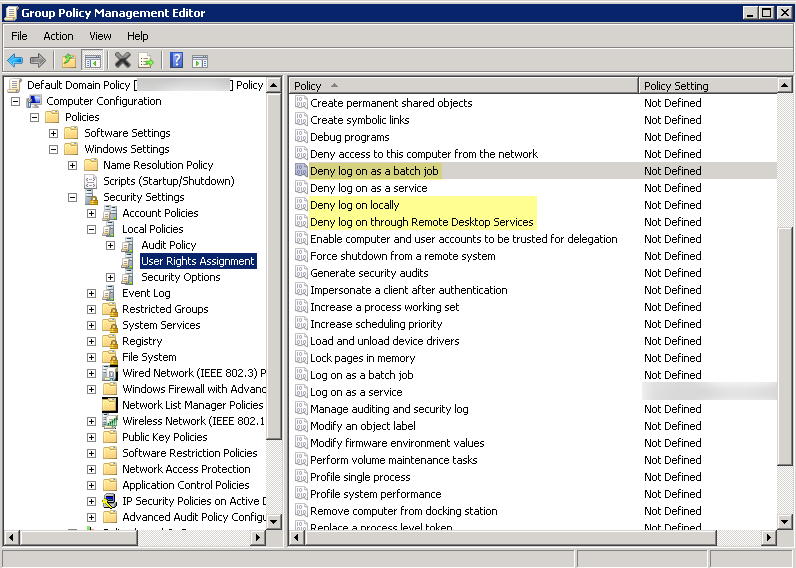
Assign the User-ID service account Full Control and then click OK to save the setting.![]() Disable service account privileges that are not required.By ensuring that the User-ID service account has the minimum set of account privileges, you can reduce the attack surface should the account be compromised.To ensure that the User-ID account has the minimum privileges necessary, deny the following privileges on the account.
Disable service account privileges that are not required.By ensuring that the User-ID service account has the minimum set of account privileges, you can reduce the attack surface should the account be compromised.To ensure that the User-ID account has the minimum privileges necessary, deny the following privileges on the account.- Deny interactive logon for the User-ID
service account—While the User-ID service account does need
permission to read and parse Active Directory security event logs,
it does not require the ability to logon to servers or domain systems
interactively. You can restrict this privilege using Group Policies
or by using a Managed Service account (refer to Microsoft TechNet for more information).
- Select .
- For Deny log on as a batch job, Deny log on locally, and Deny log on through Remote Desktop Services, right-click Properties.
- Select and add the service account name, then click OK.
![]()
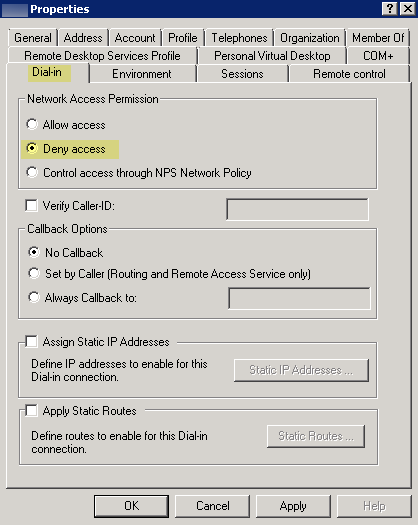
- Deny remote access for the User-ID service account—This
prevents an attacker from using the account to access your network from
the outside the network.
- Select , enter MMC, and select .
- Right-click the service account name, then select Properties.
- Select Dial-in, then Deny the Network Access Permission.
![]()
As a next step, Configure User Mapping Using the Windows User-ID Agent.Configure a Service Account for the PAN-OS Integrated User-ID Agent
Create a dedicated Active Directory (AD) service account for the PAN-OS Integrated User-ID agent to access the services and hosts it will monitor to collect user mappings.You must create a service account in each domain the agent will monitor. After you enable the required permissions for the service account, Configure User Mapping Using the PAN-OS Integrated User-ID Agent.The following workflow details all required privileges and provides guidance for the User-ID features which require privileges that could pose a threat so that you can decide how to best identify users without compromising your overall security posture.- Create an AD service account for the User-ID agent.You must create a service account in each domain the agent will monitor.
- Log in to the domain controller.Right-click the Windows icon (), Search for Active Directory Users and Computers, and launch the application.
![]() In the navigation pane, open the domain tree, right-click Managed Service Accounts and select .Enter the First Name, Last Name, and User logon name of the user and click Next.Enter the Password and Confirm Password, then click Next and Finish.If you want to use Server Monitoring to identify users, add the service account to the Event Log Reader builtin group to allow the service account to read the security log events.
In the navigation pane, open the domain tree, right-click Managed Service Accounts and select .Enter the First Name, Last Name, and User logon name of the user and click Next.Enter the Password and Confirm Password, then click Next and Finish.If you want to use Server Monitoring to identify users, add the service account to the Event Log Reader builtin group to allow the service account to read the security log events.- On the domain controller or Exchange server that contains the logs you want the User-ID agent to read, or on the member server that receives events from Windows log forwarding, select , enter MMC.Select , then click OK to run the MMC and launch the Active Directory Users and Computers snap-in.
![]() Navigate to the Builtin folder for the domain, right-click the Event Log Readers group, and select .
Navigate to the Builtin folder for the domain, right-click the Event Log Readers group, and select .![]() Add the service account then click Check Names to validate that you have the proper object name.
Add the service account then click Check Names to validate that you have the proper object name.![]() Click OK twice to save the settings.Confirm that the builtin Event Log Reader group lists the service account as a member ().If you want to use WMI to collect user data, assign DCOM privileges to the service account so that it can use WMI queries on monitored servers.
Click OK twice to save the settings.Confirm that the builtin Event Log Reader group lists the service account as a member ().If you want to use WMI to collect user data, assign DCOM privileges to the service account so that it can use WMI queries on monitored servers.- Select .Right-click and enter the service account name.Enable the service account to read the CIMV2 namespace on the domain controllers you want to monitor and assign the required permissions on the client systems to be probed.Do not enable client probing on high-security networks. Client probing can generate a large amount of network traffic and can pose a security threat when misconfigured. Instead collect user mapping information from more isolated and trusted sources, such as domain controllers and through integrations with Syslog or the XML API, which have the added benefit of allowing you to safely capture user mapping information from any device type or operating system, instead of just Windows clients.Perform this task on each client system that the User-ID agent will probe for user mapping information:
- Right-click the Windows icon (), Search for wmimgmt.msc, and launch the WMI Management Console.
![]() In the console tree, right-click WMI Control and select Properties.
In the console tree, right-click WMI Control and select Properties.![]() Select the Security tab, then select , and click the Security button.
Select the Security tab, then select , and click the Security button.![]() Add the name of the service account you created, Check Names to verify your entry, and click OK.You might have to change the Locations or click Advanced to query for account names. See the dialog help for details.In the Permissions for <Username> section, Allow the Enable Account and Remote Enable permissions.
Add the name of the service account you created, Check Names to verify your entry, and click OK.You might have to change the Locations or click Advanced to query for account names. See the dialog help for details.In the Permissions for <Username> section, Allow the Enable Account and Remote Enable permissions.![]() Click OK twice.Use the Local Users and Groups MMC snap-in (lusrmgr.msc) to add the service account to the local Distributed Component Object Model (DCOM) Users and Remote Desktop Users groups on the system that will be probed.(Not Recommended) To allow the agent to monitor user sessions to poll Windows servers for user mapping information, assign Server Operator privileges to the service account.Because this group also has privileges for shutting down and restarting servers, only assign the account to this group if monitoring user sessions is very important.
Click OK twice.Use the Local Users and Groups MMC snap-in (lusrmgr.msc) to add the service account to the local Distributed Component Object Model (DCOM) Users and Remote Desktop Users groups on the system that will be probed.(Not Recommended) To allow the agent to monitor user sessions to poll Windows servers for user mapping information, assign Server Operator privileges to the service account.Because this group also has privileges for shutting down and restarting servers, only assign the account to this group if monitoring user sessions is very important.- Select .Right-click and add the service account name.If you want to configure NTLM authentication for Captive Portal, configure the firewall to join the domain.If you plan to configure NTLM authentication for Captive Portal, the firewall where you’ve configured the agent will need to join the domain. To enable this, enter the name of a group that has administrative privileges to join the domain, write to the validated service principal name, and create a computer object within the computers organization unit (ou=computers).For a firewall with multiple virtual systems, only vsys1 can join the domain because of AD restrictions on virtual systems running on the same host.The PAN-OS integrated agent requires privileged operations to join the domain, which poses a security threat if the account is compromised. As a best practice, configure Kerberos single sign-on (SSO) or SAML SSO authentication for Captive Portal instead of NTLM. Kerberos and SAML are stronger, more secure authentication methods and do not require the firewall to join the domain.
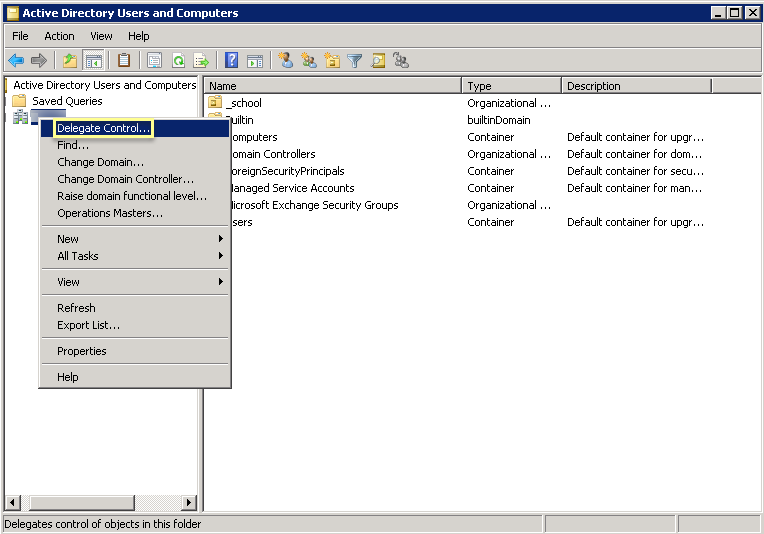
- Select , enter MMC, and select .Right-click the domain and select Delegate Control.
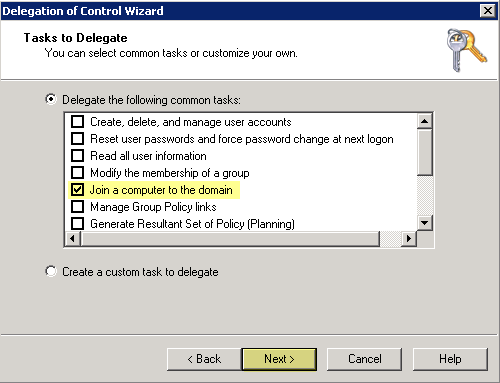
![]() Click Next, then Add the service account name and click OK.Click Next, then Join a computer to the domain.
Click Next, then Add the service account name and click OK.Click Next, then Join a computer to the domain.![]() Click Next, verify the service account information, then Finish.Disable service account privileges that are not required.By ensuring that the User-ID service account has the minimum set of account privileges, you can reduce the attack surface should the account be compromised.To ensure that the User-ID account has the minimum privileges necessary, deny the following privileges on the account:
Click Next, verify the service account information, then Finish.Disable service account privileges that are not required.By ensuring that the User-ID service account has the minimum set of account privileges, you can reduce the attack surface should the account be compromised.To ensure that the User-ID account has the minimum privileges necessary, deny the following privileges on the account:- Deny interactive logon for the User-ID
service account—While the User-ID service account does need
permission to read and parse Active Directory security event logs,
it does not require the ability to logon to servers or domain systems
interactively. You can restrict this privilege using Group Policies
or by using a Managed Service account (refer to Microsoft TechNet for more information).
- Select .
- For Deny log on as a batch job, Deny log on locally, and Deny log on through Remote Desktop Services, right-click Properties, then select and add the service account name, then click OK.
![]()
- Deny remote access for the User-ID service account—This
prevents an attacker from using the account to access your network from
the outside the network.
- , enter MMC, and select .
- Right-click the service account name, then select Properties.
- Select Dial-in, then Deny the Network Access Permission.
![]()
As a next step, Configure User Mapping Using the PAN-OS Integrated User-ID Agent.