Set Up Credential Phishing Prevention
Table of Contents
Expand All
|
Collapse All
Next-Generation Firewall Docs
-
PAN-OS 9.1 (EoL)
- PAN-OS 11.1 & Later
- PAN-OS 11.0 (EoL)
- PAN-OS 10.2
- PAN-OS 10.1
- PAN-OS 10.0 (EoL)
- PAN-OS 9.1 (EoL)
- Cloud Management of NGFWs
-
- Management Interfaces
-
- Launch the Web Interface
- Configure Banners, Message of the Day, and Logos
- Use the Administrator Login Activity Indicators to Detect Account Misuse
- Manage and Monitor Administrative Tasks
- Commit, Validate, and Preview Firewall Configuration Changes
- Export Configuration Table Data
- Use Global Find to Search the Firewall or Panorama Management Server
- Manage Locks for Restricting Configuration Changes
-
-
- Define Access to the Web Interface Tabs
- Provide Granular Access to the Monitor Tab
- Provide Granular Access to the Policy Tab
- Provide Granular Access to the Objects Tab
- Provide Granular Access to the Network Tab
- Provide Granular Access to the Device Tab
- Define User Privacy Settings in the Admin Role Profile
- Restrict Administrator Access to Commit and Validate Functions
- Provide Granular Access to Global Settings
- Provide Granular Access to the Panorama Tab
- Panorama Web Interface Access Privileges
-
- Reset the Firewall to Factory Default Settings
-
- Plan Your Authentication Deployment
- Configure SAML Authentication
- Configure Kerberos Single Sign-On
- Configure Kerberos Server Authentication
- Configure TACACS+ Authentication
- Configure RADIUS Authentication
- Configure LDAP Authentication
- Configure Local Database Authentication
- Configure an Authentication Profile and Sequence
- Test Authentication Server Connectivity
- Troubleshoot Authentication Issues
-
- Keys and Certificates
- Default Trusted Certificate Authorities (CAs)
- Certificate Deployment
- Configure the Master Key
- Export a Certificate and Private Key
- Configure a Certificate Profile
- Configure an SSL/TLS Service Profile
- Replace the Certificate for Inbound Management Traffic
- Configure the Key Size for SSL Forward Proxy Server Certificates
-
- HA Overview
-
- Prerequisites for Active/Active HA
- Configure Active/Active HA
-
- Use Case: Configure Active/Active HA with Route-Based Redundancy
- Use Case: Configure Active/Active HA with Floating IP Addresses
- Use Case: Configure Active/Active HA with ARP Load-Sharing
- Use Case: Configure Active/Active HA with Floating IP Address Bound to Active-Primary Firewall
- Use Case: Configure Active/Active HA with Source DIPP NAT Using Floating IP Addresses
- Use Case: Configure Separate Source NAT IP Address Pools for Active/Active HA Firewalls
- Use Case: Configure Active/Active HA for ARP Load-Sharing with Destination NAT
- Use Case: Configure Active/Active HA for ARP Load-Sharing with Destination NAT in Layer 3
- Refresh HA1 SSH Keys and Configure Key Options
- HA Firewall States
- Reference: HA Synchronization
-
- Use the Dashboard
- Monitor Applications and Threats
- Monitor Block List
-
- Report Types
- View Reports
- Configure the Expiration Period and Run Time for Reports
- Disable Predefined Reports
- Custom Reports
- Generate Custom Reports
- Generate the SaaS Application Usage Report
- Manage PDF Summary Reports
- Generate User/Group Activity Reports
- Manage Report Groups
- Schedule Reports for Email Delivery
- Manage Report Storage Capacity
- View Policy Rule Usage
- Use External Services for Monitoring
- Configure Log Forwarding
- Configure Email Alerts
-
- Configure Syslog Monitoring
-
- Traffic Log Fields
- Threat Log Fields
- URL Filtering Log Fields
- Data Filtering Log Fields
- HIP Match Log Fields
- IP-Tag Log Fields
- User-ID Log Fields
- Tunnel Inspection Log Fields
- SCTP Log Fields
- Authentication Log Fields
- Config Log Fields
- System Log Fields
- Correlated Events Log Fields
- GTP Log Fields
- Syslog Severity
- Custom Log/Event Format
- Escape Sequences
- Forward Logs to an HTTP/S Destination
- Firewall Interface Identifiers in SNMP Managers and NetFlow Collectors
-
- User-ID Overview
- Enable User-ID
- Map Users to Groups
- Enable User- and Group-Based Policy
- Enable Policy for Users with Multiple Accounts
- Verify the User-ID Configuration
-
- App-ID Overview
- App-ID and HTTP/2 Inspection
- Manage Custom or Unknown Applications
-
- Apply Tags to an Application Filter
- Create Custom Application Tags
- Workflow to Best Incorporate New and Modified App-IDs
- See the New and Modified App-IDs in a Content Release
- See How New and Modified App-IDs Impact Your Security Policy
- Ensure Critical New App-IDs are Allowed
- Monitor New App-IDs
- Disable and Enable App-IDs
- Safely Enable Applications on Default Ports
- Applications with Implicit Support
- Application Level Gateways
- Disable the SIP Application-level Gateway (ALG)
- Maintain Custom Timeouts for Data Center Applications
-
- Best Practices for Securing Your Network from Layer 4 and Layer 7 Evasions
- Set Up Antivirus, Anti-Spyware, and Vulnerability Protection
- Set Up File Blocking
- Prevent Brute Force Attacks
- Customize the Action and Trigger Conditions for a Brute Force Signature
- Enable Evasion Signatures
- Monitor Blocked IP Addresses
- Threat Signature Categories
- Create Threat Exceptions
- Custom Signatures
- Threat Prevention Resources
-
- Decryption Overview
-
- Keys and Certificates for Decryption Policies
- SSL Forward Proxy
- SSL Forward Proxy Decryption Profile
- SSL Inbound Inspection
- SSL Inbound Inspection Decryption Profile
- SSL Protocol Settings Decryption Profile
- SSH Proxy
- SSH Proxy Decryption Profile
- Decryption Profile for No Decryption
- SSL Decryption for Elliptical Curve Cryptography (ECC) Certificates
- Perfect Forward Secrecy (PFS) Support for SSL Decryption
- SSL Decryption and Subject Alternative Names (SANs)
- High Availability Support for Decrypted Sessions
- Decryption Mirroring
- Configure SSL Forward Proxy
- Configure SSL Inbound Inspection
- Configure SSH Proxy
- Configure Server Certificate Verification for Undecrypted Traffic
- Enable Users to Opt Out of SSL Decryption
- Temporarily Disable SSL Decryption
- Configure Decryption Port Mirroring
- Verify Decryption
-
- How Decryption Broker Works
- Layer 3 Security Chain Guidelines
- Configure Decryption Broker with One or More Layer 3 Security Chain
- Transparent Bridge Security Chain Guidelines
- Configure Decryption Broker with a Single Transparent Bridge Security Chain
- Configure Decryption Broker with Multiple Transparent Bridge Security Chains
- Activate Free Licenses for Decryption Features
-
- About Palo Alto Networks URL Filtering Solution
- How Advanced URL Filtering Works
- URL Filtering Use Cases
- Plan Your URL Filtering Deployment
- URL Filtering Best Practices
- Activate The Advanced URL Filtering Subscription
- Configure URL Filtering
- Test URL Filtering Configuration
- Log Only the Page a User Visits
- Create a Custom URL Category
- URL Category Exceptions
- Use an External Dynamic List in a URL Filtering Profile
- Allow Password Access to Certain Sites
- URL Filtering Response Pages
- Customize the URL Filtering Response Pages
- HTTP Header Logging
- Request to Change the Category for a URL
-
-
- Tap Interfaces
-
- Layer 2 and Layer 3 Packets over a Virtual Wire
- Port Speeds of Virtual Wire Interfaces
- LLDP over a Virtual Wire
- Aggregated Interfaces for a Virtual Wire
- Virtual Wire Support of High Availability
- Zone Protection for a Virtual Wire Interface
- VLAN-Tagged Traffic
- Virtual Wire Subinterfaces
- Configure Virtual Wires
- Configure an Aggregate Interface Group
- Use Interface Management Profiles to Restrict Access
- Virtual Routers
- Service Routes
- RIP
- Route Redistribution
-
- DNS Overview
- DNS Proxy Object
- DNS Server Profile
- Multi-Tenant DNS Deployments
- Configure a DNS Proxy Object
- Configure a DNS Server Profile
- Use Case 1: Firewall Requires DNS Resolution
- Use Case 2: ISP Tenant Uses DNS Proxy to Handle DNS Resolution for Security Policies, Reporting, and Services within its Virtual System
- Use Case 3: Firewall Acts as DNS Proxy Between Client and Server
- DNS Proxy Rule and FQDN Matching
- Dynamic DNS Overview
- Configure Dynamic DNS for Firewall Interfaces
-
- NAT Rule Capacities
- Dynamic IP and Port NAT Oversubscription
- Dataplane NAT Memory Statistics
-
- Translate Internal Client IP Addresses to Your Public IP Address (Source DIPP NAT)
- Enable Clients on the Internal Network to Access your Public Servers (Destination U-Turn NAT)
- Enable Bi-Directional Address Translation for Your Public-Facing Servers (Static Source NAT)
- Configure Destination NAT with DNS Rewrite
- Configure Destination NAT Using Dynamic IP Addresses
- Modify the Oversubscription Rate for DIPP NAT
- Reserve Dynamic IP NAT Addresses
- Disable NAT for a Specific Host or Interface
-
-
- Policy Types
- Policy Objects
- Track Rules Within a Rulebase
- Enforce Policy Rule Description, Tag, and Audit Comment
- Move or Clone a Policy Rule or Object to a Different Virtual System
-
- External Dynamic List
- Built-in External Dynamic Lists
- Configure the Firewall to Access an External Dynamic List
- Retrieve an External Dynamic List from the Web Server
- View External Dynamic List Entries
- Exclude Entries from an External Dynamic List
- Enforce Policy on an External Dynamic List
- Find External Dynamic Lists That Failed Authentication
- Disable Authentication for an External Dynamic List
- Register IP Addresses and Tags Dynamically
- Use Dynamic User Groups in Policy
- Use Auto-Tagging to Automate Security Actions
- CLI Commands for Dynamic IP Addresses and Tags
- Application Override Policy
- Test Policy Rules
-
PAN-OS 11.1 & Later
- PAN-OS 11.1 & Later
- PAN-OS 11.0 (EoL)
- PAN-OS 10.2
- PAN-OS 10.1
-
- Tap Interfaces
-
- Layer 2 and Layer 3 Packets over a Virtual Wire
- Port Speeds of Virtual Wire Interfaces
- LLDP over a Virtual Wire
- Aggregated Interfaces for a Virtual Wire
- Virtual Wire Support of High Availability
- Zone Protection for a Virtual Wire Interface
- VLAN-Tagged Traffic
- Virtual Wire Subinterfaces
- Configure Virtual Wires
- Configure a PPPoE Client on a Subinterface
- Configure an IPv6 PPPoE Client
- Configure an Aggregate Interface Group
- Configure Bonjour Reflector for Network Segmentation
- Use Interface Management Profiles to Restrict Access
-
- DHCP Overview
- Firewall as a DHCP Server and Client
- Firewall as a DHCPv6 Client
- DHCP Messages
- Dynamic IPv6 Addressing on the Management Interface
- Configure an Interface as a DHCP Server
- Configure an Interface as a DHCPv4 Client
- Configure an Interface as a DHCPv6 Client with Prefix Delegation
- Configure the Management Interface as a DHCP Client
- Configure the Management Interface for Dynamic IPv6 Address Assignment
- Configure an Interface as a DHCP Relay Agent
-
- DNS Overview
- DNS Proxy Object
- DNS Server Profile
- Multi-Tenant DNS Deployments
- Configure a DNS Proxy Object
- Configure a DNS Server Profile
- Use Case 1: Firewall Requires DNS Resolution
- Use Case 2: ISP Tenant Uses DNS Proxy to Handle DNS Resolution for Security Policies, Reporting, and Services within its Virtual System
- Use Case 3: Firewall Acts as DNS Proxy Between Client and Server
- DNS Proxy Rule and FQDN Matching
-
- NAT Rule Capacities
- Dynamic IP and Port NAT Oversubscription
- Dataplane NAT Memory Statistics
-
- Translate Internal Client IP Addresses to Your Public IP Address (Source DIPP NAT)
- Create a Source NAT Rule with Persistent DIPP
- PAN-OS
- Strata Cloud Manager
- Enable Clients on the Internal Network to Access your Public Servers (Destination U-Turn NAT)
- Enable Bi-Directional Address Translation for Your Public-Facing Servers (Static Source NAT)
- Configure Destination NAT with DNS Rewrite
- Configure Destination NAT Using Dynamic IP Addresses
- Modify the Oversubscription Rate for DIPP NAT
- Reserve Dynamic IP NAT Addresses
- Disable NAT for a Specific Host or Interface
-
- Network Packet Broker Overview
- How Network Packet Broker Works
- Prepare to Deploy Network Packet Broker
- Configure Transparent Bridge Security Chains
- Configure Routed Layer 3 Security Chains
- Network Packet Broker HA Support
- User Interface Changes for Network Packet Broker
- Limitations of Network Packet Broker
- Troubleshoot Network Packet Broker
-
- Enable Advanced Routing
- Logical Router Overview
- Configure a Logical Router
- Create a Static Route
- Configure BGP on an Advanced Routing Engine
- Create BGP Routing Profiles
- Create Filters for the Advanced Routing Engine
- Configure OSPFv2 on an Advanced Routing Engine
- Create OSPF Routing Profiles
- Configure OSPFv3 on an Advanced Routing Engine
- Create OSPFv3 Routing Profiles
- Configure RIPv2 on an Advanced Routing Engine
- Create RIPv2 Routing Profiles
- Create BFD Profiles
- Configure IPv4 Multicast
- Configure MSDP
- Create Multicast Routing Profiles
- Create an IPv4 MRoute
-
-
PAN-OS 11.2
- PAN-OS 11.2
- PAN-OS 11.1
- PAN-OS 11.0 (EoL)
- PAN-OS 10.2
- PAN-OS 10.1
- PAN-OS 10.0 (EoL)
- PAN-OS 9.1 (EoL)
- PAN-OS 9.0 (EoL)
- PAN-OS 8.1 (EoL)
- Cloud Management and AIOps for NGFW
End-of-Life (EoL)
Set Up Credential Phishing Prevention
After you have decided which of the Methods
to Check for Corporate Credential Submissions you want to
use, take the following steps to enable the firewall to detect when
users submit corporate credentials to web pages and either alert
on this action, block the credential submission, or require users
to acknowledge the dangers of phishing before continuing with credential
submission.
- If you have not done so already, Enable
User-ID.Each of the Methods to Check for Corporate Credential Submissions requires a different User-ID configuration to check for corporate credential submissions:
- If you plan to use the group mapping method, which detects whether a user is submitting a valid corporate username, Map Users to Groups.
- If you plan to use the IP user mapping method, which detects whether a user is submitting a valid corporate username and that username is the same as the login username, Map IP Addresses to Users.
- If you plan to use the domain credential filter method, which detects whether a user is submitting a valid username and password and that those credentials belong to the logged-in user, Configure Credential Detection with the Windows-based User-ID Agent and Map IP Addresses to Users.
- If you have not done so already, configure a best practice URL Filtering profile to
ensure protection against URLs that have been observed hosting malware
or exploitive content.
- Select ObjectsSecurity ProfilesURL Filtering and Add or modify a URL Filtering profile.
- Block access to all known dangerous URL categories: malware, phishing, dynamic-dns, unknown, command-and-control, extremism, copyright-infringement, proxy-avoidance-and-anonymizers, newly-registered-domain, grayware, and parked.
- Add a decryption policy rule to decrypt the traffic you want to monitor for user credential submissions.
- Configure
the URL Filtering profile to detect corporate credential submissions
to websites that are in allowed URL categories.The firewall does not check credential submissions for trusted sites, even if you enable the checks for the URL categories for these sites, to provide best performance. The trusted sites represent sites where Palo Alto Networks has not observed any malicious or phishing attacks. Updates for this trusted site list are delivered through Application and Threat content updates. For a list of App-IDs that are exempt from credential detection, see Trusted App-IDs That Skip Credential Submission Detection on live.paloaltonetworks.com.
- Select User Credential Detection.
- Select one of the Methods
to Check for Corporate Credential Submissions to web pages
from the User Credential Detection drop-down:Confirm that the format for the primary username is the same as the username format that the User-ID source provides.
- Use IP User Mapping—Checks for valid corporate username submissions and verifies that the login username maps to the source IP address of the session. To do this, the firewall matches the submitted username and source IP address of the session against its IP-address-to-username mapping table. To use this method you can use any of the user mapping methods described in Map IP Addresses to Users.
- Use Domain Credential Filter—Checks for valid corporate usernames and password submissions and verifies that the username maps to the IP address of the logged in user. See Configure Credential Detection with the Windows-based User-ID Agent for instructions on how to set up User-ID to enable this method.
- Use Group Mapping—Checks for valid username submissions based on the user-to-group mapping table populated when you configure the firewall to Map Users to Groups.With group mapping, you can apply credential detection to any part of the directory, or for specific groups that have access to your most sensitive applications, such as IT.
This method is prone to false positives in environments that do not have uniquely structured usernames. Because of this, you should only use this method to protect your high-value user accounts. - Set the Valid Username Detected Log Severity the firewall uses to log detection of corporate credential submissions. By default, the firewall logs these events as medium severity.
- Block (or alert) on credential submissions to allowed
sites.
- Select Categories.
- For each Category to which Site Access is
allowed, select how you want to treat User Credential
Submissions:
- alert—Allow users to submit credentials to the website, but generate a URL Filtering log each time a user submits credentials to sites in this URL category.
- allow—(default) Allow users to submit credentials to the website.
- block—Block users from submitting credentials to the website. When a user tries to submit credentials, the firewall displays the Anti-Phishing Block Page, preventing the credential submission.
- continue—Present the Anti-Phishing Continue Page response page to users when they attempt to submit credentials. Users must select Continue on the response page to continue with the submission.
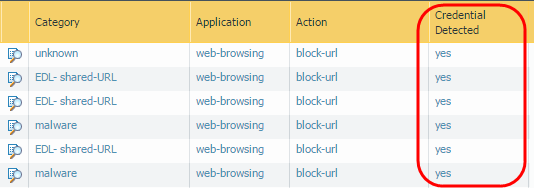
- Select OK to save the URL Filtering profile.
- Apply the URL Filtering profile with the credential detection settings
to your Security policy rules.
- Select PoliciesSecurity and Add or modify a Security policy rule.
- On the Actions tab, set the Profile Type to Profiles.
- Select the new or updated URL Filtering profile to attach it to the Security policy rule.
- Select OK to save the Security policy rule.
- Commit the configuration.
- Monitor credential submissions the firewall detects.Select ACCHosts Visiting Malicious URLs to see the number of users who have visited malware and phishing sites.Select MonitorLogsURL Filtering.The new Credential Detected column indicates events where the firewall detected a HTTP post request that included a valid credential:
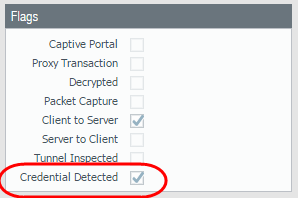
To display this column, hover over any column header and click the arrow to select the columns you’d like to display.Log entry details also indicate credential submissions:
- Validate and troubleshoot credential submission detection.
- Use the following CLI command to view credential detection statistics:
> show user credential-filter statistics
The output for this command varies depending on the method configured for the firewall to detect credential submissions. For example, if the Domain Credential Filter method is configured in any URL Filtering profile, a list of User-ID agents that have forwarded a bloom filter to the firewall is displayed, along with the number of credentials contained in the bloom filter.- (Group
Mapping method only) Use the following CLI command
to view group mapping information, including the number of URL Filtering
profiles with Group Mapping credential detection enabled and the usernames
of group members that have attempted to submit credentials to a restricted
site.
> show user group-mapping statistics
- (Domain
Credential Filter method only) Use the following
CLI command to see all Windows-based User-ID agents that are sending mappings
to the firewall:
> show user user-id-agent state all
The command output now displays bloom filter counts that include the number of bloom filter updates the firewall has received from each agent, if any bloom filter updates failed to process, and how many seconds have passed since the last bloom filter update. - (Domain Credential Filter method only) The Windows-based User-ID agent displays log messages that reference BF (bloom filter) pushes to the firewall. In the User-ID agent interface, select MonitoringLogs.