GlobalProtect
Use the Default System Browser for SAML Authentication
Table of Contents
Use the Default System Browser for SAML Authentication
Use the default system browser for SAML authentication to enable seamless single
sign-on (SSO) for GlobalProtect. This feature is supported on Windows, macOS, Linux,
Android, and iOS devices starting with GlobalProtect app 5.2. You must pre-deploy the
settings on client endpoints to use the default system browser for SAML
authentication.
If you have configured the GlobalProtect portal
to authenticate users through SAML authentication, end users can
connect to the app or other SAML-enabled applications without having
to re-enter their credentials, for a seamless single sign-on (SSO)
experience. End users can benefit from using the default system
browser for SAML authentication because they can leverage the same
login for GlobalProtect with their saved user credentials on the
default system browser such as Chrome, Firefox, or Safari.
In
addition, on any browser that supports the Web Authentication (WebAuthn) API,
you can use the Univeral 2nd Factor (U2F) security tokens such as
YubiKeys for multi-factor authentication (MFA) to identify providers
(ldPs) such as Onelogin or Okta.
This feature is supported
for Windows, macOS, Linux, and Android, and iOS devices starting
with GlobalProtect™ app 5.2.
- Change the pre-deployed settings on Windows, macOS, Linux, and Android, and iOS endpoints to use the default system browser for SAML authentication.You must set the pre-deployed settings on the client endpoints before you can enable the default system browser for SAML authentication. GlobalProtect retrieves these entries only once, when the GlobalProtect app initializes.If there is no pre-deployed value specified on the end users’ Windows or macOS endpoints when using the default system browser for SAML authentication, the Use Default Browser for SAML Authentication option is set to Yes in the portal configuration, and users upgrade the app from release 5.0.x or release 5.1.x to release 5.2.0 for the first time, the app will open an embedded browser instead of the default system browser. After users connect to the GlobalProtect app and the Use Default Browser for SAML Authentication option is set to Yes in the portal configuration, the app will open the default system browser on Windows and macOS endpoints at the next login.If the default browser value is set to Yes in the pre-deployed setting of the client machine and the Use Default Browser for SAML Authentication option is set to No in the portal configuration, end users will not have the best user experience. The app will open the default system browser for SAML authentication for the first time. Because the default browser values differ between the client machine and the portal, the app detects a mismatch and opens an embedded browser at the next login.The Use Default Browser for SAML Authentication option of the Globalprotect portal and the pre-deployed settings in the client machine must have the same value to provide the best user experience.
- On Windows endpoints, you can use the System Center Configuration Manager (SCCM) to pre-deploy the GlobalProtect app 5.2 and set the DEFAULTBROWSER value to yes from the Windows Installer (Msiexec) using the following syntax:msiexec.exe /i GlobalProtect.msi DEFAULTBROWSER=YESOn macOS endpoints, set the default-browser value to yes in the macOS plist (/Library/Preferences/com.paloaltonetworks.GlobalProtect.settings.plist) for the GlobalProtect app using the following syntax:sudo defaults write /Library/Preferences/com.paloaltonetworks.GlobalProtect.settings.plist '{"Palo Alto Networks" ={GlobalProtect={Settings={default-browser=yes;};};};}'You must specify the plist key to launch the default system browser for SAML authentication after GlobalProtect app 5.2 is installed.After you add the plist key, you must restart the GlobalProtect app in order for the plist key to take effect. After you restart the GlobalProtect app, the default system browser for SAML authentication launches. To restart the GlobalProtect app:
- Launch the Finder.
- Open the Applications folder:
- From the Finder sidebar, select Applications. If you do not see Applications in the Finder sidebar, select from the Finder menu bar.
- Open the Utilities folder.
- Launch Terminal.
- Execute the following commands:
username>$ launchctl unload -S Aqua /Library/LaunchAgents/com.paloaltonetworks.gp.pangpa.plist
username>$ launchctl unload -S Aqua /Library/LaunchAgents/com.paloaltonetworks.gp.pangps.plist
username>$ launchctl load -S Aqua /Library/LaunchAgents/com.paloaltonetworks.gp.pangpa.plist
username>$ launchctl load -S Aqua /Library/LaunchAgents/com.paloaltonetworks.gp.pangps.plist
On Linux endpoints, set the default-browser value to yes in the /opt/paloaltonetworks/globalprotect/pangps.xml pre-deployment configuration file under <Settings>. After you add the default-browser value, follow the pre-deployment instructions before you reboot the Linux endpoint in order for the change to take effect.Starting from GlobalProtect Linux version 6.2.1, end users have the option to use the command-line interface (CLI) to connect to the GlobalProtect app when it is configured with SAML authentication and the default browser. Previously, the only way to connect to the GlobalProtect app configured with SAML authentication and the default browser was through the GUI version. To connect to the GlobalProtect app configured with SAML authentication using either the CLI or GUI version, it is mandatory to have the Firefox browser installed on the Linux endpoint. Use the latest Firefox ESR release version to ensure a seamless connection with SAML authentication on the default browser using either the CLI or GUI versionOn Android and iOS endpoints, create a VPN profile by using the supported mobile device management system (MDM) such as Workspace ONE.- Log in to Workspace ONE UEM as an administrator.
- Select an existing VPN profile () in the list.
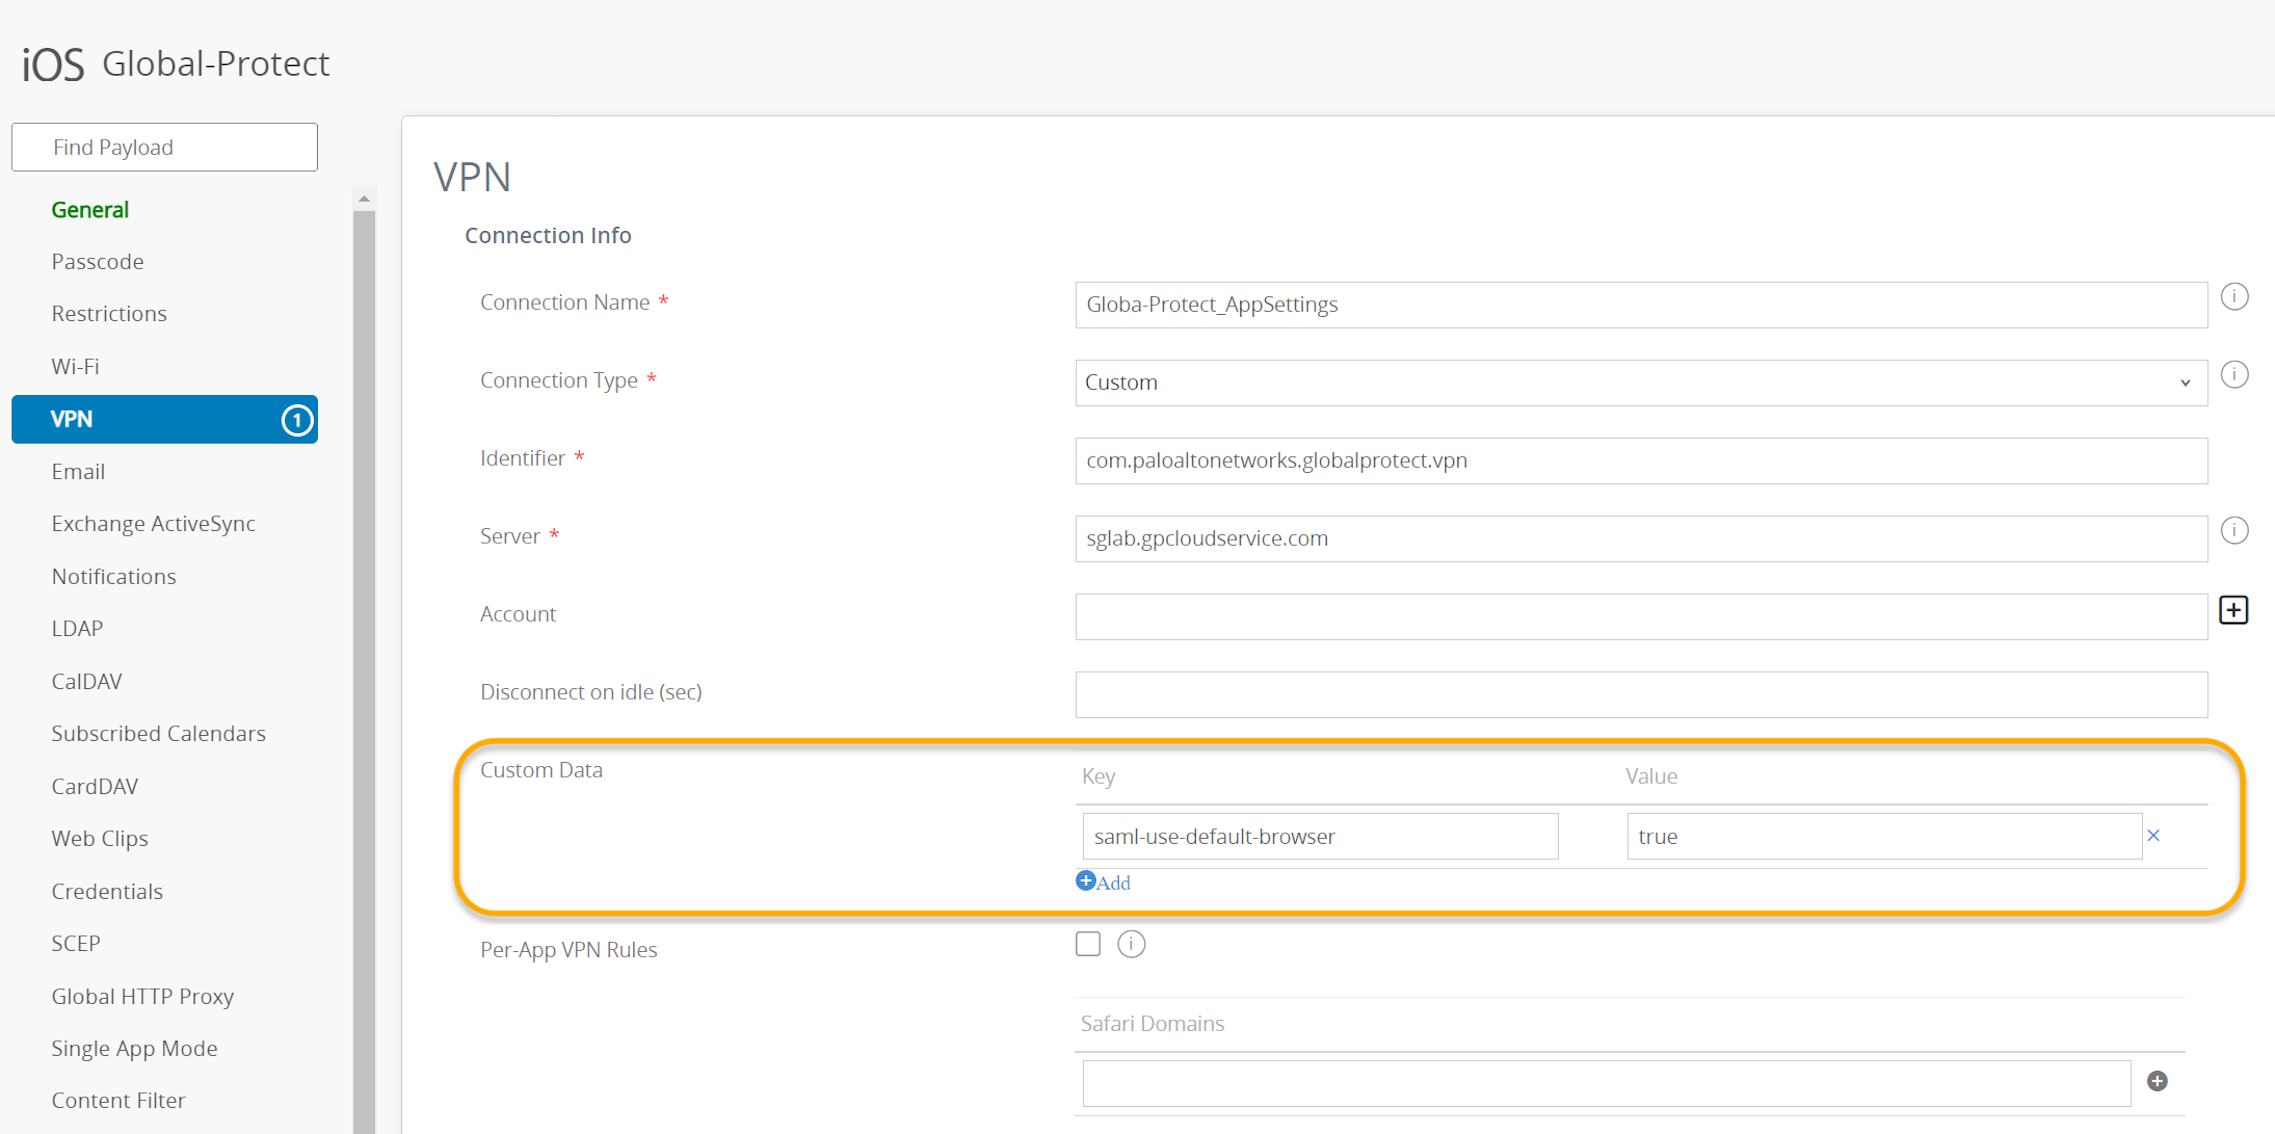
- Select VPN to add a VPN profile.On Android endpoints, enter the Custom Data Key (use_default_browser_for_saml). Enter the Custom Data Value (true).On iOS endpoints, enter the Custom Data Key (saml-use-default-browser). Enter the Custom Data Value (true).
![]()
- Click Save and Publish to save your changes.
Set up SAML authentication to authenticate users.In order for the default system browser for SAML authentication to not open multiple tabs for each connection, we recommend that you configure an authentication override. For more information, see Cookie Authentication on the Portal or Gateway.Enable the GlobalProtect app so that end users can leverage the same login for GlobalProtect and their default system browser for SAML authentication.- Select .Select Yes to enable the GlobalProtect app to open the default system browser for SAML authentication.If single-sign-on (SSO) is enabled, we recommend that you disable it. Set Use Single Sign-On (Windows) or Use Single Sign-On (macOS) to No to disable single sign-on when using the default system browser for SAML authentication.Click OK twice.Commit the configuration.Verify that end users can successfully authenticate to the ldP using their saved credentials.
- Select Refresh Connection, Connect, or Enable on the GlobalProtect app to initiate the connection.A new tab on the default browser of the system will open for SAML authentication.Login using the username and password to authenticate on the ldP.After end users can successfully authenticate on the ldP, click Open GlobalProtect.Connect to the GlobalProtect app or other SAML-enabled applications without re-entering the user credentials.