Device Security
Learn Device Attributes by Polling
Table of Contents
Learn Device Attributes by Polling
Poll devices on the network to learn their attributes.
| Where Can I Use This? | What Do I Need? |
|---|---|
|
One of the following subscriptions:
One of the following Cortex XSOAR setups:
|
To identify devices and detect vulnerabilities, Device Security must
first learn device attributes, such as the vendor, model, firmware, OS, and others.
It does this primarily by analyzing network traffic metadata in the logs it receives
from next-generation firewalls or from Prisma® Access and SD-WAN devices.
Device Security can optionally supplement this data with
more learned from third-party integrations.
However, Device Security can’t learn about all assets through firewall
traffic alone. Devices might generate traffic that does not reach a firewall
or Prisma device and there are no third-party systems with which to integrate and
import information. Some devices might generate so little traffic that
there simply isn’t enough for a thorough analysis. In particular, operational
technology (OT) devices are not always discoverable, especially when firewalls are
deployed on the network edge. For example, control devices and sensors communicate
predominantly with the devices they manage or monitor. To provide Device Security
with the data it needs to identify OT devices and assess their risk level, integrate
Device Security with Cortex XSOAR to poll devices to learn their
attributes. Device Security displays the attributes it learns through
polling on the following pages:
- Assets Inventory
- Device Details
- IP Endpoints
When XSOAR learns attributes for assets that are already in the Device Security database, Device Security adds
whatever attributes it did not yet have for them. When it learns attributes for
assets that are not yet in its database, it creates new entries for them. If
Device Security learns the IP address and MAC address
of a new device, which it can learn when using SNMP to poll, it adds a new entry to
the Devices page. If it learns only an IP address, it adds a new entry to the IP
Endpoints page.
When polling DHCP clients, ensure that Device Security is getting
metadata from DHCP Traffic logs so that it can update the devices in its inventory
with changing DHCP-assigned IP addresses. This way, the IP address-to-device mapping
will be up to date and in sync with the attributes learned per IP address through
asset attribute polling.
For most device attributes, Device Security uses the latest value it
learns regardless of whether it’s discovered through network traffic or through an
integration. However, there are 10 attributes for which a value learned through
network traffic has priority even if Device Security later learns
of a different value through integration:
- Model
- Vendor
- OS group
- OS version
- Firmware
- Serial number
- Wired or wireless
- VLAN
- Hostname
- Active Directory domain
If Device Security learns a conflicting value for one of
these attributes, it prioritizes the value learned through network traffic first and
then through an integration (including asset attribute polling) second. The basic
logic is as follows:
- Whatever new value is learned through network traffic replaces a value learned previously by any means.
- A new value learned through integration will replace a previously learned value learned through the same type of integration. It won’t replace a value learned through network traffic or through another type of integration.
When using a cohosted, limited-featured Cortex XSOAR
instance, this integration requires an on-premises XSOAR engine. When using a
full-featured Cortex XSOAR server on premises,
an XSOAR engine is needed only if the network topology
requires an engine to reach a part of the network that the XSOAR server can’t. When
using a full-featured Cortex XSOAR server in the cloud, you
must configure an on-premises XSOAR engine.
Alternatively, you can use the free Network Discovery plugin to do
protocol polling. You can download the plugin onto a supported firewall and
configure a polling job without needing to integrate with Cortex XSOAR.
Cortex XSOAR Engine Installation
When using a cohosted XSOAR instance, a cloud-hosted XSOAR server, or an
on-premises XSOAR server that can’t reach part of the network, XSOAR performs
device polling through an on-premises XSOAR engine. Although it's possible to
install an XSOAR engine on machines running Windows, macOS, and Linux operating
systems, only an engine on a Linux machine supports Device Security integrations. For more information about operating system and
hardware requirements, see the Cortex XSOAR Administrator's
Guide.
We recommend downloading the Cortex XSOAR engine using the shell
installer script and installing it on a Linux machine. This simplifies the
deployment by automatically installing all required dependencies and also
enables remote engine upgrades.
When placing the XSOAR engine on your network, make sure it can reach
the devices you want to poll using the relevant network services:
- Axis Communications: TCP ports 80 and 443
- BACnet: UDP port 47808
- Beckhoff: TCP port 10000, UDP port 48898
- CIP Ethernet/IP: TCP port 44818, UDP port 44818
- CodeSysV3: TCP port 11740, UDP port 1740
- Cognex Discovery: UDP port 1069
- EPM: UDP port 34964
- FANUC Focas: TCP port 8193
- FTP Banner: TCP port 21
- GE-SRTP: TCP port 18245
- HTTP Banner: TCP port 80
- IEC 61850 MMS: TCP port 102
- Mitsubishi MELSOFT TCP: TCP port 5562
- Modbus: TCP port 502
- Moxa: UDP port 4800
- Niagara Fox: TCP port 1911
- Omron FINS: UDP port 9600
- Profinet I/O CM: UDP port 49154
- Reverse DNS: UDP port 53
- Siemens-S7: TCP port 102
- Siemens-S7-Comm-Plus: TCP port 102
- Siemens Web Server: HTTP port 80
- SNMPv1, SNMPv2, SNMPv3: UDP port 161
- UMAS Modbus: TCP port 502
- UPnP: UDP port 1900
- WinRM: TCP port 5985
The on-premises firewall must allow the Cortex XSOAR engine to form
HTTPS connections on TCP port 443 to the Cortex cloud at
https://<your-domain>.iot.demisto.live/. You can see the URL of your
Cortex XSOAR instance when you log in to Device Security
and click Integrations and then click Launch
Cortex XSOAR. It’s visible in the address bar
of the web page displaying the Cortex XSOAR interface.
To create an Cortex XSOAR engine, access the Cortex XSOAR
interface (from Device Security, click
Integrations and then click Launch
Cortex XSOAR). In the Cortex XSOAR UI,
click . Choose
Shell as the type.
For Cortex XSOAR engine installation instructions, see Engine Installation.
For help troubleshooting Cortex XSOAR engines, including installations,
upgrades, connectivity, and permissions, see Troubleshoot Engines and Troubleshoot Integrations Running on
Engines.
Configure Device Security and Cortex XSOAR
- Log in to Device Security and from there access settings for device polling settings in Cortex XSOAR.
- Log in to Device Security and then click Integrations.
![]()
- Device Security uses Cortex XSOAR to poll devices, and the settings you must configure are in the XSOAR interface. To access these settings, click Launch Cortex XSOAR.The Cortex XSOAR interface opens in a new browser window.
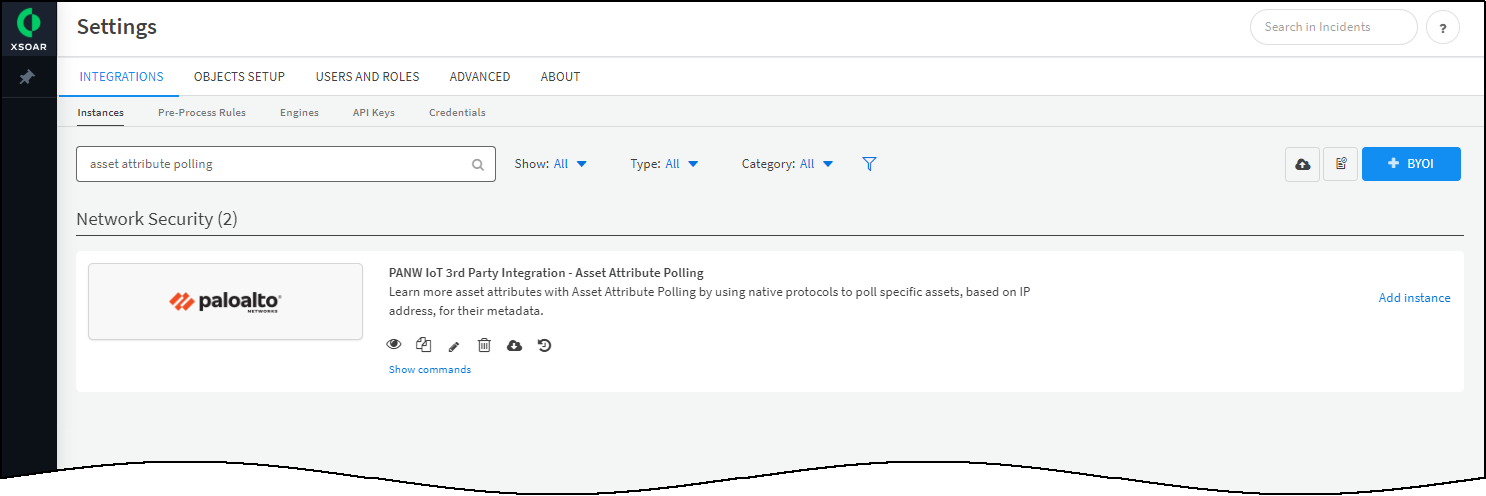
- Click Settings in the left navigation menu, and search for asset attribute polling to locate it among other instances.
![]()
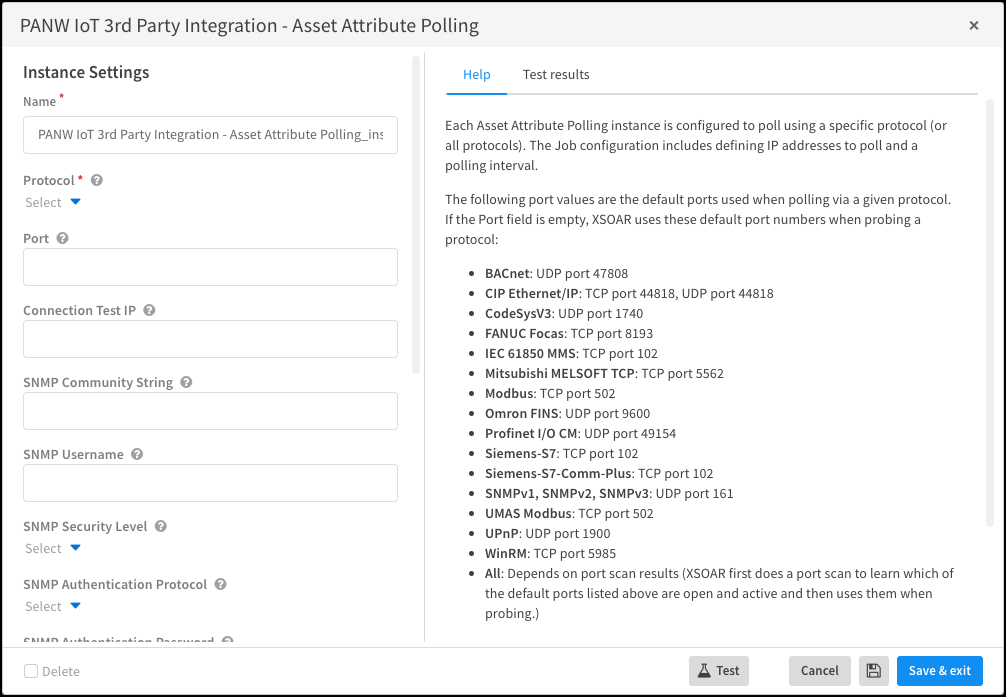
Configure the Asset Attribute Polling integration instance.Each Asset Attribute Polling instance is configured to poll devices using a specific protocol (or all protocols).- Click Add instance to open the settings panel.
- Enter the following settings:Name: Use the default name of the instance or enter a new one.Remember the instance name because you're going to use it again when creating a job that Cortex XSOAR will run to gather device attributes.Protocol: Choose the protocol you want to use for device polling. If you choose All, XSOAR first performs a port scan using the default port numbers of each protocol to learn which devices have these ports open and are actively responding. It then uses whichever protocols elicited a response when polling.Port: Leave the field empty to use the default TCP or UDP port numbers or enter a custom port number.When you enter a custom port number, XSOAR polls devices on that port using the same TCP and UDP transports it uses to poll with the default port number.When polling with SNMPv1 or SNMPv2, enter an SNMP community string that matches the one on the devices to be polled. When polling with SNMPv3, enter a username, and choose a security level (noAuthNoPriv, authNoPriv, or authPriv). Then depending on the security level chosen, enter an authentication protocol (MD5 or SHA), authentication password, privacy protocol (DES or AES), and privacy password. When the security level is noAuthNoPriv, enter just an SNMP username; a password is unnecessary. For information about these settings, see Set up Device Security and Cortex XSOAR for SNMP Discovery.When polling with WinRM, enter a WinRM username and password.Run on Single engine: Choose the XSOAR engine that you want to poll devices. When using an on-premises XSOAR server that does not require an XSOAR engine, leave this field empty.
![]()
- When finished with the configuration, enter an IP address of a device within a subnet that you want to probe in the Connection Test IP field and then click Test.This tests connectivity between the cohosted XSOAR instance or XSOAR server and a device to be polled. It uses the selected protocol to contact the device at the specified IP address on the specified TCP or UDP port (or both TCP and UDP if the protocol supports both). For example, if you want to poll multiple devices for asset attributes in a subnet, pick the IP address of a device you know is in that subnet—and is responsive to the protocol on the port number specified—and XSOAR sends a probe request to that device. If this device responds, you can safely assume that XSOAR will reach others in the same subnet.If you select All for connection testing, XSOAR uses each protocol sequentially to probe the target device. If it gets a response, it returns a Success message and stops probing. If it does not receive a response with one protocol, it times out after 2 seconds and tries the next protocol until it either gets a response from one of them or from none at all.If the test is successful, a Success message appears. If not, check that the settings were entered correctly, and then test the configuration again.
![]()
- After the test succeeds, click Save & exit to save your changes and close the settings panel.
To poll devices using other protocols or through other XSOAR engines, repeat the previous steps to add more integration instances.Create a job for XSOAR to poll devices and add returned attributes to Device Security.The job configuration defines which IP addresses to poll and which playbook and integration instance to use. If the job is set to run on a recurring schedule, it also specifies the polling interval.- Copy the name of the instance you created, click Jobs near the bottom of the left navigation menu and then click New Job at the top of the page.
- In the New Job panel that appears, enter the following and leave the other settings at their default values:Recurring: Select this if you want to periodically poll devices. Clear it if you want to poll devices on-demand.Every: If you select Recurring, enter a number and set the interval value (Minutes, Hours, Days, or Weeks) and select the days on which to run the job. (If you don’t select specific days, the job will run every day by default.) This determines how often XSOAR polls for device attributes. For example, every day at 11:00 AM.Name: Enter a name for the job.Playbook: Choose Bulk Import Device Attributes Using Device Polling — PANW IoT 3rd Party Integration.Device Polling IP/Subnet: Set the scope of the polling by entering one or more comma-separated device IP addresses (IP address example: 10.1.1.20) or one or more comma-separated subnet addresses (subnet example: 10.1.1.0/24). You can combine IP addresses and subnets. The number of IP addresses can’t be more than 1500, and a subnet can’t be larger than 255.255.255.0 or /24.Integration Instance Name: Paste the instance name you copied a few moments ago.
- Click Create new job.The job appears in the Jobs list.
Enable the job and run it.- Check the Job Status for the job you created. If it’s Disabled, select its check box and then click Enable.
- After you enable it, keep the check box selected and click Run now. The Run Status changes from Idle to Running.If you selected Recurring, XSOAR performs device polling at the defined interval and forwards the device attributes it learned to Device Security.If you cleared Recurring, XSOAR immediately performs polling and forwards device attributes to Device Security.
If you created more integration instances for multiple XSOAR engines, add more jobs as necessary.Each XSOAR engine requires a separate job.Run the job for each integration instance you create. The first time you run a job that references an integration instance, it triggers XSOAR to report the instance to Device Security, which then displays the integration instance on the Integrations page.When done, return to Device Security and check the status of the Device Polling integration.An integration instance can be in one of the following four states, which Device Security displays in the Status column on the Integrations page:- Active — the integration was configured and enabled and is functioning properly.Disabled — either the integration was configured but intentionally disabled or it was never configured and a job that references it is enabled and running.
- Error — the integration was configured and enabled but is not functioning properly, possibly due to a configuration error or network condition.
- Inactive — the integration was configured and enabled but no job has run for at least the past 60 minutes.
When you see that the status of an integration instance is Active, its setup is complete.To view the results of a polling job, return to the Jobs page in the XSOAR interface and click Completed in the Run Status column for the asset attribute polling job you ran. Click Work Plan and then click the green box for "Fetch Asset Attribute Polling info and Send to PANW IoT Cloud". You can see how many IP addresses were polled, how many IP addresses XSOAR retrieved attributes from, and how many IP addresses were updated in Device Security. When using SNMP, XSOAR polls either IP or MAC addresses and then updates devices in the Device Security inventory accordingly. For more information about XSOAR playbooks, see Check XSOAR Integration Activity.