Device Security
Set up Integration with Cisco ISE pxGrid
Table of Contents
Set up Integration with Cisco ISE pxGrid
Set up Device Security, Cortex XSOAR, Cisco pxGrid, and
Cisco ISE for integration.
| Where Can I Use This? | What Do I Need? |
|---|---|
|
One of the following subscriptions:
One of the following Cortex XSOAR setups:
|
To set up the integration, perform the following
steps:
- (Device Security and Cortex XSOAR) Install a Cortex XSOAR engine
- (Cisco ISE) Enable pxGrid on the ISE node
- (Cisco ISE) Add custom attributes for Device Security
- (Cisco ISE) Import an endpoint profiler policy
- (Cisco ISE) Restart pxGrid Profiling
- (Cisco ISE, OpenSSL, Device Security, Cortex XSOAR) Set up the XSOAR engine to connect with Cisco ISE through pxGrid
- (Cisco ISE) Connect the XSOAR engine to Cisco ISE pxGrid
- (Cortex XSOAR) Send IoT device attributes to Cisco ISE
Note: These
instructions are based on Cisco pxGrid 2.0 and Identity Services
Engine 2.4 with a Cisco Plus license.
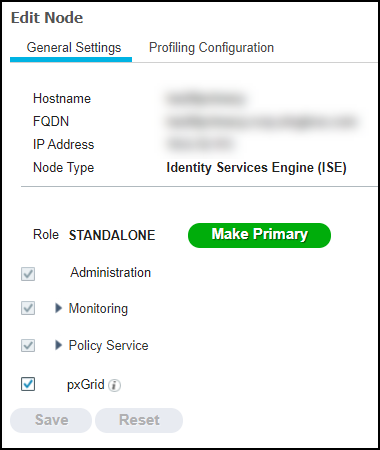
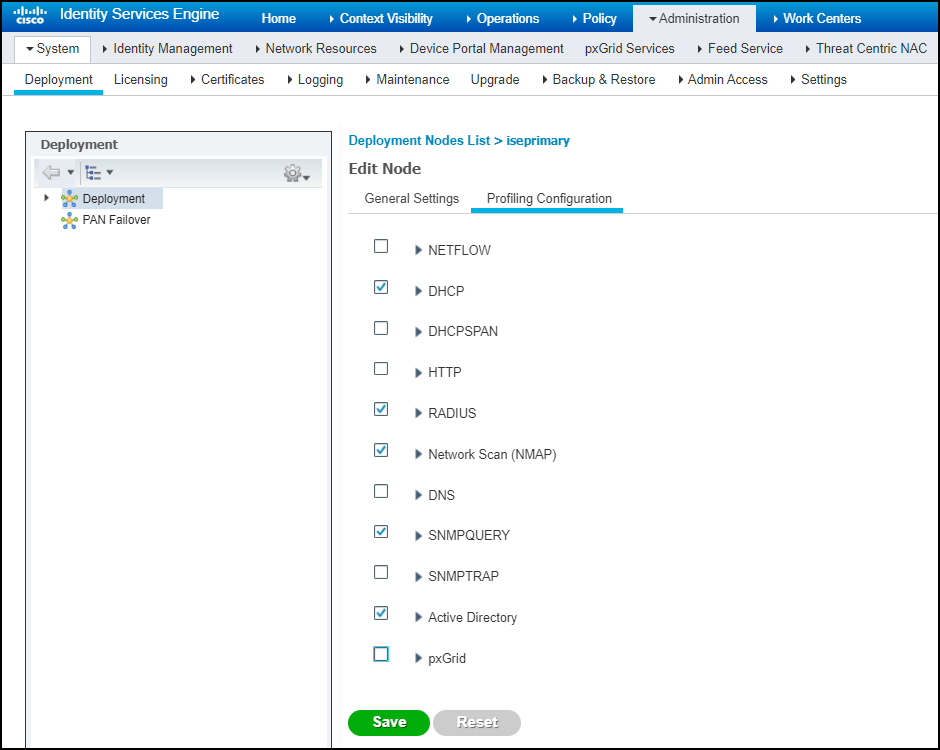
- (Device Security and Cortex XSOAR) Install a Cortex XSOAR engine.You must install an XSOAR engine on site to facilitate communications between the Cisco pxGrid controller and ISE system and the Cortex XSOAR cloud. Although it's possible to install an XSOAR engine on machines running Windows, macOS, and Linux operating systems, only an engine on a Linux machine supports Device Security integrations. For more information about operating system and hardware requirements, see the Cortex XSOAR Administrator’s Guide.We recommend downloading the XSOAR engine using the shell installer script and installing it on a Linux machine. This simplifies the deployment by automatically installing all required dependencies and also enables remote engine upgrades.When placing the XSOAR engine on your network, make sure it can form connections to your pxGrid controller/ISE system on TCP 8910 and resolve its FQDN to an IP address.The on-premises firewall must allow the Cortex XSOAR engine to form HTTPS connections on TCP port 443 to the Cortex cloud at https://<your-domain>.iot.demisto.live/. You can see the URL of your Cortex XSOAR instance when you log in to Device Security and click Integrations and then click Launch Cortex XSOAR. It’s visible in the address bar of the web page displaying the Cortex XSOAR interface.To create an Cortex XSOAR engine, access the Cortex XSOAR interface (from Device Security, click Integrations and then click Launch Cortex XSOAR). In the Cortex XSOAR UI, click . Choose Shell as the type.For Cortex XSOAR engine installation instructions, see Engine Installation.For help troubleshooting Cortex XSOAR engines, including installations, upgrades, connectivity, and permissions, see Troubleshoot Engines and Troubleshoot Integrations Running on Engines.(Cisco ISE) Enable pxGrid on the ISE node.Cisco pxGrid runs as a module inside ISE, but before you can start using pxGrid, you must first enable it in the general and profiling settings on the ISE node.Log in to the Cisco ISE UI, click > node_name, select the pxGrid check boxes on the General Settings and Profiling Configuration tabs, and then Save.
![]()
![]() (Cisco ISE) Add custom Device Security attributes.Device Security discovers, classifies, and identifies IoT devices and reports them through pxGrid to ISE using a set of custom attributes. For example, to send IoT device profiles to Cisco ISE, configure a custom endpoint attribute for device profiles called PanwIoTProfile on your Cisco ISE instance:
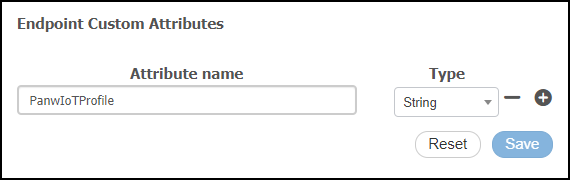
(Cisco ISE) Add custom Device Security attributes.Device Security discovers, classifies, and identifies IoT devices and reports them through pxGrid to ISE using a set of custom attributes. For example, to send IoT device profiles to Cisco ISE, configure a custom endpoint attribute for device profiles called PanwIoTProfile on your Cisco ISE instance:- Log in to the Cisco ISE UI, click , enter PanwIoTProfile in the Attribute name field, choose String from the Type drop-down list, and then Save.
![]()
- To add the ZingboxProfile attribute, click +, enter ZingboxProfile in the Attribute name field and choose String for Type. (This attribute is required because the profiler policy, which will be added later, references it.)
- Repeat this procedure to add other custom attributes. The following is the complete set of custom attributes.PanwIoTProfile and ZingboxProfile are required. All the others are optional.
Custom Attribute Name Type Notes PanwIoTProfile String The IoT device profile, which identifies devices at a more granular level than Category does. Example: Pyxis MedStation ZingboxProfile String The same as PanwIoTProfile. It’s used in the profiler policy. PanwIoTCategory String The device category to which an IoT device belongs. Example: Medication Dispensing PanwIoTIP IP The IP address of an IoT device PanwIoTRiskScore Integer The daily calculated risk score for a device based on alerts, vulnerabilities, behavioral anomalies, and threat intelligence. PanwIoTConfidence Integer A score from 0 to 100 indicating the confidence in identifying a device and assigning it a device profile, 100 being the most confident. PanwIoTTag String The asset tag of a device. Note: This comes from an integrated CMMS (computerized maintenance management system). PanwIoTHostname String The hostname of a device, if available. If not, its MAC address appears here. PanwIoTOS String The type of operating system running on a device PanwIoTModel String The device model PanwIoTVendor String The device vendor or manufacturer PanwIoTSerial String The serial number of a device, when available PanwIoTEPP String The endpoint protection (EPP) solutions deployed on a device. If this is blank, no EPP was observed. PanwIoTAET String The application entity title (AET) if it’s available for the following types of medical devices: X-ray machine, ultrasound machine, PACS server, DICOM-workstation, and DICOM-viewer PanwIoTInternetAccess String Whether or not a device can and does access the Internet
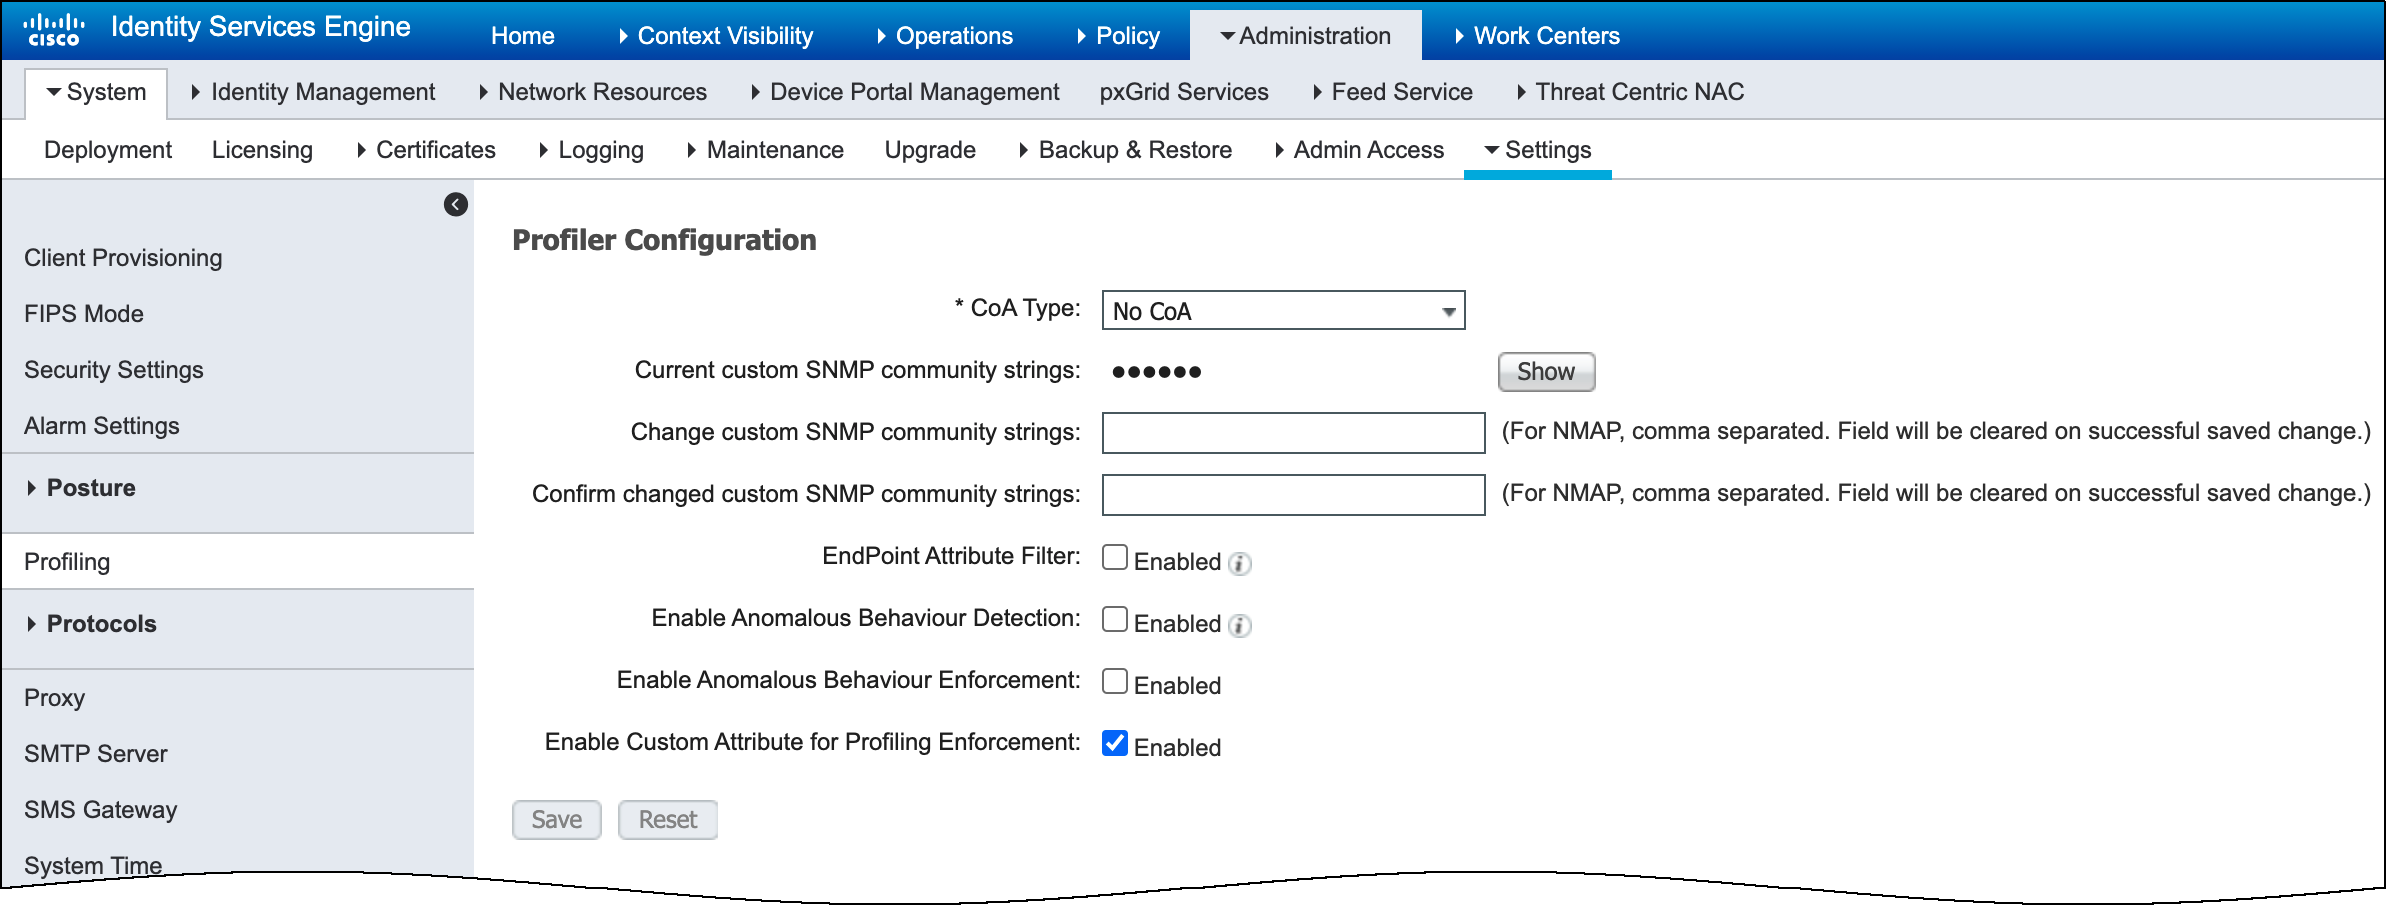
(Cisco ISE) Import an endpoint profiler policy.- In the Cisco ISE UI, navigate to , select Enable Custom Attribute for Profiling Enforcement, and then Save.
![]()
- Copy the following text and paste it into a text file.<?xml version="1.0" encoding="ISO-8859-1"?><CPMProfilerPolicies> <Policies> <Policy description="" isEnabled="true" matchingIdentityGroup="false" minimumCertaintyMetric="10" name="ZingboxUpdate" version="2"> <PolicyRules> <PolicyRule certaintyFactor="65535" name="ZingboxRule53739030-b54e-415e-802a-e1ff2d44c67d"/> </PolicyRules> </Policy> </Policies> <Rules> <Rule description="CUSTOMATTRIBUTE_ZingboxProfile_EQUALS_ZingboxUpdate" expression="ZingboxRule53739030-b54e-415e-802a-e1ff2d44c67dCheck62932c59-12df-42d1-9bef-6e3efced33c9" name="ZingboxRule53739030-b54e-415e-802a-e1ff2d44c67d" ruleType="Regular"/> </Rules> <Checks> <Check attributeName="ZingboxProfile" attributeValue="ZingboxUpdate" description="CUSTOMATTRIBUTE ZingboxProfile EQUALS ZingboxUpdate" name="ZingboxRule53739030-b54e-415e-802a-e1ff2d44c67dCheck62932c59-12df-42d1-9bef-6e3efced33c9" operator="Equals" type="CUSTOMATTRIBUTE"/> </Checks> <Actions/> <ScanActions/> </CPMProfilerPolicies>Save the file as ZingboxUpdate.txt and then change its extension from .txt to .xml.The IoT device attribute updates that the XSOAR engine sends to ISE will affect the policy, triggering ISE to apply the updates to the IoT device attributes in its system.In the Cisco ISE UI, click , and then click Import.
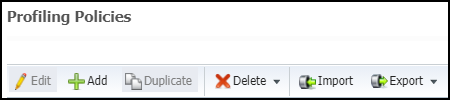
![]() Navigate to the .xml file, select it, and then click Submit.To confirm that the file was successfully imported, check that the imported policy (named ZingboxUpdate) appears in the profiling policies list.
Navigate to the .xml file, select it, and then click Submit.To confirm that the file was successfully imported, check that the imported policy (named ZingboxUpdate) appears in the profiling policies list. - (Cisco ISE) Restart pxGrid Profiling.To enable pxGrid to start profiling devices based on the input it receives from the XSOAR engine, it is necessary to restart profiling services.
- Click > ISE_hostname.
- In the Edit Node dialog box, click the Profiling Configuration tab.
- Clear the check box for pxGrid and click Save.
![]()
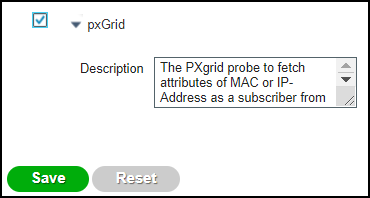
- Select the check box for pxGrid and click Save.
![]()
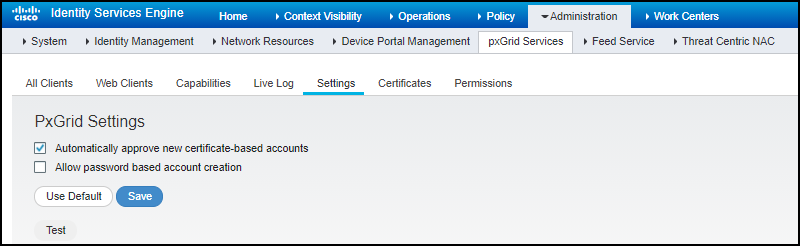
(Cisco ISE, OpenSSL, Device Security, Cortex XSOAR) Set up the XSOAR engine to connect with Cisco ISE through pxGrid.Before the XSOAR engine can communicate with ISE through pxGrid, it must first authenticate itself. The authentication can use either digital certificates or passwords. The ISE pxGrid controller automatically approves certificate-based SSL authentication but not the password-based method. Both authentication methods are described here:Your choice of authentication method will determine the settings in the integration instance.Certificate-based Authentication- (Cisco ISE) Click , select Automatically approve new certificate-based accounts, and then Save.
![]()
- When prompted to confirm the configuration change, click Yes.
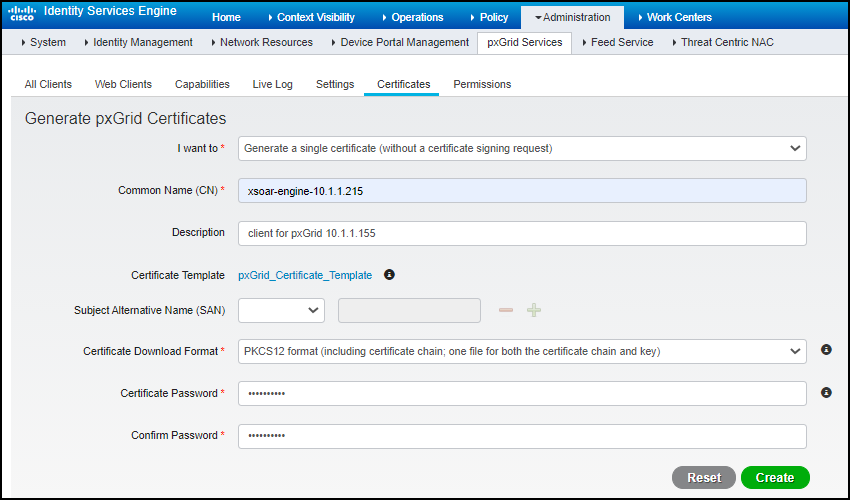
- To generate a certificate for the XSOAR engine, click , fill in the fields like the example below, and then click Create.
![]() The certificate password must be between 8 and 15 characters and contain at least 6 letters, 1 uppercase letter, and 1 number. It can also contain underscores ( _ ) and hashtags ( # ). Record the common name (CN) and certificate password. For example, xsoar-engine-10.1.1.215 and Zingbox123.When you click Create, pxGrid generates a PKCS #12 file and saves it in a .zip file to your management system. In the example here, the PKCS#12 file name is xsoar-engine-10.1.1.215_.p12.For the next part, your management system must be running a Linux-based OS with OpenSSL installed.
The certificate password must be between 8 and 15 characters and contain at least 6 letters, 1 uppercase letter, and 1 number. It can also contain underscores ( _ ) and hashtags ( # ). Record the common name (CN) and certificate password. For example, xsoar-engine-10.1.1.215 and Zingbox123.When you click Create, pxGrid generates a PKCS #12 file and saves it in a .zip file to your management system. In the example here, the PKCS#12 file name is xsoar-engine-10.1.1.215_.p12.For the next part, your management system must be running a Linux-based OS with OpenSSL installed. - (OpenSSL) Generate a certificate file and key file.Open a terminal window, navigate to the folder with the .p12 file, and run the following two OpenSSL commands, substituting “xsoar-engine-10.1.1.215” and “Zingbox123” for the common name and password you used:openssl pkcs12 -in xsoar-engine-10.1.1.215_.p12 -passin "pass:Zingbox123" -passout "pass:Zingbox123" > xsoar-engine-10.1.1.215_.cerThe first command uses xsoar-engine-10.1.1.215_.p12 and Zingbox123 (the password you used when generating the certificate request) to generate the certificate file called xsoar-engine-10.1.1.215_.cer, which you then reference in the second command.openssl rsa -in xsoar-engine-10.1.1.215_.cer -out xsoar-engine-10.1.1.215_.key -passin "pass:Zingbox123"This command uses the xsoar-engine-10.1.1.215_.cer file generated in the first command and the same password (Zingbox123) to generate the key file xsoar-engine-10.1.1.215_.key.When done, open the two files you generated with a text editor.
- (Device Security) Log in to Device Security, click Integrations, and then click Launch Cortex XSOAR.Device Security uses Cortex XSOAR to integrate with Cisco ISE with pxGrid, and the settings you must configure to integrate with it are in the XSOAR interface.
![]() The Cortex XSOAR interface opens in a new browser window.
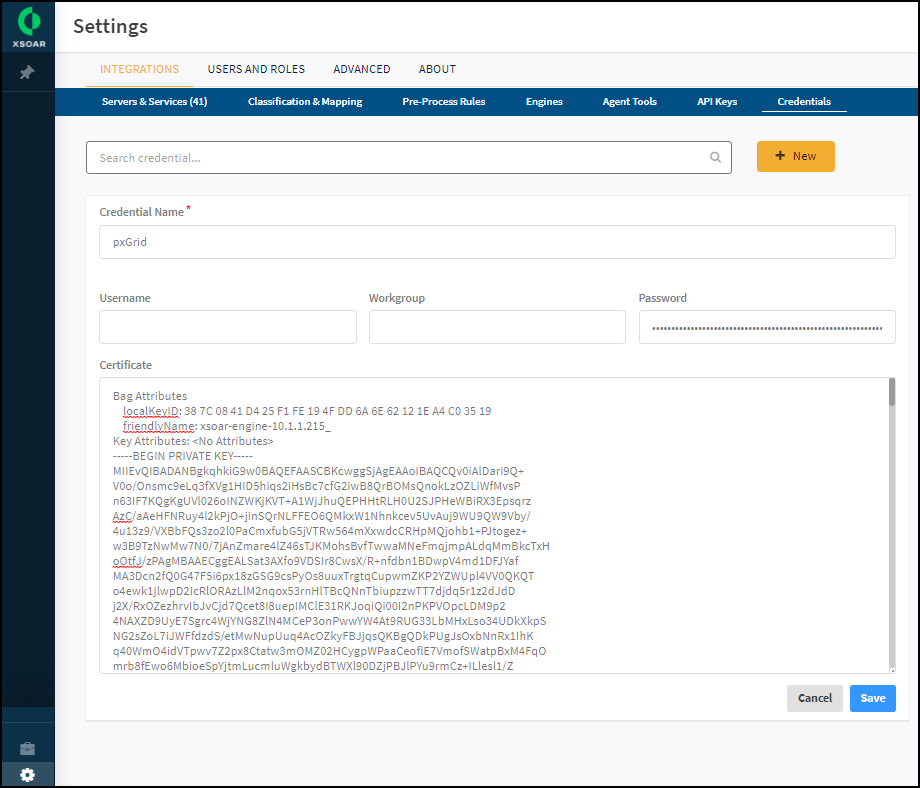
The Cortex XSOAR interface opens in a new browser window. - (Cortex XSOAR) Click Settings in the left navigation menu, click Credentials in the menu bar near the top, and then click + New. Enter the following and then Save:Credential Name: Enter a name for the credentials configuration. You will reference this name when configuring an ISE pxGrid integration instance.Password: Copy all the text in the key file (in this example: xsoar-engine-10.1.1.215_.key) and paste it in the Password field.Certificate: Copy all the text in the certificate file (xsoar-engine-10.1.1.215_.cer) and paste it in the Certificate field.
![]()
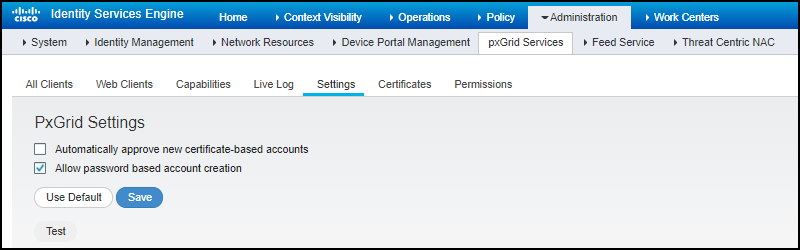
Password-based Authentication(Cisco ISE) Click , select Allow password based account creation, and then Save.![]() Integration InstanceCortex XSOAR supports a single Cisco ISE pxGrid integration instance.
Integration InstanceCortex XSOAR supports a single Cisco ISE pxGrid integration instance.- (Cortex XSOAR) Click and search for pxgrid in the Settings section to locate it among other instances.
![]()
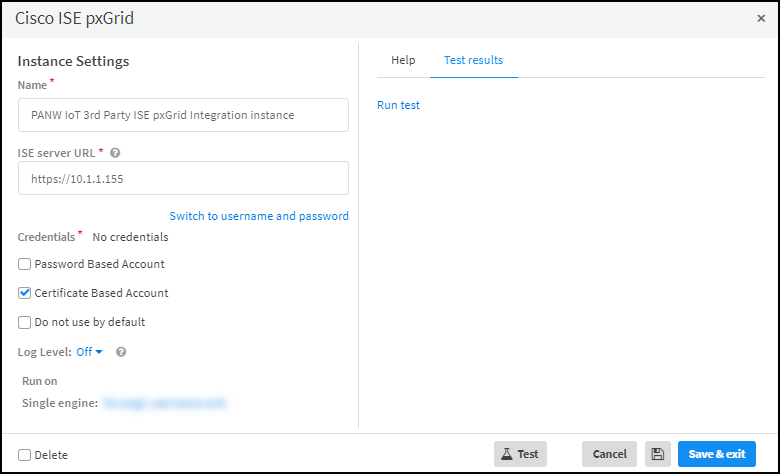
- Click the integration instance settings icon () to open the settings panel and enter the following:
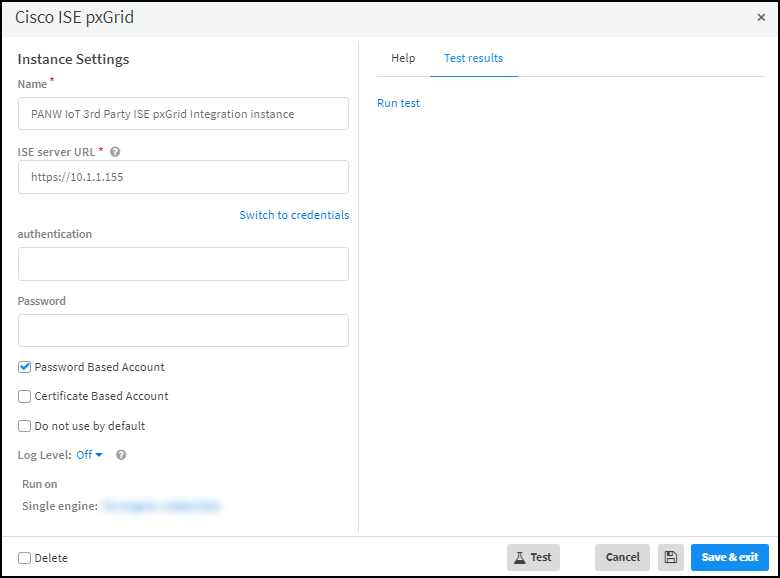
![]() Name: Use the default name of the instance or enter a new one.ISE Server URL: Enter IP address or domain name of the ISE server. For example: https://10.1.1.155When using certificate-based authentication, click Switch to credentials to see the Credentials drop-down list and choose the credential name you defined earlier. Select Certificate-based Account.orWhen using password-based authentication, click Switch to username and password if necessary (it’s displayed by default) to see the Authentication and Password fields. Leave both fields empty and select Password Based Account.You do not define a username and password with which the XSOAR engine authenticates itself. Cisco pxGrid creates them automatically when the engine contacts it.Run on Single engine: Choose the XSOAR engine that you previously installed.
Name: Use the default name of the instance or enter a new one.ISE Server URL: Enter IP address or domain name of the ISE server. For example: https://10.1.1.155When using certificate-based authentication, click Switch to credentials to see the Credentials drop-down list and choose the credential name you defined earlier. Select Certificate-based Account.orWhen using password-based authentication, click Switch to username and password if necessary (it’s displayed by default) to see the Authentication and Password fields. Leave both fields empty and select Password Based Account.You do not define a username and password with which the XSOAR engine authenticates itself. Cisco pxGrid creates them automatically when the engine contacts it.Run on Single engine: Choose the XSOAR engine that you previously installed.![]() or
or![]()
- When finished, click Run test or Test.If the test is successful for certificate-based authentication, a Success message appears. If not, check that the settings for the integration instance and credentials were entered correctly and then test the configuration again.
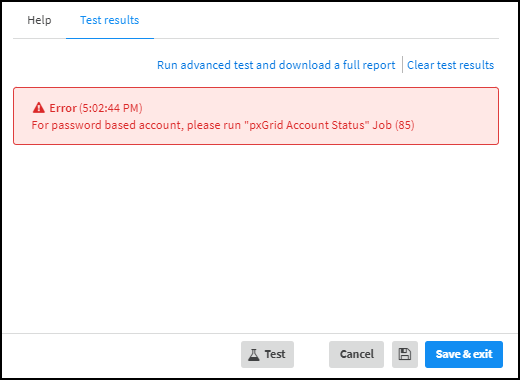
![]() When you use password-based authentication, a Cisco ISE pxGrid user must approve the pxGrid client—in this case, the XSOAR engine—before allowing it to connect. When you click Run test or Test, the following message appears, prompting you to run the pxGrid Account Status job.
When you use password-based authentication, a Cisco ISE pxGrid user must approve the pxGrid client—in this case, the XSOAR engine—before allowing it to connect. When you click Run test or Test, the following message appears, prompting you to run the pxGrid Account Status job.![]()
- Click Done to save your changes and close the settings panel.
- To activate the integration instance, click Enable.
![]() XSOAR automatically runs a preconfigured job for Cisco pxGrid integration and reports the integration instance to Device Security, which displays it on the Integrations page.
XSOAR automatically runs a preconfigured job for Cisco pxGrid integration and reports the integration instance to Device Security, which displays it on the Integrations page. - Click Jobs in the left navigation menu, search for pxgrid to display the relevant jobs, select pxGrid Account Status, and then click Run now.The job sends a request to pxGrid using HTTPS on TCP port 8910 to accept the XSOAR engine as a pxGrid client and create an account for it.
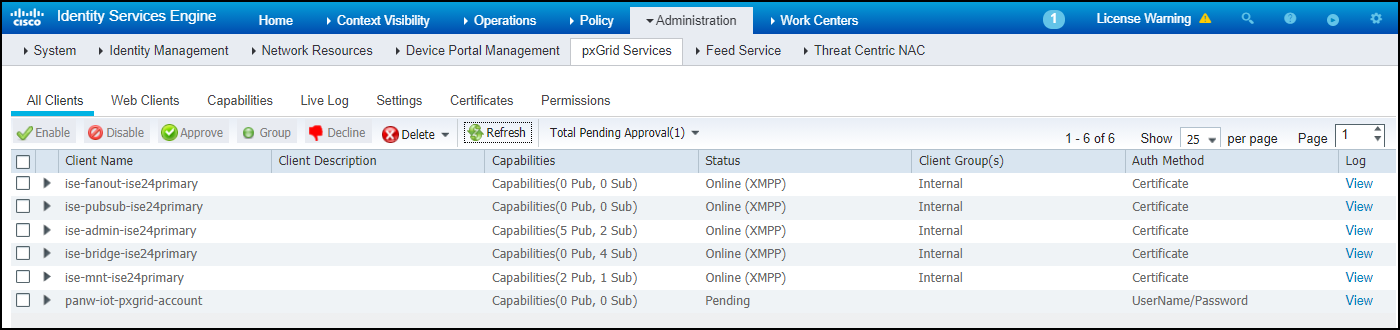
(Cisco ISE) Connect the XSOAR engine to Cisco ISE pxGrid.Because Cisco pxGrid runs as a module on Cisco ISE, when an XSOAR engine connects to Cisco pxGrid, it is also connecting through pxGrid to ISE.- Log in to the Cisco ISE UI, click and note that the XSOAR engine appears in the Client Name list.For a certificate-based account, its status is Offline, which is normal. (This does not indicate its connection status. The status changes to Online during data update sessions.). For a password-based account, its status is Pending because it must still be manually authorized.
![]()
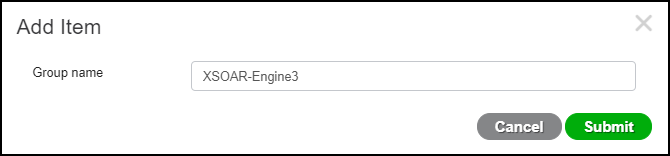
- Create a group permitting the XSOAR engine to publish data to the asset attribute topic. Click and then click + Add in the Manage Groups dialog box.
- In the Add Item dialog box, enter a name such as XSOAR-Engine3, and then click Submit.
![]()
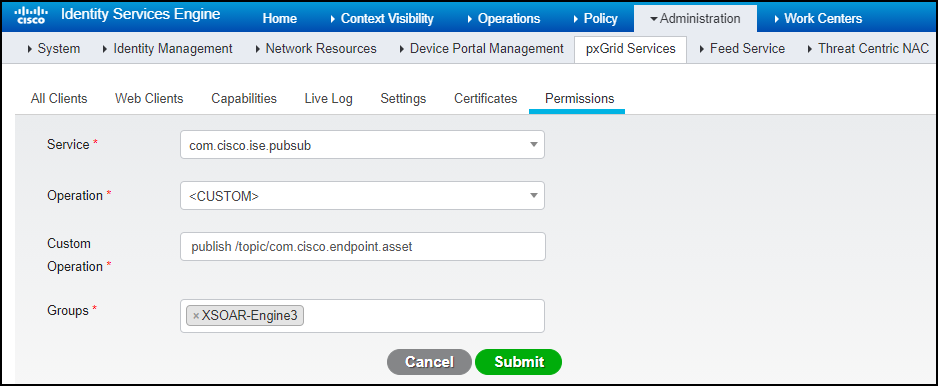
- Close the Manage Groups dialog box, and on the page, click + Add.
- Enter the following and then click Submit:Service: com.cisco.ise.pubsubOperation: <CUSTOM>Custom Operation: publish /topic/com.cisco.endpoint.assetGroups: Enter the name of the group you created.
![]()
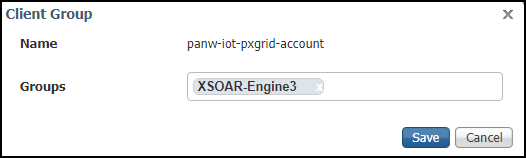
- Return to , select the check box for the pending XSOAR engine, and then click Group to open the Client Group dialog box.
- Add the engine to the group you created and then click Save.
![]()
- For an XSOAR engine using password-based authentication, select its check box again, and then click Approve. (The ISE pxGrid controller automatically approves clients authenticating with certificates, but password-based authentication requires manual approval.)The status of the engine changes from Pending to Offline. The client now belongs to the client group you created, and the XSOAR engine and Cisco ISE server are now connected.
(Cortex XSOAR) Send IoT device attributes from Device Security to Cisco ISE.Before starting regular, automated incremental updates, it’s good practice to send ISE a complete device inventory from Device Security. This requires a bulk data export from Device Security to ISE that you initiate from the XSOAR interface at a time that’s suitable for network operations. To shorten the time required for the bulk export to complete, plan to run it during off-peak hours on a slow day such as a holiday or weekend. Exporting an inventory of 30,000-40,000 IoT devices takes up to 12 hours when a network is under normal usage. Doing this when network traffic is light can shorten the time needed to complete the job.- To start the bulk export of the entire device inventory, return to the Cortex XSOAR interface. Click Jobs, select PANW IoT Bulk Export to Cisco ISE pxGrid, and then click Run now.While it’s in progress, its status is shown as Running.
![]() Although it’s possible to run multiple bulk export jobs in parallel, doing so can affect the XSOAR engine performance. Therefore, we advise not running more than one at a time.
Although it’s possible to run multiple bulk export jobs in parallel, doing so can affect the XSOAR engine performance. Therefore, we advise not running more than one at a time. - After the bulk export job completes, start the automated incremental update, which will then continue running every 15 minutes by default. (The interval is editable in the job settings.) To start the incremental updates, select PANW IoT ISE pxGrid Integration and then click Run now.