Device Security
Set up Device Security and XSOAR for CrowdStrike Integration
Table of Contents
Set up Device Security and XSOAR for CrowdStrike Integration
Set up Device Security and Cortex XSOAR to integrate with
CrowdStrike.
| Where Can I Use This? | What Do I Need? |
|---|---|
|
One of the following subscriptions:
One of the following Cortex XSOAR setups:
|
To set up Device Security to integrate through
Cortex XSOAR with CrowdStrike, you need the following:
- CrowdStrike client ID
- Secret
- URL of the CrowdStrike API
- Log in to Device Security and then access CrowdStrike integration settings in Cortex XSOAR.
- Because Device Security uses XSOAR to integrate with CrowdStrike, you must configure settings for the CrowdStrike integration instance in the Cortex XSOAR interface. To access XSOAR, log in to Device Security and select .
![]()
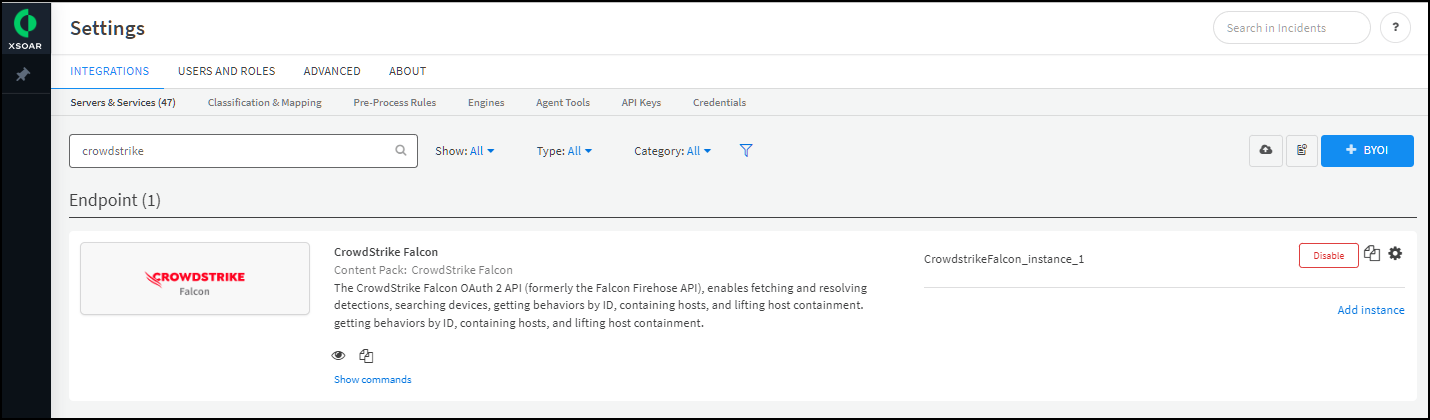
- Click Settings in the left navigation menu, search for crowdstrike to locate it among other instances.
![]()
Configure the CrowdStrike integration instance.- Add instance to open the settings panel.
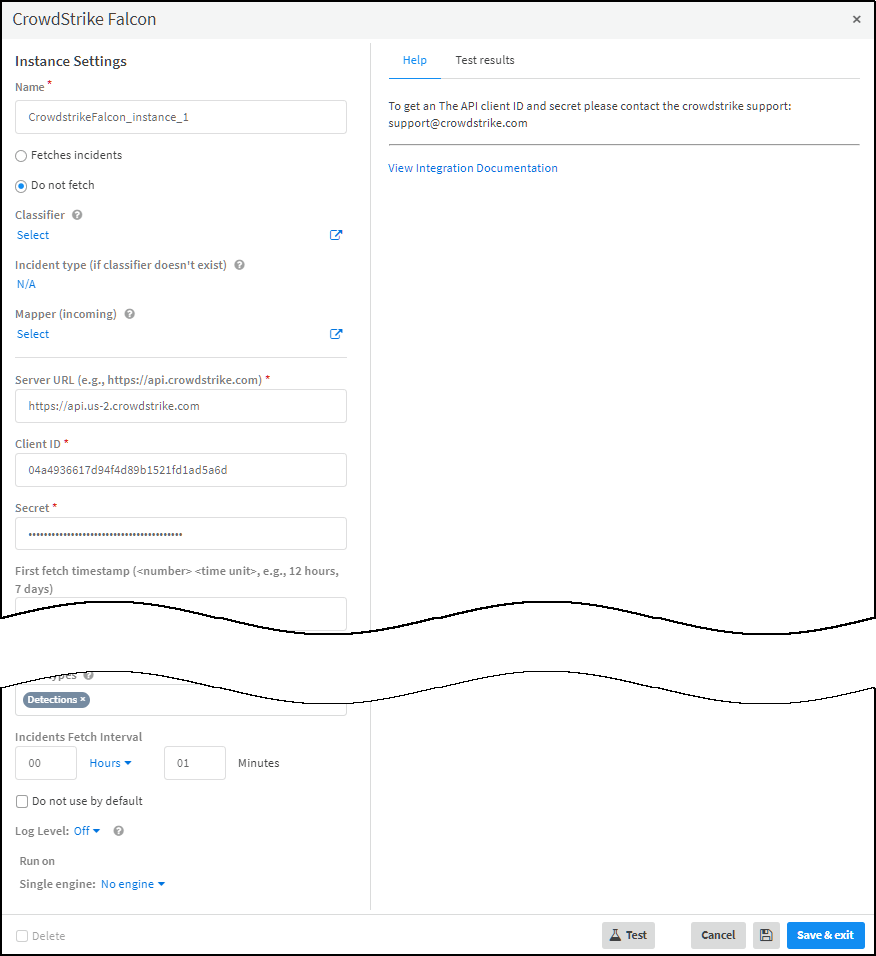
- Enter the following and leave other settings at their default values:Name: Enter a name for the CrowdStrike integration instance.Server URL: Copy the base URL that you saved earlier in a text file and paste it here.Client ID: Copy the client ID text string that you previously saved and paste it here.Secret: Copy the text string of the secret and paste it here.Single engine: Choose No engine.
![]()
- When finished, click Test.If the test is successful, a Success message appears. If not, check that the settings were entered correctly and then test the configuration again.
![]()
- After the test succeeds, copy the name of the integration instance to use in the job you create next, and then click Save & exit to save your changes and close the settings panel.
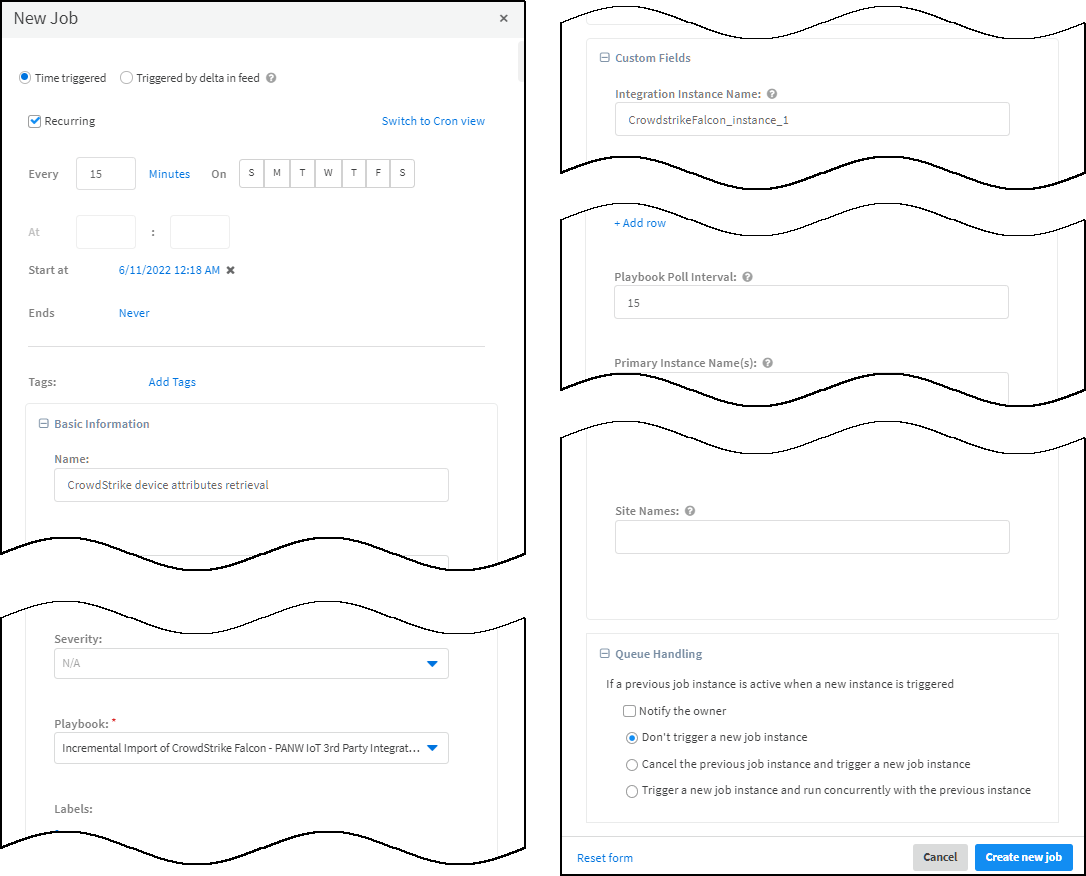
To enable the CrowdStrike integration instance, click Enable.Create a job to retrieve device attributes from CrowdStrike every 15 minutes.- Click Jobs near the bottom of the left navigation menu to open the Jobs page.
- Click New Job at the top of the Jobs page.
- Enter the following, leave the other fields at their default values:Time triggered: (select)Recurring: Select this because you want to periodically import device attributes from CrowdStrike.Every: Enter a number and set the interval value (Minutes, Hours, Days, or Weeks) and select the days on which to run the job. (If you don’t select anything, the job runs everyday.) This determines how often XSOAR imports data from CrowdStrike. It’s important to set an interval that allows enough time for the job to complete, considering factors such as the number of devices that are active on the network. You might start by running the job every 15 minutes and then increasing it as necessary until each job completes before the next one starts. You can see the run status of a recurring job on the Jobs page. When in progress, its status is Running. When done, its status changes to Completed.Name: Type a name for the job such as CrowdStrike device attributes retrieval.Playbook: Incremental Import of CrowdStrike Falcon - PANW IoT 3rd Party IntegrationIntegration Instance Name: Paste the integration instance name that you copied in the previous step. If this field is empty or an entered name doesn’t match an instance, the job won’t run successfully.Playbook Poll Interval: Enter a number (the value, though unspecified, is minutes) defining the period of time during which Device Security must see newly discovered devices or network activity from previously discovered devices to import device attributes from CrowdStrike. It’s common to use the same interval as the one for running the recurring job. However, if you increase the interval between jobs, you can set a shorter interval for polling than that for the job. If you leave it blank, the default poll interval is 15 minutes.The default value is 15 minutes, which is the interval that XSOAR will use if the field is left blank.Site Names: Leave the field empty to import device attributes for all sites. To limit imports to devices at one or more sites, enter comma-separated site names.
![]()
- Click Create new job.XSOAR begins an automated process that retrieves incrementally updated device attributes from CrowdStrike occurring within the last 15 minutes.
- Select the job and click Run now.The first time you run a job that references an integration instance triggers XSOAR to report the instance to Device Security, which then displays the integration instance on the Integrations page.
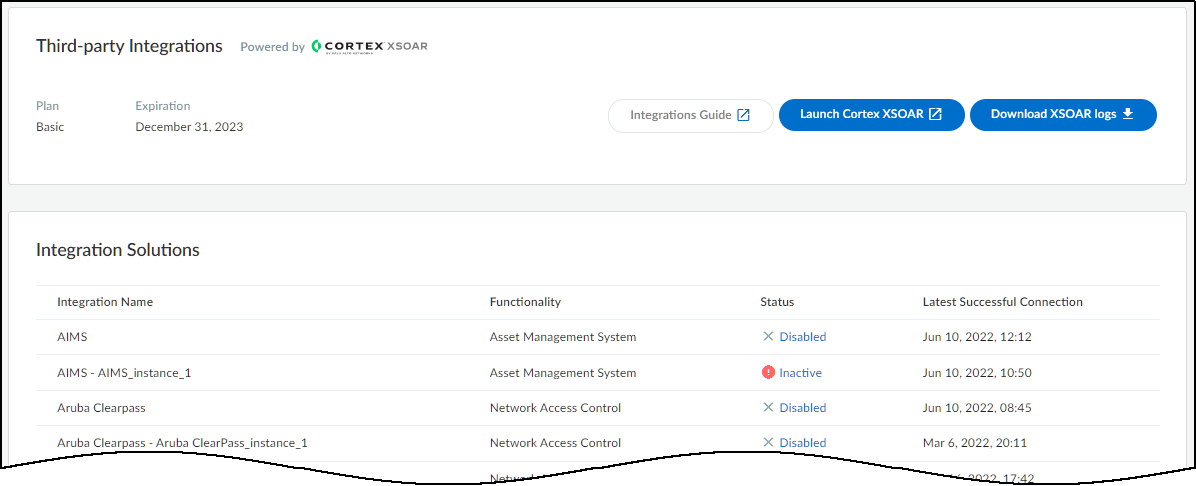
Continue creating and enabling more integration instances and jobs as needed for Device Security to import device attributes from other CrowdStrike instances.Be sure to run each job you create at least once to populate the Integrations page with all the integration instances you’re using.Return to Device Security and check the status of the CrowdStrike integration instances you created and enabled.An integration instance can be in one of four states, which you can see in the Status column on the Integrations page:- Disabled means that either the integration was configured but intentionally disabled or it was never configured and a job that references it is enabled and running.
- Error means that the integration was configured and enabled but is not functioning properly, possibly due to a configuration error or network condition.
- Inactive means that the integration was configured and enabled but no job has run for at least the past 60 minutes.
- Active means that the integration was configured and enabled and is functioning properly.
When you see the status of an integration instance has changed from Disabled to Active, its setup is complete.