Device Security
Set up Device Security and XSOAR for ServiceNow Integration
Table of Contents
Set up Device Security and XSOAR for ServiceNow Integration
Set up Device Security and Cortex XSOAR to integrate with
ServiceNow.
| Where Can I Use This? | What Do I Need? |
|---|---|
|
One of the following subscriptions:
One of the following Cortex XSOAR setups:
|
To set up Device Security to integrate with ServiceNow,
you need the URL of your ServiceNow instance and the username and
password of a ServiceNow user account that allows XSOAR to add device
attributes, security alerts, and device vulnerabilities to the device
and incident tables you created in ServiceNow.
- Log in to Device Security and then access ServiceNow settings in Cortex XSOAR.
- Log in to Device Security and then click Integrations.
![]()
- Device Security uses Cortex XSOAR to integrate with ServiceNow, and the settings you must configure to integrate with it are in the XSOAR interface. To access these settings, click Launch Cortex XSOAR.The Cortex XSOAR interface opens in a new browser window.
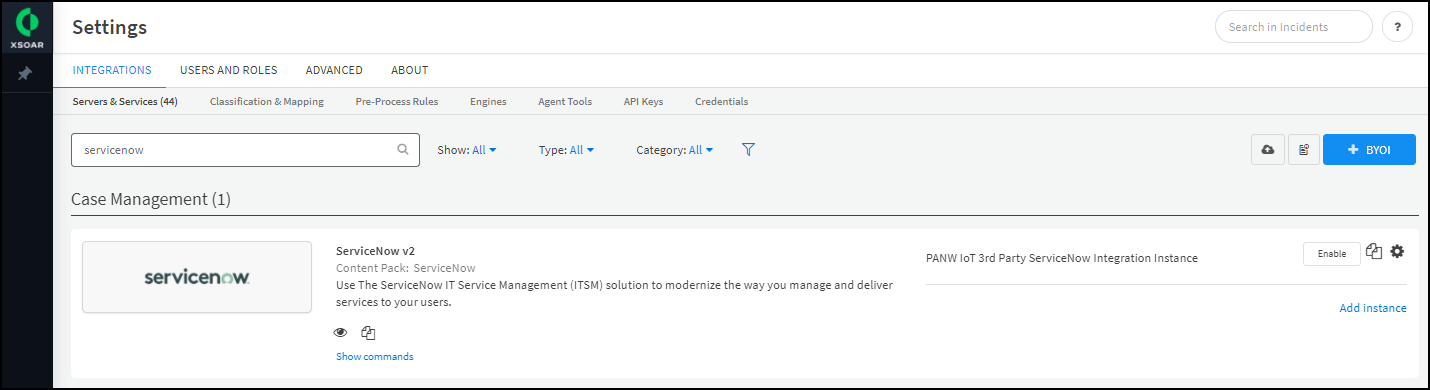
- Click Settings in the left navigation menu, search for servicenow to locate it among other instances.
![]()
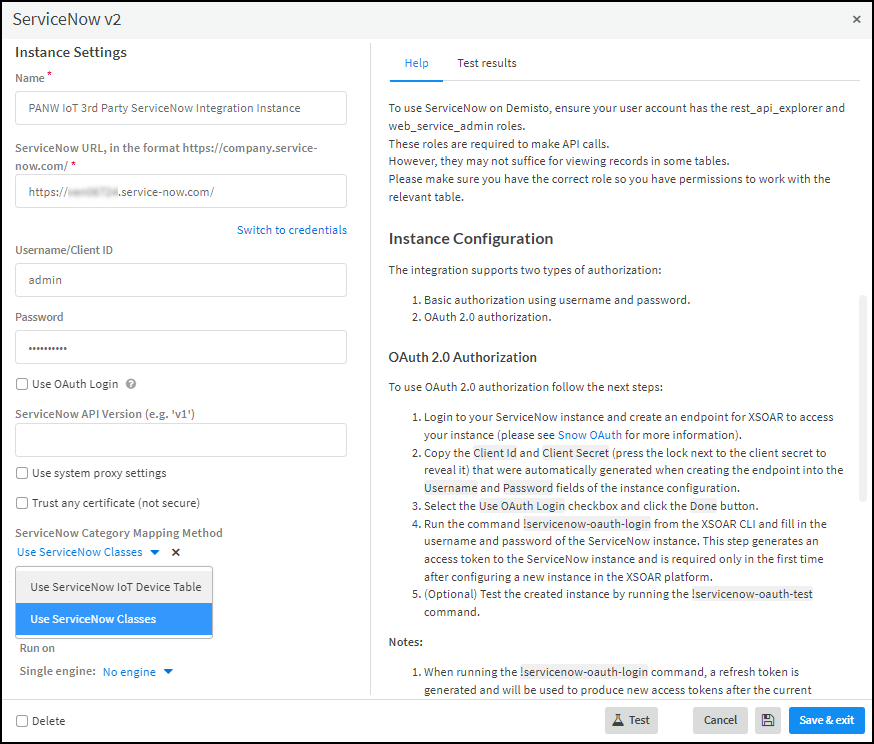
Configure the ServiceNow integration instance.- Click the integration instance settings icon () for PANW IoT 3rd Party ServiceNow Integration Instance to open the settings panel.
![]()
- Enter the following and leave the other settings at their default values:Name: Use the default name for the integration instance (PANW IoT 3rd Party ServiceNow Integration instance) or, if you use the mapping method based on ServiceNow classes, you can use the default name or enter a new one.When the ServiceNow Category Mapping Method is Use ServiceNow IoT Device Table, XSOAR jobs for ServiceNow use playbooks that refer to the default integration instance name specifically, so it cannot be changed. When the mapping method is Use ServiceNow Classes, you can use the default name or a new name, but then you must enter it in the Integration Instance Name field in the jobs that Cortex XSOAR will run using this instance.ServiceNow URL: Enter the URL of your ServiceNow account, including https:// .Username/Client ID: Enter the name of the user account you previously configured in ServiceNow.Password: Enter the password associated with the user account.Use OAuth Login: Select if you want XSOAR to use OAuth to log in and refer to the help in the right column on the page. Clear for XSOAR to use basic authentication with a username and password. Leave the other settings at their default values.ServiceNow Category Mapping Method: Choose the method you want to use to map devices and device attributes from IoT Security to ServiceNow. Use ServiceNow Classes (default method) maps Device Security device types, categories, and profiles to ServiceNow classes. Use ServiceNow IoT Device Table maps the labels for various device attributes in Device Security to their counterparts in a custom table in ServiceNow.
![]()
- When finished, click Test.If the test is successful, a Success message appears. If not, check that the settings were entered correctly and then test the configuration again.
![]()
- After the test succeeds, click Save & exit to save your changes and close the settings panel.
To integrate with other ServiceNow accounts, repeat the previous steps to add more integration instances.You might need more ServiceNow integration instances if, for example, you have one ServiceNow account for your production network and another for staging and testing.When Device Security integrates with ServiceNow and you use the predefined integration instance with its default name (PANW IoT 3rd Party ServiceNow Integration Instance), you don’t have to configure any jobs. The predefined jobs—PANW IoT ServiceNow Integration and PANW IoT Bulk Export to ServiceNow—reference the default name of the predefined integration instance and simply work when you enable or run them.If you create additional integration instances and jobs, you must make sure that each job references a specific instance; otherwise, if a job doesn’t specifically reference the name of an integration instance, it will use the default instance.Edit ServiceNow jobs to add the integration instance name and, optionally, to change the poll interval for incremental updates.Cortex XSOAR has two predefined jobs that export device attributes, alerts, and vulnerabilities to ServiceNow:PANW IoT ServiceNow Integration – This sends incremental updates to ServiceNow every 15 minutes by default.PANW IoT Bulk Export To Servicenow – This sends all device records and security incidents (security alerts and vulnerabilities) to ServiceNow in one update.- Select Jobs, search for servicenow, select PANW IoT ServiceNow Integration, and then click Edit.
- In Integration Instance Name, enter the name of the ServiceNow integration instance for which you want to run this job. To know if entering the integration instance name is required, consider these three situations:If you added a new Service integration instance, entering its name here is required.If you use the default ServiceNow integration instance with the default name and the mapping method is Use ServiceNow Classes, entering its name here is also required.If you use the default ServiceNow integration instance with the default name and the mapping method is Use ServiceNow IoT Device Table, then this field is optional.
- By default, the PANW IoT ServiceNow Integration job applies a 15-minute playbook poll interval. This interval is the period of time for which Cortex XSOAR polls Device Security for new or modified device records and security incidents to include in its incremental updates. If you want to continue using the 15-minute poll interval, either leave the Playbook Poll Interval field empty or enter 15. (Although not stated, “minutes” is the unit of time that XSOAR uses.) To change the interval to something else, enter a different number.
- When done, Update Job.
Mapping method: Use ServiceNow Classes Edit ServiceNow jobs to map additional Device Security types, categories, and profiles to ServiceNow classes.If you want to send device records for anything other than OT devices, add their types, categories, or profiles to the Cortex XSOAR jobs.If you don’t want Device Security to send ServiceNow device records for any other device type, category, or profile, skip this step.When Device Security integrates with ServiceNow and you use the predefined integration instance with its default name (PANW IoT 3rd Party ServiceNow Integration Instance), you don’t have to modify the two predefined jobs. By default, they reference the default name of the predefined integration instance.- Select PANW IoT ServiceNow Integration, and then click Edit.
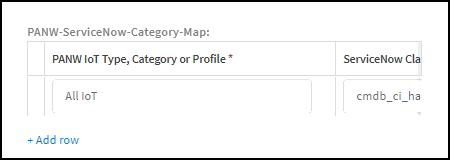
- Scroll down to the Custom Fields section and find the PANW-ServiceNow-Category-Map table.
- Click + Add row and enter the name of a device type, category, or profile in Device Security and the class you want to map it to in ServiceNow Class.To find the exact text strings to enter in the IoT Security, refer to their use in the Device Security portal. In particular, the query tool at the top of the portal contains text strings for all the device types, categories, and profiles in your tenant.For a list of ServiceNow class table names, refer to the list in CMDB table descriptions.For example, you can use this setting to map medical imaging devices in the DICOM-Imager, MRI Machine, and X-Ray Machine categories in Device Security to the cmdb_ci_imaging_hardware class in ServiceNow.
- Continue adding rows and entries in the two columns to map more IoT Security device categories to ServiceNow categories.
![]()
- When done, Update Job.
- Repeat these steps for the PANW IoT Bulk Expert to ServiceNow job.
Mapping method: Use ServiceNow IoT Device Table If you want to convert the device category names that Device Security sends to ServiceNow to match those that ServiceNow uses, create category name mappings.In XSOAR, map the names for Device Security device categories to those in ServiceNow. You must define these mappings in the two jobs that XSOAR uses to send device attributes to ServiceNow.If you don’t want Device Security to convert its device category names to those that ServiceNow uses, skip this step.- Select PANW IoT ServiceNow integration, and then click Edit.
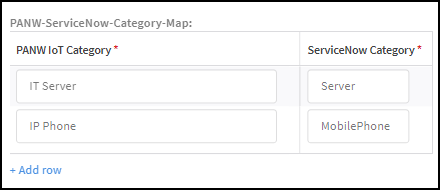
- Scroll down to the Custom Fields section and find the PANW-ServiceNow-Category-Map table.
- Click + Add row and enter a name in the PANW IoT Category column and its corresponding name in the ServiceNow Category column.
- Continue adding rows and entries in the two columns to map more Device Security device categories to ServiceNow categories.
![]()
- When done, click Update Job.
- Add the same entries to the PANW-ServiceNow-Category-Map table in the PANW IoT Bulk Export To Servicenow job.
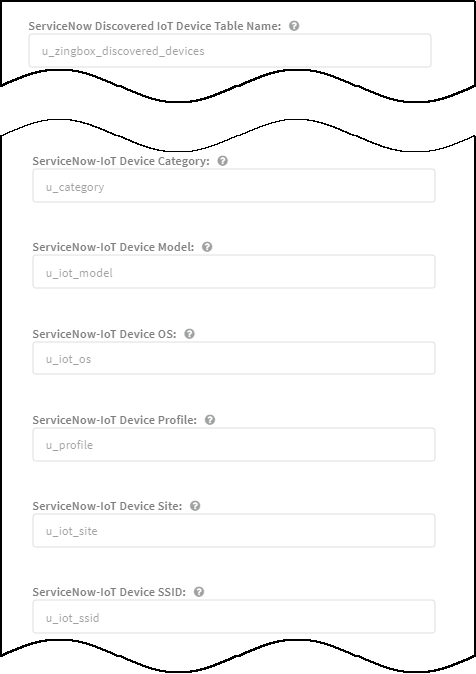
Mapping method: Use ServiceNow IoT Device Table If you use an existing device cmdb table with a different table label or different column labels, set the corresponding table and column names in Cortex XSOAR jobs that send device records to ServiceNow.If you are using the default table and column labels in ServiceNow, skip this step.- Select Jobs, search for servicenow, select PANW IoT ServiceNow integration, and then click Edit.
- Edit the default values to match those you used in the ServiceNow table to which XSOAR will send device records.
![]()
- When done, Update Job.
- Select PANW IoT Bulk Export to ServiceNow, click Edit, make the same changes there, and then Update Job.
If you created more integration instances for multiple ServiceNow accounts, add more jobs as necessary.Each ServiceNow integration instance requires its own jobs for incremental and bulk updates, each of which must reference the instance by name. In this case, make sure the Integration Instance Name field in the jobs has the name of the correct ServiceNow instance.Run the job for each integration instance you create. The first time you run a job that references an integration instance, it triggers XSOAR to report the instance to Device Security, which then displays the integration instance on the Integrations page.To enable the ServiceNow integration instance, click Settings and then click Enable next to the instance name.Return to Device Security and check the status of the ServiceNow integration.XSOAR automatically runs a preconfigured job for ServiceNow integration and reports the integration instance to Device Security, which displays it on the Integrations page. The integration instance can be in one of the following four states as shown in the Status column on the Integrations page:- Disabled means that either the integration was configured but intentionally disabled or it was never configured and a job that references it is enabled and running.
- Error means that the integration was configured and enabled but is not functioning properly, possibly due to a configuration error or network condition.
- Inactive means that the integration was configured and enabled but no job has run for at least the past 60 minutes.
- Active means that the integration was configured and enabled and is functioning properly.
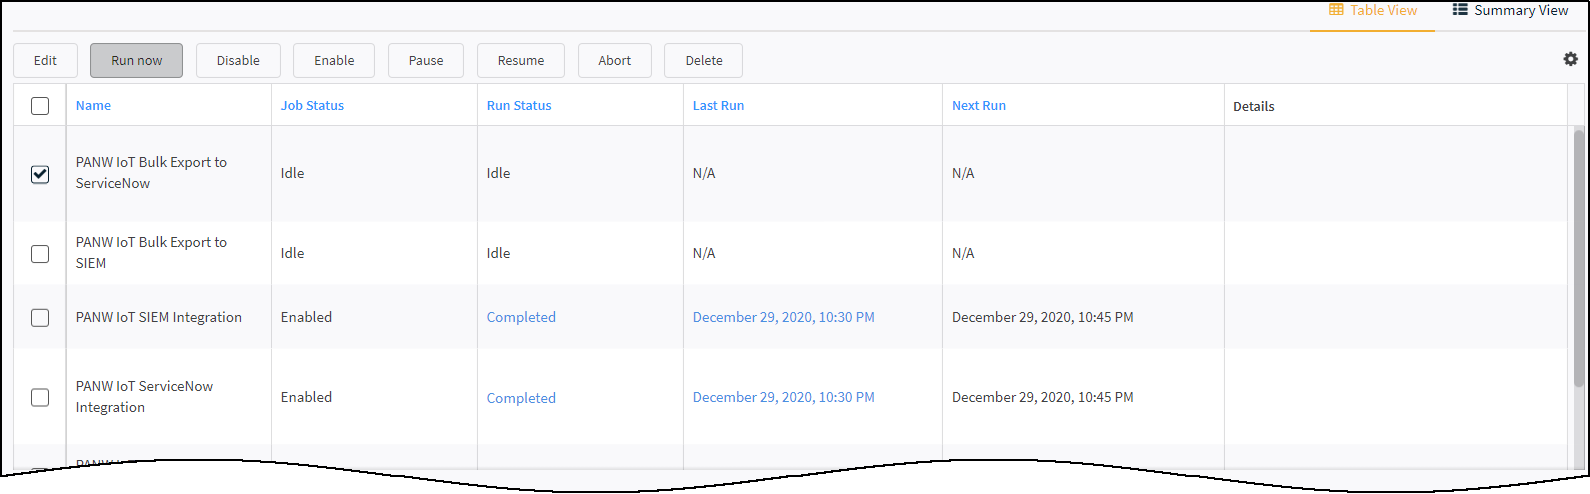
When you see that the integration instance status has changed from Disabled to Active, its setup is complete.XSOAR begins an automated process that sends ServiceNow incrementally updated data from Device Security about changes to device attributes occurring within the last 15 minutes.Export the IoT device inventory from Device Security to ServiceNow.Although regular, automated incremental updates are now in progress, ServiceNow doesn’t yet have a complete device inventory from Device Security. This requires a bulk data export from Device Security to ServiceNow that you initiate from the XSOAR interface. The process is somewhat time consuming; for example, exporting an inventory of 30,000–40,000 IoT devices can take up to 36 hours.To start the bulk export of the entire device inventory, click Launch Cortex Access to return to the XSOAR interface. Click Jobs, select PANW IoT Bulk Export to ServiceNow, and then click Run now.![]() During the bulk export and after the job completes, the automated incremental update will continue running every 15 minutes.
During the bulk export and after the job completes, the automated incremental update will continue running every 15 minutes.