Device Security
Set up Device Security and XSOAR for SIEM Integration
Table of Contents
Set up Device Security and XSOAR for SIEM Integration
Set up Device Security and Cortex XSOAR to integrate with
SIEM.
| Where Can I Use This? | What Do I Need? |
|---|---|
|
One of the following subscriptions:
One of the following Cortex XSOAR setups:
|
To set up Device Security to integrate through Cortex XSOAR with SIEM,
configure XSOAR with one or more syslog sender integration instances and jobs to
export device data, security alerts, and vulnerabilities from Device Security to
the SIEM server. You can configure XSOAR to perform incremental exports
automatically at regular intervals and you can perform bulk exports manually on
demand. The configuration requires the following information about the SIEM
server:
- IP address, port number, and protocol of the server
- Digital certificate or username and password of the user account that Cortex XSOAR uses when securely connecting to the SIEM server
When using a cohosted XSOAR instance, a cloud-hosted XSOAR server, or an on-premises
XSOAR server that cannot reach part of the network, you must also add a Cortex XSOAR engine to your network. This engine receives syslog
notifications in CEF format from Device Security and sends them on to the SIEM
server.
Cortex XSOAR Engine Installation
When using a cohosted XSOAR instance, a cloud-hosted XSOAR server, or an on-premises XSOAR server
that cannot reach part of the network, XSOAR initiates connections to the SIEM
server through an on-premises XSOAR engine. Although it's possible to install an
XSOAR engine on machines running Windows, macOS, and Linux operating systems,
only an engine on a Linux machine supports Device Security integrations. For
more information about operating system and hardware requirements, see the
Cortex XSOAR Administrator’s Guide.
We recommend downloading the Cortex XSOAR engine using the shell
installer script and installing it on a Linux machine. This simplifies the
deployment by automatically installing all required dependencies and also
enables remote engine upgrades.
When placing the XSOAR engine on your network, make sure it can reach your SIEM server on port
514 for UDP or TCP or on port 6514 for TLS, or whatever port on which the SIEM
server is configured to listen for incoming syslog event notifications.
The on-premises firewall must allow the Cortex XSOAR engine to form
HTTPS connections on TCP port 443 to the Cortex cloud at
https://<your-domain>.iot.demisto.live/. You can see the URL of your
Cortex XSOAR instance when you log in to Device Security
and click Integrations and then click Launch
Cortex XSOAR. It’s visible in the address bar
of the web page displaying the Cortex XSOAR interface.
To create an Cortex XSOAR engine, access the Cortex XSOAR
interface (from Device Security, click
Integrations and then click Launch
Cortex XSOAR). In the Cortex XSOAR UI,
click . Choose
Shell as the type.
For Cortex XSOAR engine installation instructions, see Engine Installation.
For help troubleshooting Cortex XSOAR engines, including installations,
upgrades, connectivity, and permissions, see Troubleshoot Engines and Troubleshoot Integrations Running on
Engines.
Configure Device Security and Cortex XSOAR
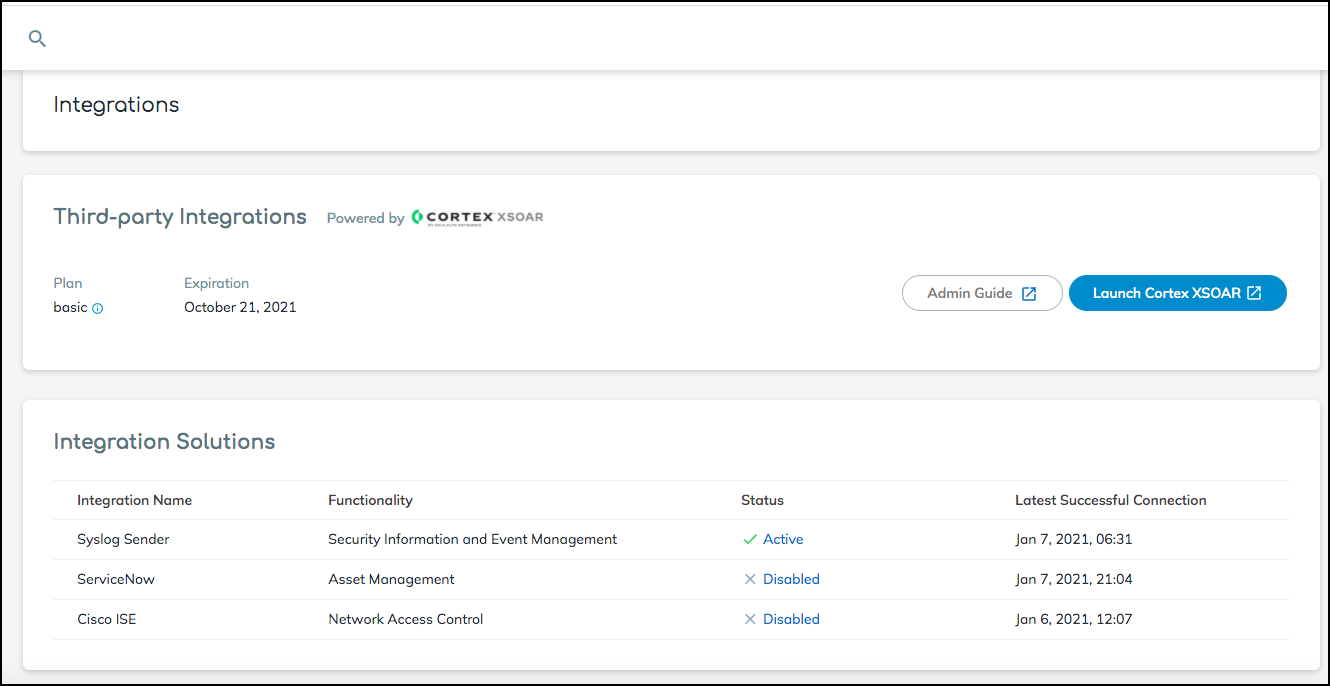
- Log in to Device Security and from there access SIEM settings in Cortex XSOAR.
- Log in to Device Security and then click Integrations.
- Device Security uses Cortex XSOAR to integrate with SIEM, and the settings you must configure to integrate with SIEM are in the XSOAR interface. To access these settings, click Launch Cortex XSOAR.The Cortex XSOAR interface opens in a new browser window.
- Click Settings in the left navigation menu, search for siem to locate it among other instances.
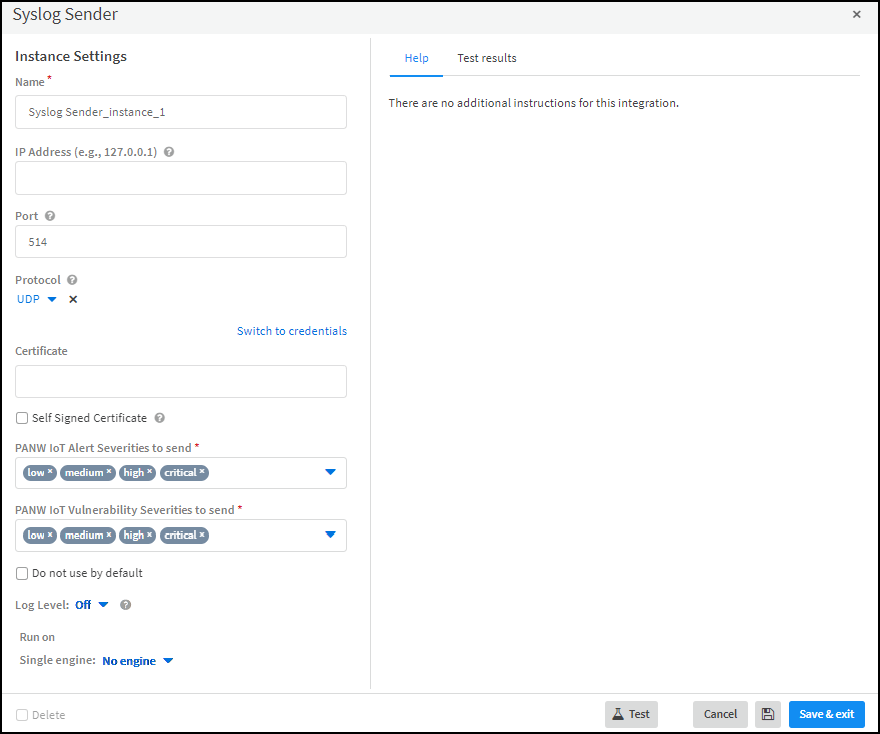
![]() Configure the SIEM integration instance.
Configure the SIEM integration instance.- For a cloud-based cohosted XSOAR instance, click the SIEM instance settings icon () to open the settings panel for the predefined integration instance: PANW IoT 3rd Party SIEM Integration Instance. If you leave the default name unmodified, the predefined job for incremental updates, which references the default instance name, begins working automatically as soon as you save and enable the integration instance. If you change the default name of the predefined integration instance or if you create a new instance, you must modify the predefined job or create a new job so that it references the name of the instance.
![]() For a full-service XSOAR server, click Add instance and create a new integration instance with a unique name.
For a full-service XSOAR server, click Add instance and create a new integration instance with a unique name. - Enter the SIEM server IP address and the protocol and port number on which it listens for syslog notification messages.For closed, private networks where the privacy of the syslog messages is assured, you can safely use UDP or TCP on port 514. When sending syslog messages over networks where privacy is a concern, you can use TLS. (XSOAR supports TLS 1.2 and 1.3.) When using TLS, also choose a certificate for authenticating the connection. The certificate can either be signed by a Certificate Authority (CA) or self-signed. For information about using certificates in XSOAR, see HTTPS with a Signed Certificate.
- Set the severity level of the alerts and vulnerabilities for which you want Device Security to send syslog messages.By default, XSOAR sends syslog messages for alerts and vulnerabilities at all severity levels. However, you can remove any severity levels from the lists to exclude them. XSOAR will then only send messages with the alerts and vulnerabilities at the severity levels remaining in the lists.
- Choose the XSOAR engine that you want to communicate with the SIEM server.
![]()
- When done, click Test.XSOAR sends the following test message in Common Event Format (CEF) to the server:<timestamp> <server-ip-address> 1 <utc-timestamp> SysLogLogger 1 - - {‘CEF:0|PaloAltoNetworks|PANWIOT|1.0|Test Connection’}If the test is successful, a Success message appears. If not, check that the settings were entered correctly and then test the configuration again.
![]() After the test succeeds, click Save & exit to save your changes and close the settings panel.
After the test succeeds, click Save & exit to save your changes and close the settings panel. - To enable PANW IoT 3rd Party SIEM Integration Instance, click Enable.Return to Device Security and check the status of the Syslog Server integration.An integration instance can be in one of the following four states, which Device Security displays in the Status column on the Integrations page:
- Active — the integration was configured and enabled and is functioning properly.Disabled — either the integration was configured but intentionally disabled or it was never configured and a job that references it is enabled and running.
- Error — the integration was configured and enabled but is not functioning properly, possibly due to a configuration error or network condition.
- Inactive — the integration was configured and enabled but no job has run for at least the past 60 minutes.
When you see that the status of an integration instance is Active, its setup is complete.![]() Cloud-based co-hosted Cortex XSOAR instance: If you configure and enable the default integration instance (with its name, PANW IoT 3rd Party SIEM Integration Instance, unmodified), XSOAR immediately begins an automated export process. A predefined job called PANW IoT SIEM Integration is already enabled. There’s no need to enable it or configure and enable another job. Cortex XSOAR sends the specified SIEM server incremental syslog updates from Device Security about changes to device attributes, new alerts, and new vulnerabilities occurring within the last polling interval, which is 15 minutes by default and is configurable.On the other hand, if you create and enable a new SIEM integration instance, you must next create and enable a job that references the new instance. Only after you configure and enable both an integration instance and job does XSOAR begin the automated export process.Full-featured Cortex XSOAR server: You must configure and enable an integration instance for SIEM and a job that references the instance for the XOAR server to begin sending the SIEM server incremental syslog updates about new device attributes, alerts, and vulnerabilities that occurred within the last polling interval.To integrate with other SIEM servers, repeat the previous steps to add more integration instances.When Device Security integrates with SIEM through a cohosted Cortex XSOAR instance and you use the predefined integration instance with its default name (PANW IoT 3rd Party SIEM Integration Instance), you don’t have to configure any jobs. The predefined jobs—PANW IoT SIEM Integration and PANW IoT Bulk Export to SIEM—reference the default name of the predefined integration instance and simply work when you enable or run them.When Device Security integrates with SIEM through a full-featured Cortex XSOAR server in the cloud or on premises, there aren’t any predefined integration instances and jobs. You must always configure them. Also, if you create additional integration instances and jobs, you must make sure that each job references a specific instance; otherwise, if a job doesn’t specifically reference the name of an integration instance, it will use the default instance.Export data about devices, security alerts, and device vulnerabilities incrementally from Device Security to SIEM.
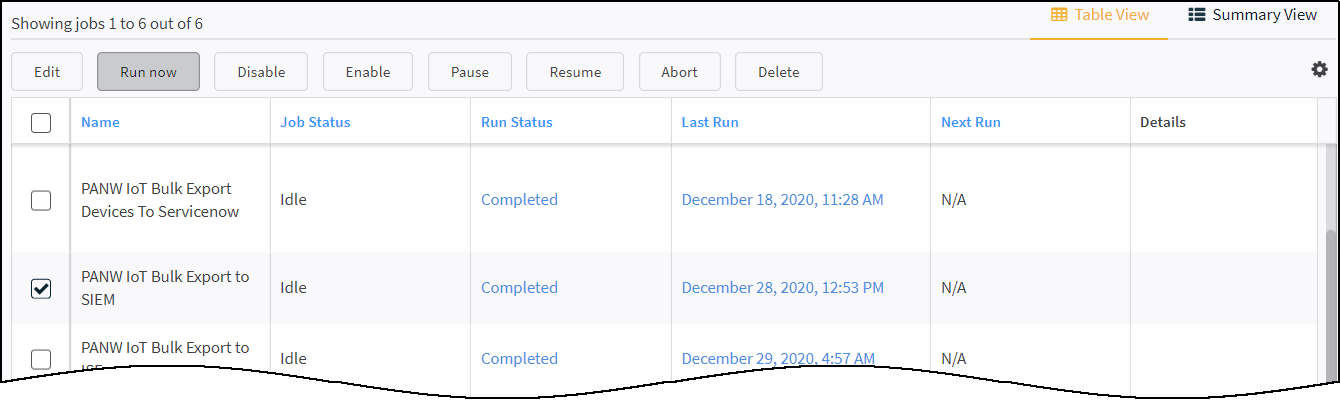
Cloud-based co-hosted Cortex XSOAR instance: If you configure and enable the default integration instance (with its name, PANW IoT 3rd Party SIEM Integration Instance, unmodified), XSOAR immediately begins an automated export process. A predefined job called PANW IoT SIEM Integration is already enabled. There’s no need to enable it or configure and enable another job. Cortex XSOAR sends the specified SIEM server incremental syslog updates from Device Security about changes to device attributes, new alerts, and new vulnerabilities occurring within the last polling interval, which is 15 minutes by default and is configurable.On the other hand, if you create and enable a new SIEM integration instance, you must next create and enable a job that references the new instance. Only after you configure and enable both an integration instance and job does XSOAR begin the automated export process.Full-featured Cortex XSOAR server: You must configure and enable an integration instance for SIEM and a job that references the instance for the XOAR server to begin sending the SIEM server incremental syslog updates about new device attributes, alerts, and vulnerabilities that occurred within the last polling interval.To integrate with other SIEM servers, repeat the previous steps to add more integration instances.When Device Security integrates with SIEM through a cohosted Cortex XSOAR instance and you use the predefined integration instance with its default name (PANW IoT 3rd Party SIEM Integration Instance), you don’t have to configure any jobs. The predefined jobs—PANW IoT SIEM Integration and PANW IoT Bulk Export to SIEM—reference the default name of the predefined integration instance and simply work when you enable or run them.When Device Security integrates with SIEM through a full-featured Cortex XSOAR server in the cloud or on premises, there aren’t any predefined integration instances and jobs. You must always configure them. Also, if you create additional integration instances and jobs, you must make sure that each job references a specific instance; otherwise, if a job doesn’t specifically reference the name of an integration instance, it will use the default instance.Export data about devices, security alerts, and device vulnerabilities incrementally from Device Security to SIEM.- Click Launch Cortex XSOAR to return to the Cortex XSOAR interface. Click Jobs, search for siem, select PANW IoT SIEM Integration, and then click Edit.If you have another integration instance (besides the default) and you want the job to reference that one, you can create a new job with similar settings to these but that references the instance with the non-default name.
- Check that the following predefined settings are correct for the predefined incremental import job or enter similar settings for a new job:Time triggered: (select)Recurring: (select) If the Every field is empty, XSOAR applies an interval of 15 Minutes by default. If you want, you can change it to another value.Name: PANW IoT SIEM IntegrationPlaybook: Incremental Export to SIEM - PANW IoT 3rd Party IntegrationIntegration Instance Name: If the field is empty, the job references the default integration instance: PANW IoT 3rd Party SIEM Integration Instance. If you’ve changed the default integration instance name or want the job to use a different instance that you created, make sure its name appears here.Playbook Poll Interval: If the field is empty, XSOAR applies a default 15-minute interval so that it collects data about devices, security alerts, and device vulnerabilities that occurred during the last 15 minutes. If you want to change the interval, enter a numerical value, which although unstated is in minutes.
- If you make any updates to the default job, click Update Job. If not, click Cancel. If you create a new job, click Create new job.
Export the data about all devices, security alerts, and device vulnerabilities from Device Security to SIEM in bulk.When using a cohosted Cortex XSOAR instance with the default integration instance and job or when creating and enabling a new integration instance and job, XSOAR starts exporting incremental updates to the SIEM server. However, SIEM doesn’t yet have a complete list of devices, security alerts, and device vulnerabilities from Device Security. This requires a bulk data export from Device Security to SIEM that you initiate from the XSOAR interface at a time that’s suitable for network operations. To shorten the time required for the bulk export to complete, plan to run it during off-peak hours on a slow day such as a holiday or weekend. Exporting an inventory of 30,000-40,000 devices takes up to 12 hours when a network is under normal usage. Doing this when network traffic is light can shorten the time needed to complete the job.- On the Jobs page in the Cortex XSOAR interface. Click Jobs, select PANW IoT Bulk Export to SIEM, and then click Run now.If you have another integration instance (besides the default) and you want the job to reference that one, you can create a new job with similar settings to these but that references the instance with the non-default name.
- Before starting the bulk export, check that the following predefined settings are correct for the predefined bulk import job or enter similar settings for a new job:Time triggered: (select)Recurring: (select) If the Every field is empty, XSOAR applies an interval of 15 Minutes by default. If you want, you can change it to another value.Name: PANW IoT Bulk Export to SIEMPlaybook: Bulk Export to SIEM - PANW IoT 3rd Party IntegrationIntegration Instance Name: If the field is empty, the job references the default integration instance: PANW IoT 3rd Party SIEM Integration Instance. If you’ve changed the default integration instance name or want the job to use a different instance that you created, make sure its name appears here.Run Once: Yes This stops the job after it completes.
- If you made any changes to the default job, click Update Job. If not, click Cancel. If you create a new job, click Create new job.
- To perform a bulk update of device details, security alerts, and unresolved vulnerabilities to the SIEM server, select the bulk export job and then click Run now.When you manually start the bulk export job, Cortex XSOAR exports device attributes for a maximum of 1000 devices, a maximum of 1000 security alerts, and a maximum of 1000 device vulnerabilities every 15 minutes until it exports them all to the SIEM server identified in the integration instance. These settings instruct Cortex XSOAR to run the job every 15 minutes until it exports everything and then stops.
![]() During the bulk export and after the job completes, the automated incremental update will continue running every 15 minutes or for whatever recurring interval you set.Although it’s possible to run multiple bulk export jobs in parallel, doing so can affect the XSOAR engine performance. Therefore, we advise not running more than one at a time.
During the bulk export and after the job completes, the automated incremental update will continue running every 15 minutes or for whatever recurring interval you set.Although it’s possible to run multiple bulk export jobs in parallel, doing so can affect the XSOAR engine performance. Therefore, we advise not running more than one at a time.