Set up Cisco ISE to Identify and Quarantine IoT Devices
Table of Contents
Expand all | Collapse all
-
- Integrate IoT Security with AIMS
- Set up AIMS for Integration
- Set up IoT Security and XSOAR for AIMS Integration
- Send Work Orders to AIMS
- Integrate IoT Security with Microsoft SCCM
- Set up Microsoft SCCM for Integration
- Set up IoT Security and XSOAR for SCCM Integration
- Integrate IoT Security with Nuvolo
- Set up Nuvolo for Integration
- Set up IoT Security and XSOAR for Nuvolo Integration
- Send Security Alerts to Nuvolo
- Send Vulnerabilities to Nuvolo
- Integrate IoT Security with ServiceNow
- Set up ServiceNow for Integration
- Set up IoT Security and XSOAR for ServiceNow Integration
- Send Security Alerts to ServiceNow
- Send Vulnerabilities to ServiceNow
-
- Integrate IoT Security with Cortex XDR
- Set up Cortex XDR for Integration
- Set up IoT Security and XSOAR for XDR Integration
- Integrate IoT Security with CrowdStrike
- Set up CrowdStrike for Integration
- Set up IoT Security and XSOAR for CrowdStrike Integration
- Integrate IoT Security with Microsoft Defender XDR
- Set up Microsoft Defender XDR for Integration
- Set up IoT Security and Cortex XSOAR for Microsoft Defender XDR Integration
- Integrate IoT Security with Tanium
- Set up Tanium for Integration
- Set up IoT Security and XSOAR for Tanium Integration
-
- Integrate IoT Security with Aruba AirWave
- Set up Aruba AirWave for Integration
- Set up IoT Security and Cortex XSOAR for Aruba AirWave Integration
- View Device Location Information
- Integrate IoT Security with Aruba Central
- Set up Aruba Central for Integration
- Set up IoT Security and XSOAR for Aruba Central Integration
- Integrate IoT Security with Cisco DNA Center
- Set up Cisco DNA Center to Connect with XSOAR Engines
- Set up IoT Security and XSOAR for DNA Center Integration
- Integrate IoT Security with Cisco Meraki Cloud
- Set up Cisco Meraki Cloud for Integration
- Set up IoT Security and XSOAR for Cisco Meraki Cloud
- Integrate IoT Security with Cisco Prime
- Set up Cisco Prime to Accept Connections from IoT Security
- Set up IoT Security and XSOAR for Cisco Prime Integration
- Integrate IoT Security with Network Switches for SNMP Discovery
- Set up IoT Security and Cortex XSOAR for SNMP Discovery
- Integrate IoT Security with Switches for Network Discovery
- Set up IoT Security and Cortex XSOAR for Network Discovery
-
- Integrate IoT Security with Aruba WLAN Controllers
- Set up Aruba WLAN Controllers for Integration
- Set up IoT Security and XSOAR for Aruba WLAN Controllers
- Integrate IoT Security with Cisco WLAN Controllers
- Set up Cisco WLAN Controllers for Integration
- Set up IoT Security and XSOAR for Cisco WLAN Controllers
-
- Integrate IoT Security with Aruba ClearPass
- Set up Aruba ClearPass for Integration
- Set up IoT Security and XSOAR for ClearPass Integration
- Put a Device in Quarantine Using Aruba ClearPass
- Release a Device from Quarantine Using Aruba ClearPass
- Integrate IoT Security with Cisco ISE
- Set up Cisco ISE to Identify IoT Devices
- Set up Cisco ISE to Identify and Quarantine IoT Devices
- Configure ISE Servers as an HA Pair
- Set up IoT Security and XSOAR for Cisco ISE Integration
- Put a Device in Quarantine Using Cisco ISE
- Release a Device from Quarantine Using Cisco ISE
- Apply Access Control Lists through Cisco ISE
- Integrate IoT Security with Cisco ISE pxGrid
- Set up Integration with Cisco ISE pxGrid
- Put a Device in Quarantine Using Cisco ISE pxGrid
- Release a Device from Quarantine Using Cisco ISE pxGrid
- Integrate IoT Security with Forescout
- Set up Forescout for Integration
- Set up IoT Security and XSOAR for Forescout Integration
- Put a Device in Quarantine Using Forescout
- Release a Device from Quarantine Using Forescout
-
- Integrate IoT Security with Qualys
- Set up QualysGuard Express for Integration
- Set up IoT Security and XSOAR for Qualys Integration
- Perform a Vulnerability Scan Using Qualys
- Get Vulnerability Scan Reports from Qualys
- Integrate IoT Security with Rapid7
- Set up Rapid7 InsightVM for Integration
- Set up IoT Security and XSOAR for Rapid7 Integration
- Perform a Vulnerability Scan Using Rapid7
- Get Vulnerability Scan Reports from Rapid7
- Integrate IoT Security with Tenable
- Set up Tenable for Integration
- Set up IoT Security and XSOAR for Tenable Integration
- Perform a Vulnerability Scan Using Tenable
- Get Vulnerability Scan Reports from Tenable
Set up Cisco ISE to Identify and Quarantine IoT Devices
Integrate IoT Security through Cortex XSOAR with Cisco ISE to identify and quarantine IoT
devices.
As an IoT Security administrator, you can
selectively quarantine devices through Cisco ISE using PanwIoTAlertSeverity
and PanwIoTAlertType attributes. When you send ISE the quarantine
command, ISE quarantines impacted devices by applying policy rules
based on the alert severity, alert type, or both.
In addition
to configuring ISE to
identify IoT devices, configure the following on your Cisco
ISE system to quarantine IoT devices when there are security alerts:
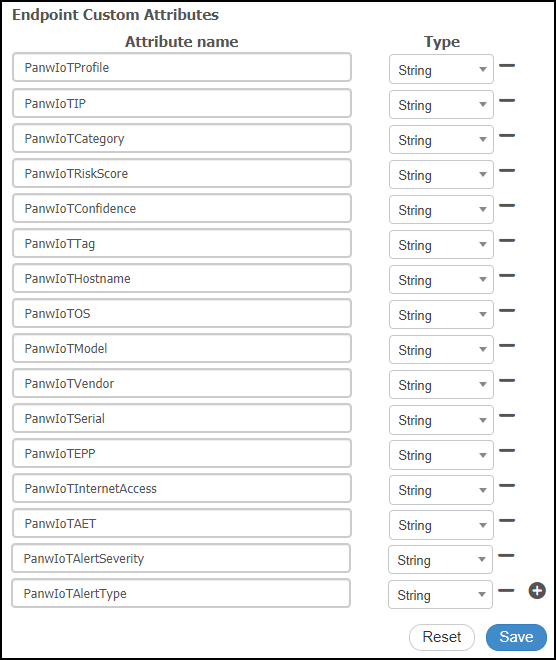
- Add these custom endpoint attributes for IoT Security alerts: PanwIoTAlertSeverity and PanwIoTAlertType
- Create authorization profiles
- Create exception rules
- Add IoT Security endpoint attributes for alert severity and type.
- Click AdministrationIdentity ManagementSettingsEndpoint Custom Attributes.
- Click the Add icon ( + ), enter PanwIoTAlertSeverity in the Attribute name field, and then choose String from the Type drop-down list.
- Click the Add icon ( + ), enter PanwIoTAlertType in the Attribute name field, choose String from the Type drop-down list, and then Save the configuration.This is a possible set of attributes:PanwIoTProfile, PanwIoTIP, PanwIoTCategory, PanwIoTRiskScore, PanwIoTConfidence, PanwIoTTag, PanwIoTHostname, PanwIoTOS, PanwIoTModel, PanwIoTVendor, PanwIoTSerial, PanwIoTEPP, PanwIoTInternetAccess, PanwIoTAET, PanwIoTAlertSeverity, PanwIoTAlertType
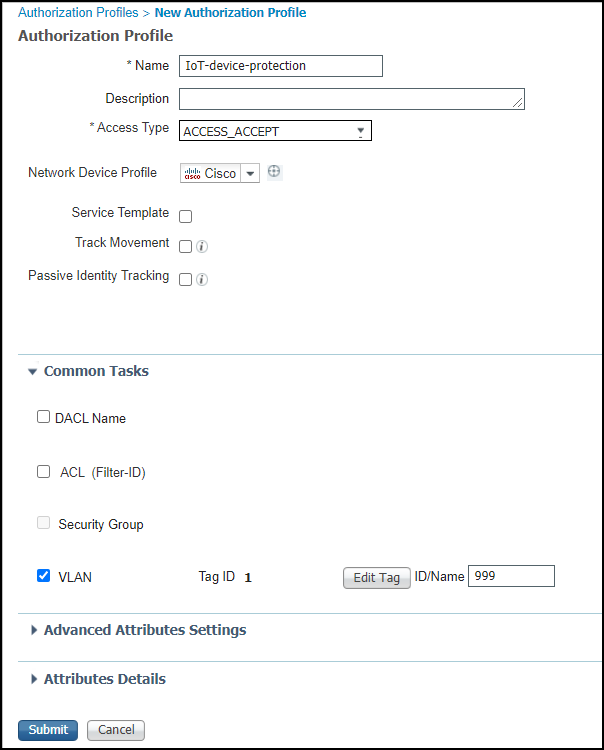
Create an authorization profile that allows IoT devices to access the network and associates them with the quarantine VLAN.- Click PolicyPolicy ElementsResultsAuthorizationAuthorization Profiles and then click Add.
- Enter settings like those described below, leave the other settings at their default values:Name: Enter a name for the profile; for example: IoT-device-protectionAccess Type: ACCESS_ACCEPTVLAN: (select); Tag ID: 1; ID/Name: 999, where 999 is the ID number of the quarantine VLAN.
- Submit the settings.
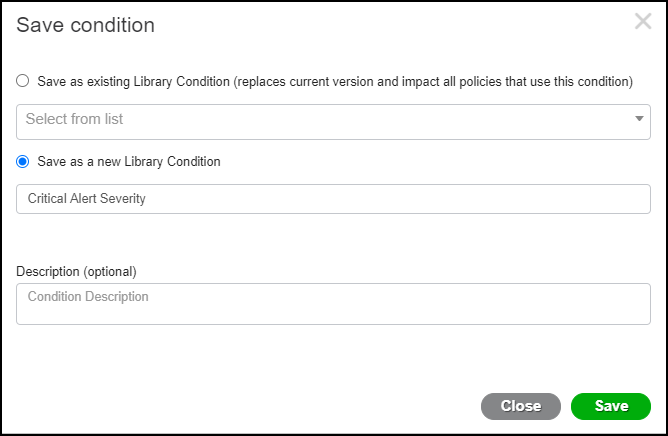
Create a condition for applying an exception rule, such as applying it when the severity is critical.- Click PolicyPolicy ElementsConditionsLibrary Conditions and then enter the following in Editor:Click to add an attribute: EndpointsPanwIoTAlertSeverityOperator: EqualsAttribute value: Critical
- Save the configuration.
- In the Save condition dialog box, select Save as a new Library Condition, enter a name such as Critical Alert Severity in the Condition Name field, and then click Save.
Create authorization policy exception rule that assigns devices with critical alerts to the quarantine VLAN.- Click PolicyPolicy Sets and then click the Arrow icon ( > ) to modify your existing policy set.
- Expand Authorization Policy - Local Exceptions, click the Plus icon ( + ) to add an exception rule, and then click the Plus icon ( + ) to add a condition.
- Click-drag Critical Alert Severity from the Library into the Editor and then click Use.
- In Results-Profiles, choose IoT-device-protection, which is the authorization profile you created for this condition.
- Save the configuration.When you quarantine a device in the IoT Security portal, it sends the two alert attributes (PanwIoTAlertType and PanwIoTAlertSeverity) for that device (identified by its MAC address) through XSOAR to ISE. The next time that device connects to the network and requests access from Cisco ISE, the two alert attributes will match this exception rule and assign it to the quarantine VLAN.The device remains in quarantine while you investigate the cause of the alert. Once it’s resolved, you then release it from quarantine, which clears the alert attributes. When the device connects to the network and again requests access from Cisco ISE, ISE reassigns it to its usual VLAN.