Device Security
Set up Device Security and XSOAR for ClearPass Integration
Table of Contents
Expand All
|
Collapse All
Device Security Docs
Set up Device Security and XSOAR for ClearPass Integration
Set up Device Security and Cortex XSOAR to integrate with
Aruba ClearPass.
| Where Can I Use This? | What Do I Need? |
|---|---|
|
One of the following subscriptions:
One of the following Cortex XSOAR setups:
|
To set up Device Security to integrate through
Cortex XSOAR with Aruba ClearPass, you must add one or more Cortex XSOAR engines to your network.
You must also configure one
or more Aruba ClearPass integration instances in XSOAR. To do this,
you need the IP address or URL of your ClearPass systems, client
ID, and client secret for identifying and authenticating the XSOAR
engines when they connect to Aruba ClearPass.
Cortex XSOAR Engine Installation
A Cortex XSOAR engine initiates connections
to Aruba ClearPass and to the Cortex cloud and provides the means
through which they communicate with each other. Although it's possible
to install an XSOAR engine on machines running Windows, macOS, and
Linux operating systems, only an engine on a Linux machine supports
Device Security integrations. For more information about operating
system and hardware requirements, see the Cortex XSOAR
Cortex XSOAR.
We recommend downloading the Cortex XSOAR engine using the shell
installer script and installing it on a Linux machine. This simplifies the
deployment by automatically installing all required dependencies and also
enables remote engine upgrades.
When
placing an XSOAR engine on your network, make sure it can form HTTPS
connections to your Aruba ClearPass system on TCP port 443 when
authenticating and sending it quarantine commands.
The on-premises firewall must allow the Cortex XSOAR engine to form
HTTPS connections on TCP port 443 to the Cortex cloud at
https://<your-domain>.iot.demisto.live/. You can see the URL of your
Cortex XSOAR instance when you log in to Device Security
and click Integrations and then click Launch
Cortex XSOAR. It’s visible in the address bar
of the web page displaying the Cortex XSOAR interface.
To create an Cortex XSOAR engine, access the Cortex XSOAR
interface (from Device Security, click
Integrations and then click Launch
Cortex XSOAR). In the Cortex XSOAR UI,
click SettingsEngines+ Create New Engine. Choose
Shell as the type.
For Cortex XSOAR engine installation instructions, see Engine Installation.
For help troubleshooting Cortex XSOAR engines, including installations,
upgrades, connectivity, and permissions, see Troubleshoot Engines and Troubleshoot Integrations Running on
Engines.
Configure Device Security and Cortex XSOAR
- Log in to Device Security and from there access Aruba ClearPass settings in Cortex XSOAR.
- Log in to Device Security and then click Integrations.
- Device Security uses Cortex XSOAR to integrate with Aruba ClearPass, and the settings you must configure to integrate with it are in the XSOAR interface. To access these settings, click Launch Cortex XSOAR.The Cortex XSOAR interface opens in a new browser window.
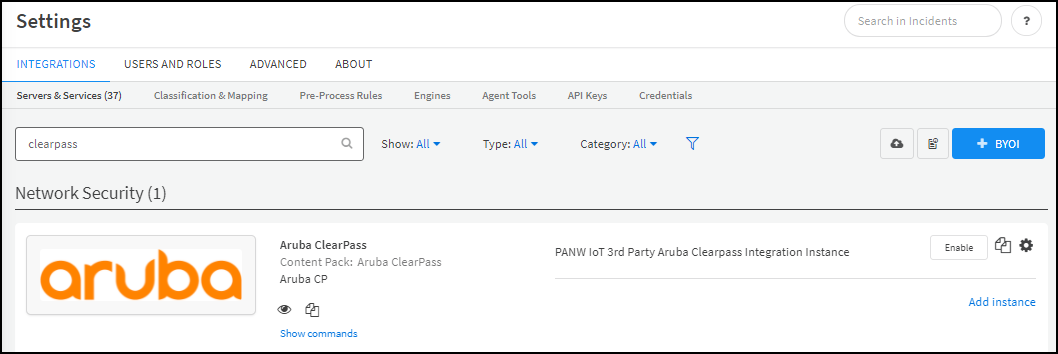
- If necessary, search for clearpass to locate it among other instances.
![]()
Configure the Aruba ClearPass integration instance.- Click the Settings icon () for the preconfigured Aruba ClearPass instance: PANW IoT 3rd Party Aruba Clearpass Integration Instance.
![]()
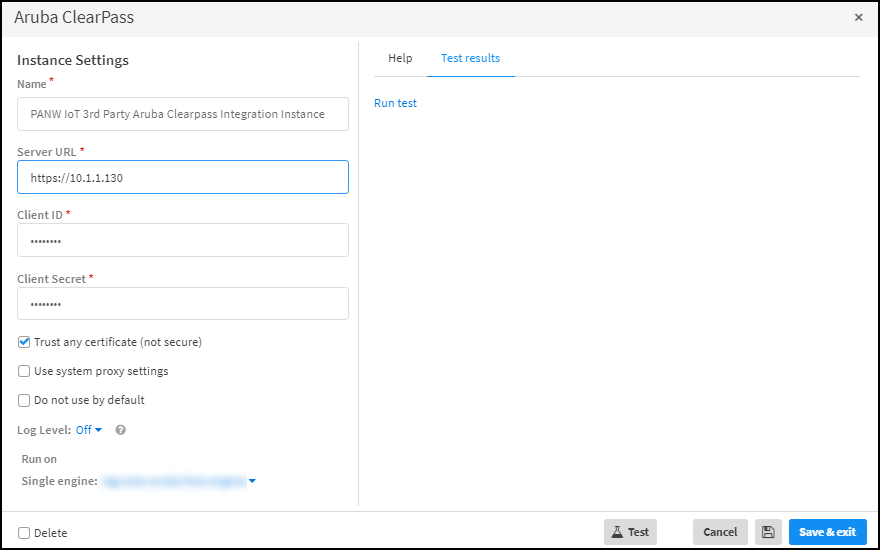
- Enter the following and leave other settings at their default values:Name: Use the default name of the instance or enter a new one.If you change the instance name, remember it because you’re going to use it again when creating jobs that Cortex XSOAR will run. On the other hand, if you keep the default instance name, the jobs will automatically use it.Server URL: Enter the Aruba ClearPass server URL (beginning with “https://”).Client ID: Enter the client ID that you previously recorded when configuring Aruba ClearPass.Client Secret: Enter the client secret that you previously recorded when configuring Aruba ClearPass.Run on Single engine: Choose the XSOAR engine that you previously installed.
![]()
- When finished, click Run test or Test.If the test is successful, a Success message appears. If not, check that the settings were entered correctly and then test the configuration again.
![]()
- After the test succeeds, click Save & exit to save your changes and close the settings panel.
(Optional) Create more integration instances to which Device Security and XSOAR will export device attributes.You can add multiple Aruba ClearPass integration instances, each one with settings to communicate through an XSOAR engine with a different ClearPass server. To add another instance, click Add instance. Each additional integration instance must have a unique name, which the jobs you create to use the instance must reference.Edit the preconfigured job that updates ClearPass with custom endpoint attributes incrementally or create a new job.- Copy the name of the integration instance and then navigate to Jobs.
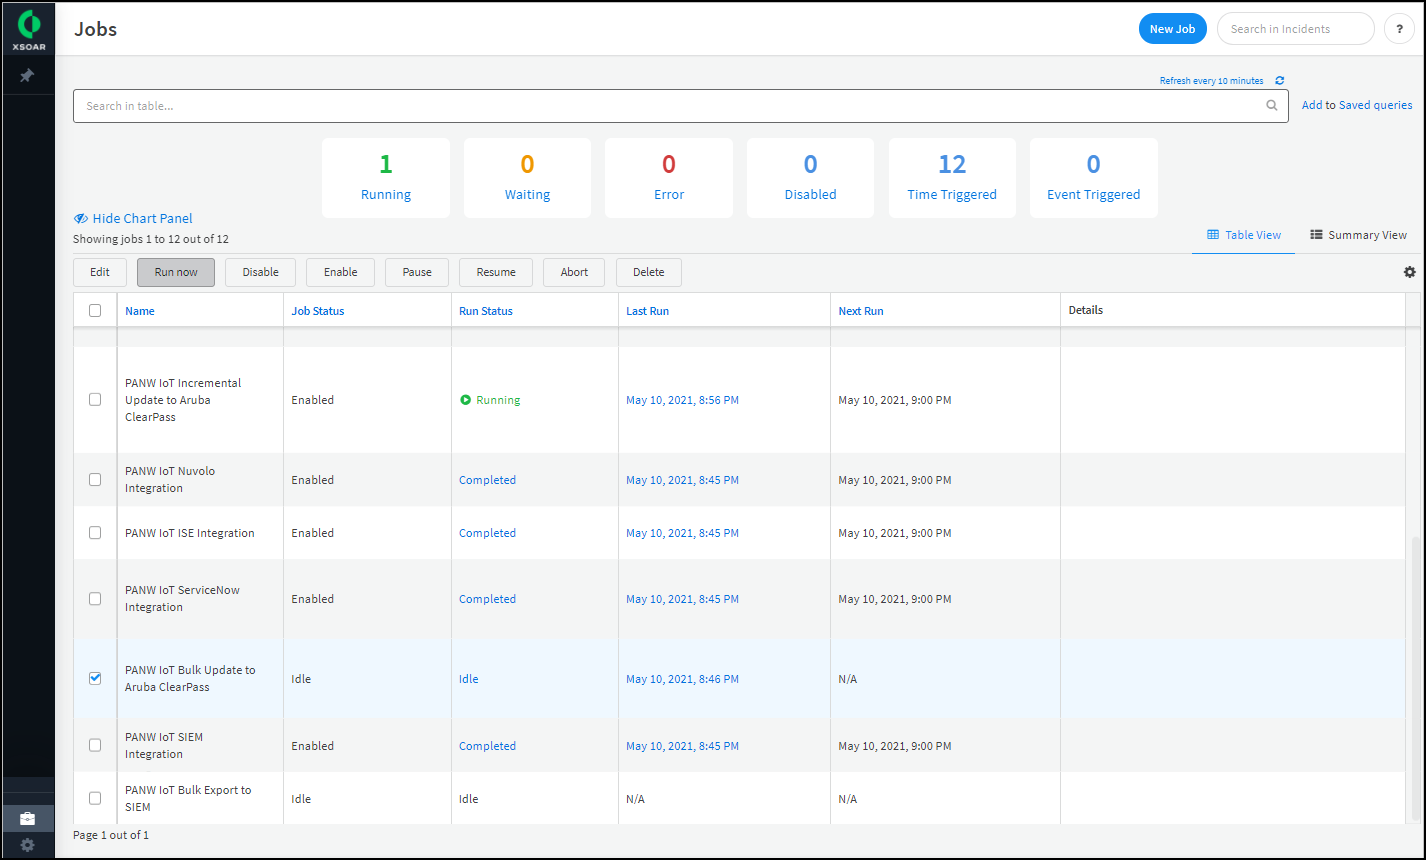
- To edit the preconfigured job, search for ClearPass near the top of the page, select PANW IoT Incremental Update to Aruba ClearPass, and then click Edit.orTo create a new job, click New Job at the top of the page.
- In the job panel that appears, enter the following and leave the other settings at their default values:Recurring: Select this because you want to periodically export endpoint attributes to ClearPass.Every: Enter a number and set the interval value (Minutes, Hours, Days, or Weeks) and select the days on which to run the job. (If you don’t select anything, the job runs everyday.) This determines how often XSOAR sends data to ClearPass. It’s important to set an interval that allows enough time for the job to complete, considering factors such as the number of devices involved, the amount of bandwidth and latency in the connection, and the processing speed of the ClearPass server. You might start by running the job every 15 minutes and then increasing it as necessary until each job completes before the next one starts. You can see the run status of a recurring job on the Jobs page. When in progress, its status is Running. When done, its status changes to Completed.Name: For the preconfigured job, leave this as is. For a new job, enter a name. Example: ClearPass - Incremental UpdatesPlaybook: Choose Incremental Export to Aruba ClearPass- PANW IoT 3rd Party Integration.Integration Instance Name: Paste the name of the Aruba ClearPass integration instance you copied earlier. If you leave this field empty, XSOAR uses the preconfigured ClearPass integration instance: PANW IoT 3rd Party Aruba Clearpass Integration Instance.PANW IoT Device Custom Attributes: By default, Device Security exports all device attributes through XSOAR to ClearPass. If you want to export a subset, clear the Export Attribute check box for the ones you don’t want to export.When Device Security connects through XSOAR to Aruba ClearPass, ClearPass automatically generates the custom endpoint attribute names defined here. If you modify any of the names, ClearPass automatically generates the modified names the next time XSOAR connects to it.PANW IoT In Scope Tag Enforcement: Select Yes to filter attributes that Device Security exports to only devices with the Aruba Clearpass tag type and the In Scope tag value. If you don’t want to filter exported attributes by tagged devices, leave this as No. For information about tagging devices in Device Security, see Tag Management.Playbook Poll Interval: Enter a number (the value, though unspecified, is minutes) defining the period of time during which Device Security must see newly discovered devices or changes in any attribute fields of previously discovered devices to include their attributes in the list it provides to XSOAR for export. It’s common to use the same interval as the one for running the recurring job. However, if you increase the interval between jobs, you can set a shorter interval for polling than that for the job. If you leave it blank, the default poll interval is 15 minutes.Site Names: Leave the field empty to export device attributes for all sites. To limit exports to devices at one or more sites, enter comma-separated site names.
- Click Update Job or Create new job.
Edit the preconfigured job that exports custom endpoint attributes in bulk to ClearPass or add a new job.- To edit the preconfigured job, search for ClearPass near the top of the page, select PANW IoT Bulk Update to Aruba ClearPass, and then click Edit.orTo create a new job, click New Job at the top of the page.
- In the job panel that appears, enter the following and leave the other settings at their default values:Name: For the preconfigured job, leave this as is. For a new job, enter a name. Example: ClearPass - Bulk ExportPlaybook: Choose Bulk Export to Aruba ClearPass - PANW IoT 3rd Party Integration.Integration Instance Name: Paste the name of the Aruba ClearPass integration instance you copied earlier. If you leave this field empty, XSOAR uses the preconfigured ClearPass integration instance: PANW IoT 3rd Party Aruba Clearpass Integration Instance.PANW IoT Device Custom Attributes: By default, Device Security exports all device attributes through XSOAR to ClearPass. If you want to export a subset, clear the Export Attribute check box for the ones you don’t want to export.If you defined your own custom endpoint attribute names in ClearPass, replace the default names with those.PANW IoT In Scope Tag Enforcement: Select Yes to filter attributes that Device Security exports to only devices with the Aruba Clearpass tag type and the In Scope tag value. If you don’t want to filter exported attributes by tagged devices, leave this as No. For information about tagging devices in Device Security, see Tag Management.Site Names: Leave the field empty to export device attributes for all sites. To limit exports to devices at one or more sites, enter comma-separated site names.
- Click Update Job or Create new job.
Continue creating more jobs for other ClearPass integration instances as needed.To enable ClearPass integration instances, return to the Settings page and click Enable for the instances you edited and created.Return to Device Security and check the status of the Aruba ClearPass integration.An integration instance can be in one of the following four states, which Device Security displays in the Status column on the Integrations page:- Active — the integration was configured and enabled and is functioning properly.Disabled — either the integration was configured but intentionally disabled or it was never configured and a job that references it is enabled and running.
- Error — the integration was configured and enabled but is not functioning properly, possibly due to a configuration error or network condition.
- Inactive — the integration was configured and enabled but no job has run for at least the past 60 minutes.
When you see that the status of an integration instance is Active, its setup is complete.Export device attributes to ClearPass.Whenever you want to export device attributes from Device Security, select the name of the bulk export job that you want to use—the preconfigured job or one you created—and then click Run now. Cortex XSOAR will export device attributes for devices in the Device Security device inventory through the XSOAR engine to the ClearPass instance that the job references.You can do this as often as you want, once a month being a common choice. Each time you do, XSOAR exports the device attributes of all devices in the Device Security inventory.The first time you run a job that references an integration instance triggers XSOAR to report the instance to Device Security, which then displays the integration instance on the Integrations page.Export the IoT device inventory from Device Security to Aruba ClearPass.After completing the setup, run a bulk export to add all the inventory to ClearPass. To start the bulk export, click Jobs, select PANW IoT Bulk Export to Aruba ClearPass, and then click Run now.Although regular, automated incremental updates are now in progress, ClearPass doesn’t yet have a complete device inventory from Device Security. This requires a bulk data export from Device Security to ClearPass that you initiate from the XSOAR interface at a time that’s suitable for network operations. To shorten the time required for the bulk export to complete, plan to run it during off-peak hours on a slow day such as a holiday or weekend. Doing this when network traffic is light can shorten the time needed to complete the job.![]() During the bulk export and after the job completes, the automated incremental update will continue running every 15 minutes.Although it’s possible to run multiple bulk export jobs in parallel, doing so can affect the XSOAR engine performance. Therefore, we advise not running more than one at a time.
During the bulk export and after the job completes, the automated incremental update will continue running every 15 minutes.Although it’s possible to run multiple bulk export jobs in parallel, doing so can affect the XSOAR engine performance. Therefore, we advise not running more than one at a time.


