Device Security
Set up Qualys Enterprise TruRisk for Integration
Table of Contents
Set up Qualys Enterprise TruRisk for Integration
Set up Qualys for integration with Device Security through
Cortex XSOAR.
| Where Can I Use This? | What Do I Need? |
|---|---|
|
One of the following subscriptions:
One of the following Cortex XSOAR setups:
|
Before integrating Device Security with Qualys Enterprise TruRisk, make sure that
you’ve already set up one
or more Qualys scanners and defined the assets you want to scan.
If you want to add more assets, such as IoT devices that were not
included in a previously defined inventory, do that in the Assets
section by clicking Add IPs for Scanning.
To
set up your Qualys Enterprise TruRisk instance to integrate with Device Security through
Cortex XSOAR, you must create a user account that allows XSOAR to
access the Qualys API, and (optionally) add a custom options profile.
Both tasks are explained in this section.
These instructions
explain how to integrate Device Security and Cortex XSOAR with
QualysGuard Express v10.9.0.0-2 (now known as Qualys Enterprise TruRisk Vulnerability Management, Detection & Response.
However, you can integrate Device Security and
XSOAR with any Qualys product that has vulnerability management.
User Account with API Access
- Ask your Qualys representative to enable the API for your account.Copy the Qualys URL.The URL you need to use is listed under Security Operations Center (SOC); for example, https://qualysguard.qg3.apps.qualys.com. Depending on your geographic region, this might be different. Copy the URL and save it for configuring the Qualys instance in the Cortex XSOAR UI.Create a Qualys user account for XSOAR to use when connecting to Qualys.
- Enter the Vulnerability Management section and then click .
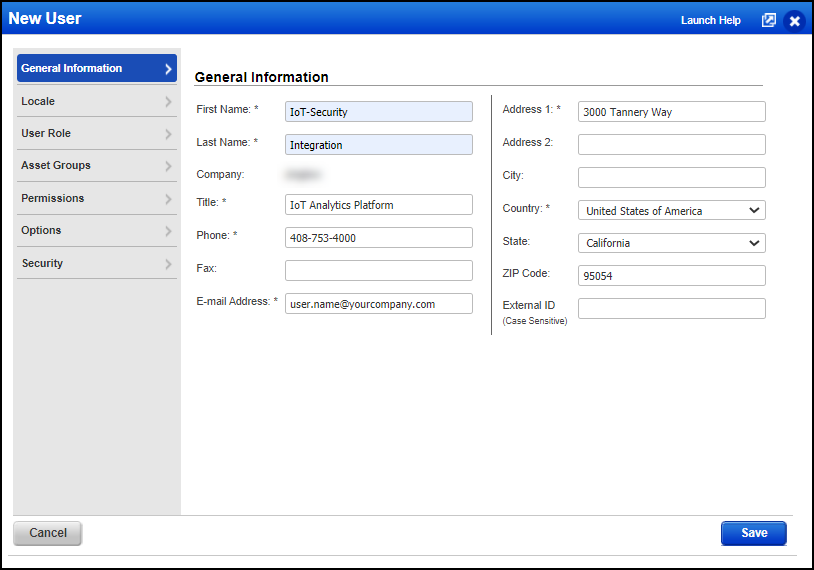
- Create a Qualys user account by filling the required fields on the General Information tab.
![]()
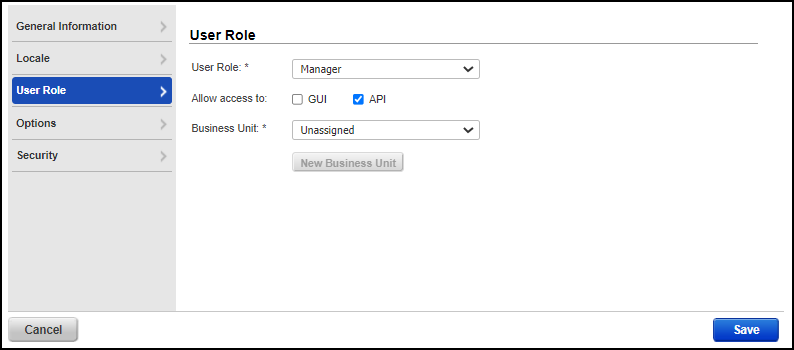
- Click User Role, choose Manager, and select API.
![]()
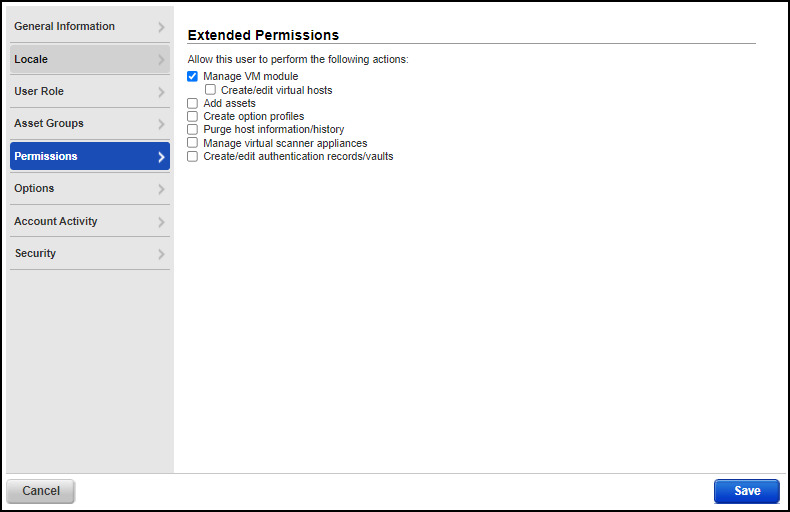
- Click Permissions, select Manage VM module, and then Save.
![]() Qualys sends a welcome email to the user’s email address with a username and one-time link to obtain a password.
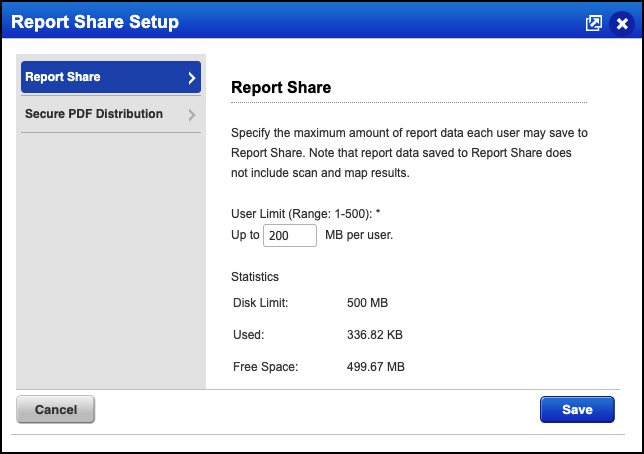
Qualys sends a welcome email to the user’s email address with a username and one-time link to obtain a password. - After you create the new user account, check that it has enough storage space (200 MB) for generating vulnerability scan reports.To check, click . If the user limit range is less than 200 MB, enter 200 (or higher) in the Up to ___ MB per user. field and then Save.
![]()
- When you receive the email from Qualys and follow the link to set a new password, note the username in the email and the new password that you set.If you edit a user account and change the email address, Qualys won’t send another welcome email to the second address. To change the email address for an account and have Qualys send a welcome email to the new address, delete the first account and then create a new account with the second address.
Options Profile (Optional)
An options profile defines the type of vulnerability scan for the Qualys VM scanner to run. You can use the default profile or optionally create a new one.- Click , enter the following, and then Save.Option Profile Title: Enter a title for the profile. (Note this name because you will enter it later in the Device Security portal when defining the type of scan to run on a particular device.)Scan: Define the parameters of the vulnerability scan.Map: Set information gathering preferences.Additional: Enter additional settings for the scan such as which TCP and UDP ports to check to ensure a device is responsive before attempting a full scan.Repeat the previous step to create multiple option profiles.