Device Security
Set up Device Security and XSOAR for Aruba WLAN Controllers
Table of Contents
Set up Device Security and XSOAR for Aruba WLAN Controllers
Set up Device Security and Cortex XSOAR to integrate with
Aruba WLAN controllers.
| Where Can I Use This? | What Do I Need? |
|---|---|
|
One of the following subscriptions:
One of the following Cortex XSOAR setups:
|
To set up Device Security to integrate through
Cortex XSOAR with an Aruba WLAN controller, you must add an XSOAR
engine to your network.
You must also configure Cortex XSOAR
with an Aruba WLAN controller integration instance and a job to
periodically collect device data from the controller. To do this,
you need the IP address or hostname of your Aruba WLAN controller
and the username and password of the read/write user account that
the XSOAR engine will use when forming a secure connection with
it.
Cortex XSOAR Engine Installation
An on-premises XSOAR engine facilitates communications between the Cortex XSOAR cloud and Aruba WLAN controllers. Although it's possible to install an XSOAR engine on machines running Windows, macOS, and Linux operating systems, only an engine on a Linux machine supports Device Security integrations. For more information about operating system and hardware requirements, see the Cortex Administrator’s Guide.
We recommend downloading the Cortex XSOAR engine using the shell
installer script and installing it on a Linux machine. This simplifies the
deployment by automatically installing all required dependencies and also
enables remote engine upgrades.
When placing the XSOAR engine on your network, make sure it can form HTTPS connections to the API of your Aruba WLAN controllers. By default, XSOAR uses TCP port 4343 for this HTTPS connection. You don’t need to specify this port number when entering the Aruba WLAN controller IP address or hostname in the integration instance; XSOAR adds it automatically.
The on-premises firewall must allow the Cortex XSOAR engine to form
HTTPS connections on TCP port 443 to the Cortex cloud at
https://<your-domain>.iot.demisto.live/. You can see the URL of your
Cortex XSOAR instance when you log in to Device Security
and click Integrations and then click Launch
Cortex XSOAR. It’s visible in the address bar
of the web page displaying the Cortex XSOAR interface.
To create an Cortex XSOAR engine, access the Cortex XSOAR
interface (from Device Security, click
Integrations and then click Launch
Cortex XSOAR). In the Cortex XSOAR UI,
click . Choose
Shell as the type.
For Cortex XSOAR engine installation instructions, see Engine Installation.
For help troubleshooting Cortex XSOAR engines, including installations,
upgrades, connectivity, and permissions, see Troubleshoot Engines and Troubleshoot Integrations Running on
Engines.
One XSOAR engine can connect to one or more controllers.
Configure Device Security and Cortex XSOAR
- Log in to Device Security and from there access Aruba WLAN controller settings in Cortex XSOAR.
- Log in to Device Security and then click Integrations.
- Device Security uses Cortex XSOAR to integrate with Aruba WLAN controllers, and the settings you must configure to integrate with it are in the XSOAR interface. To access these settings, click Launch Cortex XSOAR.The Cortex XSOAR interface opens in a new browser window.
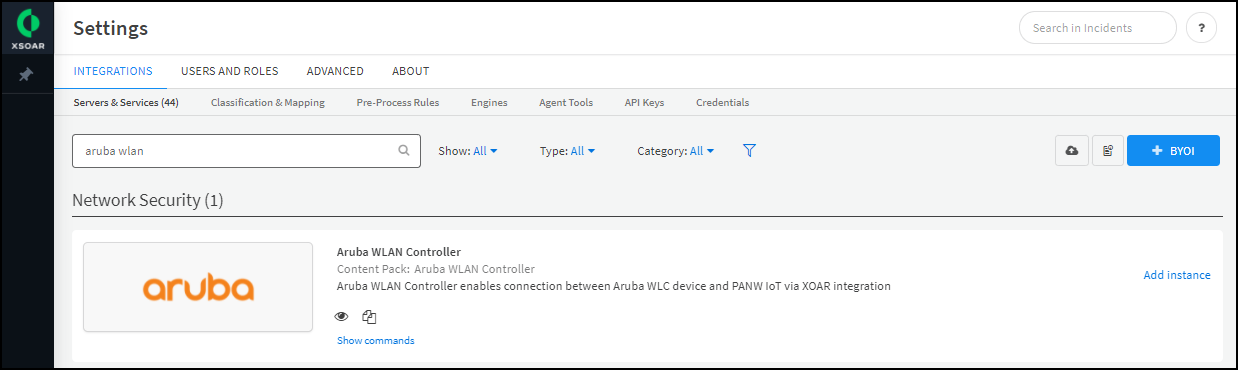
- Click Settings in the left navigation menu, search for aruba wlan to locate it among other instances.
![]()
Configure the Aruba WLAN Controller integration instance.- Click Add instance to open the settings panel.
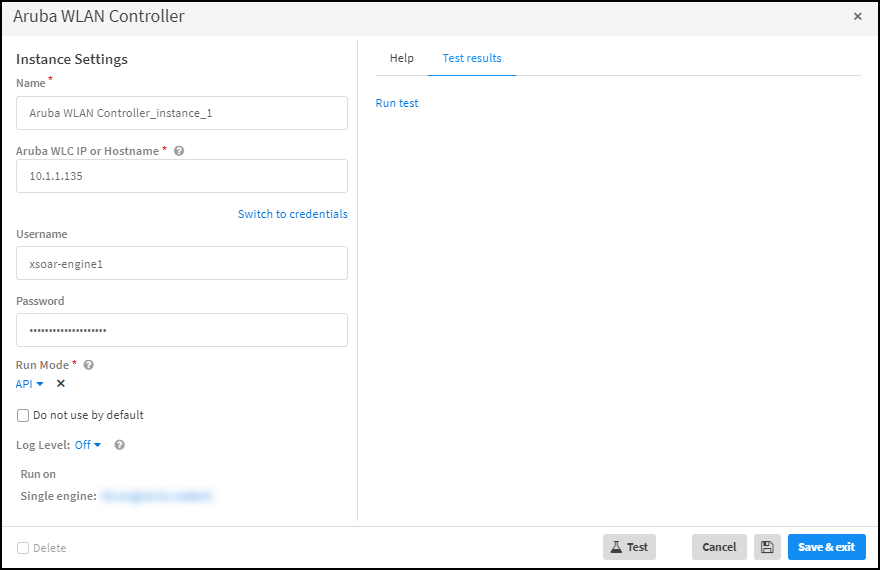
- Enter the following settings:Name: Use the default name (Aruba WLAN Controller_instance_1) of the instance or enter a new one.Aruba WLC IP or Hostname: Enter the IP address or hostname of the wireless controller. You can prepend https:// to the IP address or hostname or omit it. These, for example, are all acceptable: https://10.1.1.25 or 10.1.1.25, and https://wlc1.acme.com or wlc.acme.com.Username: Type the name of the user account that you previously created for the XSOAR engine to use when connecting to the WLAN controller.Password: Type the password associated with the user account.Run Mode: APIRun on Single engine: Choose the XSOAR engine that you want to communicate with this Aruba WLAN controller.
![]()
- When finished, click Run test or Test.If the test is successful, a Success message appears. If not, check that the settings were entered correctly and then test the configuration again.
![]()
- After the test succeeds, click Save & exit to save your changes and close the settings panel.
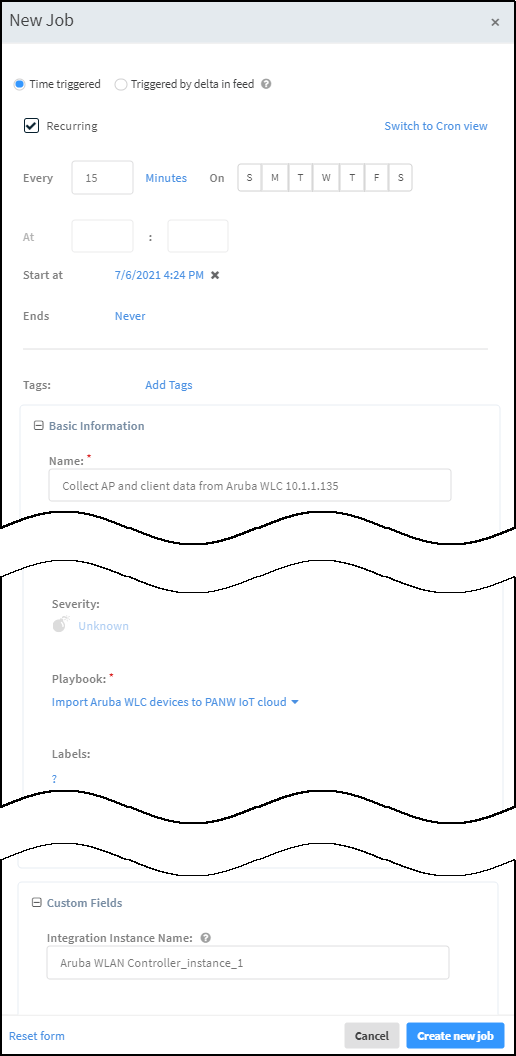
Create a job for XSOAR to query the Aruba WLAN controller for details about currently active devices and send them to Device Security.Device Security only updates attributes for devices that are in its database and whose MAC address matches that returned by the controller. If your network has static IP devices without MAC addresses, they will not be updated.- Copy the name of the instance you just created, click Jobs near the bottom of the left navigation menu and then click New Job at the top of the page.
- In the New Job panel that appears, enter the following and leave the other settings at their default values:Recurring: Select this because you want to periodically poll the controller for device details.Every: Enter a number and set the interval value (Minutes, Hours, Days, or Weeks) and select the days on which to run the job. (If you don’t select specific days, then the job will run everyday by default.) This determines how often XSOAR queries the controller for details about its active devices. For example: 15 minutes.Name: Enter a name for the job.Playbook: Choose Import Aruba WLC devices to PANW IoT cloud.Integration Instance Name: Paste the instance name you copied a few moments ago.
![]()
- Click Create new job.The job appears in the Jobs list.
Enable the job and run it.- Check the Job Status for the job you created. If it’s Disabled, select its check box and then click Enable.
- After you enable it, keep the check box selected and click Run now. The Run Status changes from Idle to Running.At the defined interval, XSOAR begins querying the Aruba WLAN controller for client details, which it then forwards to the Device Security cloud.
If you created more integration instances for multiple Aruba WLAN controllers, add more jobs as necessary.Each Aruba WLAN controller instance requires a separate job.Run the job for each integration instance you create. The first time you run a job that references an integration instance, it triggers XSOAR to report the instance to Device Security, which then displays the integration instance on the Integrations page.When done, return to Device Security and check the status of the Aruba WLAN Controller integration.An integration instance can be in one of the following four states, which Device Security displays in the Status column on the Integrations page:- Active — the integration was configured and enabled and is functioning properly.Disabled — either the integration was configured but intentionally disabled or it was never configured and a job that references it is enabled and running.
- Error — the integration was configured and enabled but is not functioning properly, possibly due to a configuration error or network condition.
- Inactive — the integration was configured and enabled but no job has run for at least the past 60 minutes.
When you see that the status of an integration instance is Active, its setup is complete.